Kitchen Remodel/Tile work
|

Floor tiles[edit | edit source]
There is not too much new wisdom that I could possibly contribute to the topic of tile selection or tile laying. All imaginable information can be found on the internet, including tons of video tutorials on Youtube. But there are still some ideas that I would like to share.
Product selection[edit | edit source]
For my own kitchen project, I picked a 1x2 ft tile from my local home improvement store that would match the colors both of my cabinet fronts and of my wall shelves (grey and brown). Since we had gone considerably over budget with our remodel in its entirety, we were happy to find tiles that were reasonably priced but turned out to be quite decent in quality, that is they were neither bent nor chipped. For the grout, we decided on the darkest shade that was available (after noticing somewhere else that a dark tile with a grout that is even slightly less dark looks really mismatched).
Another consideration was that we did not want every crumb that falls on the floor to show; the natural answer to that was to pick a tile with an irregular and distractive pattern.
We have also been thinking back and forth about the question of whether the space should have a bright or a dark floor. We decided for dark, because the eye catching element of our kitchen is the countertop, with its vast surfaces that we worked so hard to highlight – with our lighting scheme, with the very understated grey cabinet fronts and with the two waterfalls. A white or even tan colored floor would have undermined that. But the dark floor tiles point the bright countertop out, strongly so.
Mapping[edit | edit source]
The best advice that I can give for tile laying is to plan it all out in detail before you start the project. Whenever I have tiles to lay, I start with an accurate floor plan. I do this in Inkscape, but any other vector graphics software will do. Next, I create a tile pattern, based on the exact dimensions of the tile and on the exact distance between the tiles (grout line). Then I play around with that pattern, shifting it left and right and up and down, in order to find the best layout in terms of beauty as well as of practical considerations (where will the first row of tiles being laid out?) and of avoiding of "ugly" cuts, especially avoiding of very narrow strips of tiles and of complicated cuts; we have a simple wet tile saw, which serves us well for our humble purposes, but it cannot, for example, perform U-shaped cuts.


By the way, there is much more in the realm of tile patterns than just the same old same old regular offset (1st and 4th images). Tile laying is a great chance to be creative and to invent your own. If you can draw it, you can probably do it. I figured that in my project and with the type of tile that I had chosen, an irregular pattern (roughly represented in the 5th image) would work best. When we laid those tiles out, we followed strictly the horizontal lines that were shown in our map, but operated very flexibly with the length of the first tile that we put down in every single row. Whenever we had a cutting left from the previous row that made sense to use again immediately, we did so, sometimes starting from the right end, sometimes from the left. This saved us a lot of material, too.
Other preparations[edit | edit source]
Another important thing, at least to me, was to sort the tiles – at least the dozen that were immediately to be used. Many modern tiles seem to have a naturally varied appearance, every specimen unique, but they are actually printed, and the design will repeat. The number of variations probably very much depends on the product. I noticed that my product featured roughly 20 different variations, which is probably more than average. Anyway, I sorted them to avoid clusters of identical tiles, and I also turned half of them 180 degrees for maximum diversity. I also had some variations that I outright disliked; so I kept the majority of those for either hidden spots, like under the dishwasher and the fridges, or for pieces that had be cut anyway.
Images[edit | edit source]
-
 Our tiles had to match or to go along with the colors of the cabinet fronts…
 -
 …the countertop…
 -
 …the wall shelves…
 -
 …and the flooring in the adjacent areas. This is interlocking engineered hardwood flooring.
 -
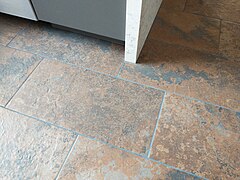
 This is the corner were we started the work (top right); notice that we could start with a (more or less) full tile.
 -
 One of our tricky spots. The most complicated cuts that we had to do were L-shaped.
 -
 These are the narrowest pieces we had to lay.
 -

-

-
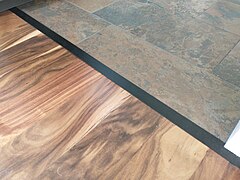 For the transition areas we simply used black aluminum strips which we glued to the tiles.
 -
 We made our own custom designed baseboards.


