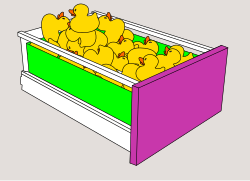
Kitchen Remodel/Cabinet selection
|

After you have a rough layout for your new kitchen and have chosen a manufacturer, cabinet selection can follow. It may even make sense to proceed with separate cabinet selection processes for two or more manufacturers, if you are undecided.
Some important goals of cabinet selection are:
- to "translate" your rough draft into an ensemble of commercially available cabinets
- to compose cabinet front views that you find beautiful
- the plan the cabinets' interiors
- to figure out how much money those cabinets will cost you
Six steps of cabinet selection[edit | edit source]
Cabinet selection includes up to 6 steps:
- choice of a manufacturer/of a product line
- taking measurements
- choice of cabinet frames
- design of a front element scheme
- planning of the cabinet interiors
- planning of cover and filler elements
With conventional manufacturers such as KraftMaid, step 3 already includes steps 4+5. Only with modular cabinet systems (the most important example is probably Ikea's product line) all six steps require individual consideration.
Step 1: Choice of a manufacturer/a product line[edit | edit source]


For our own kitchen, we chose Ikea's cabinet system (Sektion). There were multiple reasons for that decision, of which I will only name a few. The two most imperative were that we wanted to go frameless, with a European style modern appearance, and that we were on a tight budget. We were even considering installing the kitchen ourselves, which for sure is Ikea's strong point.
Another very important reason was that this system allows a lot of flexibility. Hampton Bay for example also offer a line of frameless cabinets, but only with limited options, while Ikea take modularity to the max. On their web site they appear to mostly market pre-configured cabinets, but alternatively, you can literally start out with only a cabinet frame, and then configure it – with different kinds of drawers, pull-outs, doors, shelves, and appliances – any way you want. Flexibility was important to me not only because I was fussy with the visual design of my kitchen, but also because I wanted to max out the interior space of our cabinets. The new kitchen would not exactly be small, but we had recently moved from a much larger house into a smaller one, and I needed every cubic inch of usable storage space that I could possibly squeeze out of it.
A third major reason why we decided on Ikea's Sektion was that those cabinets don't have traditional toe kicks but legs (Ikea's "toe kicks" are mere covers that are being clipped to the legs). We were planning to feed a number of electrical and water connections through under those cabinets, which would be much easier with no structural barriers in the way.
A general downside of Ikea's Sektion system, in my view, is that they offer only white cabinet frames (this at least was the case in 2022/2023; in those parts in the world where Ikea market Metod instead of Sektion, there are more color options) which is a disadvantage if you choose dark front elements. Even if you use filler panels, there will always be areas where the white shows.
Another downside is that with Ikea D.I.Y. will probably be not just an option for you, but your only option. In my experience, contractors will – even in the U.S. where Sektion is a niche product – very eagerly assure you that they had done Ikea kitchens before and that they very expertly do so, but unless they show you pictures or even let you talk to their previous customers, I would be very careful believing that. The installation of an Ikea kitchen is fundamentally different from that of conventional, pre-assembled cabinets, and the craftspeople who end up being appointed with the work will possibly not have the first idea of what to do with the content of all those flat packs and with the included suspension rails, assembly kits and support brackets. As a lay person you have the tremendous advantage that you are humble to begin with, and willing and hungry to obediently study both Ikea's installation guides and relevant YouTube tutorials; this won't necessarily apply to a professional.
Another disadvantage for us was that our next Ikea stores are hundreds of miles away from were we live; even if Ikea deliver your kitchen to your home (which you pay for), expect multiple trips that you do to the store in person, be it for a visual inspection of elements that you consider purchasing, be it for returns of elements that you decide not to use.
Also, an Ikea kitchen is most certainly nothing for those who are either fretful or in a rush. Beginning with the pandemic, Ikea had major delivery chain issues, and for a number of products (which obviously permanently alternate) they are notoriously out of stock. In our case, it took more than half a year until we got everything delivered that we initially had signed up for. But at the end, there was not a single item that we couldn't get.
Step 2: Taking measurements[edit | edit source]
If you haven't done so yet, now it is high time to take detailed measurements of your space:

|
The curse and the challenge of taking measurements: There is no perfectly rectangular room in existence. None. |

|
Taking measurements of a room should begin with an exploration of the floor. Is it really level? Most floors are not. Identify where the high and where the low points are. |

|
After you thoroughly know your floor, check the ceiling in all 4 corners of the space. Do the 4 ceiling corner points vertically align with the floor corner points? Use a plumb bob to check this out, and if both differ, mark the ceiling point on the floor (if there is nothing that can be marked on the floor – either because everything is just fine or because in that corner the ceiling is generally wider than the floor, any discrepancy can be ignored for the present).
While you are climbing a ladder anyway, use the opportunity to measure the ceiling height, too (in all four corners). |

|
Next, take measurements of the large dimensions (overall room dimensions). If in a corner the floor is marked (because the corners are not aligned), measure from the mark, not from the floor's corner. Never assume that opposing walls have the same length: take measurements of both. (You may even want to check out the diagonals and compare their lengths.)
Also don't trust that those walls are straight or perfectly flat. |

|
Finally, take measurements of the smaller dimensions (doors, windows, soffits, radiators and other elements that may get in the way of your kitchen). Decide on reliable reference lines and take all measurements from those lines, not from other elements. |
You will also need the exact dimensions of your sink and of your major appliances, including information about any clearance that those require (conventional refrigerators for example need clearance for ventilation; there may also lateral clearance be necessary for proper door opening).
I find it extremely helpful to record measurements not on paper, but in a vector graphics software such as Inkscape, in true proportions. Even better if you have mastered something more specialized like Revit or AutoCAD. The reason is that the software will scream into your face if you overlook measurements that need to be taken or if you make mistakes.
Step 3: Choice of cabinet frames[edit | edit source]


Based on the rough draft, the new floor plan, and a list of available cabinet frames, the space can now be (virtually) filled with cabinet frames. This will turn the rough draft into an intermediate floor plan. I say "intermediate", because depending on your layout and on decisions that you will make in later steps, it may become necessary to add a little spacing here and there, or a filler piece or two. Be prepared that any cabinet row that you compose in step 3 may or may not grow by roughly 1 inch (2-3 cm) for technical reasons. This section is not the place yet for details; only so much:
- Any two of Ikea's cabinet frames which stand side-by-side can and should fundamentally directly touch each other. There is never a gap needed for unobstructed door opening.
- If a cabinet frame stands with its side adjacent to a wall, there may be a specified clearance between cabinet and wall needed – but only in two very special cases.
- Between any two cabinets that don't stand side-by-side but form a corner, there will most likely filler pieces be needed.
For details see step 6.

Ikea's cabinet frame line includes the following formats, among others:
| depth | 23¾" deep | 14¾" deep | ||||||||||
|---|---|---|---|---|---|---|---|---|---|---|---|---|
| height | 10" | 15" | 20" | 30" | 80" | 90" | 15" | 20" | 30" | 40" | 80" | 90" |
| 12" wide | + | + | + | + | ||||||||
| 15" wide | + | + | + | + | + | + | ||||||
| 18" wide | + | + | + | + | + | + | + | + | ||||
| 21" wide | + | |||||||||||
| 24" wide | + | + | + | + | + | + | ||||||
| 30" wide | + | + | + | + | + | + | + | + | ||||
| 36" wide | + | + | + | + | + | + | + | |||||
| Annotation: This chart includes neither corner cabinets nor mere shelf elements. | ||||||||||||
With the help of these data plus information about the available corner cabinet frames, I selected 22 cabinet frames for my kitchen (see image).
In spite of the relatively large range of available formats, it may happen that for a specific place in your kitchen a fitting cabinet frame cannot be found. Be aware that in many cases it may be possible to convert an available frame to custom dimensions. The only requirements for such modifications are a (hand) circular saw and an idea for the modification of the corresponding front element. I will show an example in a later chapter. Alternatives are to omit that cabinet, to to chose something smaller, or to build a fitting custom element (open shelves: like a wine rack or a place for your cookbooks) from scratch, that is from filler panels.
Step 4: Front view design[edit | edit source]
One characteristic of Ikea's current kitchen cabinet system is that the front elements can be arranged independently of what is behind them – to a certain degree at least:


With such flexibility, a kitchen designer has a field day here. Four variations of one kitchen (the cabinet frames are the same in each):


| 12" | 15" | 18" | 21" | 24" | 30" | 36" | |
|---|---|---|---|---|---|---|---|
| 5" | + | + | + | + | + | ||
| 10" | + | + | + | + | + | ||
| 15" | + | + | + | + | + | ||
| 20" | + | + | + | ||||
| 30" | + | + | + | + | + | ||
| 40" | + | + | + | + | + | ||
| 50" | + | + | + | ||||
| 60" | + | + |
Like most cabinet manufacturers, Ikea offer a number of different front element styles. They don't market those under the name "Sektion", but as complementary product lines, each design with its own name. The range of available front element formats depends on the product line, some offer more choices than others.
Notice that, fundamentally, all of these elements can be mounted both horizontally and vertically. In addition, there is no set-in-stone distinction of doors and drawer fronts; any element can be used for both purposes.
Although the possibilities are virtually endless and the system very much invites to use nested drawers (drawer nesting can have up to 3 tiers!) and drawers behind doors, I think those should be used wisely:
- Both nested drawers and drawers behind doors are a very strong choice if you go for custom spacing between drawers. Notably drawers behind a door allow you to vertically space your drawers individually, with the accuracy of a fraction of an inch (a millimeter), either using the predrilled holes or drilling your own holes.
- But both nested drawers and drawers behind doors are a little awkward to access. In a pantry, this may not be a problem, but for the storage of, for example, your everyday cutlery, even a slightly inconvenient access may become a major annoyance over time.
Step 5: Cabinet interior fittings[edit | edit source]
Frame conditions of interior fittings[edit | edit source]
In congruence with the general idea of modularity, ''Sektion'' cabinet frames are mere frames that come without toe kicks, without doors, and without interior fittings. High cabinets come with one shelf that can be used to add structural stability; this is a specialty shelf which is a bit sturdier than regular shelves; it can be installed at any height or it can be omitted, whatever is convenient. Base cabinets don't have a top panel, because they will be covered with a counter top anyway.
| in 10" high cabinets | 7 rows |
| in 20" high cabinets | 15 rows |
| in 30" high cabinets | 23 rows |
| in 40" high cabinets | 31 rows |
| in 80" high cabinets | 63 rows |
| in 90" high cabinets | 71 rows |
But all frames feature an array of predrilled holes that provides the structure for the mounting of all interior fittings: doors, shelves, and drawers.
-
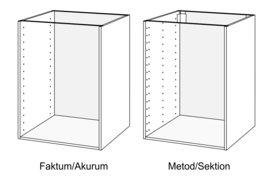 a Sektion base cabinet (compared to an Akurum cabinet, which was Ikea's predecessor product)
 -
 Exact dimensions (the pattern of predrilled holes depends on the depth of the cabinet)
 -
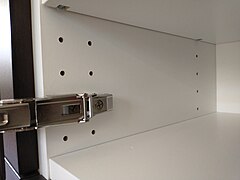 The predrilled holes hold door hinges, too.


While planning the interior fittings of a cabinet, you need to be aware that door hinges, too, require their share of the available predrilled holes and may prevent the mounting of a shelf or a drawer hinge at a specific position. Depending on its height, a door has 2–4 hinges. Details can be found in the product description. A common position of a hinge midpoint is at ≈2½" (63 mm) below the top and above the bottom edge of a door. Since Ikea use concealed European hinges which latch into precast recesses in the door leaf, it would probably not be advisable to modify a door's hinge pattern.
Shelves[edit | edit source]
The shelves are marketed under the name Utrusta. They come in different widths (12", 15", 18", 21", 24", 30", 36") and two different depths, albeit some combinations of those two dimensions are not available.
Regular shelves are ¾" (19 mm) thick, the material is Melamine foil covered particle board while the edges are plastic covered. Regular shelves rest on either 6 or 4 (the number depends on the depth of the cabinet) dowel pins that are being plugged into the predrilled holes. The pins come with the shelves; if you loose any, you can request free replacement ones. The load capacity of a shelf is 22–88 lb (10–40 kg), depending on the size. If you plan on heavier loads, you may want to add steel angles for additional support.
There are also glass shelves in the Utrusta program, but only for 15" deep cabinets.
High cabinet frames come with one shelf which is for structural support. These are specialty shelves that don't differ from regular shelves in dimensions and appearance, but are mounted slightly differently, that is with screws instead of dowel pins, and the cut-outs in the shelf that embrace the screws, are a bit deeper, which is why those shelves sit a fraction of an inch (a few millimeters) lower relative to the predrilled holes than regular shelves. The reason why I am stressing this minor height difference is that in some cases it can bring a shelf in conflict with a door hinge.
Drawers and pull-outs[edit | edit source]
The drawers that Ikea offer for their kitchen cabinets are called Maximera. This is a system of wide opening drawers which run on soft close slides. For customers who want to go without handles, there are also push-opening kits available that can be installed in addition to the standard drawer outfit. Customers have reported that push-opening will not work with drawers that are heavily loaded. The drawer material is epoxy/polyester powder coated steel, only the bottom is melamine coated particleboard. Notice that the inside of the drawers' side pieces is not quite vertical but slightly arched which probably adds to the stability.
Maximera drawers are sold without a front piece and need to be completed with one. If a drawer is mounted as an exterior drawer (with the drawer front exposed), an element from a cabinet front product line (like Axstad) is used. In the case of nested drawers or drawers behind doors, the interior drawers can have Utrusta fronts, which are plain white and cheaper; they don't need a handle, because you will just grab over the upper edge (Utrusta fronts tend to be low and to leave a gap to the next drawer).
They come obviously in different widths (15", 18", 24", 30", 36") and two different depths. If you need drawers for a 12" wide cabinet, you'll probably have to purchase a 12" pull-out interior fitting (simply omit the connector); you'll also have to buy an extra drawer (which you won't use) just to get the slides, since the pull-out interior fitting comes only with one left slide and one right slide, and Ikea don't sell those slides separately.
The nominal load capacity of a Maximera drawer is 45–55 lbs (20–25 kg), depending on the drawer type (low, medium, high). So to insure that the slides are not overloaded, it may be preferable to choose a narrower cabinet for those drawers that you designate for your heaviest loads.
Equally important to know is that the Maximera drawers also come in three different heights (high, medium, low). High is intended for drawer fronts that are +15" high, medium for 10", and low for 5". But technically any drawer front can be mounted to any type, as long as the front is not lower than the drawer. In the case of nested drawers it will be even unavoidable to use a lower type for the exterior drawer even though its front will be higher, or else there wouldn't be room left for the inner drawer(s). Notice that the medium and high drawers don't feature side pieces that go all the way up to the top of the rear piece, only braces that help to stabilize the drawer front. If you actually want to close those side gaps, you can use the add-on glass side pieces that Ikea also sell. If you are planning on a drawer with a very high drawer front, Ikea offer an additional fixture "for mounting door on drawer" (Utrusta).
Talking about very high drawer fronts: My first trips to an Ikea store had left me with low expectations for the static qualities of such drawers, since in the store I found those fronts being rather floppy. Only later I figured that those were probably just incorrectly mounted. I later chose a one-drawer high-front configuration for our trash bins, installed it with the add-on fixture and found it surprisingly sturdy and trustworthy.
The Utrusta program also comprises an "assembly kit for pull-out function" which can be used to join two drawers together. Although with the assembly kit only two drawers can be linked together, other drawers can be nested between those two. The advantages of a pull-out over a two-drawer solution may be that the simultaneous opening of two drawers will give you a better overview about the contents, and that the mounting of a high front element will be statically sounder on a pull-out than in a similar arrangement with nested drawers. An obvious disadvantage is that at least the bottom drawer will only be accessible from the side.
-
 The three types of Maximera drawers; inner and exterior vertical dimensions (exterior dimensions include the slide) and number of rows of holes that one drawer (plus its slide) will claim, if the lowest possible front element is used
 -
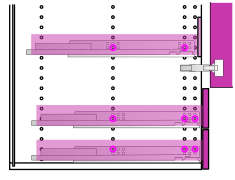 The most common options of mounting (bottom position requires use of the slide's upper holes)
 -
 That a Maximera drawer is "medium" or "high" rather than "low" does not necessarily mean that it can hold more content. First and foremost, it will make a high drawer front more stable.
 -
 To prevent loose contents from falling out, there are optional glass side pieces available.
 -
 A much cheaper and simpler solution is the use of an additional box.


Other interior fittings[edit | edit source]
The Utrusta product line also includes a "pull-out work surface", that is a flat drawer-like element with a load capacity of 40 lb (18 kg). I doubt that this element really is convenient as a work surface (unless the kitchen is so small that you are desperate for any square inch of work surface that you can get), but if installed into a high cabinet, put behind a door and supplied with an in-cabinet electric outlet, it would probably make a great permanent base for your most used stationary small appliance, like a KitchenAid, a blender, or a food processor (anything that won't involve heat).
In addition, the Utrusta program includes a base and a wall corner cabinet carousel, a rather nifty corner base cabinet pull-out fitting and other such things and paraphernalia.
Examples[edit | edit source]
The Sektion system is modular and cut out for custom solutions, but on their web site, Ikea tend to display preconfigured ensembles of cabinet frames, doors and drawers, probably to respond to their customers expectations and to offer some easy options. In this section, I would like to give another glimpse in the bandwidth of possible customization, beginning with a preconfigured example.

|
This is a configuration for 80" high cabinets that Ikea suggest on their website: three drawers of different height at the bottom and a door, with shelves and two additional drawers, on top.
It is not an overall horrid configuration, but some remarks:
|

|
Here, a slight variation:
|

|
My second variation features two doors: one with shelves and one with an array of drawers.
|

|
My next configuration comprises three parts: a door with shelves, an array of exterior drawers, and an array of nested drawers.
|

|
My last variation includes two units with shelves behind doors, and two more with drawers.
|
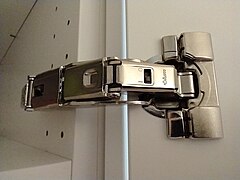
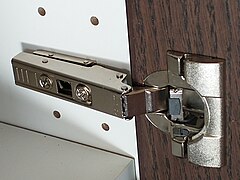
Door hinges[edit | edit source]
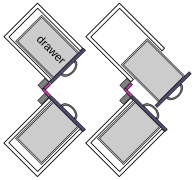
To know a little about Ikea's door hinges is important a. because this knowledge will help to ensure full functionality of your cabinets and b. because it may be important for you to know how those hinges "behave" upon opening. The latter is crucial if you want to determine if there will any spacing be necessary between your cabinets. For Sektion cabinets, Ikea market three different door hinges – two for vertical (regular) doors and one for horizontal (flip-up) doors:
-
 For vertical doors, there is the choice between 153-degree and 110-degree hinges.
 -
 One opens to an angle of max. 153°.
 -
 Notice how point A swings out, while point B moves out of the way.
 -
 The other hinge opens to an angle of max. 110°.
 -
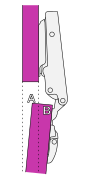 With this hinge, point A does not swing out, but point B stays in the way.
 -
 Ikea's hinge for horizontal doors.


Of the two different hinges for vertical doors, in most cases, both are possible. But:
- The 153° hinge is more elaborate and therefore more expensive.
- The use of a 153° hinge is imperative if there are drawers behind the door. A 110° hinge would not get the door leaf (point B, see image) far enough out of the way to allow a drawer to open.
- The use of a 110° hinge is imperative if the cabinet's side (the hinge side) touches a wall, with not even a ¼" (6 mm) gap in between. A 153° hinge would make the door leaf (point A, see image) swing out and bang into the wall before the door is even halfway open.
The hinges for horizontal door are recommended only for doors of max. 36"x15". They open up an estimated 110° angle, but if you have a low ceiling, you can set a lower maximum angle. Notice that these hinges are huge.
All hinges go under the name Utrusta; the manufacturer is Blum in Austria.
My project[edit | edit source]
The following drawings will show what I chose to do with my kitchen, in terms of front elements and interior fittings. My favorite interior fittings are definitely drawers. I use drawers and pull-outs for virtually everything: utensils, cups, glass tumblers, plates, bowls, pots, pans, cutting boards, baking sheets, small appliances, and food storage. Close to my cooktop, I even keep a drawer that is high enough to hold my cooking oils, vinegars and other bottled liquids, standing upright. With soft close drawer slides, they won't fall over. Unless there are small children in a household, I wouldn't even advice for pegboard drawer organizers or such; a simple grip shelf liner will probably do perfectly fine and is much cheaper. I don't even use an organizer for my spices; these just lay flat in a shallow drawer, labels up, firmly kept in position by their neighbors and the grip shelf liner on which they all rest.


Step 6: Spacing; filler and cover elements[edit | edit source]
Spacing[edit | edit source]

As already mentioned above, any two Sektion cabinets that stand side-by-side may and should directly touch. There will never spacing or fillers be necessary between two flanking cabinets, regardless of hinge types.
There are two specific restrictions though for cabinets that stand beside a wall. A spacing (or filler) is required if:
- a cabinet has outer drawers that upon opening would collide with a door frame, a wall outlet or any other protrusion of the wall
- a cabinet with at least one drawer behind a door (hinge side only); there will be a 153° hinge required which swings out when the door is opened (see above); a spacing of ¼" (6 mm) is necessary
A difference between the spacing mentioned in this section, and the spacing that we will be dealing with in the next section is that here the gaps can probably remain open.
Technical fillers[edit | edit source]
The need for a technical filler emerges, wherever a spacing between two cabinets becomes necessary. This will mostly happen in a corner where two rows of cabinets are linked together. Three examples:
-
 In a corner like this, fillers should always be installed, even if there are no handles or only doors. It will look much better.
 -
 When there are drawer handles, the fillers should be even wider.
 -
 Filler scheme of a 47" corner base cabinet. Study the product instructions for exact dimensions and generally for more information.


The product that is being used for technical fillers is the same that also serves for cover (next section).
Cover elements[edit | edit source]

Cover panels can be used for/as…
- technical fillers
- covering of…
- exposed cabinet sides (if the front elements are not white)
- bottom front edges of wall cabinets, unless a "rounded deco strip" is the preferred choice
- any unsightly gaps that may emerge anywhere in a cabinet ensemble
- raw material for elements (like shelves) that you want to build from scratch
How to select cover panels[edit | edit source]
If you order your kitchen with the assistance of an Ikea kitchen designer, they will select all cover panels that you may need for you. In my own case, they simply put a custom selection of cover panels into my order, without even mentioning that those would be necessary. Only later we realized what they were good for and that the sizes were well chosen. We got some, too, that turned out to be unnecessary, which wasn't a problem since we could return them.
So unless you want to plan out your kitchen layout down to quarter of an inch, it may not really be necessary to think about cover panels before installation.
But if you want to plan your fillers and covers ahead, there are some basic things to know:
Ikea's web site doesn't make it overly obvious, but every product line of cover elements includes not just drawer fronts, doors, toe kicks, and "rounded deco strips", but also an array of cover panels. Specifically for white and for grey cabinet fronts, there is also a whole product line named Förbättra.
| 26" | 30" | 32½" | 42½" | 80" | 90" | 96" | |
|---|---|---|---|---|---|---|---|
| 15" | + | + | + | ||||
| 25" | + | + | + | ||||
| 36" | + | + |
- Dimensions
- Cover panels may vary a little in thickness, even within one product line, but they are roughly ½ inch (12 mm). By the way, that means that they may be slightly thinner than your front elements.
- Characteristics
- The materials are the same as with the regular front elements. Every cover panel has six "good" faces, so even the four edge faces are fully usable.
A good way to decide what to order is to make proportionally correct drawings of all pieces that you are planning to use; mark the edges that need to be "good" edges (because they will be exposed). I would do this in a graphic software like Inkscape, but it certainly can be also done on paper. Then make drawings of the available products, and see how your custom pieces best fit in.