Kitchen Remodel/Appliance and sink installation
|

Appliance and sink installation must strictly follow the manufacturer's instructions. In this chapter, I will just add a few remarks, in piecemeal fashion, that may be helpful in some cases.
General[edit | edit source]

The probably best advice that I can give for appliance installation is to think ahead while you do it: is there a chance that you will move the appliance out of its position, like for a check or a repair or simply because you still need to install floor tiles under it? Make sure the electrical and water connections are long enough to pull it out of its recess and even further (you may want to be able to crawl behind it).
We almost overlooked that necessity when we installed our refrigerator, because it doesn't stand against a wall, but we could conveniently access it from behind (see image), for most of the time during our kitchen installation. After the installation of the back row of cabinets, we would have lost that access and run into severe doo doo.
Microwave oven[edit | edit source]
The installation of a microwave oven into a Sektion cabinet frame requires a trim kit which needs to be purchased in addition to the appliance. That those are two separate products, was the case at least in 2022, when I ordered my kitchen. Due to its weight, a microwave oven must not sit on a regular shelf, but on a "reinforced ventilated shelf". Both this shelf and the set of black Nyttig support brackets which are needed for the attachment of the cover frame are separate products which need to be ordered in addition to the cabinet frame and to the trim kit.
Although we are very happy with that appliance now, initially I would have preferred not to purchase the Ikea products, namely their rather pricey trim kit. But I didn't dare to because I didn't know at that time if a product of another manufacturer would fit into my cabinet configuration.
If you have a similar conflict, maybe the following images can help you a little to decide what you are going to do:
-
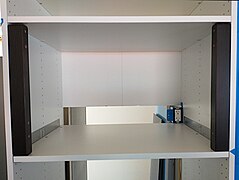 The cabinet frame with a reinforced shelf and and two black Nyttig support brackets; notice the cut-out in the cabinet's backside. It's for the electrical connections.
 -
 The microwave oven in its position, with the cover frame not installed yet
 -
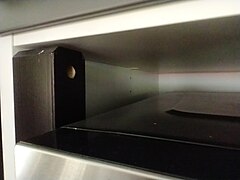 A support bracket's top; notice the screw hole in the bevel: here, the frame will be attached.
 -
 The exhaust duct (a tray-like element) and the two bottom mounting rails are included in the trim kit
 -
 The exhaust duct and one of the bottom mounting rails (detail); the appliance stands on the rails which in turn rest on the exhaust duct
 -

-
 The frame (back side); it is part of the trim kit, too.
 -

-

-

-
 The frame (front side)
 -

-

-
 With the frame installed; the black cover piece immediately below (between microwave and oven) is a Nyttig filler piece


Notice that it will be necessary to cut some openings into the cabinet's back panel for the electrical connections (see first image). Ikea give detailed instructions. But if your cabinet configuration deviates from what they suggest or if you disagree with their recommendation, you may also use common sense and only cut what you think is necessary under your special circumstances. However, since those cut-outs won't be visible anyway, there isn't too much to worry to begin with.
Oven[edit | edit source]
The most important thing to consider when installing an oven is that, depending on where you live and on the product, it may require a special electrical connection with higher voltage. In the U. S., that means, too, that you may have to deal with a supply cable that is thicker and stiffer than for most other appliances and therefore will need more place.
If you have a built-in oven, the second most important thing is that it will probably be the heaviest appliance which you don't only need to move around in your space, but also to lift into a relatively high position. Our own oven weighs 260 lbs (118 kg). We found it extremely helpful that we, at that point of time, had a team of contractors in our home anyway, who were friendly enough to contribute elbow grease. Like a microwave oven, a oven must be installed on a "reinforced ventilated shelf".
If you have an Ikea kitchen designer helping you with your order list, they will add everything you need for your oven installation. This includes elements which will reinforce the shelf on which the oven will sit. They will also give you two Nyttig filler pieces which will cover the two gaps above and below the oven (first image).
By the way: On their web site, Ikea give the impression that there are only two possible heights on which a built-in oven can be installed. Don't get mislead: as long as you have a plan what to do with the rest of that cabinet frame (including drawer fronts or doors that fit into you design), you can actually place an oven and/or a microwave oven at any height that works best for you. The installation of an oven and a microwave uses up 50" of height. So in our 80" high cabinet, we still had 30" of height left, which we decided to use for two 15" high front elements. It could also have been done differently; but considering our body heights, this layout is what worked best for us.
-
 Before…
 -
 …and after oven installation (still with some protective foils on)
 -
 On completion


Cooktop[edit | edit source]
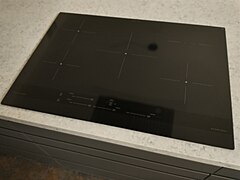
Depending on where you live and on the chosen appliance, an induction or electric cooktop may require a special electrical connection with higher voltage.
Otherwise, the installation of a cooktop is pretty straightforward. The product's instructions include information about the dimensions and exact position of the rectangular pit that needs to be cut into the plywood countertop base (if such a base is required) and that will contain the appliance. In our case, this very information was somewhat ambiguous, so we decided to use common sense and that the cut-out needs to be just large enough to fit the lower part of the cooktop, while the edge of the glass ceramic part will lie on top of the countertop. The overlap between the wide top part of the cooktop and the countertop should be as large as possible (or to put it the other way around: the cut-out should be as small as possible), because that countertop will bear the load of the appliance.
I would not want to attempt to sink the cooktop deeper in and to make it flush with the countertop, because this will make the installation more difficult and more fault-prone, and it will also create a groove around the cooktop which will be hard to keep clean. I don't know about you, but in my kitchen there is no other place where so often an inadvertent spill occurs as on my cooktop.
-
 Testing the correct fit
 -
 After the installation of the countertop…
 -
 …we sealed the gap between cooktop and countertop with transparent silicone.


Sink[edit | edit source]
Our kitchen sink is not an Ikea product, but a Kräus. As I mentioned in a earlier chapter, we had planned on an undermount, with the sink's top side partially being covered by countertop.
Although Ikea don't give instructions on how to install a sink of a different manufacturer, the installation was not too difficult. The overall width of our sink matches exactly that of its 30" base cabinet. So in order to install it, we had to cut the cabinet's side panels and the back panel to size. This required very careful measuring and calculating, since the upper edge of the sink had to sit exactly at the right height: aligned with the top side of the plywood that would cover all our base cabinets as a foundation for the future countertop.
One of the best advices that I can give for kitchen sink installation is to be really meticulous when you decide about the exact positions of your faucet and and of your soap dispensers. An ill-placed faucet may have a control lever that cannot be properly operated because it hits a windowsill or some other obstacle. An ill-placed soap dispenser may be of limited use if its spout doesn't reach the sink's basin; a soap dispenser should, as a general rule, be installed as close to the sink as possible.
-
 Anatomy of our sink cabinet: the side panels and the back panel are cut to size.
 -
 With the plywood on, but the sink not being installed yet
 -
 Seen from within the cabinet
 -
 The goal was to align the upper edge of the sink perfectly with the upper edge of the plywood.
 -
 With the sink in place, we could install the insinkerator…
 -
 …and the faucet.
 -
 On completion, with the countertop in place
 -
 The element above the pair of doors is a flipped drawer front that is cut to size.


