Kitchen Remodel/Cabinet assembly and installation
|

In this chapter, I would like to give some impressions of our Ikea kitchen assembly and installation, and to share some of the experiences that we made. If I am mentioning possible mistakes and hazards, you can be assured: we experienced every single one of those, first hand, by our own fault, so I know what I am talking about.
By the way, this chapter is not meant to replace a thorough study of the printed instructions that come with every product. Those are very clever, and they can even be found online.
Cabinet frame assembly[edit | edit source]
-
 Cam lock nuts and screws
 -
 Make sure to keep all the small stuff in a container until it is needed
 -
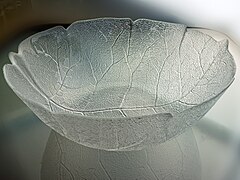
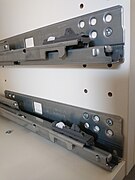
 Our first cabinet frame, ready assembled. For learning purposes, we began with the smallest.
 -
 The back panel locks into channels. Only in a base cabinet the top is attached to a top rail.
 -
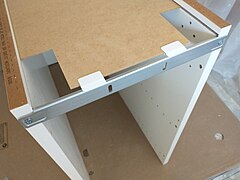
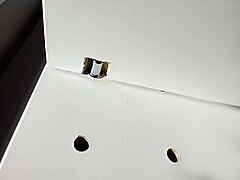
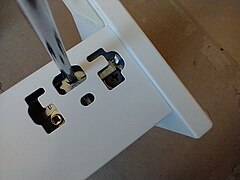
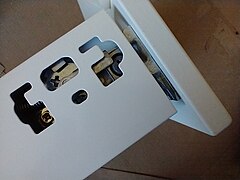
 The cut-outs at both upper corners will later accommodate the gear that is needed to attach the cabinet frame to a wall or to other cabinet frames with which it stands back-to-back.
 -
 Base cabinets come with two top rails (for front and back). If they are meant to bear the heavy load of a countertop, additional lateral top rails ("Fixa") are recommended.
 -
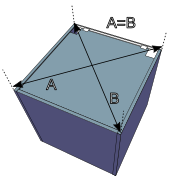 In order to nail the back panel down, the frame must be put flat on its face. Then compare the length of the two diagonals and adjust the frame, until they are perfectly equal.
 -
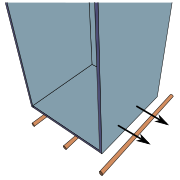 The wheel an assembled cabinet on make-shift rollers may look weird, but is a simple and wholesome alternative to heavy lifting.


I'll begin with a health advice. The flat packs are heavy, namely those that contain high cabinets. Early on, we decided not to lift them, let alone to carry them from our storage place in the garage into the kitchen space. Instead we unpacked the content in the garage, as needed, and lifted or carried only single panels. By the way, the packs need to lie flat for unpacking; if you open one while it is standing upright, you may build yourself a booby trap.
Base cabinet frames consist of two side panels and a bottom panel; high cabinet and wall cabinet frames include a fourth panel at the top. The material is particle board with melamine foil and plastic edging. Like many other Ikea furniture, the Sektion frames are being assembled with cam lock nuts and screws, and with wooden dowels. The back panel is made of fiber board, with a plastic foil face on the side that shows. It is thinner than the frame panels and sits in routed channels where it is firmly secured by a large number of small nails.
Make sure that you set up your assembly space on a soft surface, like a large rug, to prevent the panels from being scratched up. Every cabinet frame pack includes a bag of small parts; I found it very helpful never to empty those on the floor, but strictly into a designated bowl where they would not get lost. While a small cabinet frame can probably be assembled by one person alone (especially after they gathered some experience), I would not attempt to do this with a medium or large one. The parts are heavy and you won't have enough hands to hold everything in place while you also operate your tools. Talking about heavy: the need will arise to move assembled cabinet frames, too. We used a small wooden moving dolly, and at one point, where a very low ceiling height impeded the use of it, we cut a stick of round timber into three 2-foot pieces and put those under our load, in turns, while we gradually pushed the cabinet frame towards its destination. That felt like the ancient Egyptians moving building blocks of a pyramid, only they allegedly didn't know that technique yet.
The greatest mistake that can be made during assembly, is to mount a frame askew. This can be easily avoided by setting up the work space on a (floor) surface that is absolutely flat. Equally important is it to be really meticulous about the installation of the back panel. Before it is being nailed in, the frame needs to be straightened, with perfect right angles. Better than using a carpenter's square (which is never big enough) we found it to compare the two diagonals. If they are equal, down to a small fraction of an inch, the frame is standing straight, and those little nails should be hammered in without further ado. Even a slight accidental blow from any side can change the geometry and you may have to start the straightening procedure all over.
Putting cabinet frames into place[edit | edit source]
Legs[edit | edit source]
The default way to install Ikea's base and high cabinets is to put them on legs. The great advantage of those legs is that they are adjustable in height which allows it to very conveniently straighten every cabinet so that its top is perfectly level and all sides are perfectly vertical. With a conventional base you would have to use shims which I imagine to be a pain, namely at the cabinet's rear end. The legs are made of plastic and very easy to assemble and to attach to the cabinet frame, there is not even a screwdriver needed. They will be quite robust once the cabinet stands in its place, but they can break while the cabinet is still being moved between places, especially if this is being done in a rough or clumsy way. An even more dangerous moment is probably the one when a cabinet frame that has been lying down for assembly is brought up to its upright position. We never had any leg breakage; but Ikea wouldn't point that hazard out in their instruction material, if it didn't exist.
When island support brackets (see next section) are being used, hazard can be avoided if you first lift the cabinet frame onto the installed brackets, and only then attach the leg bases and the legs.
Wherever there are two adjacent cabinets, Ikea give you the choice to either allot to both of them their own four legs, or to install a shared pair of legs in the center where the two frames touch. An advantage of the latter may be that the height adjustment will be much simpler and quicker. A disadvantage may be that those two legs will bear a load that you as well could distribute over four legs. By the way: if you don't fully trust those legs, you can always install island support brackets in addition, under any cabinet and in virtually any number.
-
 Two legs in place. Later, the toe kick panels will be clipped onto the legs. The function of those rings close to the legs' bottoms is not decoration, but to hold the toe kicks at the right distance.
 -
 Ikea probably would discourage that, but for a couple of our cabinets…
 -
 …we had to shorten the legs half an inch because the cabinets had to fit under a very low ceiling. In Europe, Ikea market shorter legs, but we couldn't get those in the U.S.


Brackets for island support[edit | edit source]
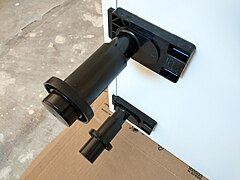
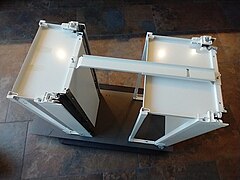
As I will point out in the next section, all Ikea cabinets (wall, base, and high cabinets) are designed to be wall-hung cabinets. So even base and high cabinets do not just stand on feet, but designed to be hung to a wall, too, for additional support. Well, this won't work for every cabinet, namely in the context of a peninsula or island. To create compensation for an omitted wall support, Ikea market brackets for island support, which go also under the name "Sektion". Those are basically blocks of solid pine wood, roughly in the dimensions of a two-by-four. They come with L-shaped steel brackets which have to be screwed into the floor (this may require a hammer drill, depending on the type of floor). After the cabinet frame is in place and level and straightened, the wooden log, which is at first mounted in the lowest possible position, can be brought all the way up and screwed tightly.
There is no rule that says that support brackets are only for islands. If you want to, you can mount those under any base or high cabinet. The best spot is probably under the cabinet's side panels, because this is where the load attacks. Make sure that neither the log nor the metal brackets stick out beyond the front legs, or else they may interfere with the toe kick. Once the cabinet is in place and well aligned to its neighbors, its bottom piece should be screwed to the wooden log from above.
-
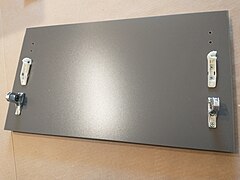
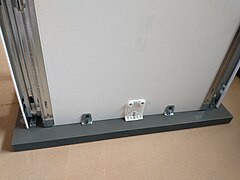
 Two island support brackets
 -

-
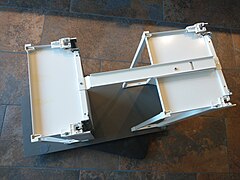
 An island support bracket makes a great base, too, for elements like a junction box or an electrical outlet for a built-in appliance.


Using the suspension rail[edit | edit source]
We began our kitchen installation with the sink row, for a number of reasons. One was that the water connections very much determined where to place the sink cabinet (while we were more flexible with the two peninsulas), another was our desire to study and to understand the use of Ikea's suspension rails. The latter serve two purposes:
- The rails bear part of the weight of the cabinets.
- They also help to align the cabinets straight and level. We found that this was extremely helpful: Once the rail is properly installed, the cabinet installation will be a breeze.
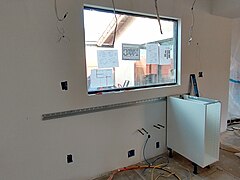
The installation of the rail itself may be quite cumbersome, because many kitchen walls are not as straight as they appear to be. In our case, it took us two full days to get that piece of metal in its final position. It is imperative that the rail is 1. screwed into studs (not just into drywall), and that it sits 2. at the correct height, 3. perfectly horizontal, and 4. perfectly straight. You may need to use shims to avoid bending.
-
 Don't expect the rail to be mounted in just a few minutes.
 -
 Our first cabinet in its final position.
 -
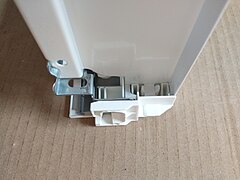
 Every cabinet frame comes with two L-shaped brackets which are designed to lock into the rail. There are white plastic caps included to conceal the brackets and cutouts.
 -
 Once the rail is well mounted, it will be very easy to align the cabinets straight.


To install and to align the cabinets, they need to be hung into the rail while adjusting the height of the individual legs. Once two adjacent cabinets are in their final positions and well aligned, they need to be screwed together (screws for that are included, too). When you do this, make sure that you don't occupy any of the predrilled holes that you may need later for drawers or shelves.
Back-to-back base cabinets[edit | edit source]
When cabinets cannot be hung into a rail, because they are standing back-to-back to each other in an island or peninsula, they can be mounted back to back with a special "assembly kit for kitchen island". This sounds grand, but is mostly a piece of softish particle board that can be cut to size. This product is probably most useful if the cabinets that stand back-to-back are of equal width. If the brackets that would be screwed to it don't align at all, you may as well return the kit to the store and rely on other methods to attach those two rows of cabinets to each other.


Back-to-back high cabinets[edit | edit source]
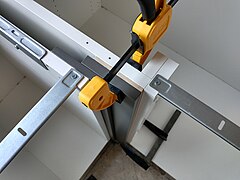
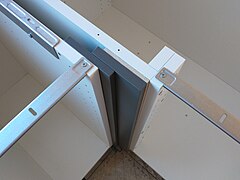
Yes, high cabinets can be installed back-to-back, too! We did this with our oven/refrigerator row, which is standing back-to-back to our main pantry row. Omitting a wall between those saved us some precious and actually badly needed space. But still, we had to leave a little gap for the electrical and water connections. Instead of Ikea's assembly kit, we used a 2-by-4 beam to hold the upper ends of the high cabinets and to support the "wall" cabinet that hovers above the fridge.
-
 Before…
 -
 …and after the installation of a 2-by-4
 -
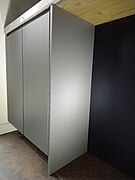
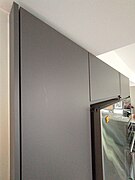
 The first cabinet in the other row


High cabinets without a suspension rail[edit | edit source]
Another factor that may make it impossible to use the suspension rail is the ceiling. If it is very low, it may be difficult to coax a high cabinet in its position. We had such a situation in the case of our "extra", two narrow high pantry cabinets which were supposed to go into a custom-built recess. Since those would not be difficult to align in any case, we omitted the rail and simply screwed them to the adjacent walls, to the ceiling and to each other for stability.
-
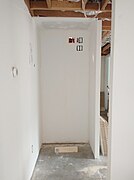 Not enough height to wheedle brackets into a suspension rail!
 -
 So we didn't use a rail at all for these particular cabinets
 -
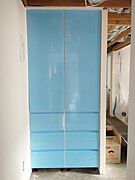 After assembly (the fronts still with the protective foil on)


Cover and filler panels[edit | edit source]
Preliminary remark[edit | edit source]
Exact planning of the use of cover/filler panels requires an inspection and measuring of the material that has been delivered. At least in my case, the panels came in slightly inconsistent thickness although they were all announced as 5/8 ". In some cases, we had to modify our original designs and to add some underlayers.
Installing a 47" corner cabinet[edit | edit source]
The installation of a 47" corner cabinet requires some sort of a filler. Without it, there would be interference of the corner cabinet's door and the drawers/door of the adjacent cabinet. Ikea don't give instructions how to do it, probably because there are multiple possible ways to do it and because the requirements may not always be the same. Our own preference was to make it simple and space-saving, so we came up with this solution:
-
 A circular saw is probably the best tool to cut a filler panel.
 -
 After bringing the fillers in position…
 -
 …they can be attached with screws from the cabinet's interior.
 -
 When designing the filler scheme, the position and thickness of drawer fronts and doors need to be carefully considered.
 -
 After completion, with all front elements installed.
 -
 The 47" cabinet is not perfectly aligned to the neighboring cabinets (see annotation below).


Annotation: We didn't align the rear end of the left cabinet and the left side of the 47" corner cabinet (4th image), but remove the corner cabinet a little from the wall; therefore the asymmetry in the filler scheme (3rd+5th image). The reason why we did this is that the 47" cabinet is part of a peninsula; its row (47" cabinet + dishwasher + a 18" cabinet) had to match the length of the cabinet row on the rear side of the peninsula (6th image).
Installing two base cabinets in a right angle[edit | edit source]
Most people would probably not position two standard cabinets in a right angle but rather use a corner cabinet instead. But we did (because we found a way to access the – otherwise "dead" – corner space from the other side of the peninsula) and therefore needed another filler panel scheme. Without fillers, we might not have been able to open those drawers. This is what we did to prevent any interference and to make the corner look pretty:
-
 Cross section (seen from above): two filler pieces, and a 2-by-4 for additional stabilization
 -
 After completion


Covering cabinet frame sides[edit | edit source]
I am not sure what you would do if the color of your cabinet front matches the color of the front elements (drawer fronts and doors). In my case, it did not match, and we had to cover a small number of cabinet frame sides that otherwise would have shown a white surface while everything else is dark grey. Covering those is very straightforward, you just cut pieces of filler panel to size and screw those on from the inside of the cabinet frame so that the screw heads aren't visible. Make sure to not only cover the cabinet frames, but the sides of your drawer fronts and doors, too.
-
 In the case of the little twin-cabinet in the bar row…
 -
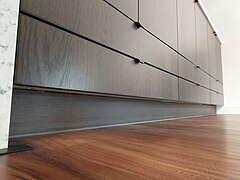
 …we decided to extend the cover panel all the way down to the floor…
 -
 …to match the shape of the countertop waterfall on the opposite side of the bar.
 -
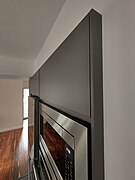
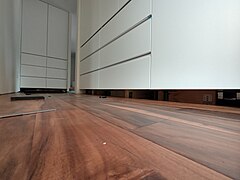
 The other unit where we needed cover panels was the fridge/over row…
 -
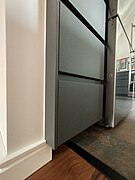 Here we covered only the cabinet frames, not the toe kick space.
 -
 The reason why we had to pull this row out of its recess…
 -
 …I will explain in the following chapter.


.jpg)


When the decision is made to extend a cover panel all the way down to the floor, the question may arise if this should be done before or after floor installation. We found it much easier to do the flooring first and the panel installation later.
Covering a simple gap[edit | edit source]
If a gap between a cabinet and a wall is only a fraction of an inch (a few millimeters) wide, it can mostly be left as it is. But we had one that was almost 2 inches (5 cm) wide and wanted it to be covered. Although it may be easier to do this right after the installation of the cabinet frame, while it is still fully accessible with no countertop in the way, we found that it still wasn't a problem to do this later.
-
 A gap between a cabinet and a wall…
 -
 …can be filled with a piece of panel…
 -
 …without screwheads being exposed.
 -
 Seen from the bottom


When a gap between a cabinet and a wall is to be covered, there is fundamentally the question if you want to extend the cover all the way to the floor or whether you want to leave the toe kick space open. We decided for the latter and simply extended the toe kick panel to the wall (4th image).
Covering a complex gap[edit | edit source]
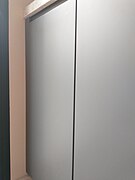
More need for custom use of filler panels came up in our kitchen project in the area above the refrigerator. Ikea don't offer a cabinet frame of the dimensions that would have filled that space, so we had to compromise and buy a frame that was a bit too high and a bit too narrow. The height problem was easy to fix, we just cut off a bit from the side pieces, from the back piece, and from the door. A more daring problem was the gap. In order to fill it, we built a custom box. The challenge was to design something with only "good" sides of filler panel pieces showing, no raw particle board. So we designed the following:
-
 There was a 3" (8 cm) gap between the cabinet above the fridge and the high cabinet to the right.
 -
 Our custom component
 -
 After installation (the adjacent front elements still with the protective foil on)
 -
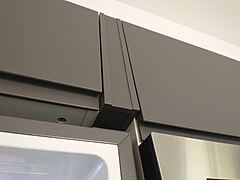 Notice that the bottom of the box shows, too (at least when the fridge door is being opened)


Shelves, drawers and pull-outs[edit | edit source]
Shelves, drawers and pull-outs can be installed as soon as a cabinet frame is in its final position and properly attached to all elements (adjacent cabinet frames, wall, ceiling, island support, etc.) to which it needs to be attached. Corner cabinet shelves and carousels even have to be installed early, namely as long as the interior of the cabinet is still accessible from the top.
Shelves[edit | edit source]
Utrusta shelves are being mounted with pins that are included in the package. Make sure you open the bags which contain the pegs carefully, the pegs are small and have a tendency to escape at least my hands and to get lost, especially in the mess of a construction site. I lost at least half a dozen, some of them never to be found again, and there is no good substitute for them. I ended up ordering extras from Ikea, the product number is 101532. Ikea give them out without charge, in the store and by online order, but it may take a while until you get them.
Utrusta shelves are the standard shelves which have to be ordered in addition to the cabinet frames. Apart from those, there is also one support shelf included in every high cabinet frame. Those Sektion shelves come with special pins which are not only pushed into the predrilled holes, but also screwed for additional tightness. There are also additional little plastic braces in the shelves where the pin locks in (3rd image). You can mount a Sektion support shelf at any height you want, although they are obviously designed to sit not too far from the center for best structural support. Since the cut-out in the shelf that holds the pin is a bit deeper than in an Utrusta shelf, a Sektion support shelf will sit a fraction of an inch lower than an Utrusta shelf. This is important to know if you experiment with custom positioning of elements; so if a Sektion shelf gets into your way by just a tiny bit, you can try an Utrusta shelf instead.
-
 Standard pin (Utrusta shelf)
 -
 Standard pin in place, seen from below
 -
 Special pin in a Sektion support shelf (high cabinets only)
 -
 The two types of pins


Drawers[edit | edit source]
Drawer assembly and installation was one of my favorite parts of installing an Ikea kitchen, although there is a cornucopia of stupid mistakes that can be made. On any account, I will be a good idea to both scrupulously follow Ikea's instructions and be well rested and fully focused when you tackle this task. The good news: unless you really break anything (which is unlikely), any mistake that is being made can be reverted and fixed.
Drawer base assembly[edit | edit source]
The assembly of a Maximera drawer begins with the rear piece, the two trapezoid side pieces, and the bottom plate. (The front piece is a different product and comes one step later.) It may be helpful to understand how the side pieces lock into the rear piece – although you will possibly push them in successfully a dozen times before you figure you want to understand the mechanism –, this is why I included the following pictures. It is a simple plastic clasp, comparable to a sprung clothespin, at the end of the side piece that locks onto a little bar in the rear piece. If you believe you made a mistake pushing a side piece in, you can pull it back out, using moderate strength (and possibly giving the clasp a little straddle), without causing any damage.
-
 A ready assembled Maximera drawer, seen from behind
 -
 Detail, included here because it shows the little braces (right) where the trapezoid side piece locks in
 -
 The same detail on a lower drawer
 -
 Maximera drawer without a front piece (normally, you would install the front before installing the drawer)…
 -
 …and with a Voxtorp drawer front


Drawer front assembly[edit | edit source]
Maximera drawers come without a drawer front and need to be complemented with one: either a regular front element product like for example Voxtorp, or – in the case of a nested drawer or a drawer behind a door – an Utrusta front. Utrusta drawer fronts match the color of the cabinet frame. Both come with detailed instructions which should be followed carefully to avoid unpleasant surprises when you are ready to install the drawer in a cabinet frame. The most common mistake that can be made is not to consider the fact that bottom drawers need to have a slightly different front piece mounting than drawers which sit in higher positions. When we assembled multiple drawers in one session before installing them into a cabinet frame, we found it very helpful, too, to earmark the bottom drawers so that we wouldn't mix them up with other drawers.
-
 A Voxtorp drawer front, ready prepared for assembly
 -
 An Utrusta drawer front; the white plastic brackets are only being used on medium and high drawers.
 -
 The brackets must go in this orientation, with the protruding part up and the flat end down.
 -
 The brackets will be held by the rectangular casing within the trapezoid side piece.
 -
 A drawer front in place
 -
 Medium and high drawers include additional side bars…
 -
 …which lock into white plastic brackets that are mounted onto the front piece.
 -
 A Voxtorp front with the side bars attached
 -
 Wider drawers (15"+) get an additional support where the front element meets the bottom plate
 -
 The mechanism which holds the bracket allows adjustment of the front element into all directions.
 -
 It also allows to remove the front. Insert a Philips screw driver in the +-shaped mechanism in the center opening (it is half hidden behind a small piece of metal which can be pushed up)…
 -
 …turn it a few degrees…
 -
 …and voilà.


Special situations[edit | edit source]
Interference with hinge cut-outs[edit | edit source]
Ikea don't offer elements which are specifically for doors and specifically for drawer fronts. Every front element can fundamentally be used for both purposes. But all larger elements come with round cut-outs in their rear sides which are designed to hold door hinges. If they are not used for hinge installation, they can be covered with a plastic cap. But if such a front element is used as a drawer front, chances are that the bottom hinge cut-outs will interfere with the drawer assembly. Ikea therefore offer a special kit (Utrusta "Fixture for mounting door on drawer"; product # 002.807.55) which does not only include support for an otherwise wobbly high drawer front, but also a set of plastic plugs that can be inserted and mounted into the cut-outs and holes and thereby make it possible to properly attach brackets even in this awkward position.
-
 A hinge cut-out in a Voxtorp front element
 -
 If it is not used for a hinge, it normally will be covered.
 -
 But if it is used as a drawer front, the cut-out may interfere with the bracket.
 -
 Ikea therefore offer a special kit to tightly close the cut-out…
 -
 …to make it possible to screw a bracket on anyway.


Flipping or modifying an Utrusta drawer front[edit | edit source]


There is a default mount for Utrusta drawer fronts which is described in Ikea's instructions. In some cases, it may be advisable to deviate from that and to either turn the front upside-down (images) or to drill custom holes. This applies in particular when you work with custom configurations, when a normally mounted front piece would get in the way of another element or wouldn't leave enough space for your fingers to open the drawer. In such cases it may even become necessary to cut a front piece to a lower height (I simply turned the piece with the cut/ugly edge to the bottom where it wouldn't be seen).
Drawer installation[edit | edit source]
Drawer installation is a rather straightforward process. The most important thing about it is to meticulously follow the instructions that Ikea give in their manual, namely to use the indicated screw holes both in the slide and in the interior of the cabinet frame. Any improvisation may lead to a situation where the drawer will either not close or leave a gap.
Using custom holes rather than the predrilled cabinet frame holes is fundamentally possible, but the only application for this is custom-positioning of interior drawers (nested drawers, drawers behind a door). If you feel the default holes don't work for your regular drawer, it is most likely you who made a mistake.
When the drawer slide is properly installed and positioned and the drawer, too, is properly assembled, it should be easy to bring them together. Pull the slides out (it doesn't even need to be all the way, but do it symmetrically), set the drawer on top (make sure it is well centered and roughly horizontal) and then carefully push it forward into the cabinet. It should easily lock in, and then run smoothly, both ways, and close completely without a problem, even if you don't manually push it all the way in. If it doesn't, take it out and try again. Over time, you have a good chance to foster a sure instinct how to do this. Both locking a Maximera drawer into the slides and removing it from there is not a matter of strength or of tricks but of experience and of sensitive fingertips.
It is certainly a good idea to start learning with the smallest drawer that you have until you got the hang of it. You may even discover that one specific member of your household has a genius for these operations while others don't.
After installation the drawer fronts can be adjusted through the mechanism in the side pieces. We never had to.
-
 Dampers are included and need to be clipped onto the drawer slide
 -
 A damper in place
 -
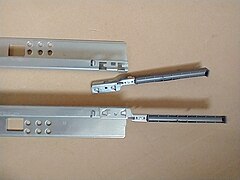
 This is the part of a slide which locks into the drawer
 -
 Two slides in different stages
 -
 Notice that the bottom slide is mounted through the upper holes
 -
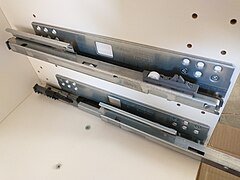
 A number of installed slides, ready to receive drawers
 -
 Custom installation is an option only for interior drawers; here, it helped to avoid the collision with a door hinge.
 -
 The mechanism for final drawer front adjustment; it can be worked with a Philips screwdriver.


The images above show drawer slides for 15" deep cabinets (2nd thru 5th image) and for 24" deep cabinets (1st, 6th and 7th image).
Pull-outs[edit | edit source]
The most important thing to know about Ikea's pull-out fittings for 12" cabinets is that they can be custom-assembled. The two drawers (one is high, the other medium) can be swapped, and both can be mounted at any height, depending of the height of what you want to store in this cabinet. If you want, you can even omit the side bars. The mechanism that links both drawers together at their rear ends consists of two parts which are designed to be joined in different ways so that the length is variable. But since those variations are not continuous but in defined increments, it makes a lot of sense to first put everything together, as a test – the two drawers and the joined link mechanism –, and only then to finally decide on the exact position of the upper drawer (the lower drawer should always sit in its default position, that is: as low as possible).
I naively did it the other way around and ended up joining the link mechanism with a custom hole, bolt, and nut, rather than the much more elegant default way.
On any account, the custom-assembly of a pullout is one of the trickiest and most complex operations in the installation of an Ikea kitchen; it requires a lot of very careful measuring and thinking and full concentration, and is probably best done in a team. But it is absolutely worth it.
-
 An assembled pull-out
 -
 Trying out if there is enough height for the designated content (here: a large cutting board).
 -
 Seen from the back; if the distance between the two drawers is well chosen, the two parts of the link mechanism will lock into each other.
 -
 If they don't…
 -
 …there is the awkward, but still fully functional solution of a custom screw.
 -
 Pull-outs sit on only two slides
 -
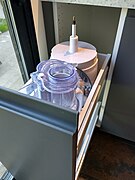 Pull-outs are great for clunky kitchen appliances that you otherwise wouldn't use very often for want of accessibility.
 -
 Another excellent use is the storage of cutting boards.


The installation of a pull-out fitting for 47" corner cabinets is well described in the product instruction. The only thing that I can add to that is that both trays can be adjusted in height, within limits. In my own kitchen, it found it helpful to deviate from the default installation and to lift both trays to higher positions. So I have three levels of storage space instead of only two.
The pull-out-mechanism works fine, but it still lacks the convenience and simplicity of a drawer. So I use it mostly like a set of shelves, with everyday stuff in the front, and the depths of the trays assigned to things that are not being used every single day.
By the way, the door of the 47" corner cabinet can be installed both ways, with the hinges at the inner side (which is probably more convenient in most cases) or at the outer side.
-
 An opening of the corner pull-out comprises two stages:
 -
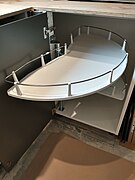 First the tray is turned 90 degrees around the axis (for partial access)…
 -
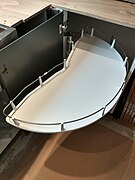 …and then pulled out (for full access)


Doors and hinges[edit | edit source]
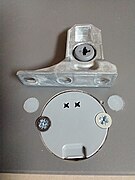
Hinge installation starts with the hinges being mounted to the door. This part doesn't require tools, the hinge is simply being plunged into the round cut-out (1st image; make sure you get it all the way in), and then press the flap down (2nd image) to tighten it. I don't have too much finger strength and found it helpful to cover the flap with a piece of cardboard or soft wood while pressing it down, that made it easier for me to make that reluctant thing budge. In case you need to open it again: that is no problem either, but you will need some strength and possibly a metal spatula or wide screwdriver, too.
The next step is the installation of the hinge bases in the cabinet frame. Make sure you know where the front of the little thing is (it is where the two little grippers are). The last step is to attach the hinges (which are already mounted to the door) to their bases. This is best done by two people: one holding the door in the right position and the other (preferably the stronger person) clicking the hinge tips into place, one by one. They should latch easily, with a little pressure and a characteristic click sound. If you, for any reason, need to remove them again, that is possible, too, just apply a little strength. No tool needed. But better don't revert the assembly without necessity, at least I managed to maltreat one hinge so badly that it became unusable.
Theoretically, the door installation can also be done the other way around: First the hinge bases and hinges installed to the cabinet frame, and only then the door attached to the hinges. We tried both variations and found the first described method much easier to perform than the latter.
-
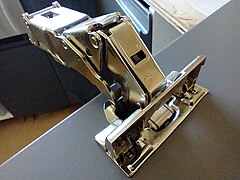 A hinge with the flap up…
 -
 …and with the flap down
 -
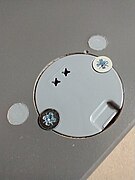
 The little base piece goes in the cabinet frame.
 -
 Notice the two gears in the center of the base piece: they will later allow adjustments.
 -
 The base is always mounted with the two grippers facing you. This is where the hinge locks in.
 -
 And here comes the fun part…
 -

-

-

-
 …Isn't that something?!


All images above show a 153 degree hinge. The installation of a 110 degree hinge works identical.
One remark: The 153 degree hinges are so cool, they are really tempting to fool around with upon unpacking. Don't hesitate to study the functionality, as long as you don't overdo it. But if you fold them all the way together, don't be too surprised if you figure that it will require a certain strength to straighten them again. But no worries, it isn't too difficult.
About the installation of a hinge for a horizontal door isn't much to say, only follow Ikea's instructions and be aware that the maximum opening angle can be adjusted.
-
 A hinge for a horizontal door, before…
 -
 …and and after installation of its cover
 -

-


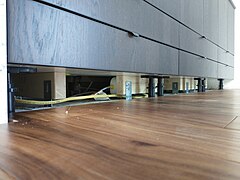
Toe kicks[edit | edit source]
The toe kick panels can only be installed after all flooring work is finished. I found it useful to map all my cabinets out in a drawing, together with the delivered toe kick panels (1st image). When this is been done on a computer screen or on paper ahead of time, before the toe kick installation begins for real, you will have more time to make good decisions about the use of your material. If piecing on is unavoidable, the seams should be at positions where they will only get a minimum of attention. In our case, the map also revealed that our kitchen designer had supplied us with more material than we needed. We could return it to the store without a problem.
We used a miter saw to cut the toe kick panels, with masking tape over the cutting lines to preserve clean edges. If you don't have a miter saw, a hand saw will certainly do just as well.
Our biggest challenge were the toe kicks in the refrigerator/oven row and in the pantry where the ceiling is so low that we had to cut the cabinet legs to custom length. Consequently, we had to trim the toe kick panels, too, which is fundamentally not a problem; only if you cut off too much, this will destroy the channel which has to hold the clasp that embraces the cabinet leg.
-
 My toe kick map. Ikea added more toe kick panels to our shopping list than we actually needed.
 -
 This is how the toe kick panels are attached to the legs. Notice the ring at the leg's bottom: it keeps the panel upright.
 -
 If panels need to be combined, there are joint pieces (tongues) included.
 -
 The dining row before toe kick installation; this row is 90" (229 cm) wide, so just 1 panel was not enough. We needed two.
 -
 We decided to place the extra piece away from the waterfall so that the seam wouldn't get too much attention.
 -
 The dining row with toe kicks
 -
 The pantry without…
 -
 …and with toe kicks
 -

-
 The main kitchen space with toe kicks
 -
 Detail: a corner
 -
 The dish washer came with its own toe kick panel
 -
 In the fridge/oven row, where we had to cut the legs to custom length, we had to cut the toe kicks, too.


