Kitchen Remodel/Countertop
|

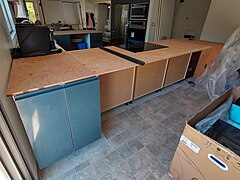
Plywood base[edit | edit source]
The type of quartz countertop that we were planning to install required a plywood foundation. The thinner the countertop material, the more the manufacturers encourage you to have such a foundation. Since we didn't know the first thing about the specifics of a plywood installation, we hired an experienced craftsman who assisted us with most of it, until we fully understood the concept and could finish without help.
We used 5/8" (15 mm) plywood. The idea is to cover the entire surface that will have a countertop. The front edges of the plywood have to be aligned to the front edge of the cabinet frame (while the drawer fronts and doors are being ignored). That included, in our case, the recesses for the dishwasher and wine chiller and the bar surface. There were cut-outs for the sink, the faucet, the cooktop and for our pop-up outlet. We didn't drill holes yet for the soap dispensers and the button for the insinkerator, though.
The two edges which would get a waterfall had to be covered with plywood, too. However, at the edge of the bar peninsula we were planning a wrap-around (= countertop material both on the edge's outside and the inside) and therefore omitted the plywood where the wrap-around would go.
Another spot that needed special attention was the bar surface. Our bar is very wide (more than 9 ft. resp. 289 cm), and the countertop sales person had recommended us to add a good reinforcement to the plywood cover there. So we used a wood router to cut a number of long grooves into the plywood surface into which we mounted iron bars.
-
 After the plywood installation
 -

-

-
 With all drawer fronts and doors installed
 -

-
 The wrap-around was the only part of surface which didn't require plywood.
 -
 The bar has a 13" (34 cm) overhang.
 -
 Installation of iron reinforcement
 -


The very cool thing about having the plywood in place is that you can finish installing your drawers and shelves and doors, if you haven't done so yet, and you can start to fill those cabinets with your things. We also finished the installation of our sink and faucet and began to actually use the kitchen. We had been without one for more than four months. With no date set for the countertop installation (we were still waiting for a call back to get a date for the measurements), we didn't have another option anyway. The one major appliance though that we couldn't use yet, without a proper countertop, was the cooktop.
Countertop[edit | edit source]
The selection of a countertop material is a great opportunity to cut back on expenses if someone figures that they went over budget with their cabinets and appliances. Laminate countertops come in all sorts of designs today, some of them even looking more interesting and appealing than the pricey alternatives. And there are many other options, too. However, my family does weird stuff in the kitchen, like soldering or other works that you normally would do in a workshop, so we decided not to take risks and to buy a material that is really heat resistant and tough: engineered quartz. We reduced the costs a bit by picking a product that was on sale in one of our local home improvement stores.
My other criteria, besides a reasonable price, was that the material must be mostly white, but picks up the color of the cabinet fronts, too, so we were quite pleased to find a cost-effective product with gossamer grey structures in a white base. I prefer a fine pattern over a large-scale one, because if there ever occur any damages, they will hardly be noticeable. The white was important to me because I wanted these very large horizontal surfaces to brighten up our kitchen space, both during daytime, with natural light coming through the windows, and after dusk when the lights come into play that we installed directly above.
The home improvement store which sold us the product, with the installation work in the price included, delegates the job to local firms. We learned during this process that contractors who install countertops cover a huge range of different ways of working. When we bought our first countertop, in New York State, a decade ago, we had someone coming to our place and pulling a laser-operated gimmick out of a case. He finished the measuring within a few minutes, obviously creating a set of digital data which the would probably feed directly into their stone cutting device. Well, now, in California, we saw exactly the other end of the spectrum: the contractor didn't use laser technology or even a tape measure, but simply created a huge template, glued together from wooden strips. What can I say? Both methods worked out. More or less.
A few weeks later the crew came back, with the prepared countertop material, and installed it. At that point, we could offer them our own template with the exact positions of our soap dispensers and the button for the insinkerator.
The best advice that I can give to anybody who pays for a countertop installation is to closely monitor the work while it is being done. Our contractors for example didn't use a mechanic's level but eyeballed literally everything, with the result that one of our waterfalls is not quite vertical, but a fraction of a degree off; they also seemed not to care too much about installing the countertop edge in constant distance to the cabinet fronts. The latter is most likely the result of their method of measuring. The good news is that to an innocent viewer, those flaws are not perceptible at all.
-
 Our product, here on display in the home improvement store
 -
 After installation
 -

-

-

-


And now some details. Notice that the quartz material is actually only ¾" (19 mm) thick, but appears to be much thicker because there are strips of material added at the edges.
-
 The wrap-around next to the bar
 -
 Without it, there would have been open plywood, like here under the bar overhang
 -
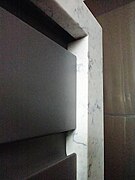
 The skinny edge piece is added and glued onto the main slab.
 -
 Some of the plywood will be permanently exposed. We painted those areas dark grey.
 -
 Detail of the other waterfall; notice how the material is "wrapped" around the horizontal and the vertical edge.
 -
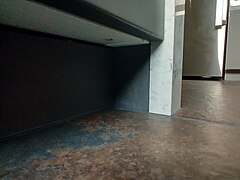 At the bottom, some plywood remains exposed. We painted it dark grey, matching the shade of the cabinet fronts.
 -
 The opposite side of the same waterfall
 -
 Sink area, detail
 -
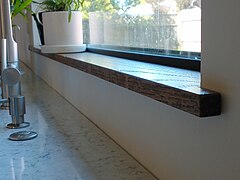 The windowsill is a custom build, matching the wall shelves


By the way, our contractor offered to cut and to install a matching windowsill, too. We declined, since we wanted a wooden one, matching our shelves, but I still found this an interesting idea.