Kitchen Remodel/Cabinet installation preparation
|

This chapter will mostly be relevant for readers who are preparing to assemble and install an Ikea kitchen, but most of the considerations may apply to probably every D. I. Y. kitchen installation.
Required skills and tools
[edit | edit source]With their assembly instructions, Ikea give lists of required tools. Apart from that and in general, I would consider the following items and tools (and the skill to handle them) as essential for the assembly and installation of an Ikea kitchen. Safety first:
- Ear and eye protection
- Working gloves (for the work with a saw and for heavy lifting)
- Proper work lighting
Measuring:
- Tape measure, folding meter stick or laser distance tape measuring tool
- Carpenter's square (the larger the better)
- Level (the larger the better; ideally a laser level, too)
- Stud finder
Tools:
- A very good box cutter with oodles of replacement blades. There will be a lot of cardboard boxes to be opened (but be utterly careful not to damage the delicate content through an unwise cut) and even more empty cardboard boxes to be cut into pieces for the recycling bin. We collected so much cardboard that we even reached out to a nearby architecture school, asking if they were interested in free building material for their classes.
- Cordless screwdriver, with Phillips and flathead and drill bits
- Ratcheting multi-bit screwdriver, with both Phillips and flathead bits; a conventional, non-ratcheting screwdriver may only be a poor substitute. Being a female with not too much arm strength, I preferred the use of a ratcheting screwdriver over that of an electrical one, because it is much lighter and allows a person of less strength much better control. Most people will see that differently though.
- Center punch (extremely helpful for drawer assembly)
- Hammer (ideally a rubber head hammer, too)
- Carpenter's pincers (to remove nails that didn't go in as planned)
- Pliers (to remove shelf pins; those can get stuck really badly and be a pain to remove with bare hands)
- Hand saw and ideally a miter box (to cut the suspension rails; we also had to cut some of the cabinet legs to custom height)
- Hand circular saw, a pair of saw horses and some board that goes on the saw horses as a working base (mostly for the cutting of filler/cover pieces). A table circular saw will be more comfortably to use though. We were lucky enough to have a miter saw at hand, too; the latter is not really necessary, but easier to handle than a circular saw; our main application with it was the cutting of toe kicks.
Other:
- 1 pack of wooden shims (for the suspension rails)
- 2 C-clamps
- Masking tape (for cleaner saw cuts; can also be used for all sorts of marking purposes)
- Small can of paint, flat, in the exact shade of the front elements (to stain any element, for example plywood, that won't be covered with cover panels or countertop material)
- Caulk gun with silicone (to fill a gap here and there)
- Pencil
- An old rug or anything else that is large and soft to be put on the floor where the assembly of frames or drawers takes place. You don't want to scratch those up. We used for that the cardboard in which the cabinets came.
- A deep dinner plate or any other container in which you can empty the content of the small-item bag that comes with virtually every Ikea flat pack. This little routine helped us a lot not to loose or misplace those very important screws and other little things that are needed for assembly. By the way, we also kept a well organized sorting system for unused or spare parts.
- Additional bolts or screws (to attach cabinets to each other, to the ceiling, or to an adjacent wall)
Other tools that we used but that may not be generally necessary:
- Hammer drill (we had to anchor a number of kitchen island support brackets in a concrete floor)
- Electric jigsaw (for custom cut-outs in the plywood cover)
Item names
[edit | edit source]I found it very helpful to understand and to acknowledge Ikea's way to identify the different elements of a kitchen. Every single item has…
- a 8-digit number (for example "002.653.97")
- an "Ikea name" ("Sektion"; the name indicates the type of article; in this case: either a cabinet frame or something very closely related to a cabinet frame)
- an abbreviated description ("bas cab frm 15x24x30" white NA" = base cabinet frame 15" wide, 24" deep, 30" high, white, model for North America).
All of this information appears both in the order lists and on the labels that stick on the flat packs in which the components are being delivered.
Notice that the 8-digit numbers strictly identify items that are 100% identical. So when there is for example a different color or a different size, there will also be a different number.
Before an Ikea kitchen can be assembled and installed, there will be an awful lot of sorting, organizing, inventory and allocating with those parts. My own kitchen included no less than 80 different types of products (288 parts altogether, but 80 different 8-digit-numbers). Focusing on the 8-digit numbers helped me a lot to stay on top of things. At some point, I figured that we could ignore the first three digits and give the items nicknames, based on only the last 5 digits, because at least in our case they were all unique.
Inventory of parts
[edit | edit source]
Inventory on delivery is typically stressful, because the delivery people understandably want to finish their job and to get a signature as fast as they can. We had a small number of pieces missing in a delivery once, and even though we had confirmed a complete delivery by our signature, we didn't find it a problem to complain subsequently. Ikea proved to be rather accommodating, they sent us the missing parts with a later delivery with neither a fuss nor a charge.
But meticulous inventory is crucial and has to be done at some point. I did it multiple times and used the opportunity, too, to organize the items in a way that I would later, during assembly and installation, find them easily. One good criteria for organization, beyond the 8-digit numbers, is the Ikea name ("Sektion", "Utrusta", etc.).
It cannot be stressed enough that the parts need to be stored at a place where they are safe from damage, namely from water. We had just moved to California, and oblivious about the regional hazards, we had put everything in the garage, not expecting torrential rain and sudden heavy water penetration into that space. So we lost a few pieces.
By the way, unpacking on delivery is not advisable. Unpacking will limit your possibilities to return unneeded items and it will add an enormous risk that parts will get lost or untraceable or inidentifyable.
Assembly drawings
[edit | edit source]With no less than 22 cabinets to put together, I found it prudent to prepare us with detailed assembly drawings for each row of cabinets. Those drawings gave exact information about the required cabinet frame, legs, drawers, shelves, doors, hinges, drawer fronts and other components, all identified through their 8-digit number.
I also prepared a detailed pattern for the required cover/filler panels. Our kitchen planner had suggested two white panels, but later we figured that we wouldn't need them. We returned those. The grey panels, too, required some deviation from what we originally had thought. But mapping the panels out saved us definitely avoidable waste of material and allowed us to return one unused grey panel, too.
-
 Assembly plan for one of my rows of cabinets
 -
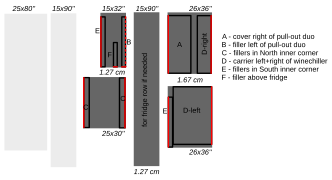 Plan for the use of filler panels in my kitchen

.svg)
Floor marking
[edit | edit source]

Since we had decided to install our cabinets first and to lay the tiles later, we had the great opportunity to draft our kitchen floor plan (cabinet frames only) directly on the floor. The floor was concrete and I could use a Sharpie pen. If there would have been tiles already, I would have used masking tape.
If you are planning complicated things like a peninsula, this in-situ mapping can be both extremely helpful and quite a challenge, because often a space is not 100% rectangular, and then an executive decision may have to be made between pest and cholera: is it more important to you to set up your rows of cabinets in an impeccable right angle or do you rather want to perfectly align them with the walls? At the end, the difference won't even be noticeable, probably, but floor marking is clearly the time for decision making.