
Guitar/Forming the D chord

This page is currently being translated from Germans Wikibooks into English. • Expect some errors and inconsistencies. •Images has to be repainted. The German fingering ZMRK = imrp (Z = Index, K = small Finger = pinKy •Some German words in pictures has to be translated. • Assisted the translator because he is not a native speaker. Feel free to correct mistakes and style. • The Wikitorians among you may help me with the peculiarities of English Wikibooks. (how do you handle things, what are your preferd templates...). •delete {:Guitar/under construction - in translation}if you think the translation is largely error-free and good enough.• Be patient. The translation of the finished German lesson (links in the navigation) will take time. |
Basic information about playing chords
[edit | edit source]There is more than one way to form the chords, set the fingerings and determine the tones. Here I will introduce you to a method that is particularly suitable for simple chords in song accompaniment. The goal is to be able to grip all the handles comfortably and with little effort. A position that is as natural as possible makes your fingers more flexible and prevents cramps. Pay attention to the way you finger chords in future lessons. Based on experience, the mistakes shown in this lesson are often corrected in the first month or so.
Position of the thumb
[edit | edit source]For simple chords, the thumb is opposite the middle finger, approximately at the height shown. In practical terms, this means that your thumb always begins behind the second fret. This makes it easier for fingerings that extend over three frets to get the index finger into the first fret, the middle finger into the second fret and the ring finger into the third (see C major chord in the 3rd lesson). If the thumb is too far towards the head, you can no longer reach the 3rd fret with your ring finger and little finger. However, if the thumb is too far towards the sound hole, the index finger tends to slip from the first to the second fret.
The left hand only touches the fingerboard at two points, so the palm remains mobile.


- The first three chords D, A and G


The main job of the thumb is to keep the hand from falling. This may sound obvious, but many beginners use their thumb like a vise to create counter pressure against their fingers. This works, but the thumb is actually too weak and tires quickly. Then your hand cramps and playing is no longer fun.
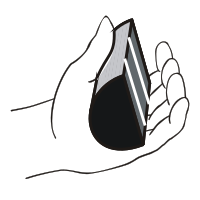
The solution? The pressure on the strings is not created by the thumb, but by the pull of the arm; almost like you want to open a drawer:


- In the photos, pay attention to how much space is between the palm and the fingerboard.


In this position the wrist is not (or only slightly) bent. Without going into too much detail about the anatomy of the hand, you should know that the tendons of your fingers are held together by ligaments at the wrist. If the hand is bent, the tendons of the fingers rub against these ligaments. In the short term this isn't a big problem, but in the long run it can lead to inflammation, which could be avoided if you don't bend the wrist unnecessarily.
By the way, the counter pressure is created with the elbows of the playing hand by pressing the guitar body a little bit and thus pushing the fingerboard slightly forward. The fretting hand only needs to pull back the fingerboard and thus generate enough force to grasp the chords. It should be clear that you should not rest the elbow of the gripper arm on your stomach, but should hold it loosely at your side; otherwise it will be difficult to pull the fingerboard back.
Any tension or tension in the palm of your hand is a sign that you are tensing more muscles than necessary. Of course, you shouldn't pull on the guitar neck so hard that it changes the tone. Much less force is required for gripping than you think. The goal is to apply as little pressure as possible, but just enough so that the strings don't buzz. If the hand does not tense up, the fingers will become much looser and therefore faster for changing grips (and later for solo playing).
| Tip:
|
(something you can demonstrate in class.)
However, you don't hook your fingers like in the Bavarian sport, but you only touch each other with one or more fingertips.
Learn that the power to grasp comes from the forearm and not the thumb.[1] |
|---|

Many students find it hard to believe that they have more than enough finger strength to play the chords cleanly, and that the main problem is the unfamiliar position of the fingers.
Exercise
[edit | edit source]Even if you can hardly do without your thumb when changing grips (just because of the orientation), it is a good exercise to try out playing the first grips without your thumb.
To practice, first finger the chord with your thumb, as usual. But then, when the chord sounds good, you take your thumb away while playing. The chord should sound full and flawless even without the thumb. Of course, the next time you change chords, the thumb is added again.
- Goal of this exercise
Getting a clean fingering and realizing that the thumb doesn't have to build up a lot of pressure to make the chord sound. If you realize that the chord also sounds without the thumb, you can do without a "clamp grip". The fingers find their position even without cramped gripping. Without a thumb, they may need to adopt a different posture to achieve their goal. These positions are often more comfortable or open up new posture options for the guitarist that he would never have thought of with his thumb. Unfortunately, a tense posture already works somehow, so you don't think that there is an easier way.
It takes a bit of practice to figure out how much pressure is needed to push a string down. At first you almost always push too hard.
| Tip:
|
Sometimes it helps to place two more fingers between the fretboard and the guitar student's fretting hand. He then also has to reach around the guitar teacher's fingers to put his fingers on.
Many people initially can't believe that they have more room with their fingers than they thought. With most holds you still have a lot of air and can still get everywhere. But first you have to get to know the unusual position. |
|---|
Of course, the fingering shown here is not the only possible one. Later (on the Rock Diploma) you will learn additional fingering techniques for the barre chords, where you place your thumb a little lower and apply a little more counter pressure than with the simple chords. You also like to hold your thumb a little lower when plucking and playing solo because it gives you more flexibility. But we'll save that until then. Teachers who first teach classical guitar, including reading music, often frown upon placing the thumb in the upper neck area. But a high thumb base is only really unfavorable if it impairs the reach of the fingers (especially the 4th finger). For the first few simple chords, you can choose the convenient way that you can always fall back on when you want to relax your fingers a little after a strenuous solo.
Further information
[edit | edit source]Template:Vorlage:Navigation Vertiefung

Where to put your fingers?
[edit | edit source]If you experiment a little, you will notice that the strings buzz every now and then. The fingers apply enough pressure, but they are too close or too far away from the waistband.

If a finger is too far away from the fret, there will not be enough pressure to push the string all the way onto the fret. The string then does not rest properly on the fret and buzzes. A common reason for this error: the thumb is too far towards the bridge and no longer above the second fret. The ring finger in particular no longer reaches the third fret. Try to remember this when you have trouble reaching the third fret with your ring finger on the C major chord.

The optimal position is just before the fret. So, if possible, try to keep your fingers in the last third of the band. You won't always be able to do this because you still need space for the other fingers (you'll notice this at the latest when you play the A major chord...). Still, try to get as close to the frets as possible.

Of course, you can't be 'tooc close to the fret, otherwise you'll accidentally push the string onto the fret after that. A common reason for this error: the thumb is not over the second fret, but rather in the third (see above).
- By the way
- The name "fret" (waistband) comes from the fact that in the past you actually "tied" a cord, wire or something similar around the fretboard to mark the correct distances.
Don't stall strings
[edit | edit source]Don't worry if everything doesn't work out right away. During the first few exercises it can sound a little off (if you don't make any serious mistakes), and you can ignore that. Experience has shown that such errors disappear after a few lessons.

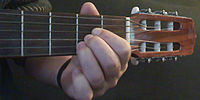
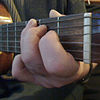
From the beginning, try to touch the strings of the guitar only with your fingertips (as in the first illustration). The finger lies like a hammer on the string. The second illustration shows the finger "choking off" the adjacent string. In addition, such a posture damages the finger joints. To protect your joints, you should avoid flexing your fingers if possible.
Look again at the photos of the handles. The fingers do not come vertically from below, but rather at a slight angle from the bottom left (as seen from the guitarist). This creates a little more space to the neighboring string.
Avoid spreading your fingers unnecessarily
[edit | edit source]
Try to keep your fingers straight as much as possible. This means: keep your fingers closed as much as possible when gripping.

Any spread of the fingers leads to cramps, which are avoidable.
The first chord for the first song
[edit | edit source]You can reach most positions on the fretboard by simply stretching and bending your fingers.
| rather like this: | as such: |
 |

|
Most chords can be played comfortably. As described above, the palm of the hand should remain movable and not stick to the neck of the guitar.
 |
By the way, you can see here how to draw finger pictures, namely on the head! Just like you see when you look at your fingers from above. |
- ↑ This finger hook exercise is intended as a demonstration rather than strength training.