Guitar/Campfire strumming pattern

This page is currently being translated from Germans Wikibooks into English. • Expect some errors and inconsistencies. •Images has to be repainted. The German fingering ZMRK = imrp (Z = Index, K = small Finger = pinKy •Some German words in pictures has to be translated. • Assisted the translator because he is not a native speaker. Feel free to correct mistakes and style. • The Wikitorians among you may help me with the peculiarities of English Wikibooks. (how do you handle things, what are your preferd templates...). •delete {:Guitar/under construction - in translation}if you think the translation is largely error-free and good enough.• Be patient. The translation of the finished German lesson (links in the navigation) will take time. |
Original page translated by Google
The campfire strumming pattern
[edit | edit source]With the “Western strumming” we had a good preliminary exercise for the “campfire strumming”, because the first half of the “Western strumming” is the same as the first half of the “campfire strumming”:
|
|
|
The second half of the campfire strumming takes a little getting used to. The "3" is not played! Instead, an air stroke is played (as if you were deliberately missing the 3). This means that two "ands" or two upbeats follow one another:
![]()
![]()
![]()
![]()
![]()
![]()
![]()
![]()
![]()
![]()
![]()
![]()
![]()
![]()
![]()
![]()
![]()
![]()
![]()
![]()
It is absolutely important that the upstrokes and downstrokes of the hand are executed evenly, because experience shows that two consecutive upstrokes tempt you to execute these two strokes too quickly.
![]()
![]()
![]()
![]()
![]()
![]()
![]()
![]()
![]()
![]()
![]()
![]()
![]()
![]()
![]()
![]()
![]()
![]()
This leads to an improper rhythm and a wrong beat. This mistake should be avoided at all costs. Inaccurately played chords, poorly executed downstrokes, even wrong chords, you can tolerate all of this at first and even overlook it, because it all goes away with enough practice. But if a beat is not right, i.e. if it is a little shorter or longer than it should be, then you will throw everyone singing along out of time.
- Tip
The best way to counteract the unwanted "beat shortening" is to make your arm movements quite wide. It helps to raise and lower your hand at least as far as the guitar is wide when you strike. If you manage to perform this somewhat exaggeratedly wide movement fairly evenly, you will get the right rhythm pretty quickly. As soon as the rhythm is right, you can make more subtle beat movements again.
It is worth practicing the second half of the campfire beat in isolation for a while first. The first half of the stroke has already been practiced with the Western stroke.
- | - + 4 - | - + 4 - | - + 4 - | - + 4 - |
The tip with the tap
[edit | edit source]Use your foot to help you and tap the beat. The striking hand and the foot move in parallel. Just imagine that your hand is connected to your foot with a thread (like a marionette). Each tap is a number and every time you lift your foot you get an “and”. The arm hits down parallel to each tap, and every time you lift your foot the arm also goes up. The rhythm is created by the strings sometimes being touched and sometimes not being touched during the up and down strokes. Even the head can easily follow this movement.
And at least when you practice, the rhythm is counted loudly and clearly.
“One – two and – and four” – “One – two and – and four”
- When you do the campfire beat, it looks like this

- Tip
If you accompany a group with the guitar, the striking arm can sometimes replace a conductor’s baton. Therefore, you don't need to be afraid if you make the movements a little too clearly at first. Just imagine that you are conducting a choir with your percussion hand at the same time.
When do you use which strumming pattern?
[edit | edit source]The 4/4 beat is a very simple beat that is reminiscent of a simple marching tempo. The western strumming pattern can almost always be used where the 4/4 beat or the campfire beat is also suitable. It is very reminiscent of country and western songs (hence the nickname). If you have songs in which chords are changed often and quickly one after the other, beginners have a little less trouble changing the chord in the middle of the bar than with the campfire strumming pattern. You change at the "1" and at the "3".
Now, to practice, you have to practice the songs with the beats suggested here. Later, your own taste will decide which strumming pattern you prefer. At the moment you only know four strumming patterns, but that will change sooner or later.
There is no set rule as to which strumming pattern to use, as long as the beat is right. There are a number of beat patterns that are suitable for certain styles of music. And there are countless variations of each beat pattern. It is even quite common to use several beat patterns or variations of a basic pattern in one and the same song. You can choose the beat pattern based on the original, but you don't have to. It is enough if the beat pattern only half fits the piece. Even the original performers vary their beat patterns from performance to performance.
Over time, you should learn a handful of beat patterns and learn how to vary them a little until you find a version that suits your taste, or even very close to the original. Later on, you should be able to accompany a song with very different beats, as long as the beat is right. Just try out which beat you like. What you play sometimes depends on your own mood. As already mentioned, there are no set rules for choosing a beat pattern and it doesn't always have to sound exactly like the original!
Audio example
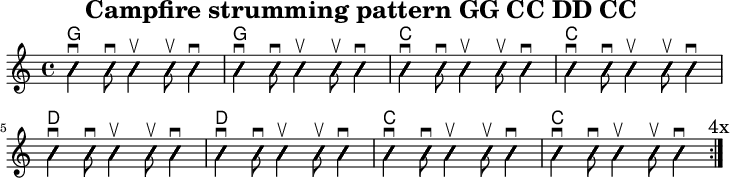
[edit | edit source]- Campfire beat with GG CC DD CC and G C D C
- One chord for two bars
- One chord per bar

You can also practice the campfire strumming pattern with the old chords as repetition.

- Try it with * The Lion Sleeps Tonight()"
Interesting side note
[edit | edit source]"Campfire beat" is a somewhat imprecise term for the rhythm. In Spanish, our campfire beat is called "quintillo", which means "five beats". It is the traditional rhythm for the Latin American dance "merengue".
The campfire beat has a special feature. In hardly any other beat pattern is the "1" emphasized as well as in this beat pattern. Even if the singer has lost the thread, he can quickly find the "1" again with the campfire beat. This is not so easy with other beat patterns.
Take a look at the beat pattern without bar lines. You can find the single "1" relatively easily. Your hearing feels the same way when it hears the campfire beat. The ear also finds the single "1" quite quickly. This is why the campfire beat is very well suited to accompany a group while they sing.
![]()
![]()
![]()
![]()
![]()
![]()
![]()
![]()
![]()
![]()
![]()
![]()
![]()
![]()
![]()
![]()
![]()
![]()
![]()
![]()
![]()
![]()
![]()
![]()
![]()
![]()
![]()
![]()
![]()
![]()
![]()
![]()
![]()
![]()
![]()
![]()
![]()
![]()
![]()
![]()