Guitar/Print Version
Note: A current version of this book can be found at Guitar
The guitar is a very popular stringed musical instrument. This book is mainly concerned with standard six-stringed acoustic or electric guitars; twelve string guitars are also applicable in most cases. It is definitely not necessary to understand music theory to read this book, although it can yield a deeper understanding of the principles contained herein.
The purpose of this book is to introduce novice and intermediate players to the basic concepts of good guitar playing. Important techniques are given their own section, and exercises and examples are provided whenever they can. When you have finished reading this book, you should have a good understanding of the fundamentals of guitar, and be on the right track towards mastering the instrument.
Table of Contents

Getting Started
- Different Types of Guitars
- Anatomy of a Guitar
- Buying a Guitar
- Buying an Amplifier
- Setting up the Guitar
- Tablature
- Lead Guitar and Rhythm Guitar
Playing the Guitar
For Beginners
Lead Guitar
- Picking and Plucking
- Scales
- Arpeggios and Sweep Picking
- Slides
- Hammer-ons, Pull-offs, and Trills
- Bending and Vibrato
- Harmonics
- Tremolo Bar Techniques
- Tapping
Rhythm Guitar
Playing Styles
General Guitar Theory
- Tone and Volume
- Writing Songs
- Playing With Others
- Recording Music
- Tuning Your Ear
- Harmonica and Guitar Combo
Equipment
Maintenance
Appendices
Authors
Getting Started
Different Types of Guitars
Playing different guitars in a music shop is a great way of familiarising yourself with each model's unique qualities but don't forget to take off any objects that could scratch the guitar. A music salesman will let you try as many guitars as you like but may not be too happy about the little scratch your coat button left. Your choice of guitar will usually be based on the type of music you wish to play and the aesthetic appeal of the colour and design.
Acoustic Guitars

There are two types of acoustic guitar: namely, the steel-string acoustic guitar and the classical guitar. Steel-string acoustic guitars produce a metallic sound that is a distinctive component of a wide range of popular genres. Steel-string acoustic guitars are sometimes referred to as flat tops. The word top refers to the face or front of the guitar, which is also called the table. Classical guitars have a wider neck than steel-string guitars and are strung with nylon strings. They are primarily associated with the playing of the solo classical guitar repertoire. Classical guitars are sometimes referred to as Spanish guitars in recognition of their country of origin.
The acoustic guitar lends itself to a variety of tasks and roles. Its portability and ease of use make it the ideal songwriter's tool. Its gentle harp-like arpeggios and rhythmic chordal strumming has always found favor in an ensemble. The acoustic guitar has a personal and intimate quality that is suited to small halls, churches, and private spaces. For larger venues some form of amplification is required. An acoustic guitar can be amplified by placing a microphone in front of the sound hole or by installing a pickup. There are many entry-level acoustic guitar models that are manufactured to a high standard, and these are entirely suitable as a first guitar for a beginner.
Electric Guitars
Electric guitars are solid-bodied guitars that are designed to be plugged into an amplifier. The electric guitar when amplified produces a sound that is metallic with a lengthy decay. The shape of an electric guitar is not determined by the need for a deep resonating body and this had led to the development of contoured and thin bodied electric guitars. The two most popular designs are the Fender Stratocaster and the Gibson Les Paul.
Electric guitar strings are thinner than acoustic guitar strings and closer to the neck and therefore less force is needed to press them down. The ease with which you can bend strings,
access to the twelfth position, the use of a whammy bar and the manipulation of pots and switches whilst playing has led to the development of a lead guitar style that is unique to the instrument. Fret-tapping is a guitar technique for creating chords and melody lines that are not possible using the standard technique of left-hand fretting and right-hand strumming. The sustain, sensitive pick-ups, low action and thin strings of the electric guitar make it an ideal instrument for fret-tapping.
Electro-acoustic Guitars
Electro-acoustic guitars are commonly referred to as semi-acoustic guitars. Electro-acoustic guitars have pickups that are specifically designed to reproduce the subtle nuances of the acoustic guitar timbre. Electro-acoustic pickups are designed to sound neutral with little alteration to the acoustic tone. The Ovation range of Electro-acoustic guitars have under-the-saddle piezo pickups and a synthetic bowl-back design. The synthetic bowl-back ensures a tough construction that stands up to the rigours of the road while offering less feedback at high volumes. Ovation were the first company to provide on-board Equalization and this is now a standard feature. The Taylor Electro-acoustic range uses the traditional all-wood construction and the necks of these guitars have a reputation for superb action and playability. Yamaha, Maton and many other companies manufacture Electro-acoustic guitars and the buyer is advised to test as many models and makes as they can while taking note of the unplugged and amplified sound.
Twelve-string Guitars
The twelve-string guitar is a simple variation of the normal six string design. Twelve-string guitars have six regular strings and a second set of thinner strings. Each string of the second set corresponds to the note of its regular string counterpart. The strings form pairs and therefore you play a twelve-string guitar in the same manner as you would a standard six-string.
Twelve-string guitars produce a brighter and more jangly tone than six-string guitars. They are used by guitarists for chord progressions that require thickening. The twelve-string is mainly used as a rhythm instrument due to the extra effort involved in playing lead guitar using paired strings. Twelve-string guitars have twelve tuning pegs and double truss rods and are slightly more expensive than their corresponding six-string version.
Archtop Guitars

The archtop is a hollow or semi-hollow steel-string acoustic or electric guitar. The carved top, combined with violin-style f-holes and internal sound-block, creates a timbre that is acoustic and mellow. These two factors have made archtops a firm favourite with jazz guitarists.
Acoustic and electric archtops are identical in design with the only difference being the addition of electro-magnetic pickups and pots. Archtops can either be full-bodied or thinline. The full-bodied archtop retains good volume and acoustic resonance when played unplugged, though feedback may be an issue when amplified. The thinline body minimizes feedback by sacrificing acoustic volume and resonance.
The archtop is one of the most aesthetically pleasing guitar designs, and makers usually adhere to very high standards of construction and playability. These factors ensure its continuing popularity with guitarists.
Steel Guitars
The steel guitar is unusual in that it is played horizontally across the player's lap. The steel guitar originates from Hawaii where local musicians, newly introduced to the European guitar, developed a style of playing involving alternative tunings and the use of a slide. The Hawaiian guitarists found that by laying the guitar flat across the lap they could better control the slide. In response to this new playing style some Hawaiian steel guitars were constructed with a small rectangular body which made them more suitable for laying across the lap.There are two types of steel guitar played with a steel, the solid metal bar from which the guitar takes its name, namely the lap steel guitar and the pedal steel guitar with its extra necks. The pedal steel guitar comes on its own stand with a mechanical approach similar to the harp. Pedals and knee-levers are used to alter the pitch of the strings whilst playing thereby extending the fluency of the glissandi technique.
Touch Guitars
The first Touch Guitar Invention started in 1959 with the filing of patent #2,989,884 issued in 1961 as the first touch tapping instrument which could be played on two separated necks Simultaneously by muting the strings at the distal end of the neck along with numerous other claims. Until 1974 it was known as the DuoLectar and with a new patent "the "Electronic Mute" has been known as the "Touch Guitar. It is held in the normal way over the shoulder and design with the left hand playing the lower bass neck in a traditional way and the right hand playing over the top on a neck which has a wider string spacing allowing the hand to be used in both vertical and horizontal angles to the strings. It is absolutely off at all times, until Touched or picked.
Resonator Guitars
Resonator guitars are distinctive for not having a regular sound hole instead they have a large circular perforated cover plate which conceals a resonator cone. The cone is made from spun aluminum and resembles a loudspeaker. The bridge is connected to either the center or edge of the cone by an aluminum spring called the spider. The vibrations from the spider are projected by the cone through the perforated cover plate. The most common resonator guitars have a single cone although the original model patented in 1927 by John Dopyera had three and was called a tricone resophonic guitar. Resonator guitars are loud and bright. They are popular with blues and country guitarists and can be played with a slide or conventionally.
Some resonator guitars possess metal bodies and these are called steel guitars. This can lead to some confusion with the Hawaiian guitar of the same name. They are two distinct instruments. The Hawaiian steel guitar takes its name from the steel bar used to create the glissandi and the Resonator steel guitar refers to the material used for the construction of the body.
Bass Guitars
The bass guitar has a long neck (scale-length) and thick strings. The open strings of the bass guitar corresponds to the four lowest strings of the guitar and are pitched an octave lower. The standard bass has four strings though five and six string basses are available which extends the range of the instrument. Because the bass guitar is the bass instrument of the guitar family and the double-bass is the bass instrument of the orchestral string family, their similar roles have drawn bass players to both instruments.
Double-neck Guitars
The double-neck guitar is designed so that two guitar necks can share one body. This design allows the guitarist to switch between either neck with ease. The double-neck guitar will normally have a standard six-string neck and a twelve-string neck. Other combinations, such as a six-string neck and a fretless neck, are available. The double-neck guitar may be used in live situations when a guitarist needs a twelve-string guitar for the rhythm part and a six-string guitar for the solo break.
Anatomy of a Guitar
This chapter presents an overview of the different parts most commonly found on the three main types of guitar.
Overview of Components


| 1 Head |
| 2 Nut |
| 3 Tuning pegs |
| 4 Frets |
| 5 Truss rod |
| 6 Inlays |
| 7 Neck |
| 8 Neck joint/Heel |
| 9 Body |
| 10 Pickups |
| 11 Pots |
| 12 Bridge |
| 13 Pick guard |
| 14 Back |
| 15 Sound board |
| 16 Sides |
| 17 Sound hole |
| 18 Strings |
| 19 Saddle |
| 20 Fretboard |
On Acoustics and Electrics
Body
The body of a guitar consists of a treble or upper bout (the half of the guitar closest to the neck), the bass or lower bout (the wider half of the guitar), and the waist bout (the narrow section between the treble and bass bouts).
The body is one of the most important factors in shaping the overall tone of a guitar. It provides the resonance that shapes the tonal qualities. It determines the volume of acoustic guitars and affects the sustain of electric guitars.
Resonance is affected by:
- the types of wood used
- whether the body is made from layered woods (ply) or single pieces
- whether the body is hollow or solid
- the shape and size of the body
The woods listed below are used in the construction of both acoustic and electric guitars.
Tone wood
- Agathis (also known as Commercial Grade Mahogany or Poor Man's Mahogany) is a tropical pine commonly found throughout south-east Asia. It is a plantation-wood used mainly for building cabinets. Agathis is cheap and usually used in the construction of budget guitars. Its tone is similar to mahogany but more bland sounding with a less complex response.
- Alder is a lightweight wood that provides a clean balanced tonal response and good resonance. Its soft and tight porous structure is similar to basswood but with a bolder hard grain pattern that adds to the stiffness making it more robust. Alder has a medium light tan color and provides a balanced tone across the frequency range with a slight upper mid-range producing a clean sound. Its resonance provides a good dynamic range.
- Ash has an open grain pattern which requires a lot of lacquer to seal and this can have a marked affect on the length of the sustain. Ash is typically used in mid-range priced guitars. Ash offers two varieties for guitar construction and they differ in tone:
- (1) Northern hard ash (also known as Baseball Bat Ash) is hard, heavy and dense. This gives it a bright tone and long sustain.
- (2) Swamp Ash (also known as Southern Soft Ash) comes from swamps in the Southern USA. Swamp Ash grows underwater which makes the wood lightweight and porous. Many Fender guitars from the 1950s were built with Swamp Ash. It has hard grain lines between its softer layers and a creamy light tan color with bold darker grain patterns. Its tonal qualities are a balance between brightness, warmth and dynamic range with clear bell-like highs, slightly scooped mids and strong lows. Swamp Ash has good resonance across the whole frequency spectrum and therefore can sound quite complex.
- Basswood is a lightweight (lighter than Alder) close-grained wood with a consistent and tight grain pattern. Its very soft with light colors that range from almost white to medium tan. It requires a hard finish, such as polyester, for protection and good engineering to allow the screws and screw-holes to hold the parts. The installation of a tremolo system on such a softwood also means the body needs to be thicker to prevent cracking. Tonally, basswood has a warm soft tone which attenuates both the high and extreme low frequencies. It also creates a pronounced midrange fundamental frequency response and a reduced smoother high-end response. The tonal response compared with other softwoods such as ash and alder is less complex with a narrower dynamic range. Basswood doesn't excel in clean sounds though when coupled with distortion and overdriven amplifier produces a metal-lead sound much favoured by some rock guitarists. It is used in the construction of budget guitars and expensive guitars.
- Cedar became popular in the mid-twentieth century after master luthier Jose Ramirez III of Madrid pioneered the use of red cedar as a substitute for the increasingly scarce European spruce. It is now considered one of the world's premier tone woods.
- Mahogany is a highly dense, heavy wood with a fine, open grain and large pores. The color is reddish brown. Tonally, it provides good low frequencies, a compressed mid-range and smooth sounding highs. Overall, its tone is mellow, soft and warm with a full and thick quality. Its density provides excellent sustain and also makes it less susceptible to dents and scratches. Its density and weight have led some manufacturers to experiment with a thinner body as seen on the Ibanez S series.
- Nato (also known as Eastern Mahogany) is a native wood from the Caribbean and South America. Nato is not a mahogany though its appearance and tonal similarities to mahogany has led to it being used on guitars as a mahogany substitute. It is also a commercial grade wood used in cabinet building. It has a bright tone with pronounced midrange but lacks in sensitivity and punch compared with mahogany. Nato is used by the manufacturer B.C. Rich for their Assassin range.
.jpg)
- Maple is used for the backs and sides of more expensive acoustics like the J200 series by Gibson. Though not generally used as a table for flat-topped instruments; it is the wood of choice for arched top guitars, mandolins, and the violin family of instruments. Its usually white in color with tight pores and thin grain lines. There are two main types of American maple:
- (1) Eastern Hard Maple (also known as Hard Rock Maple or Sugar Maple and usually associated with maple syrup) is an excellent tonewood. As named, it is very hard and dense with a medium weight which makes it difficult to work and therefore it is usually reserved for necks. When used for the body, it provides a bright sound with very strong highs and upper mid-range but quieter bass frequencies. Overall, hard maple has a very long sustain. Eastern hard maple can exhibit a figure (grain pattern) called the bird's eye whose aesthetic appeal has led to it being used for guitar tops and backs usually bookmatched.
- (2) Western Soft Maple (also known as Big Leaf Maple) is much lighter in weight than Hard Maple. It has a bright tone with good bite and attack though not as brittle as hard maple. Its tonal qualities produce singing highs with a tight low-end. This kind of maple is often seen with a figure called flame or curl and less commonly a figure called quilt.
- Rosewood is used for the backs and sides of acoustics and also for fingerboards. It possesses an extremely high density which makes for an acoustically reflective tone wood. Its color is dark brown with reddish, purple or orange streaks running through it. There are many varieties of rosewood that are suitable for guitar construction.
- Poplar is a wood used by manufacturers of budget guitars most notably Danelectro who use masonite (top and back) glued to a poplar frame (sides). Its a closed grain wood with a greyish-green color and similar to alder in weight and tone. Due to the resurgence of interest in budget guitars from the 1950s onwards some modern reissues that use poplar are relatively expensive.
- European Spruce is a premium tonewood used in the design of many stringed instruments including the violin, viola and lute. Increasing scarcity has resulted in the use of substitutes such as the North American species of spruce and red cedar.
- Walnut is a medium hard wood with a strong grain pattern. Its body has a constant density. Walnut is harder, heavier and more dense than mahogany and therefore closer to maple. Tonally, it is warmer than maple with a solid low-end. The mid-range is relatively complex and the high-end is smooth and bright. Due to its density it provides good sustain.
Body top
Some electric guitars have an extra top added to the body to blend the tonal qualities of different types of wood together. Maple with figuring is a popular top and produces a pronounced look and tone (adds brightness). Body tops are not used on acoustics since the layering of two pieces of wood for the table would inhibit the resonance and dull the tone.
Bridge

The bridge is found on the lower bout of the body and forms one one end of the vibrating length of the strings, the other end being the nut, which is located at the end of the fretboard. On most electric guitars, the height of the bridge is adjustable by screws, allowing the guitars action – distance that the strings sit above the frets – to be raised or lowered. On most electrics, the horizontal position of the bridge saddles is also screw-adjustable, allowing the guitar's intonation to be set by the user. These adjustments are discussed further in the Adjusting the Guitar section.
Depending on the guitar, the strings may terminate at the bridge or just pass over it.
The bridge of an acoustic consists of two parts: a saddle and the tie block. Saddles are either a piece of plastic or polished bone. Acoustic guitar saddles are made with a smooth top edge (no notches) and the base of the saddle is seated in a groove cut into the tie block. The wood tie block of a classical guitar is glued to the lower bout and acts as a string terminator. A classical guitar string is pushed through the hole in the tie block and the string is then brought back under itself three or four times and pulled tight to form a knot. Once the saddle is seated in the groove of the tie block the tension of the strings clamp it.
Steel string acoustics also have a saddle and tie block though due to the strings having terminating end balls there is no need to knot. The ball end of the string is thrust into a vertical hole in the tie block and secured with a pin. The position and height of the saddle and tie block on acoustics are set by the manufacturer, and usually do not require user adjustment. Adjustments to the height of the acoustic saddle are possible by shaving (lowering) the saddle though this job is best left to a luthier since if too much is taken off, a new saddle will required unless one resorts to the temporizing measure of shims.
The design of bridges varies between manufacturers and the above generic descriptions may not apply to some guitars.
Fretboard and Frets
The fretboard is a piece of wood that is glued to the front of the neck. These are commonly made of rosewood though other hard woods such as ebony may also be used. Embedded in the fretboard are a number of metal frets (fret-wire) usually numbering twenty one to twenty-four. Strings are pressed down behind a fret which changes the length that is left free to vibrate thereby producing a different note. A simple demonstration is to be found on the twelfth fret. On all guitars this is the fret that divides the string exactly in half and produces a note an octave higher than the open note. Any open string that maintains its original tension and is halved produces its octave. This applies to all stringed instruments including the piano and violin.
There are a variety of fret designs. Jumbo frets are higher and wider than normal frets and require less fretboard contact to sound a clear note. Medium frets are closer to the board and must be firmly in contact with the fretboard to sound a clear note. Some guitarist prefer jumbo frets due to the ease with which you can bend strings and the faster play offered by less fretboard contact. As with many design elements of the guitar this is a subjective area that is more personal preference rather than advantage. Good technique is not dependent on fret size
The first fret is the one nearest the nut. Some manufacturers place a zero fret immediately after the nut and the strings sit on the zero fret. This brings the sound of the open strings nearer to the quality of a fretted note.
A fretboard may have decorative inlays at the 3rd, 5th, 7th, 9th and 12th frets which serve as markers for the positions of the guitar. Fretboard inlays can be highly decorative or simple shapes and on expensive guitars may be made from exotic material like mother of pearl or abalone.
Head

The headstock lies at the end of the guitar's neck. The purpose of the headstock is to support the tuners, which terminates the strings of the instrument. The tuners are attached to tuning pegs and this allows the guitarist to lower or raise the pitch of the string. A secondary purpose of the headstock is identification and many guitar manufacturers choose to use a distinctive headstock shape often in combination with the name of the model and a trademark logo. On some guitars the model name and trademark logo may be created using inlaid materials though decals are also commonly used.
Neck
The neck can be a single piece of wood or several pieces glued together and cut to shape. The fretboard is a separate piece of wood that is attached to the neck. Necks can be glued to the body (set neck) or bolted on. Set necks are usually found on acoustic guitars and many other instruments including the violin, lute and cello. The bolt-on neck is a design feature more commonly associated with electric guitars. Most necks are wood though alternative materials such as carbon fibre composites have been used.
Nuts
All strings pass through a nut at the headstock end of the fretboard. Its function is to maintain correct string spacing and alignment so that the strings feed into their respective tuning pegs. On acoustic guitars the nut and saddle are usually made of the same material. Electric guitars commonly use plastic or synthetic nuts though sometimes metal is used. As tremolo bars can cause tuning problems, guitars equipped with them usually have some manner of locking nut, where the strings are clamped down.
Tip: Some guitarists lubricate the nut grooves so that the strings move more smoothly. You can do this at home with a soft graphite pencil. There's no need for excessive marking with the pencil just a few swipes through the groove should deposit enough graphite.
Pick Guard
.jpg)
Guitars, in common with all wood instruments, are prone to dents, scratches and wear. A pick guard (also known as a scratch plate) protects the body of the guitar at the point of most contact. Some electric guitars have raised pick guards so your pick is directed out and away from the pots and strings. Pick guards sometimes need replacing due to wear or damage. In the case of an expensive or rare guitar, which may have a tortoise shell pick guard, the guitar will have to be sent to an experienced luthier.
Sound Hole
Sound holes are found on all acoustics. Their purpose is to allow the air pressure to stay equalized so that the soundboard can vibrate. Archtop guitars have f-shaped sound holes - a design feature they share with the violin, viola, cello and double bass. Round sound holes usually have a decorated edge based on a geometrical design known as a rosette. On modern guitars these decorations are machine-made though some luthiers of expensive guitars still use the traditional method of laying by hand small pieces of exotic material like mother of pearl.
Truss Rod
Steel-strung guitars, whether acoustic or electric, have a metal truss rod that runs the length of the neck under the fretboard. Strengthening the neck with a truss rod counteracts the tension exerted by the strings and allows the curvature of the neck to be adjusted. Classical guitars do not require a truss rod due to the lower tension of nylon strings. Some less expensive steel-string acoustics do not have a truss rod. Adjusting the truss rod can have a marked impact on the tuning and playability of a guitar.
Truss rod adjustments should be performed with great care as it is possible to damage the neck or the truss rod. Overtightening is especially to be avoided because if the truss rod snaps or its threads strip, a very involved repair job will be necessitated. For this reason, the truss rod nut should only be tightened one quarter turn at a time. It should then be left alone for a day so the neck has time to assume the new shape. If further adjustment is necessary, repeat the process – a quarter turn, max. If one is not mechanically inclined, truss rod adjustment should be deferred to someone who is, including perhaps a guitar repair-person.
Tuning Pegs
The strings are tensioned by means of tuning pegs, also known as tuners, tuning machines, or machine heads. A high gear ratio gives smoother, easier tuning but is not essential. A guitar can be tuned successfully even with fairly cheap tuners. Most guitar tuning problems originate in other areas, especially string sticking in the nut slots, and dirty or worn strings.
Due to the tension of the strings and the constant turning of the pegs the screws that secure the tuners to the headstock may loosen. It is recommended that you check that they are screwed in tightly though avoid over-tightening which may cause alignment problems or damage the screw head or the wood.
Electric Guitar
Pickup

A pickup is a magnet wrapped in a coil of wire. When a string is plucked the vibration of the string causes the magnetic flux to vary, inducing a voltage in the coil. This is then amplified and played through a speaker.
Humbucking pickups use two coils having opposite polarity, placed in magnetic fields of opposite direction. The result is that the signal from the strings is doubled, while electromagnetic noise from other sources is cancelled. Thus humbucking pickups, or "humbuckers", have less hum and other objectionable noise pickup than single-coil pickups. However, having two coils in series, their inductance is generally higher, which decreases their high-frequency response so they sound less bright than single-coils. Humbuckers are also less able to reproduce very high harmonic frequencies of the string because their magnetic field is less localised than the field of a single coil pickup.
Active pickups are pickups with a built in preamplifier. This can reduce noise pickup and reduce signal losses in the guitar cord. Against these advantages must be weighed cost and the fact that a power source must be provided for the preamplifier. The power source can be a 9 volt battery on the guitar, or "phantom power" piped in via the guitar cord.
Passive single coils are the standard pickup for Fender Stratocasters. They have a bright and twangy clean sound but traditionally have a relatively low output voltge. They are susceptible to noise pickup from transformers – including the transformer in your amp –, neon signs, and other AC electrical equipment. This may or may not be a critical problem, depending on your physical location, and on whether you use a clean sound or a sound with a lot of amplifier compression/distortion which will make electromagnetic noise pickup more noticeable and more of a problem. Some single coils, such as the P-90, are larger than regular single coils, and thus warmer than a standard single coil. However they still retain more of a single coil sound and still can pick-up background hum. Another single coil design is the Lipstick, commonly found on Danelectro Guitars, where the entire pickup is placed in a metal enclosure with a small gap left between the two metal halves. Lipstick pickups tend to be bright sounding and the metal case results in some reduction of hum. Active single-coils can have higher output and enhanced sensitivity.
Humbuckers provide a warm and fat sound. They typically have a higher output voltage than single-coils which suits them to overdriving an amplifier so as to create a heavy sound with lots of sustain and distortion. Some humbuckers allow coil tap (using only one of the coils) or parallel connection which provides a sound similar to a single coil.
Pickups of every type are found in all genres of music, although single-coils, with their bright, twangy sound are often associated with country; and humbuckers producing thick, warm sounds with the rhythm playing in rock. In heavy metal music, humbuckers are the norm because of the necessity of having a low-noise pickup when the amplifier gain is so high.
Pickup Arrangements
There are many different arrangements for pickups. The most basic is a single pickup near the bridge.
- S + S - the original Telecaster design uses two single coils. Telecasters have a percussive twang with lots of treble. Even when using thick single coils, as found on the Fender Jazzmaster and Gibson Les Paul P90, the tone is more emphasized on the treble side.
- S + S + S - three single coils are standard on Fender Stratocasters and Stratocaster copies.
- H + S + S - used on Stratocasters which are often called Fat Strats to distinguish them from the standard three single coil Stratocaster. The pick-up at the bridge is replaced by a humbucker. A favourite with guitarists who want the clean tone of single coils and the hum-free fat tone of a humbucker.
- H + H - the standard configuration for the Gibson Les Paul. Also known as the Double Fat Strat configuration when mounted on a Stratocaster body.
- H + S + H - found on the Steve Vai signature model by Ibanez and a favourite pickup arrangement for metal guitarists. Stratocasters using this configuration are called Super Strats.
- H + H + H - the standard pickup arrangement for the Gibson Firebird VII, SG Custom and Les Paul
Pickup Selector
Every electric guitar, except those with a single pickup, has a pickup selector. Guitars with two pickups have a three-way switch which allows the guitarist to select either the neck pickup or the bridge pickup. When the switch is in the middle position both pickups are used.
On guitars with three pickups there is usually a five way switch. The positions are:
- neck pickup
- neck-middle
- middle pickup
- middle-bridge
- bridge pickup
Tremolo Bar
A tremolo bar alters the pitch of the strings. Pushing down on the bar lowers the pitch of the strings and pulling up raises the pitch. Rapidly pushing and releasing will produce a modulation in pitch called vibrato. Vibrato is often confused with tremolo, a volume modulation effect found on amplifiers, hence the misnomer tremolo bar. Originally used just for vibrato; the modern improvements in guitar design, amplifiers and effects has allowed guitarists to create a new palette of tremolo bar sound effects like the popular dive bomb.

There are four kinds of tremolo:
- Bigsby tremolo - fitted at the bottom end of the body and with a limited pitch bend on both up and down. These distinctive looking tremolos are normally found on archtop guitars. Because of its limited range, it holds its tuning and is more stable than other non-locking tremolos that allow wider pitch bends.
- Vintage synchronized tremolo - (sometimes called the strat-type tremolo) can only down bend. This type of tremolo is more stable than the floating bridge tremolo though still prone to tuning problems.
- Floating bridge tremolo - this design allows wide bends of a tone or more in either direction though this greatly affects tuning stability. Poorly designed floating bridges on cheap guitars should be avoided since the flexibility of the design demands the highest quality in construction and components to ensure tuning stability.
- Floyd Rose locking tremolo - this design locks the strings therefore ensuring that the original tension of the strings are not affected by the tremolo bar and the strings return to their original tension after use. The locking tremolo makes changing strings and tuning slightly more complicated though once in tune the locking tremolo maintains tuning stability far better than non-locking designs. You still need to check your tuning every time you play since tuning is affected by other factors, such as moving from a cold room to a hot room, and the locking tremolo does not negate these factors.
Pots
Almost all electric guitars have at least two pots (potentiometers) to control the volume and tone. The usual tone control circuit uses the inductance of the pickup's coil in conjunction with an additional capacitor to reduce high frequencies when the pot is turned counterclockwise. Near the minimum position (at about 2 or 3 out of 10) there is usually a noticeable midrange peak or nasality resulting from the capacitor and inductor resonating with each other. This is a distinctive sound not easily achieved with the tone controls of the amplifier alone.
A Fender Stratocaster will typically have one master volume pot and two tone pots for the neck pickup and middle pickup.
Electric Guitar Necks

This section describes the different methods used for attaching the neck to an electric guitar:
Bolt-on neck - the neck is attached to the body with bolts which are held by a mounting plate for increased stability. The mounting plate can make accessing the higher frets difficult so some manufacturers, notably Ibanez, use a hidden plate. The bolt-on neck is a standard design used by Fender.
Set neck - the neck is attached to the body with adhesive. This is the method used on acoustics and rarely is it used for mass-produced electrics. Electric guitars that feature a set neck have to be built to a high standard since once glued on the neck is permanent and cannot be adjusted. Set necks are commonly found on more costly electric guitars. Gibson and Epiphone use set necks which is claimed to have these advantages over a bolt-on neck:
- warmer tone
- more sustain
- better access to higher frets
Thru-body neck - the neck extends the entire length of the body. The strings, fretboard, pickups and bridge are all mounted on the thru-body neck. The ears or wings (the bouts) are attached or glued to the central stick. The wings may be book-matched in order to give a symmetrical appearance.
The thru-body neck is usually found on high-end guitars since the design is not favoured by mass-production manufacturers. It is more common on basses than guitars. The thru-body neck allows easier access to the higher frets because there is no heel and is considered by some guitarists to offer greater sustain.
Buying a Guitar
A new guitar can be purchased for a moderate price. Modern manufacturing techniques coupled with mass production keeps costs low while intonation and playability are preserved by precise machining. Most manufacturers offer a full range of guitars from budget to custom-shop.
Acoustic or Electric
The first decision a buyer has to make is which type of guitar to purchase. After deciding this the buyer should research the models available within their price-range. Research avoids impulse buying and allows an informed decision to be made. It is recommended that a first guitar be bought from a guitar shop. Pawn-brokers and charity shops may offer second-hand guitars but all decisions fall upon the buyer who may not be experienced in spotting flaws or damage. Guitar shops will offer a range of new guitars from established manufacturers and a selection of second-hand guitars without faults. It is important that the buyer not be swayed from their informed choice on the day of purchase. If you know that you want to play electric guitar in a band then this is the correct type of guitar to purchase. It is not uncommon that when faced with a bewildering range of guitars in a shop a buyer may choose to purchase a different type of guitar other than their original choice. If at anytime a doubt arises whilst purchasing it is better to walk away and review your aims and buying options.
Singer-songwriters favour the steel-string acoustic guitar as the standard accompaniment for solo performance. The buyer should be aware that acoustic guitars have no internal pickups for amplification so a microphone must be placed in front of the sound-hole for recording. An electro-acoustic guitar is an acoustic guitar with pickups and a quarter inch jack output which allows the electro-acoustic guitar to be plugged into an amplifier. Note that thin-line guitars are not true acoustics and it is a common error that beginners raise the action in the belief that there is something wrong with their thin-line guitar which despite its obvious acoustic build has buzzing strings and produces a weak volume when played unplugged. Thin-line guitars are electric guitars with a body that imparts an acoustic resonance when amplified.
Testing a guitar

- The height of the strings above the fretboard is called the action. If the action is too low the strings will buzz and if the action is too high more effort is required to push the strings down. Acoustic guitars have their action set by the factory and should not need further adjustment and therefore acoustics with a high action should be avoided since this may be a sign of faulty construction or a warped neck. You can test the action by playing barre chords at different positions. If the barre chords are difficult to play then the action may be set too high.
- Intonation is a term used to describe accurate tuning over the range of the guitar which is three octaves. A guitar with its intonation set correctly ensures that an open C chord played on the first three frets sounds the same as a C barre chord played at the eighth fret. Guitarists use octaves to check intonation by striking an open string then fretting its twelfth fret octave equivalent. The open string and its octave should be in tune together with neither being sharp or flat in relation to the other. On all electric guitars the intonation can be adjusted at home by the player using an electronic guitar tuner but for acoustic guitars any adjustments must be made by a luthier since the nut and bridge need to be adjusted by filing and shaving. Guitar manufacturers ensure that the intonation is set at the factory and a further check is normally made by guitar dealers before a guitar is put on display. A second-hand guitar must be tested for intonation problems as sometimes a warped neck will render accurate intonation impossible though the guitar may sound in tune in the first position. Intonation depends on the straightness of the neck, whether the nut allows correct spacing and seating of the strings, the height of the bridge, and the scale of the frets. Intonation and tuning are two related but different concepts. Setting the intonation is about preparing the guitar so that it can be accurately tuned across its complete range.
- The guitar should be played from its first to last fret on all strings to check for fret buzz and wolf notes. Fret buzz may be present when the truss rod is not properly adjusted or the action has been set too low. Worn fretboards or incorrectly shaped fret-wire can also cause fret buzz. Wolf notes sound dull and lack sustain and in some cases they can affect the tuning stability of a guitar. It is common to find a wolf note on the G string in the first position though they can occur anywhere on the neck where string contact to the fret is impeded or incorrect. The problematic wolf note can be corrected by sending the guitar to a luthier for setting-up and adjustment. The luthier will ask you which make of guitar strings you use and will adjust the guitar for that gauge. The guitar must be restrung every time with that particular string brand and gauge to preserve the set-up. Re-grooving nuts, adjusting necks and permanent bridge alterations are best left to a luthier whose traditional skills coupled with modern tools like the oscilloscope and precision calipers ensures a stable match between the strings and the guitar.
- Look for misaligned screws on electric guitars as these may be a sign of wear or previous adjustments. On acoustic guitars glue spots may point to flaws though in most cases they are just residue that wasn't wiped off the guitar and generally don't affect the tone or playability. Loose switches on electric guitars are common and if dirt has accumulated then the familiar crackling of reduced contact will be heard when a pot or switch is moved. Pots, switches and wiring can be replaced so a good electric guitar with these problems should not be dismissed though the price should reflect the cost of replacing the damaged parts. Look down the sight of the neck to check for a warped neck and to ensure that the guitar strings are all at the same height. The thickness (gauge) of the low E string may not allow it to sit in the nut groove correctly and it may be slightly higher than the other strings. This may be a sign that you need thinner gauge strings or that the guitar needs to be set-up. Run your finger along the neck edges where the fret-wire ends. Fret-wire is tapped into a fretboard and then cut flush with the neck edge. As you run your finger along you should not feel any fret-wire protruding and this is an indication that the manufacturer has ensured a degree of quality control.
- The intonation tuners located on the bridge of most electric guitars should be in a neat staggered row with the high E string intonation tuner nearest to the neck and the low E string intonation tuner furthest away from the neck. If testing a guitar you notice that the intonation tuners are not in a diagonal line from the high E to low E than this is a sign that someone has attempted to adjust the bridge and intonation tuners to set the action and has probably rendered the guitar unplayable. This is not a construction fault and the intonation tuners can be adjusted so that the guitar can be tuned correctly. It is common when you see misaligned intonation tuners that the bridge has also been raised to its highest position. The only time a bridge should be deliberately raised to its highest position is when a guitarist chooses to set-up a guitar permanently for use with a slide.
Buying a guitar that suits your playing style
- Try as many different necks as you can until you find a guitar neck that you feel comfortable with. Gibson favours a flat wide neck and Fender a thinner neck. Some guitarists find that bending strings on a Gibson neck is more stable and precise due to the extra surface while others prefer the thinner neck of a Fender and the ease with which you can bend strings an octave or more. Try different necks until you find one that responds to your playing style.
- The guitar should be comfortable to hold. Some guitarists like the heavier weight of Gibsons while others prefer the thinner and lighter bodies of Stratocasters. More important is the sound characteristics of a guitar. Telecasters are not as comfortable to hold as Stratocasters but many guitarists are drawn to their distinctive sound.
- The majority of new guitars have a medium action either set at the factory or adjusted by the dealer. Lead guitarists sometimes prefer a very low action which sacrifices a small amount of tone for speed and ease. Slide guitarists will raise the action up to a height that renders normal fretting very difficult though this does ensure clarity of tone when using a metal or glass slide with alternative tunings. A medium action is ideal for a beginner as it maintains tuning stability while providing a clear tone.
- Test as many models and price-ranges as you can. You should test guitars in the price range above your budget to familiarise yourself with the differences. Dealers are quite happy to give potential customers a long time to test different guitars without any sales pressure. Note that not all sales assistants are guitarists since a shop that sells both keyboards and guitars may prefer to hire a pianist to demonstrate their keyboard range. In this situation the buyer must rely on their own knowledge.
- Do not be distracted. Testing guitars involves all the mental faculties. It is during these moments that a buyer may make a wrong decision. If at any time during testing you feel as though distractions are affecting your concentration then walk away and refocus.
Where to buy a guitar
- Buying a guitar from a friend or relative who plays is an ideal way to avoid some of the common pitfalls of a first purchase. Relatives and friends may also help you search for a good guitar if they do not have one that they want to sell. It is recommended that the final choice should be made by the purchaser since guidance is never fool-proof.
- A local guitar or music store that has an established reputation. Many guitarists return to the same local shop to buy strings and other extras though a larger dealer should be sought if the range of guitars offered by your local dealer is too small. Second-hand guitars need to tested thoroughly before purchasing. If the buyer is unsure of what faults to look for then a new guitar might be the better option.
Buying an Amplifier
Amplifiers come in a wide variety of designs and your choice of amplifier should be based on the type of music you wish to play. Your local guitar dealer will let you test the different amplifiers they stock though they may only offer a limited range due to space restrictions. Its always a good idea to visit many dealers including pro-audio outlets to test amplifiers across the entire price range before committing yourself. This chapter will explain the difference between a tube amplifier and a solid state amplifier as well as exploring the variations on these two basic designs.
Tube, Solid State and Hybrid Amplifiers
Tube
Tube amplifiers produce a warm and fat tone that is popular with guitarists. New models are available from Marshall, Fender and Vox as well as other manufacturers which range in quality and price. Vintage tube amplifiers from the 1960s and 1970s are available to buy, though maintaining them can be expensive especially with regards to the cost of replacement parts. The continuing popularity of vintage amplifiers from earlier decades has resulted in a market for reissues.

There are three operating modes for tube technology: Class A, Class B and Class AB.
- Pure Class A operates by having a full continuous current flowing through the tubes. The tubes are still fully powered even when there is no signal to divert to the speaker. This makes Pure Class A tubes expensive to run; similar to a car idling in neutral with the throttle pedal right down. Pure Class A responds very fast to an input signal with a tube saturation (distortion) that many guitarists find appealing. Many Pure Class A amplifiers use tubes with a low wattage to offset their inefficient operating mode thereby increasing the tubes lifespan and reducing running costs.
- Class A refers to an output design that doesn't use a Pure Class A single-ended output stage. Class A uses a pair of tubes or multiples terminating in a push-pull output stage.
- Class B is rarely used in guitar amplifiers due to crossover distortion issues so manufacturers instead use a combination of Class A and Class B known as Class AB.
- Class AB operates by using a pair of tubes. Whereas Pure Class A produces the entire waveform, positive and negative, with a single-ended output, Class AB produces the entire waveform using two tubes with one handling the positive voltage and the other the negative voltage. In comparison to Pure Class A, which uses a full continuous current to achieve a three hundred and sixty degree waveform and is always on at full power even when there is no signal present, Class AB uses a smaller amount of constant current to achieve the same always on state for the two tubes. Class AB is thereby more efficient with regards to power consumption and heat dissipation and the operating life of the tubes are greatly extended.
Tube amplifiers:
- A tube is based on vacuum technology and requires more energy than a solid state amplifier with the same wattage.
- Vacuum tubes are expensive and require replacement every one to four years depending on use.
- Amplifiers with tubes are generally heavier than solid state amplifiers due to the need for an output transformer.
- Tube amplifiers are usually more expensive than a solid state amplifier.
- Tubes require a warm-up period before they reach optimum performance.
- Tube amps are more fragile and repair-prone than solid state amps.
Solid state

Solid state amplifiers use transistors instead of tubes. They are popular with beginners due to their affordability and lower weight. Solid state amplifiers have a fast attack time and are immediately available for use when switched on. Solid state circuitry allows more volume to be applied to the output signal before clipping occurs which makes the amplifiers appealing to amateur and professional jazz or acoustic guitarists who may wish to retain a clean sound at high volumes. A solid state amplifier matched with good quality speakers can produce a wide frequency response. Some solid state amplifiers use field effect transistors (FET) on the preamp stage which at high gain produces a distortion similar to a tube amplifier.
Solid state amplifiers retain a tight low end while producing a full harmonic distortion at high gain which is desirable for the metal genre. This has resulted in a range of solid state amplifiers specifically designed for metal guitarists. Solid state amplifiers tend to be smaller and lighter than their equivalent tube amplifiers and these design factors allows manufacturers to build amplifiers weighing less than 10lbs which are capable of 150w clean RMS sound. Root Mean Square refers to continuous output as opposed to Peak measurement which is the wattage of an amplifier measured in a short burst.
Solid state amplifiers:
- A solid state amplifier requires less energy to power than an equivalent tube amplifier.
- Solid state circuitry needs minimum maintenance and there are no tubes to replace.
- Solid state amplifiers are more robust than tube amplifiers.
- Solid state amplifiers are available in an affordable price range.
- A solid state amplifier requires no warm-up.
Hybrid
All amplifiers have a preamp stage which boosts the signal from the guitar before it is sent to the power amplifier stage. Hybrid amplifiers are designed to utilize both tube and solid state technology and are available in the following configurations:
- tube preamp coupled with a solid state power amplifier
- solid state preamp coupled with a tube power amplifier
A tube preamp coupled with a solid state power amplifier outputs a tube tone with a fast attack. A solid state preamp coupled with a tube output provides solid state high gain with the warmth of tubes.
Design variations may include digital modeling, integrated tube/solid state stages or further additional tube or solid state stages in the signal path:
- The Vox Valvetronix signal path starts with solid state effects and preamp which sends the signal to a tube/solid state integrated output stage.
- The Line 6 Spider Valve signal path starts with digital tone processing followed by a tube preamp which sends the signal to a tube power amplifier.
Features
Standard
- Input - accepts a quarter inch mono jack cable
- Power - off and on
- Volume - adjusts the volume
- Speaker - built-in or separate cabinet
Additional
- Gain - the amount of boost applied at the preamp stage
- Overdrive or distortion
- Reverb
- Tone/equalizer - treble and bass tone knobs, sometimes three or more (mid, or low mid and high mid may be added), or graphic equalizer
- Headphone socket - headphones can be used for private practice
- Channel selection - switch between clean and high gain/overdrive (often with a footswitch)
Extra
- Additional inputs - high sensitivity input for use with a low-output pickup and low sensitivity input for use with a high-output pickup
- Modeling - digital emulations of popular amplifiers, speakers and effects
- Onboard effects - built in proprietary effects such as chorus, delay, echo and compression.
- Effect loop - external effects can be plugged into the amplifier
- Line in - the audio signal bypasses the preamp stage and is sent directly to the power amplifier
- Line out - the output from the amplifier can be sent to another power amplifier or mixing desk
- Speaker out - standard on a separate amplifier "head" and when found on a combo amplifier allows a different speaker to be used, or a second speaker. Adding a second speaker can increase the wattage output and volume.
- Foot-switch plug input - an external foot-switch can be plugged in to control overdrive, reverb, solo boost, or another feature.
- Impedance switch (on tube amplifiers only) - change the resistance, measured in ohms, of the amplifier to match speaker impedance
- Standby switch (on tube amplifiers only) - the standby switch has exactly the same function as the standby mode of a computer which removes the need to cold boot when taking a short break. Any technology that requires a time period to reach optimum working state benefits from this idea. Components are powered down while remaining in a ready state which saves energy and extends their operating life.
Wattage
Amplifiers
The wattage rating is the maximum volume that an amplifier is designed to output. A 10 watt amp is typically the first purchase for a beginner. An amplifier in the 30 to 50 watt range is loud enough for band use and home band rehearsals and is a common first performing amp. If you are intending to buy a 100 watt amplifier you will need to consider using a rehearsal studio for practice, as this will be too loud for a home. The list below outlines possible uses based on the amplifier's wattage rating.
The ratings below need to be interpreted differently for some genres of music. A 30W amp that would only suffice for a rehearsal amp in a death metal band might be entirely appropriate as a large-venue amp in a jazz quartet, where all the other instrumrnts are acoustic.
Solid state amplifiers:
- 10-30W: home practice
- 30-50W: band practice, small club
- 50-100W: large venue
Tube amplifiers:
- 10-20W: home and band practice
- 20-30W: band practice, small to medium club
- 30-50W: small to medium club
- 50-100W: extremely loud in confined spaces or small clubs, though diffuse in large halls
Speakers
The function of a speaker is to convert an electrical signal into sound waves. This is achieved using an electromagnet called the voice coil which is attached to the speaker cone by a spring called the spider. The vibrations from the voice coil are transferred via the spider to the speaker cone.
A speaker cabinet will house either a single speaker or multiples. A two speaker configuration may utilize smaller speakers than a single speaker model e.g. 2x10″ instead of 1x12″. The main benefit of having multiple speakers is an increase in volume and bass response without sacrificing the higher frequencies. By having more speaker cones the speakers will move more air. For example, two 10″ speakers have a combined surface area of 157 sq.in. while one 12″ speaker has a surface area of 113 sq.in. A 4x10″ cab is often used for large combo amplifiers as it provides most of the bass response you would get from a 1x15″, but retains the high frequency that the 1x15″ cannot produce. Also, it will have increased power-handling capability, or more precisely, they split the amplifier output. Thus, given the same amplification head, a two speaker configuration will have a louder volume but only half the power to each speaker.
A low power speaker is louder at the same power than a high power speaker. This is known as speaker efficiency or sensitivity. A 25 watt speaker with a 10 watt amplifier will generally be louder than a 100 watt speaker with the same 10 watt amplifier. A cabinet with multiple speakers allows the use of low power speakers with a high power amplifier.
To avoid damaging speakers it is recommended that the speaker wattage should exceed the amplifier wattage. Damaging transient peaks or spikes that are the result of an amplifier outputting more wattage than the stated rating are negated by the higher headroom. It is not unusual to find a 150 watt speaker matched to a 100 watt amplifier or a 75 watt speaker matched to a 50 watt amplifier. Multiple speakers achieve the same effect by sharing the amplifier load between speakers which allows low wattage speakers to be used with a high wattage amplifier. If you are buying a combo amplifier the issue does not arise as the manufacturer has ensured that the amplifier and speaker are matched.
Impedance
The speaker-out socket of an amplifier will have an impedance rating. You should only plug in speakers with the same impedance rating. Some amplifiers are equipped with a switch or dial which allows the impedance to be set at 4 ohm, 8 ohm or 16 ohm. Plugging in a speaker with a too low impedance rating may cause damage to the amplifier.
Tube amplifiers are much more sensitive to speaker impedance. Any mismatch between the speaker impedance and the impedance set on the amplifier will cause a strain on the transformer and tubes. Never turn on a tube amplifier with no speakers connected. This might cause severe damage to the output transformer. Always turn off your tube amplifier before disconnecting the speaker. Some amplifiers have shorting jacks, e.g. Hiwatts, these may allow you to change speakers on the fly, but always at the amplifier side of the cable, never at the speaker side.
Types of Unit
_1959SLP-01_firmy_Marshall.jpg)
Micro/Headphone amplifiers
Micro amplifiers are small portable amplifiers that generally do not exceed 10 watts. These low wattage solid state amplifiers do not utilize FET circuitry so they tend to distort very quickly. The Danelectro Honeytone and Vox amPlug respectively illustrates the differences between a micro amplifier and a headphone amplifier. The Danelectro Honeytone has a speaker and pots and resembles a miniature amplifier. The matchbox shape Vox amPlug is a headphone amplifier with rotary dials instead of pots and offers four model emulations including the Vox AC30.
Busking amplifiers
These small portable battery powered amplifiers are designed for outdoor use where no mains power is available. The battery will normally provide up to six to ten hours use on one charge though buying a spare battery or ensuring that the amplifier can also be used with AC power will offset this limitation. Examples include the Pignose Hog 30 which has an 8″ speaker and a rating of 30 watts and the Vox DA5 which has a 6.5″ speaker and a rating of 5 watts.
Practice amplifiers
Practice amplifiers are designed to be used at home and are not suitable for concerts or band rehearsals. The Vox DA5 and Epiphone Valve Junior are small practice amplifiers designed for home use and are easily transported and stored.
Small venue/recording amplifiers
Combo amplifiers are suitable for small venues. The standard combo consists of a 50 watt amplifier combined with one 12″ speaker with both components enclosed in a single cabinet. Some manufactures combine a 30 or 40 watt amplifier with two or four speakers. A tube or solid state amplifier with a minimum of 30 watts and good tone would be acceptable for professional use. Combo amplifiers are favored by many guitarists because of their compact form and matched amplifier and speakers. The Vox AC30 and Fender Twin are examples of combo amplifiers.
These combo amps are also used in the recording studio, as they are easier to transport and one does not need high volume in a recording setting. As well, a very loud stack may need too high a volume to get a guitarist's preferred tone, to the point that there may be sound leakage into other booths or microphones. A smaller combo can reach desired overdrive levels at lower volumes.
Large Venue amplifiers
Amplifiers that range from 50 to 100 watts are suitable for a large venue. A half stack consists of a separate amplifier head connected to one 4x12″ speaker cabinet and is a very common guitar rig. A full stack consists of a separate amplifier head with two speaker outs and two 4x12″ cabinets stacked vertically. A Marshall head and full-size cabinet are bulky and heavy items to transport. A full-sized Marshall cabinet has two handles, one on either side, and requires two people to lift and move it safely. Large 8x10" cabinets are hard to transport, if you are moving them yourself (touring rock bands have a road crew to move gear like this from vehicles to the stage). Storage and transportation must be considered when buying a large guitar rig.
Heads, cabinets, and stacks
A half-stack consists of two components:
- head - amplifier
- cabinet - speakers
When purchasing the two components check that the impedance of the cabinet matches the impedance of the head. Make sure the cabs RMS rating is about the same as the head's power output at the impedance of the cab. Generally a single guitar cabinet would have 4x12″ speakers though 1x12″ and 4x10″ cabinets are also available. Some players use 1x12" speakers for small clubs or 1x15" for deeper bass response.
What format to buy
Most beginners start by buying a small, lightweight practice amp. Then, when they start jamming, they buy a more powerful, larger amp capable of being used at a pub or nightclub show. As they progress, an amateur guitarist may buy a bigger, more powerful stack for large venue shows and one or more higher-quality, expensive combo amps for recording.
Setting up the Guitar
Advances in manufacturing have solved many of the tuning problems associated with the budget guitars of yesteryear. Entry level guitars are available from major manufacturers such as Yamaha and Fender which are entirely suitable for beginners. All guitar stores sell tuning forks and electronic tuners. A tuning fork provides a single reference note for tuning and for this reason an electronic tuner will be more useful to the complete beginner.
When new strings have been put on a guitar they often fall out of tune very easily. New strings will stretch until they reach a point where their elasticity diminishes and then they will remain at the correct tension and frequency. Strings need to be broken in. It will take time to work all the slack out of the strings but the process can be sped up. Put on new strings and tune to just below concert pitch using an electronic guitar tuner. Then pull each string an inch away from the fretboard and this will instantly put them out of tune. Use your electronic guitar tuner to retune the strings to just below concert pitch and repeat the process. After a while the slack should be gone from the strings and the guitar can be tuned to concert pitch and should stay in tune.
Tuning the Guitar
Sound is created by the disturbance of particles in the air. The vibrations of a struck string causes the air particles to moves in waves which the ear receives and the brain interprets. When a string is attached to two points, as the strings on a guitar are, then striking it causes a sound to be produced at a regular frequency. The length, thickness and tension of the string determines the pitch of the note it produces. If you have a string of a certain length and tension stretched across a wooden board which produced a known frequency and you wished to double the frequency to produce the note an octave above - you simply halve the distance that it is stretched across and keep the same tension. That is exactly what happens on a guitar when you fret any of the open strings at the twelfth fret.
There are many different tunings for the open strings of the guitar but the most common is known as standard tuning or E tuning. In standard tuning the open strings should be tuned to the notes E A D G B e.
The diagram below illustrates the open strings and the twelfth fret. Note that the upper case E represents the thickest string and the lower case e represents the thinnest string. The diagram is orientated towards the player's view.

e|-----------------------|
B|-----------------------|
G|-----------------------|
D|-----------------------|
A|-----------------------|
E|-----------------------|
Four-Five Tuning
Four-Five tuning uses the open A string as the first reference note. A tuning aid is useful to ensure that the open A string is at concert pitch.
Concert pitch is an Internationally agreed standard that assigns A = 440 Hz. The guitar is a transposing instrument and is notated an octave higher than its actual pitch to avoid having to use the bass clef in standard notation. The notated middle C is played on the third fret of the A string though the pitched middle C is to be found on the first fret of the B string. A = 440 Hz is the fifth fret of the high e string but for convenience the open A string (110 Hz) is used as the reference note.
The diagram below shows the notes to be fretted.
e|-------------------0---|
B|---------------0---5---|
G|-----------0---4-------|
D|-------0---5-----------|
A|---0---5---------------|
E|---5-------------------|
Follow these six steps to tune your guitar using the Four-Five method:
 Step 1
 Step 2
 Step 3
 Step 4
 Step 5
 Step 6
It is recommended that strings be brought up to their correct pitch when tuning. The Four-Five method has the disadvantage of progressively increasing tuning inaccuracies by the use of multiple reference notes.
Harmonic Tuning
This method of tuning uses harmonics. By lightly touching a string directly above its fret-wire the fundamental of a note is silenced leaving only a series of overtones. Any note played on any instrument consists of a fundamental and a harmonic series of overtones. The twelfth, seventh and fifth nodes are the easiest frets with which to sound harmonics. After striking the string the finger should be removed quickly to produce the harmonic.
The fretboard diagram below shows the pairs of harmonics that are used. You start by tuning the harmonic on the 7th fret of the A string to the harmonic on the low E string. Then the harmonic on the 7th fret of the D string is tuned with the harmonic on the 5th fret of the A string. Tuning the G string to the D string is done in the same manner. Tune the harmonic on the B string to the harmonic on the 4th fret of the G string. Tune the harmonic on the e string to the harmonic on the B string.
e|-------------7*------------|
B|--------5*-----------------|
G|------4*-----7*------------| * = Play a harmonic at this fret
D|--------5*---7*------------|
A|--------5*---7*------------|
E|--------5*-----------------|

Tuning with harmonics can progressively increase tuning errors due to the use of multiple reference notes. The fundamental is the most dominant frequency of the harmonic series and it is recommended that a further tuning check be made using fretted notes.
Tempered Tuning
This method is recommended because it applies equal temperament with the use of a single reference note. This method uses the open high e string as the reference note. You tune the unison and octave E notes that are found on the other strings to the open high e string. Hold the fretted note down as you turn the tuning peg and you will feel the string move under your fingertip. This involves striking the strings with your right hand and then using the right hand to turn the tuning pegs. If may feel awkward at first but with practice it becomes familiar. The open low E string is the only string to be tuned to the high e string without fretting. The fretted note on the 5th fret of the B string should be tuned wide by the amount of two beats per second in relation to the high e string.

Tablature
Tablature and standard notation are two ways that musical information is shared. Sight-reading of standard notation is a requisite skill for teaching careers, session work, and the theater orchestra. Reading music increases your knowledge of music and allows you to notate your musical ideas. Each notation system has its advantages and disadvantages. Tablature does not convey timing and pitch information as well as standard notation does though it is more useful for showing bends and to what degree (1/4, 1/2 or full) they should be executed and other worded instructions such as pick scrapes and whammy bar effects. For these reasons many guitar transcriptions for rock, jazz and blues, use both standard notation and tablature.
Tablature
You do not need to know how to read music to use tablature. Each string is represented by a line and on those lines numbers are used to indicate which fret to press down.
Below is a simple melody in tablature.

Lower Section
In the lower section of the example above, the top line represents the thinnest string of the guitar (high e) and the lowest line represents the thickest string of the guitar (low E). Each number on a line represents a fretted note on that string. The number zero is an open string, the number one is the first fret, and so on.
The tab is divided into measures using bar-lines but the duration of the notes is not indicated. You can figure out the duration of the notes using the standard notation in the upper section. You can also work out the note values using the time signature; which in this example is four-four time. This means that there are four quarter-notes in each measure. The tempo or style, which is given at the top of a piece of sheet music, is also an indicator of how a song should be played.
The key signature is not shown in the example. Key signatures show which sharps , naturals, and flats are to be used; represented by #'s and b's. Each sharp or flat is shown on their respective line and space after the time signature.
Upper Section
The upper section of the example above is in standard notation and shows that the first bar has eight notes. Each note is represented by an oval note-head which indicates which note pitch is to be played. A stem with tails is used to indicate notes duration (how long the note is to be held). In standard notation only the whole-note is written without a stem. Because the notes in the first bar are all eighth notes with one tail they are connected with a single beam as shown in the example. The beaming of the same notes in a bar allows for easier reading. In a bar of music with mixed note values a single eighth note would be shown with a single tail. Sixteenth notes have two tails so a double beam is used when grouping.
The vertical bar-line after the last eighth note marks the end of one complete count of the time-signature. Bar-lines are used to show the pulse of the music and taken overall allows us to describe the form of a piece of music. The usefulness of using bar-lines to describe form is self-evident in the twelve bar blues whose title states that a cyclic group of twelve bars is to be performed. It is common to find musicians describing one complete thirty-two bar cycle of a jazz standard as a chorus. The term chorus is used to indicate how many times a song is to be repeated. A vamp on the thirty-two bar Jazz standard "Misty", written by the pianist Erroll Garner, would by convention start with all the musicians stating the melody with the following choruses dedicated to solo improvisation. The last chorus usually has the musicians stating the melody again without improvisation. The convenience of using the term chorus can be illustrated by imagining a four piece Jazz quartet with piano, saxophone, double bass and drums. If each musician is given a chorus to improvise over and the convention of all the musicians stating the melody on the first and last chorus is utilized then the song will have six choruses. The original hit recording of "Misty" as sung by Sarah Vaughan consisted of only one chorus with a four bar intro. Be aware that four and eight bar codas and intros are very common in Jazz and Blues and need to be taken into account when working out how many bars a chorus contains.
In some forms of music there is a strong emphasis placed on the first beat of each bar. This is easily demonstrated by the Waltz time signature where the first beat of a count of three is emphasized for the dancers benefit in accord with the dance steps to be performed. If a note is tied over the bar-line with a curved tie-line then the note duration is held over to the next bar. Bars never have more notes in them than is indicated by the time signature. In the next bar there is a whole note which is a white oval with no stem. The two vertical black lines at the end are called a double bar-line indicating that the piece of music has ended.
ASCII Tablature
There is a very informal and loose standard of "Internet Tablature" using only ASCII characters. The above example would be written like this:
   e---0-1-3-5-3-1-0----|-----------------||
   B------------------3-|-1---------------||
   G--------------------|-----------------||
   D--------------------|-----------------||
   A--------------------|-----------------||
   E--------------------|-----------------||
It has the same disadvantages of tab and contains much less information than the standard notation of the upper section. Rhythm can only be suggested by spacing or by adding symbols above each note (such as Q for quarter note). Much Internet tablature does not even contain bar lines. The timing must be discerned by listening to the original piece. This is the major flaw of online tabs and this style of tab in general.
However, online tabs are often much more convenient than standard notation for precisely conveying a specific finger positioning. Especially with alternate tunings this is a clear advantage.
Common Tab symbols:
| Symbol | Meaning |
|---|---|
| h or ^ | hammer on |
| p or ^ | pull off |
| b | bend string up |
| r | release bend |
| / | slide up |
| \ | slide down |
| v or ~ | vibrato |
| t | right hand tap |
| x | play 'note' with heavy damping |
Chords are often written in the form:
   EADGBE  EADGBE  EADGBE
   xx0232  x32010  320003
Standard Notation
Notes On The Staff
Here are the notes as they appear in standard notation. The set of lines and spaces that run horizontally across the page is called the staff (plural - staves). Notes can be written on the lines and in the spaces. A common mnenomic for remembering the notes of the Treble Clef is:
"Every Good Boy Deserves Fudge" and the word "FACE

The musical alphabet starts at the letter A and ends on the letter G. There are twelve sounds in music and seven letters to represent them. The other five sounds are the sharps or flats of these seven notes. Each step up the staff is the next letter, so it goes A, B, C, etc. The first symbol on the staff is always the clef; which in this case is the treble clef. The word clef is French for key and gives you the position of the first note. The treble clef shown here is also called the G clef. It is drawn so that the note G is indicated as being on the second line.

Lead Guitar and Rhythm Guitar
The terms lead guitar and rhythm guitar are mildly confusing, especially to the beginner. Of course, a guitar should almost always follow some sort of rhythm, whether loose or tight. Plus, many times, guitars are very prominent in a song, where it drives the music, but it's not quite lead. Plus, the lead guitarist doesn't even play a lead part, and that happens almost all the time! How can we untangle this mess?
The distinction is somewhat arbitrary. Many bands in contemporary music have two guitarists, where usually one would specialize in "lead" and the other in "rhythm". The Beatles, Dethklok, and Metallica are examples of bands who use this combination. Lead guitar means melody guitar, meaning that the lead guitarist must specialize in playing the melody of the song, so any guitar playing a solo is not a lead. Sure, a lead guitarist may get to solo, but someone cannot be called a lead guitarist simply because he/she plays a solo in a song. A lead part contributes entirely to melody (as lead guitar means melody guitar), instead of to the foundation, which is carried by the rhythm guitar. This means the rhythm guitarist is the driving source. Lead guitar uses few or no chords, although sometimes it can be following a chord structure, while rhythm guitar uses the chords to drive the music.
It is important to realize that lead guitar and rhythm guitar fit into two different parts of a band, but it just happens that they are played on the same instrument. Lead guitar provides a solo voice, and is grouped with the lead vocals, lead piano, etc. Rhythm guitar is part of the underlying rhythm section, along with instruments like bass, drums, sometimes piano, background vocals, etc. Generally speaking, the rhythm provides the groove of the song, while lead provides the melody.
However, these distinctions get fuzzy, especially when the so-called lead guitarists play chords and double-stops in their riffs. In some cases, a single guitar part provides both the melody and accompaniment (especially power chord riffs, commonly found in rock and metal, and finger picking, found in folk guitar).
Some bands (often three piece bands) feature a single guitarist who can act as either, by either assuming one role at a time or, in a recording studio, recording a lead track over their own rhythm track. For example, the band Dire Straits has been in both situations: in the early days, David Knopfler played rhythm while Mark Knopfler played lead. When David left, Mark usually played both parts on studio albums, and hired another guitarist to play rhythm for live shows. Some guitarists reached such technical proficiency that they were able to play both parts "simultaneously". A famous example of this technique is Dimebag Darrell, particularly on songs such like Walk or Breathing New Life (using an harmonizing effect pedal). The bass plays a big part like in songs such as Seven Nation Army by The White Stripes (even though there is no bass guitar in the song, it's an electric acoustic) to set the speed and tone for the song and that the lead guitarist (otherwise known as melody guitarist) in the chorus follows the bass and drums not, the bass follow the chorus player.
Playing Lead Guitar
Very often, a lead guitar part is played on an electric guitar, using moderate to heavy distortion (also known as drive or gain). For this reason, many amplifier manufacturers refer to their distortion channel as a lead channel. Distortion provides a more powerful sustain than a clean channel, and this is often best represented in extreme techniques like shredding and tapping, which some guitarists feel can only properly be done with distortion. Of course, lead guitar can be played on an acoustic guitar, but some techniques may not be as pronounced as on an electric.
The most common techniques for creating lead parts are bending, vibrato and slides. These provide the basic means of emphasizing notes, and allow for greater expression in the melody. Often the lead guitarists may employ arpeggios or sweep picking to add depth, and the progression of the solo often mirrors the underlying rhythm guitar part.
Playing Rhythm Guitar
Rhythm guitar is characterized mostly by playing chords in patterns. Some players criticize rhythm guitar as sounding "chordy", or not being as interesting as the lead part. Although rhythm guitar does not "express" as much as the lead guitar, there is so much to be learned about chords, chord progressions and rhythm patterns, and a player is limited only by their imagination.
Rhythm guitar is just as easily played on electric or acoustic, clean or distorted. The technique is less about expressing individual notes, and more about choosing chords or chord voicings that enrich the overall sound, which may add its own expressive tone to the music.
Playing the Guitar
For Beginners
The Basics
The guitar is, and has always been, a social instrument. In all its forms, it has always been a portable, multi-stringed instrument made for public hearing. Even today, there's nothing better than hanging out with some friends and being able to strum a few songs on the guitar. And if you've just bought your first guitar, then you're in luck: you can play literally hundreds of popular songs by learning just a handful of chords. But playing the guitar is more than just struggling through a half-recognizable version of some song, it also requires good technique. In this section, you will learn the basics of how to hold the guitar, use a pick, and other important fundamental techniques.
Never forget that instruction books are not a replacement for playing with other guitarists, or learning from a teacher, who are excellent sources of information and inspiration.
Also, this section, as with most guitar manuals, is written with right handed players in mind. Left-handed players may simply reverse the instructions as appropriate.
Holding The Guitar
The guitar can be played in many positions, but some positions are clearly more efficient than others. The choice of position is personal, but clear guidelines exist. Some basic considerations in determining a chosen playing position include:
- the physical stability of the instrument
- ensuring the freedom of both hands such that they have thorough access to the instrument and can meet all technical demands without having to support the instrument
- elimination of general muscular tension in the assumed body position. While it is natural for a beginner to experience fatigue in the muscles of his hands and arms, you must be careful to sit straight and not cause damage to your spine and waist. If you do experience pain in those regions it is possible that the position is harmful and must be changed to prevent damage.
Many beginners try and turn the guitar towards themselves, so they can look down at the frets and soundhole. Curling the guitar towards yourself in such a way actually makes it more difficult to fret the strings efficiently, because you have to curl your wrist more. This tension can be harmful. Beginners are also often inclined to put their elbow too high or low, which leads to cramping. Ideally your arm and shoulder should be relaxed.
It may take a beginner several weeks until holding the guitar feels comfortable and natural. By using efficient hand positions and not straining, the muscles in the arm and hands will get stronger. If you ever feel pain you should immediately stop and ascertain the cause of pain before continuing. Sometimes discomfort is due merely to fatigue and a period of rest will be all that is required.
Sitting
Classical Style
Sit up straight on a chair or stool, with your left foot on a footrest approximately 10-20 cm in height. Place the waist of your guitar on your left thigh. Rest your right forearm on the top front edge of the guitar's lower bout so that it is comfortable and allows you to easily strum the strings over the soundhole. The guitar headstock should approximately be at head level, which corresponds to an inclination of the guitar neck of about 45 degrees. Your left hand should be presented to the guitar neck and fretboard such that the thumb is behind the neck and all three segments of the fingers are forward of the edge of the fingerboard. Shoulders should be level and relaxed, and it helps to be leaning forward slightly. Most people should feel comfortable and able to stay in this position with little effort. If you cannot, something may not be right. As an alternative to using a footstool, you can use some sort of guitar support between your left leg and guitar. This also allows for good alignment of the spine and an efficient playing posture.
With your left hand, put your thumb so that it is behind the second fret. This is the most comfortable area for playing open chords. Your thumb should not extend over the edge of the fretboard and touch the E string.
Electric Guitar
Many rock performers hold the electric guitar lower than the classical position. The neck is held horizontally, rather than at a 45 degree angle. This allows bends to be more easily achieved and also allow the same hand angle to be maintained when moving up the neck through box positions. playing in extremely high fret positions is also facilitated by this angle as the left hand twist to accommodate playing in the cutaway in a way that would be straining and more difficult in the classical position.
Lapsteel or Hawaiian guitar
With these styles, the guitar is played horizontally, so the frets and strings point upwards. Some skilled players can fret notes and play chords by pressing down on the strings, but more often these guitars are played with a slide.
Standing
If you have a guitar strap, available from any guitar store for a few dollars, then you can also learn to play standing. This is useful if you plan on playing in a band. If you have a heavy guitar a broad guitar strap is often more comfortable than a thin strap. To attach a strap, there should be a hole in each end that you can put over two pins, usually fitted on the endblock of the guitar and where the neck meets the body. Many acoustic guitars only have one pin on the end block, and straps must be attached under the strings above the nut on the headstock. However, this sometimes makes it difficult for keep the guitar at an optimum height and can cause shoulder strain. You can usually install a second pin where the neck meets the body, but you should be careful or you might damage (and devalue) your guitar.
With the strap attached to the guitar, sling it so that it hangs around your neck on your left shoulder. You can usually adjust the height of the guitar, but the exact method depends on each strap. The length of the strap depends on your preferences, but you can use the same guidelines in found in the previous section. Some professionals have their guitar hanging down at their knees, and others keep it under their shoulders. Neither of these extremes are recommended for a beginner.
Using the Picking Hand

Please see the Picking and Plucking section for more information.
Much of the "feel" of a guitar style comes from the way the strings are hit. Since there are many different techniques, and often they defy explanation, it is difficult to explain all but the most basic techniques. How a player hits the strings is something they must discover for themselves.
In order to advance with the guitar, it is very important to properly use your picking, or impact hand. This should almost always be your dominant hand, so if you are right handed, you would use your right hand for your picking hand, and vice versa for left handed people. This hand should always be loose, because if it is not, the strings can sound clunky.
Your hand should "float" at a comfortable height above the sound hole, and you should be keeping your wrist straight or slightly bent. You should always be ready for movement in either direction, and your wrist should not touch the strings as you are strumming (unless you are doing some sort of muting technique). You can use your fourth finger to brace against your guitar, but this is considered bad in the long term; this is like a crutch, and you are limiting the potential you can get from practicing with your whole arm. For example, even though the brace will let you pick notes faster, it sometimes limit your ability to play complex rhythms using chords. While it might be good to practice using your fourth finger for a brace sometimes, you will become a better guitar player if you don't brace yourself like that.
It doesn't matter if you are using a pick or just your fingernails, whenever your impact hand hits the strings, the type of hit can be changed based on the tension of your upper finger joints. This is the area to pay attention, because slight variations in pressure and speed can make distinctly different sounds.
Fingers
The fingers can be used in two main ways, through finger picking or strumming through chords like using a pick. There are several styles of finger picking, such as Travis picking, where you only use the thumb and first finger, and other styles where you use three, four or all five fingers.
Using a Pick
Hold the pick in between your first finger and your thumb. Don't pinch it, hold it firm but loose, with the pick flat in between the side of your first finger and the bottom of your thumb. Your thumb should be in line with the first segment of the first finger, with the pick firmly (but not tightly) between. When you pick, your wrist should be loose, and the main motion comes from your wrist for picking on one string, and you should use the Elbow for crossing strings. Similarly, when you strum, make sure to use your forearm and not your wrist for strength. Your wrist should be loose enough, but controlled, and the power should come from your forearm.
It is helpful to imagine the pick like a small bird between your thumb and finger; you do not want it to fly away, and you do not want to crush it.
Using the Fretboard
The most important things to remember when playing are to keep your hand loose, avoid unnecessary movements and finger spreading, and not to smother the strings. Having good flexibility in your hand is one thing, but trying to reach too far can be exhausting. Keep your fingers tight together, but not cramped. In general, when playing acoustic instruments you should always use the tips of your left hand fingers and not the pads to press the strings. If you use the pads, you risk muffling the sound coming from adjacent strings, which may be required to be heard. The greater sustaining properties of electric guitars often requires that such strings be damped so this rule does not always apply. Ideally your left elbow should be extended from your body, and your left hand should curl in towards your body. Your fingers should be like little hammers hitting down on the strings, and this way you will use the tips to push the strings down into the frets.
Regardless of where you are playing on the fretboard, you always have to make sure that you're pressing down in the best spot to get the best sound. You should always be fretting down the string slightly behind the fret of the note you want to play. Press the string down firmly to the fretboard, close to the metal fret. If the finger is too far away from the fret, then the pressure is not sufficient to press the string down completely on the frets, and the note will buzz. If you are pressing too close to the fret you will sometimes accidentally play a note too high. You'll have to practice to get the right amount of pressure to use and the right distance at which to hold your arm. Be careful on how you hold strings
Chords
Please see the Chords section for more information
A chord is defined as three or more different notes sounded at the same time. Ability to play chords is a basic requirement of most guitar music. There are many different types of chords, and each type has its own sound. Other things about the guitar affect how a chord sounds.
Generally, playing chords involves pressing several (and sometimes all) of the strings down on the frets. Sometimes this can be very tough for beginners until their muscles develop. Often a beginner will find that when playing a chord, not all the strings are being pressed down properly, and some strings sound dead. It is important to make sure that all the strings ring out, which can be tested by picking up and down a chord, and adjust your fingers when needed. It doesn't matter how fast or loud you can play, if your chords are not fretted properly you will sound terrible.
Some players use their thumbs to play the low E string. They do this by turning their fretting hand slightly out and squeezing the thumb down on the string. Players with long thumbs can play on the low E and A strings. This technique compromises efficient left hand function as the wrist and hand have to undertake significant re-adjustment in order present the thumb to the string in such a manner and then to return the hand to its standard presentation. Additionally the tips of the fingers can no longer be presented vertically to the strings. The technique is not recommended for beginners who wish to maximise their technical abilities.
Your hand is in a different position depending on whether you are playing an open chord or a barre chord.
Melody
When a player is first starting out, it is not their ability to make melodies causing problems, it is a lack of skill in their hands. Many people can whistle or hum a melody, but have difficulty translating that to the fretboard. Learning the sound of different intervals between notes takes time and patience.
The best way to learn how to carry a melody on the guitar is simply to keep practicing. Unfortunately there is no secret to being a good player, you simply have to practice and learn for yourself. This is good though, because even if there was some secret, if everyone did the same thing, then all the music would sound the same. For general advice about learning about melody, see the Lead Guitar and Rhythm Guitar page
Coordinating Your Hands
Truly great guitar playing comes from the unison of the left and right hand. Unless both hands are connecting with the strings at the proper time, your playing will sound sloppy. So it is very important to start out slow and work your way up to playing faster.
What's Next?
Now that you have some basic control over the guitar, you're ready to start playing. A good place to begin is by exploring some of the other styles and techniques listed on the main page. The most important thing to remember is that you become a good player by practising properly, and accurately. It is always better to learn and practice a piece slowly, and then increase your speed as your increase your skill and comfort, rather than struggling through it a few times and just considering it "learned".
Double-stops and Power Chords
An interval is the distance between two notes.
Each interval has a distinctive sound.
Intervals are named with reference to scales. For example, the interval from the root of the major scale to the second note of the major scale is called a "major second"; the interval from the root to the third note of that scale is a "major third", and so on. A "minor third" is the interval from the root to the third of a minor scale, and is a semitone (one fret) less than a major third.
Major scale played on a single string:

 nut                                                                    12th fret

O||-----|--●--|-----|--●--|--●--|-----|--●--|-----|--●--|-----|--●--|--●--|----
^          ^           ^     ^           ^           ^           ^     ^
root      2nd         3rd   4th         5th         6th         7th   octave
                                                                      (8th)
Natural minor scale played on a single string:

 nut                                                                    12th fret

O||-----|--●--|--●--|-----|--●--|-----|--●--|--●--|-----|--●--|-----|--●--|----
^          ^     ^           ^           ^     ^           ^           ^
root      2nd  minor         4th         5th  minor       minor      octave
                3rd                            6th         7th        (8th)
Major 2nd interval played on one string (say, the 6th string):

 ||-----|-----|-----|-----|-----|-----|-----|-----|-----|-----|-----|-----|---
 ||-----|-----|-----|-----|--●--|-----|--●--|-----|-----|-----|-----|-----|---
Same interval played on two strings (6th and 5th):

 ||-----|--●--|-----|-----|-----|-----|-----|-----|-----|-----|-----|-----|---
 ||-----|-----|-----|-----|--●--|-----|-----|-----|-----|-----|-----|-----|---
Exception. If played on 2nd and 3rd strings, the shape of a major 2nd becomes this, because of the tuning irregularity:

 ||-----|-----|--●--|-----|-----|-----|-----|-----|-----|-----|-----|-----|---
 ||-----|-----|-----|-----|--●--|-----|-----|-----|-----|-----|-----|-----|---
Major 3rd on two strings (but not 2nd to 3rd strings)

 ||-----|-----|-----|--●--|-----|-----|-----|-----|-----|-----|-----|-----|---
 ||-----|-----|-----|-----|--●--|-----|-----|-----|-----|-----|-----|-----|---
Major 3rd on 2nd and 3rd strings:

 ||-----|-----|-----|-----|--●--|-----|-----|-----|-----|-----|-----|-----|---
 ||-----|-----|-----|-----|--●--|-----|-----|-----|-----|-----|-----|-----|---
If the two notes are played at the same time, an interval is called a harmonic interval. If they are played one after the other, it is called a melodic interval. (Only melodic intervals can be played on a single string.)
Power chords
Power chords are simple chords consisting of root, fifth, and possibly octave. An advantage to understanding power chords is their shape can be used to quickly determine the location of the perfect fifth and the octave. This improves one's overall understanding of the location of notes on the fingerboard by relation to one another and builds the groundwork for understanding scales. Power chords are a staple of heavy distortion guitar styles, where the distortion creates harmonics that give a rich sound despite the bare-bones simplicity of the chord.
Perfect fifths (e.g., C-G) and their inversion, perfect fourths (e.g., G-C), are the most consonant interval on the guitar (and in all of music for that matter), not counting unison and octaves.
It is more difficult to play the octave for a root note on the D string, because the B string is tuned differently than the other strings, and you will need to stretch further to reach the octave. Power chords are most commonly played on the thicker strings, and many songs exclusively use perfect fifth power chords.
Perfect Fifth above octave
The simplest perfect fifth power chord uses the same fingering as an E minor chord, except only the thickest three strings are played. Here is the fretting for the E5 power chord:
-
 E5 Power Chord
.png)
When you play a power chord in the open position (or any power chord), you have to be careful to mute the other strings so they do not ring out. In this case, if you also played the G string, you would be playing a full chord, not a power chord. Use your extra fingers to lightly touch the other strings, use your fretting fingers to smother the unnecessary strings, or just avoid hitting the unnecessary strings with your impact hand.
Power chords, and really any chord types, are useful because they can be moved anywhere on the neck, as long as the relationship between the notes is the same. For example, in the E5, the thickest string plays an E, the next string plays a B (which is the fifth note of any E scale), and the next string plays another E, but an octave above it.
If you take the same chord pattern, and move it up the neck to make a different power chord. For example, take the two fretted notes, then use your first finger and fret the thick E string two frets behind the others. For example, if you were fretting the E string at the third fret, you would be playing a G5 which looks like this:
-
 G5 Power Chord
.png)
There are several different fingerings you can use to play a power chord, but it is best to choose one that lets you easily move the power chord up and down the neck.
Here are three most common fingerings for a power chord, in this case, a G5. In the second and third fingering, the two strings are barred at the fifth fret. The numbers indicate the number of finger to use. Finger #1 is the index finger, #2 the middle finger, #3 the ring finger, and finger #4 is the little finger.
   EADGBE        EADGBE        EADGBE
   ---xxx        ---xxx        ---xxx
 1 ......      1 ......      1 ......
 2 ......      2 ......      2 ......
 3 1.....      3 1.....      3 1.....
 4 ......      4 ......      4 ......
 5 .34...      5 .33...      5 .44...
Alternate Fingerings
One common variation on the power chord involved omitting the second, higher octave note. For example, a G5 without the second G would look like this:
-
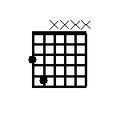 G5 Power Chord with the octave omitted
.png)
These are easier to play because you only need two fingers and the sound is similar to the three string version.
Since a power chord is just playing multiple strings that produce only two tones, it is possible to play all six strings and still be playing a power chord. Some open tunings set the guitar up so that when you strum it open, it plays a power chord. Here is an example of a full G5 chord, where all strings are either playing a G or a D.
   EADGBE
   --00--
 1 ......
 2 ......
 3 2...11
 4 ......
 5 .4....
This chord can be considered a non-traditional power chord, since in popular music, power chords usually use only two or three strings. This is also a hard fingering for the beginner, but it emphasizes an important fact about double stops: as long as you keep adding octave or unison notes, you will always be playing the same interval. Playing a non-octave or unison note will instead produce a chord.
Adding unison notes may sound different even though they are supposed to produce the same pitch. This may be because the strings have different tension or thickness. In general, the guitar's thinner strings will have a brighter, more ringing sound.
Perfect Fourths
This type of power chord can be regarded as root plus perfect fifth in the octave below.
Perfect fourths have a slightly more suspended sound than perfect fifth chords. These are easy to play, because most of the strings on the guitar are tuned in fourths. This means that playing any two of the thickest four strings, when they are beside one another and played at the same fret. For example, a D4 is played like this:
-
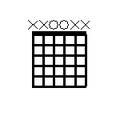 D4 Power Chord with the octave omitted

   EADGBE
   xx00xx
These can easily be moved up the neck. For example, a G4 or a B4 would be played like this:
-
 G4 Power Chord with the octave omitted
 -
 B4 Power Chord with the octave omitted


   EADGBE     EADGBE
  (33xxxx)   (x22xxx)
Perfect fourths are the same as the upper two notes of the original three-string power chord. It is rare to add a new top octave, but it may done. The following Power chords show the G4 and B4 with the octave added:
-
 G4 Power Chord with the octave
 -
 B4 Power Chord with the octave


   EADGBE     EADGBE
  (335xxx)   (x224xx)
Other Double Stops
You can play a huge variety of different intervals by playing chords, and just plucking two notes at the same time. Often you can add variety to chord strumming by playing a quick fill by playing different sections of a chord, and achieving different intervals.
Open Chords
Open chords are chords that include unfretted strings of the guitar. Open chords contain one or more open strings. For example the Em chord diagram on this page shows 4 open strings but the D major chord diagram only has 1 open string. They are both classed as "open chords".
Open chords are the easiest chords to play on the guitar and many famous songs can be played using just 3 or 4 open chords. Learning a handful of open chords at the first position (first four frets) and memorizing their shape is an important step towards mastering barre chords.
When you strum any chord, all of the strings (open and fretted) should ring out clearly. If any of the strings cannot be heard; check to make sure that you are not stopping any string from sounding. If you are accidentally muting any strings, arch your hand more and curl your fingers to ensure that it is the tip of the finger pressing the string and not the flat of the finger.
Major Chords
Major chords are defined by the major triad. The major triad consists of three notes which are spaced at specific intervals. In ascending order: the root, major third and perfect fifth. These intervals are also found between the first note of a major scale and the third note (major 3rd), and the first note and the fifth note (fifth). When combined they have a bright happy tone, and are often used in upbeat music.
There are 6 major chords commonly used in the open position; A, C, D, E, F and G. The standard tuning of a guitar is designed so that chords can be easily played. Beginners often find the G major and the F major shape challenging to play but a small amount of extra practice overcomes any initial difficulties.
E Major
.png)
Many early blues songs are written with E major as the root chord. The chord contains the notes E, G#, and B, and can be played with three fingers.
Fingering 1: (o231oo)
First, place your second finger on the second fret of the fifth string. The string now plays a B note. Then, place your third finger on the second fret of the fourth string. This note is an E, which is an octave higher than the open sixth string. Finally, place your first finger on the first fret of the third string. You can alternatively switch the second and third fingers.
When you strum this chord, all of the strings should ring out clearly. If any string sounds dull or muffled, check to see that you are not accidentally touching strings, and that all the strings are pressed firmly against their frets. It is important to build good technique early, as bad habits tend to linger. Make sure that your fingers are arched on your left hand, and that your thumb is positioned to give you a strong grip.
A Major
.png)
There are several ways to play A major. You should learn how to play all of them, then use the most suitable to each musical context. In an A major, the notes are A, C# and E. When playing an A, it is considered good form not to let the low E string ring out. While an E is one of the notes in the A major chord, playing an E below the other notes puts this A major in second inversion. This changes the tone of the chord, and may not achieve the desired effect.
Fingering: (xo123o)
Put your first, second, and third finger on the second fret of the fourth, third and second strings respectively. When you strum, ensure that all strings sound clear, except for the sixth string which should be muted. This is probably the most popular fingering, but is tough for people with thick fingers. (xo213o) is a variation by switching the first and second finger, with the second on the third string, first for fourth string, third for fifth string.
Alternatively you can finger this chord (xo112o), this requires that the first finger fret two strings (using the finger's pad rather than the tip). This leaves two fingers free and is often favoured by classical and flamenco performers, depending on musical context.
(xo234o) fingering allows for easy transition into higher position barre chords,
(xo231o) fingering allows for easy transition from open E, makes a transition from A to Amin a breeze (great if A is the IV chord), and is more comfortable for some with chubby fingers.
Finally, (xo111o) by using one of your fingers, most commonly the first or third finger, and barre the aforementioned frets. This one is tough for beginners, but easier for players with large hands. For more information on barring, see the section on barre chords.
D Major
.png)
Fingering: (xxo132)
Use your first finger on the third string, third finger on the second string, and your second finger on the first string. Be careful not to play the sixth and fifth strings, since they are not required for this chord. At first this may feel awkward, but it will be comfortable to play. Watch that you keep your thumb low when you play this chord. To play D minor, try the most common fingering (xxo231), with your first finger on the first fret of the first string, third finger on the third fret of the second string, and your second finger on the second fret of the third string. You can also try to finger the D major chord as (xxo243), which will help you to later use this as a barred, movable chord shape.
G Major
-
 three finger method
 -
 four finger method
.png)
.png)
There are two common ways to play a G major, a three finger method (Frets: 320003) and a four finger method (Frets: 320033), both with a slight difference in sonority. In either way, the notes are a combination of G, B and D. From this point forward, the fingerings will be shown in parentheses for the sake of simplicity.
Fingering 1: (32ooo4)
Put your third finger on the sixth string, second finger on the fifth string, and fourth finger on the first string. This is a favorite among beginners, and it allows for easy change to the open C major chord. Alternatively you can finger it (21ooo3), which may be easier for players with small hands or guitars with small necks and is recommended when changing to or from a open D7 chord.
Fingering 2: (21oo34)
This uses all four fingers and makes for an easy G to D major chord change. This has a more "stable" sound than the first fingering because the note played on the open B string is a D therefore avoiding the doubling of the third. Don't worry if that explanation isn't clear; just remember the difference between the two chords (one has a doubled third). The theory of chords and how they are constructed from the intervals of a scale is a subject that requires some off-the-guitar learning but with applied study can be easily understood.
C Major
.png)
Fingering: (x32o1o)
This is the most common fingering. Alternatively, you can use (x42o1o). (x32o14) or (x32o13) provide C chords with different voicings.
F Major
.png)
Fingering: (xx3211)
To play this, use the pad of your first finger, and press the first and second strings down at the first fret. You need to press firmly, or the strings will not ring out properly. Then take your second finger and put it on the third string, and put your third finger on the fourth string. The fifth and sixth strings should not be played with this chord.
Minor Chords
Minor chords use the first, third and fifth of the minor scale. They have a dark, melancholic tone and are most often used in darker music.
E Minor
.png)
.png)
Fingering: (o23ooo)
Alternatively you can finger this chord (o22ooo). For variation you can also add a G on the high E string, and play the cord using these frets: (o22oo3).
A Minor
.png)
Fingering 1: (xo221o)
You can also finger this like (xo342o).
D Minor
.png)
Fingering 1: (xxo231)
Also often fingered using the fourth finger in the place of the third. Make sure your first finger does not "fold". If you are doing it, you will know what I mean because your first finger will hurt around the joints. The proper technique should apply to this chord just as much as any other. Keep your thumb back.
Other kinds of chords
There are a variety of other chords that can be played in open position, and often it involves taking a chord you are already familiar with and adding or removing a finger. Experimentation can yield a lot of interesting sounds, and you are only limited by your imagination when it comes to using them.
Dominant-type seventh chords
Dominant-type seventh chords are notated as A7, C7 etc. They add an extra note to a major chord. The extra note is found at an interval of a minor seventh above the root note of the chord. For example, a D chord major would contain a D, an F#, and an A making the intervals 1,3,5. A D7 adds a C to these notes resulting in 1,3,5,minor7. The minor seventh interval can be easily found by an alternative method. Take any chord, and lower one of the root notes downwards in pitch by two frets (a whole step) to locate the minor 7th. The chord will usually sound more settled if the root remains as the bass note of the chord, so a root note higher than the bass is the better choice to alter. The chords already shown above all allow you to do this. Below are some chord shapes you should know. These are only the open sevenths, which are easier than others covered in the barre chords section.
D7
.png)
Notice how we moved the octave D from the D major chord (third fret second string) down two frets, making it the minor 7th. That's pretty much what we are going to do with all the other 7th chords. You can take any chord and, by moving one of the root notes down two frets, find the minor 7th.
E7
.png)
Easy, and again, we moved the octave E down two frets.
A7
.png)
.png)
Same again.
G7
.png)
A bit unfriendly. Remember, it is not much different from a C chord shape, except you stretch more.
B7
.png)
This one looks funny, but you will use it a lot in songs in the key of E major, which is the natural key of the guitar.
Muting and Raking
Muting
Muting a string is simple: with the fretting hand, touch the string with a finger, but do not press it down, and strike the string. It is usually best to do this where a harmonic will not result, but strings can be muted at harmonics for special effect. In tablature, muted notes are often marked with an "x" instead of a fret number. It is also common practice to mute a string with the picking hand after striking a note to create a shortened "staccato" effect. Again touching a string to mute away from harmonic nodes is advised, but sometimes pulling off into harmonics creates interesting effects.
Palm muting

Palm muting may or may not make the pitch of the string discernable. Very lightly rest the palm of the hand on or near the bridge, then fret and strike strings normally. Palm-muted notes are sometimes notated the same way as muted notes when the pitch is not discernable; otherwise fret numbers are given normally and the muted notes are marked "P.M." in tablature.
The Palm Muting Technique
The idea is not to mute the strings, but to dampen them, so that the notes are still clear, but with less sustain. To start, hold your guitar like you normally would, but let your palm brush against the strings, near the bridge. Remember to "let" the strings brush against your palm, not putting any force on the strings. The closer to the bridge, the more forgiving it is. As you get better, try adjusting the amount of muting by keeping your palm at different distances from the bridge. Very heavy palm muting can raise the pitch of the note(s), especially on guitars with a floating tremolo bar system equipped. Using or not using this effect is at the reader's discretion.
Finger Muting

You can also mute strings just by pressing your fingers against the strings, but not so hard that they are fretted and play notes.
Raking
Raking is not a kind of muting, but a technique for applying it. It is vaguely related to sweep picking, but instead of an arpeggio, the result is usually a single percussive-sounding note. (However, sweep picking is sometimes incorrectly notated as a rake in tablature, and sloppy sweep picking may accidentally become a rake.) Between two and four strings are struck, only one containing the desired note and the rest muted. Rakes may be notated in various ways; the most common way is to add muted grace notes, possibly adding the word "rake" to the tablature for clarification.
Learning Songs
Now that you've got a few chords under your belt, you're ready to start learning some songs. Great! There are several ways to learn songs, and some are more accessible than others.
General Tips
There are two basic forms that appear in thousands of songs. They are the twelve bar blues and the thirty-two bar ballad. Both forms are used extensively in all genres. The blues and rock 'n 'roll genres both use the twelve-bar blues form and many songs by Chuck Berry, Eddie Cochran and Buddy Holly are twelve bar blues and therefore very easy to learn. If you are trying to learn a jazz standard then you will find that many of them are of the thirty-two bar form. Practicing and understanding these two basic forms is essential for the guitarist who wishes to learn songs.
Practice the song slowly (especially if it's a fast song) until you can play it flawlessly. Then, when you are confident with the notes you are supposed to play, increase the speed until you can play along with the song.
Using a drum-machine or metronome when practicing is essential. An alternative method for improving timing is to play along with your favorite artists.
Methods of Learning
Sheet Music
The best way is to find sheet music for the song you are trying to learn, like a tab book, available from any guitar shop. Tab books are good, because they are almost always accurate, and they not only show the notes you're supposed to play, but they give good sense of how to play the notes. Generally they include both the rhythm and lead part, even written on the same page if they are played at the same time.
Tab books are expensive and there's a learning curve associated with fluent tab reading, especially if you have no prior knowledge of music notation. Understanding music theory, even just enough to properly (and easily) read a tab book is a challenge but not insurmountable. Being able to read music, whether it's tab or notation, will improve your playing.
Online Tab
A much quicker, cheaper and often faster way to learn is to search for an online tab of the song you're looking for. Simply type "Artist Name Song Name tab" into your favorite search engine, and "voila!", you have dozens to choose from. The online tab community is thriving, and there are many popular sites where you can find tabs for most popular songs. Some sites even feature a MIDI of the song, to make learning even easier.
There are several downsides to online tab, some of which are outlined in the Tablature section. The biggest problem is lack of accuracy. Always remember that online tabs are not made by professionals like tab books, and that somewhere down the line someone was sitting at home with a CD and figured it out by trial and error. Thus, the more complicated the song, the less likely the tab you are reading is 100% accurate. But since most people don't play a song exactly as it sounds on the album (even the recording artists!), this isn't such a big deal.
Another down side is that there is a huge amount of stealing in the community, and if you are looking for an obscure tab, you might only find one actual tab, with copies of it on every site you visit. Some sites allow for multiple versions, and some use voting or comments to give you a sense of how accurate the tab is. However, don't let voting alone determine which tab you read, because if the people who vote don't know how to play the song either, then they might vote a terrible tab really high. In general, you should read two or three tabs for a song, and then from that determine how you intend to play the song. Comments on a song can contain slight revisions or alternate fingerings for chords, so it is good to check those out.
By Ear
Songs can also be learned "by ear", with no sheet music. Essentially you just listen to the song and try to figure it out, with nothing for reference. Knowledge of music theory is particularly helpful for this method. It probably sounds a lot harder to learn this way than it is, but it is a really good way to practice whatever music knowledge you have. And it is especially rewarding being able to figure out a famous musicians piece and saying "I could have made that up!"
First, you should always try and figure out the key (or scale) the song is in. Knowing the key essentially tells you two important things; what the root notes are of the chords they are playing, and the scale that is used for soloing. When you know the scale, you can also probably figure out which scale degree is supposed to be major or minor.
To figure out the key, try playing random notes on the fretboard, and when one "works", play a major or minor pentatonic scale beginning with that note. Once you have figure out a few more notes, you will probably have a good idea of what scale is being used. If that doesn't work, try humming the chords being used, and then match those tones on the guitar. Be careful you don't accidentally start humming the lead vocals, because although that will help determine the key, the chords are likely different.
Once you know what key the song is in, the rest generally follows pretty quickly. Some of the tricky bits can be one-note riffs, arpeggios, of specific voicing of the chords they are using.
If have no experience of keys and their relationship to writing songs, then figuring out songs by ear is more difficult. Essentially you need to just find the same notes or chords and write them down or remember them. Generally this involves a lot of trial and error, but working this way provides excellent ear training.
Other Guitarists
This is perhaps the best way to learn. Playing with another guitarist gives you the opportunity to ask questions about chords and rhythms, and it gives you a chance to see and hear what the song is supposed to be like when it's performed live. However, the down side is that often a guitarist learns to play a song "their way", and they don't care about how it's "really" supposed to be played. Thus, you might not be learning the song exactly, but rather a slightly different version.
Concert Videos
Another place to learn is by watching concert videos, especially on DVDs where they allow you to pick camera angles. Often they will have a camera never breaks away from lead guitarist. By following along, you can learn exactly how a particular guitarist plays a particular song live.
The downside of this is that not every artist (especially new ones) has a concert DVD. Also, the guitarist may be playing the song differently live than on the album, so depending on how accurate you intend to be with your learning and playing, watching a video may not be the best way.
Chord Progressions
Songs are created using chords. Chords are derived from scales. The chords that are derived from one diatonic scale never change. If you learn the seven chords in the key of C major, then when you find a song in that key, you can quickly work out the chord progressions that make up the song.
Chords in C major
-
 C major
 -
 D minor
 -
 E minor
 -
 F major
 -
G major
-
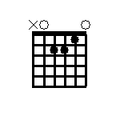 A minor
 -
 B half diminished 7th
.png)
Note that the chords in the key of C major consists of 3 major chords, 3 minor chords and 1 diminished chord. This holds true for all major keys.
Chord Theory
Songs in the key of C major will start with a C major chord and end with a C major chord. The tonic chord of C major is the chord that defines the key ( the name tonic is derived from the word tonal). If you think of music as a journey then the tonic chord is the starting point and the return point. The notes in the scale of C major are named:
I is the Tonic
II is the Supertonic
III is the Mediant
IV is the Subdominant
V is the Dominant
VI is the Relative Minor
VII is the Leading Note
VIII is the Octave
Tonic - is the first note of the scale and it is this note that determines the tonality or key, hence the name Tonic.
Supertonic – the word “super” comes from the Latin verb “superare” which means “to be above”. The second note of any scale is always above the tonic.
Mediant – the mediant refers to the fact that this note lies halfway between the tonic and the dominant.
Subdominant – the word “sub” means "to be below". This note is below the dominant.
Dominant – this note has this name because with the tonic it sets the tonality or key. The tonic and dominant notes, more than any of the others, determines the tonality of a piece of music. The fifth note of the scale is therefore a dominant factor.
Relative Minor – so called because this is the tonic note of the corresponding natural minor scale. Every major scale has a corresponding natural minor scale that contains exactly the same notes. So the relative minor of the C major scale is A natural minor. It is also called the submediant because is lies three notes below the octave as the mediant lies three notes above the tonic.
Leading-note – whenever you play a scale and arrive at this note, you will find that it naturally wants to move up to the octave note. People have a psychological expectation of music. The most important need is for the “musical journey” to have a start and end. If you were to play the C major scale and stopped at the leading-note, you would always have the sense that the scale is incomplete.
Octave – the same note as the tonic but an octave higher in sound and the end of the musical journey that a scale takes us on.
All the chords in C major take the same names given to the degrees of the scale. You can refer to the dominant note or the dominant chord.
Common Progressions
The tonic, subdominant and dominant are called the tonal chords. The supertonic, mediant and relative minor are called the modal chords. The tonal chords define tonality (key) and the modal chords suggest modality. If you play only the modal chords Am and Em from the key of C major the listener will eventually interpret the music to be in the key of A minor (aeolian mode). It must be noted that Am and Em has to be stated over a lengthy period of time. Analyzing chord progressions starts with the tonal chords:
Step One: Try the progression I-V (Tonic to Dominant)
Step Two: Try the progression I-IV (Tonic to Subdominant)
Step Three: Try the progression I-VI or I-III (Tonic to Relative Minor) or (Tonic to Mediant)
Step Four: Try the progression I-II (Tonic to Supertonic)
If you know the song starts with a C major chord and none of the above works then the song may contain chromatic chords. It is common practice to change the modal chords which are minor into their major counterparts. So D minor becomes D major and E minor becomes E major. The chromatic supertonic and the chromatic mediant are a common compositional device. Even though you have added chromatic chords the listener will still interpret the key as C major.
Try playing this progression: C - E major - Am - G
-
C major
-
 E major
 -
A minor
-
G major
In the above chord progression you have played a chord that doesn't belong to the key of C major. The tonality of the piece is preserved by the following chords which are diatonic to the key.
How To Continue Learning
- Take formal lessons from a qualified teacher. Be sure to seek testimonials and references.
- Watch others play. Notice what they have to pay attention to and what seems like magic.
- Practice arbitrary scale runs. Go up and or down 3 or 4 notes and then move up the scale with the same interval.
- Jam up with friends who are better than you as frequently as possible
- Get some friends along who are at the same skill level and form a band of your own
- Listen to your favorite music and try to envision what the guitarist is doing to make the notes come out as they do.
- Listen to different music. It may open your mind to techniques and phrasing you never imagined using before. It may also expand your musical library. Pick any genre you're not familiar with. Get a feel for the timing and note choice. Into classical? Try bluegrass. Headbanger? Pick up some jazz or blues. Then move on to your hero's heroes. Find out what musical influences got Jimi Hendrix, B.B King or Eric Clapton primed for stardom.
A great way to continue learning if you can already play is to teach guitar to other people.
Song Library
The following pages contain recommended links to external websites containing tabs, chords and video lessons which would help you learn playing the songs on your guitar.
Lead Guitar
Picking and Plucking
There are two major methods of right hand (for right handed players) techniques namely, either by using a pick (also called a plectrum) or fingers. The plectrum is very common in rock, country and pop music, where it is considered convenient for strumming and louder guitar sound. Use of fingers is most common among classical guitarists and flamenco players, as combination of strings better executed using the right hand fingers, and generally have softer sound than the pick. Other than classical guitarists and flamenco players, use of a pick or fingers is a matter of personal preference.
Striking
Using a pick
The primary advantages of the pick are its speed, its ease of striking large chords and, because the fingernails and fingertips are not involved, its preservation of player's picking hand. Furthermore, use of a pick makes a louder and brighter sound. Its primary disadvantage is its imprecision, making muting strings necessary. Also, if the player wishes to switch to the tapping style, he or she can tap with or with out the pick: to tap with the pick just put it on its side and tap it on the desired fret. However, tapping with a pick makes it harder to tap on multiple strings.
Finger Strumming
Players wishing not to use a pick may try finger strumming. This is accomplished by holding the picking hand's first finger to the thumb, much as one might hold a pick, and striking the strings with the first fingernail. Another way is to do all down strokes with the thumb and all upstrokes with the index finger; like one is 'petting' the strings.
Apoyando Strikes
Apoyando, or splinter rested, involves the finger picking through a string such that the finger stops when resting on the next string. This technique produces a strong, loud tone, and is considered the opposite of Tirando.
Tirando Strikes
When performing a tirando, or shooting splinter strike, the finger does not affect the next string at all. This is the opposite of apoyando.
Fingerpicking
Fingerpicking is a method of playing the guitar where you use your thumb and at least one other finger to pick or pluck notes, using your fingernails, fingerpicks or fingertips. Talented players can use all five fingers on their picking hand, but many players only use four fingers and use their pinky finger as a brace on the guitar. Most classical guitarists alter the shape of their picking hand fingernails for the purpose of producing a desired sound, however this is not necessary in non-classical music; one can purchase fingerpicks to fit on the hand.
Generally fingerpicking involves picking through chords organized in a melody. Fingerpicking is used extensively in folk guitar and classical guitar, but it is also common in other genres.
Fingerpicking is surprisingly easy on an electric guitar, which is strange because fingerpicking is often regarded as an acoustic style. The player may hold his or her picking hand's fourth finger against the right edge (left edge on a left-handed guitar), and if it is held straight and steady, this technique may be used to brace the hand. This technique is called anchoring, and is frowned upon by some players. It is possible on acoustic guitars by using the bridge similarly, but this is not as effective as it will deaden the sound. Classical guitarists never anchor while playing.
When strumming with individual fingers, general rule is move the wrist only if the thumb is used, while if any other finger is used, only said finger will be used.
When you start trying to learn, your finger coordination will be terrible and it is easy to be discouraged. It takes several weeks to let your muscles develop, but if you practice using all your fingers at once your overall dexterity will increase much faster.
Classical picking
In classical guitar repertoire, there will be a "PIMA" marking for the picking hand fingers (right hand for right handed players), which indicate which finger to use:
- Pulgar, or thumb.
- Indice, or index finger.
- Medio, or middle finger.
- Anular, or ring finger.
These four are the ones that are used most frequently. Sometimes, the fourth finger is used, in which it is marked either C, X or E.
Typically, the thumb has a down-picking motion and the fingers have an up-picking motion.
![]() Guitar J.S.Bach Musette for Anna.mid (help·info)
Guitar J.S.Bach Musette for Anna.mid (help·info)
Clawhammer and frailing
Clawhammer, sometimes known as frailing, is a method generally used with the five-string banjo and is characteristic of traditional Appalachian folk music of the U.S. It is primarily a down-picking style, and the hand assumes a claw-like shape and the strumming finger is kept fairly stiff, striking the strings by the motion of the hand at the wrist and elbow, rather than a flicking motion by the finger. Typically, only the thumb and second or first finger are used and the finger always downpicks, flicking the string with the back of the fingernail.
A common characteristic of clawhammer patterns is the thumb does not pick on the downbeat, as one might in typical finger-picking patterns for guitar. For example, this is a common, basic time signature|2/4 pattern:
- Pick a melody note on the downbeat (quarter note)
- On the second beat (music)|beat, strum a few strings with your strumming finger or brush with all fingers (roughly an eighth note)
- Immediately following (on the second half of this beat), pick a note with the thumb, usually the shorter fifth string. (roughly an eighth note)
Here, the thumb plays the high drone (fifth string) on the second "and" of "one and two and". This combined with the second finger strumming provides a characteristic "bum-ditty bum-ditty" sound.
Some people, however, make a distinction between frailing and clawhammer:
- In frailing, the first fingertip is used for up-picking melody, and the second fingernail is used for rhythmic downward brushing.
- In clawhammer, only downstrokes are used, and they are typically played with one fingernail as is the usual technique on the banjo.
Travis Picking
Another well known style of finger picking is called Travis picking, named after Merle Travis who was a country singer known for his legendary picking skills. When picking, you use your thumb and first finger to hit notes at the same time, creating a double stop or interval, and then continue picking with the first finger. Usually the thumb is responsible for picking the bass line, while the first/second finger is for melody. Skilled players can carry two separate melodies with the upper and lower strings.
You can create impressive rhythms playing with just your thumb and first finger, but to really become talented you must practice using more fingers. For example, Chet Atkins expanded to use all three fingers, with thumb for bass line.
![]() Guitar - Oh My Darling Clementine - Folkpicking.mid (help·info)
Guitar - Oh My Darling Clementine - Folkpicking.mid (help·info)
Rasgueado
The rasgueado or splinter striking technique originated from Spanish flamenco music, and usually refers to three or four fingers and sometimes the thumb striking the strings in quick succession. The notes quickly follow one another and produce a "rattling" or cascading effect.
Scruggs style
Scruggs-style finger-picking is a syncopated, five-string banjo style used in bluegrass music. It is played with thumb, first and second fingers; the fourth and/or third fingers are typically braced against the head of the instrument. The strings are picked rapidly in repetitive sequences or rolls; the same string is not typically picked twice in succession. Melody notes are interspersed among arpeggios, and musical phrases typically contain long series of staccato notes, often played at very rapid tempos. The music is generally syncopated, and may have a subtle swing or shuffle feel, especially on mid-tempo numbers. The result is lively, rapid music, which lends itself both as an accompaniment to other instruments and as a solo.
Scruggs style picking was popularized by Earl Scruggs in the early 1940's in rural North Carolina.
Tapping
Tapping is a style of playing where notes are created by quickly pressing, or tapping, the string down on the fret that you want to play. Usually tapping involves both hands, and most often it is on an electric guitar. It is possible to tap on an acoustic, but you cannot hear the notes as clearly as on an electric.
Scales

Western music uses twelve notes called the complete chromatic scale. The seven white keys and their corresponding black keys on a keyboard allows for easy visualization of the complete chromatic scale and the twelve semitones. From this simple twelve note system are all the other scales derived. A scale is simply a way of ordering the twelve sounds found in Western Music. It must be borne in mind that music as an activity precedes musical theory and that the scales we use now have an evolution that predates written records. Today's scale system is referred to as the major-minor system. Go back to the Medieval period and the system used then was called the Church Modes. The study of scales should start with the major scales and minor scales or the blues and pentatonic scales. Unlike the piano where each semitone is represented by a key; on the guitar each semitone is represented by a fret. Pianists visualize the chromatic scale as the seven white keys and five black keys but guitarists should visualize their complete chromatic scale as all the notes from the open E string (low) up to the open high e string. Basically play all the open notes and fretted notes on the first four frets in sequence starting with the low open E string and ending on the high open e string. This is the complete chromatic scale over two octaves as visualized on the guitar. Scales take their names from the first note played - the C major, C minor, C diminished are all scales that start with C. For historical reasons the major scale and the minor scale consists of seven notes. Other scales may use more than seven notes and some (e.g. pentatonic = 5) less than seven notes.
It is important to remember that on the guitar, if you know the pattern of a particular scale, you can move that pattern anywhere else on the fret board and be playing in a different key. By this, I mean if you are playing a major scale, beginning on the low E string at the fifth fret, which is an A note and then you played the same pattern of notes, but you started on the 3rd fret of the low E string, you will be playing a G major scale. If this sounds confusing to you, read the entire article, and if it is still unclear, see the musical scale article on Wikipedia or the Music Theory wikibook.
There are many different scales: the major scale, three different forms of the minor scale, the blues scale, the pentatonic scale, the whole tone scale, the diminished scale and some scales that originated in Spain and India. There are also very interesting scales from eastern music. It is possible to create your own scales by altering another as you wish, or completely coming up with your own. Note that though there are three minor scales (Natural. Harmonic and Melodic) you don't actually have to learn three different scales. The Harmonic and Melodic Minor scales are variations of the Natural Minor scale. After you have learnt, for example, the A natural minor scale, you only have to sharpen the seventh note to change it to a Harmonic minor scale. The Melodic Minor has two notes sharpened - the sixth and seventh note. Once again the reasons for the existence of these scales is historical. The Harmonic minor scale is so called because it is from this scale that minor harmony is usually taken. A simpler way of saying this is that the Harmonic minor scale is the scale we use to build the chords in a minor key. The Melodic Minor scale is so called because this scale is frequently used for building melodies.
The "Circle of Fifths" is a memory aid for learning the major and minor scales which can equally be applied to all scales. The scales in common use have evolved over many centuries and the established major scale, followed by the natural minor and then the two variants: the harmonic minor scale and the melodic minor scale form the basis of Western music. The "Circle of Fifths" and major scales in tab can be found in the Scale Manual section of this book.
All scales in this section are in the key of A and presented in tab except the Hungarian Minor which is given in the key of C. This means that the root note of all these scales is A.
Pentatonic Scales
Pentatonic scales are the least complicated, because they have five notes rather than the seven notes used in the major scale. The pentatonic scale is used extensively by blues and rock guitarists and provides an ideal starting point for jamming along with recorded music. A very famous song that uses the A minor pentatonic is "Stairway To Heaven" by Led Zeppelin.
A Minor Pentatonic
A-C-D-E-G-A
Most guitarists feel comfortable beginning with the A minor pentatonic, which is the single most popular scale for solos in Western music. Most guitarists know this shape of the Am pentatonic scale by heart, mainly because it is so frequently used in solos. It can also be used for pretty much anything, especially if you want to give it a slightly melancholy sound.
Remember that this scale pattern (and any other scale pattern) can be moved up and down the fretboard therefore allowing the guitarist to play in many different keys using the one shape.

In this diagram, the notes are ordered sequentially up the scale (going higher in pitch). The different octaves of the first degree of the scale (in this case, the A note) are highlighted with a yellow dot.
Learning the Scale
When you are learning any scale, it is helpful to break it down into smaller chunks, which can be practiced and memorized much more easily. With the A minor pentatonic scale, it is most commonly broken down into these sections.
Section 1:
e |--0-------3--
B |-----1----3--
G |--0-----2----
D |--0-----2----
A |--0-------3--
E |--0-------3--

Section 2:
e |-----3-----5--
B |-----3-----5--
G |--2--------5--
D |--2--------5--
A |-----3-----5--
E |-----3-----5--

Section 3:
e |--5--------8--
B |--5--------8--
G |--5-----7-----
D |--5-----7-----
A |--5-----7-----
E |--5--------8--

Section 4:
e |-----8-----10-
B |-----8-----10-
G |--7-----9-----
D |--7--------10-
A |--7--------10-
E |-----8-----10-

Section 5:
e |----10----12--
B |----10------13
G |--9-------12--
D |----10----12--
A |----10----12--
E |----10----12--

Scales should be practiced repeatedly and slowly. Scales are an ideal way to improve hand co-ordination and finger memory which in turn leads to a personal technique. A common technical problem associated with the guitar is string noise. Even a simple chord movement from C to Am should be played at the slowest speed possible with care being taken not to bend the strings and for each note, open or fretted, to ring out clearly. The A minor pentatonic shapes shown above should be played slowly up and down. If you are playing with a plectrum then practice alternate picking or tremolo picking. To play scales with fingers just alternate the index and middle finger of the right hand. If you are using a steel-string acoustic then to avoid tendonitis and hand fatigue it is advised that you tune your guitar down a tone when practising scales.
The Blues scale
Please see the Blues section for more lessons.
You can easily modify the minor pentatonic scale by adding a single note and turning it into the blues scale - the flatted fifth note (b5) of the scale. In the diagram below, A blues scale is shown at the fifth fret. The number represent the frets played, and the numbers in parentheses represent the Blue Note which, as the name suggests, is the major source of the blues vibe in the scale. The blue note is not actually part of the Minor Pentatonic scale, although it is often added in for extra colour.
e |--5--------8--
B |--5--------8--
G |--5-----7-(8)-
D |--5-----7-----
A |--5-(6)-7-----
E |--5--------8--

Major Pentatonic
The A major pentatonic also has five notes:
A-B-C#-E-F#-A

The major pentatonic can be formed from any seven note major scale by simply leaving out the fourth and seventh note. The difference between the A minor pentatonic and the A major pentatonic is their modality. They both use the same first degree, however it is the interval between the first degree and the third that defines a scales modality. In the major pentatonic we have a major third (A - C#) so therefore the modal quality of this scale is major. The minor pentatonic has a minor third (A - C) and therefore the modal quality of this scale is minor. Though they both have the same tonality by starting on the same note they differ in sound. Understanding that it is the third of a scale that determines whether a scale is minor mode or major mode is important. In a scale the I, IV and V notes are called the tonal degrees and the III, VI, and VII notes are called the modal degrees.
e |-----5---------
B |-----5-----7---
G |--4-----6------
D |--4--------7---
A |--4--------7---
E |-----5-----7---

Practice this the same way you practice the minor pentatonic scale. When you feel completely comfortable with both pentatonic scales, begin to explore the other different scales.
Major Scale
The pattern for any major scale is 2-2-1-2-2-2-1, meaning that the difference from the first note to the second is 2 frets, from the second to the third is 2 frets, from the third to the fourth is 1 fret, etc. The difference in notes can also be called steps, 2 notes being a whole step, and 1 note being a half step. This pattern in steps can be shown as W-W-H-W-W-W-H or as full tones and semitones T-T-S-T-T-T-S.
Major scale in the key of A
A-B-C#-D-E-F#-G#-A
e |-4-5---------
B |---5---7-----
G |-4---6-7-----
D |-4---6-7-----
A |-4-5---7-----
E |---5---7-----

Three scale concepts at a glance
Here all major patterns are shown in comparison to each other in the common 3 scale concepts. We are roughly based on the C major scale.
- Start with the CAGED scales
- Find the square and use it to determine the fundamental tone of the major scale.

- Derive the first and second fingerings from this.
- Place the second fingering under the first.
- Connect the lower half of the second fingering to the first fingering using the third fingering.
- first fingerings

- second fingerings

- third fingerings

- Use it to learn the 5 CAGED scales.
- Connect the 5 CAGED scales to the slide module.

- Note the change in position between the G and B strings.

- Familiarize yourself with and engage with the CAGED scales.
- Then learn how to easily expand ANY CAGED scale.


- Learn an alternative third fingering and use it to expand your CAGED scales to the 3 Notes Per Strings scales. (3NPS)
- Alternative third fingering


- Be aware that none of the concepts can be learned and mastered in a weekend. Don't be blinded by false promises on social networks and don't listen to everything that is intended for advanced guitar students.
If you later want to play more demanding polyphonic arrangements (especially jazz, classical and fingerstyle), expand the CAGED and 3NPS scales to the so-called Berklee scales by William Levitt.
- Notes of the C major scale on the fretboard
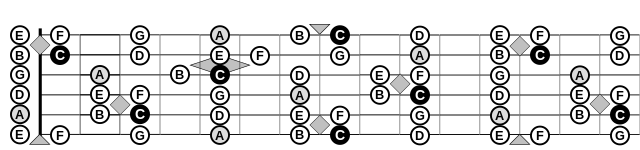
- Intervals of the C major scale (transferable to other keys).


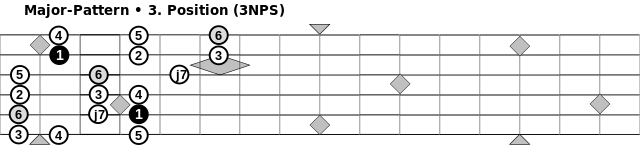

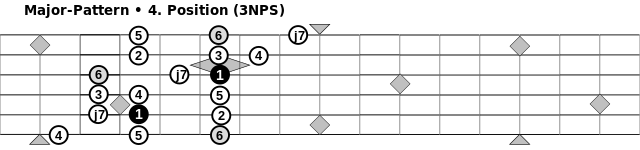


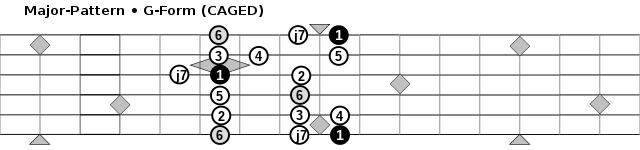

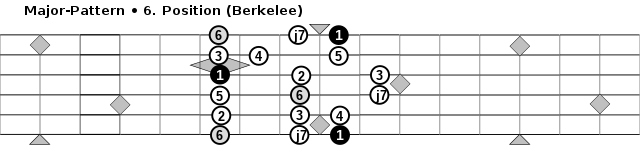


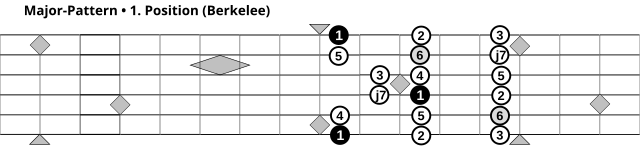


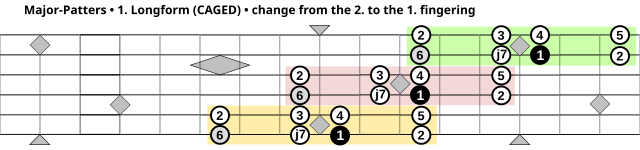


adopted from the German-language Wikibooks. here: chapter about the major scales translated from google.
Natural Minor Scale
The pattern for any natural minor scale is 2-1-2-2-1-2-2, shown in steps as W-H-W-W-H-W-W
Natural Minor Scale in the key of A
A-B-C-D-E-F-G-A
e |---5--------
B |---5-6---8--
G |-4-5---7----
D |---5---7----
A |---5---7-8--
E |---5---7-8--

The movable shape for this scale is shown:
e |-------|---x---|-------|-------|-------|
B |-------|---x---|---x---|-------|---x---|
G |---x---|---x---|-------|---x---|-------|
D |-------|---x---|-------|---x---|-------|
A |-------|---x---|-------|---x---|---x---|
E |-------|---x---|-------|---x---|---x---|
             5th
Harmonic Minor Scale
The Harmonic minor scale has a very different quality than the minor pentatonic scale. It has a "middle-eastern" sound when used to play lead lines.
A-B-C-D-E-F-G#-A
This is a moveable shape and to play in other keys just move the shape up or down the neck:
e |--4--5-----7--8--
B |-----5--6--------
G |--4--5-----7-----
D |--------6--7-----
A |-----5-----7--8--
E |-----5-----7--8--

This looks a little more complicated, and is certainly more difficult to get to sound nice, but when you have mastered it, it will sound great!
Melodic Minor Scale
This scale is actually two scales. Thus when one speaks of a "melodic minor" pattern, one refers to two patterns - one ascending and one descending.
A-B-C-D-E-F#-G#-A (ascending) A-G-F-E-D-C-B-A (descending)
This is best illustrated by playing the melodic minor scale. Below is the A melodic minor scale in tab; note the sharps when ascending and the naturals when descending.

The ascending pattern is constructed by raising the 6th and 7th steps of the natural minor scale.
When descending the normal natural minor scale is used without the 6th and 7th raised. The reason for this is to be found in singing. Vocalists find the augmented second between the F and G sharp in the Harmonic minor scale very awkward to sing. It is not impossible but the dissonance of the interval and the sense of "leaping" meant that a different approach was sought. The answer was to also raise the sixth note. The awkward augmented second was gone and the melody flowed better due to the absence of the leap.
Hungarian Minor
The Hungarian minor scale is a type of combined musical scale. It is akin to the harmonic minor scale, except that it bears a raised fourth. Its tonal center is slightly ambiguous, due to the large number of half steps. Also known as Double Harmonic Minor, or Harmonic Minor #4, it figures prominently in Eastern European music, particularly in gypsy music. Melodies based on this scale have an exotic, romantic flavor.
e |--7--8-----10--11--
B |--7--8--9----------
G |--7--8-------------
D |--------9--10------
A |--------9--10--11--
E |-----8-----10--11--

A Hungarian minor scale in the key of C would proceed as follows:
C-D-Eb-F#-G-Ab-B-C
Its scale degrees are 1 2 b3 #4 5 b6 7 and its step pattern w - h - + - h - h - + - h, where w indicates a whole step, h indicates a half step, and + indicates an augmented second.
Derived chords
Chords that may be derived from the Hungarian minor scale are:
-
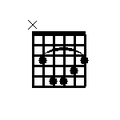 C Minor
 -
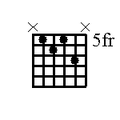 D7 Flat Fifth
 -
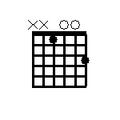 E Flat Augmented
 -
G Major
-
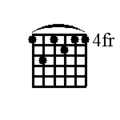 A Flat Seventh
 -
 B Minor Sixth


This scale is obtainable from the *Arabic scale by starting from the fourth of that scale. Said another way, the C Hungarian minor scale is equivalent to the G Arabic scale.
In the video game, The Illusion of Gaia (published by the Enix Corporation), the flute melody found in the Inca Ruins uses the C Hungarian minor scale (a #4 is used in the second phrase); this music is also quoted when the player reaches the Larai Cliff stage of the game, transposed to D.
Joe Satriani has composed several songs using the Hungarian minor scale.
Church Modes
The Church Modes preceded the Major-Minor system. The student is advised to listen to the music of Palestrina as well as the jazz album Kind of Blue by Miles Davis; both use modes to great effect.
For example, in the key of C, the notes are:
C-D-E-F-G-A-B-C
If you wanted to play in the 2nd mode, called the Dorian mode, then you would just play the same notes, but start on the second note. So instead you would play:
D-E-F-G-A-B-C-D
The different modes are called:
- Ionian
- Dorian
- Phrygian
- Lydian
- Mixolydian
- Aeolian
- Locrian
The Phrygian mode - E F G A B C D E - is of special interest to flamenco players. The third and seventh degrees are often sharpened, giving the scale notes E F G# A B C D# E. This arrangement is commonly used in descending form. The second degree of the scale is referred to as a leaning note, which means the note tends to fall one semitone. In this case F falls to E.
Arpeggios and Sweep Picking
Introduction
The word arpeggio (ar-peh-jee-oh) is Italian for "like a harp". It is a common technique for playing chords on the harp. To play an arpeggiated chord on the guitar, pick each note of the chord slowly, one string at a time. You can play arpeggios with a plectrum or fingerstyle.
Exercise 1
Below is a simple arpeggio study using these chords:
-
 A major
 -
 D major
 -
E major
.png)
Sweep picking
Sweep picking is a more specialized technique, occurring most often in metal. It involves playing a fast arpeggio with a special technique: when switching from one string to the next, mute the note currently ringing by lifting the fretting finger. A sweep can become a rake if notes are muted incorrectly. Rakes can sound nice, but they are not sweeps. Remember only one note can ring out at a time or it won't sound good. It takes practice and it helps to start slow and build up speed.
Below is example tablature of sweep picking:

This is not the only way to notate sweeps. Small sweeps can be indicated with grace notes or even the arpeggio notation with the word "sweep" (or, less correctly, "rake") written above.
In a more classical approach, arpeggios must follow a distinct pattern of notes depending on the chord/scale we're playing. This is similar to playing chords note-by-note on a piano (not on a guitar).
The basic chords (the major and minor triads) are composed of three tones: the first, the third and the fifth note of the scale (major or minor, depending on the chord type).
For instance, the C major scale is: C D E F G A B. So, according to the 1-3-5 principle, the C major triad consists of C, E and G. Note that the C major chord on a guitar also consists only of these three notes but they are not always in the 1-3-5 order. Now, while playing "classical arpeggios", you would not just pick around the chord randomly but you would play C, E, G, then C, E, G an octave higher, etc. This is what is called an arpeggio scale. You can play around it, up and down with complete freedom or just use the 1-3-5 pattern as a bass line. This method can also be used with more complex chords (sus4, maj7, etc.) but then it follows a pattern different from 1-3-5 structure, depending on the chord type. In all, this is a very simple but effective method for composing.
While playing guitar, this might not appear as interesting as picking "full" six-string chords but it can be used to give your music a classical edge. It also has a more lead quality to it than using full chords and requires more skill. Playing fast arpeggios like these is sometimes used in metal music with very satisfactory results. The "classical arpeggios" are in no way better than the "harp like chords" and it is ultimately up to the player/composer to choose what is best for the song in question.
External links
Slides
The slide is one of the simplest guitar techniques. There are two kinds of slides: shift slides and legato slides. In a shift slide, a note is fretted, then struck, and then the fretting finger slides up or down to a different fret, and the string is struck again. A legato slide differs in that the string is struck only for the first note.

The first slide pictured is a shift slide; the second is a legato slide. A few tablature writers do not distinguish between the two slides, using only shift slide notation. The abbreviation "sl." for slide may be omitted. When sliding from a higher fret to a lower fret, the slanted lines are usually changed to have a downward slope instead of an upward slope, to emphasize the sliding "down". It is possible to slide up from an open string, but this often does not sound as clean because this requires a hammer-on at the first fret (or for really fast slides, a higher fret) before sliding up. Likewise, it is possible to slide down to an open string but it requires a pull-off at the first (or some other) fret.
In Internet tablature, a slide from the third fret to the fifth might be written like any of these:
   3/5
   3>5
   3>s>5
   3s5
Internet tablature rarely distinguishes between the two kinds of slides.
Less commonly, tablature can instruct the guitarist to "slide into" or "slide out of" a note. In printed tablature, they are notated identically except, in the case of slide-into, the first note is omitted, and in the case of slide-out-of, the second note is omitted. In other words, the note slides in from nowhere, or out to nowhere. It simply tells the guitarist to quickly slide from or to an arbitrary point, usually only a few frets away.
Good sliding keeps the new note audible, while keeping the note in tune. If you don't press the string hard enough, you mute the string or buzz it on the frets. Too hard and the string bends out of tune. The latter does not happen often, but sounds awful and should be avoided.
- Example
- C C C C | F F C C | G F C G
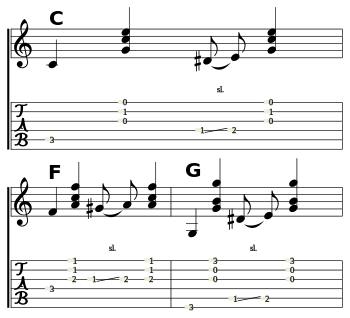
 Guitar Slide Training - Folkblues in C.mid (help·info)

- E E E E | A A E E | H7 A E H7

- Guitar Slide Training - Folkblues in E.mid (help·info)

Hammer-ons, Pull-off, and Trills
Hammer-ons and pull-offs are two closely related techniques. They are used to play legato, that is, in a smooth manner, and are also used to help the guitarist to play faster. They are most commonly used in electric guitar work, but can be used in acoustic tunes as embellishments.
The hammer-on

Hammer-ons can be done anywhere on the fretboard, but for the beginner it is easiest using an open string. To quickly learn, strike an open E on the first string. While the note is still ringing, quickly and firmly press a finger on the third fret. If done properly, a G note should be sounding.
Quickly pressing your finger down and raising the note without hitting the string again is called "hammering on". Without electric amplification, the hammer-on tends to be quieter than regularly struck notes, especially if you haven't practiced it! Because the strings are closer to the fretboard, hammer-ons are easier to execute on an electric guitar. However, this doesn't make them less common on an acoustic guitar, where they are used frequently to embellish open chords
The hammer-on can just as easily be played with fretted notes: just play the note normally and hammer onto another (higher-numbered) fret on the same string. If you practice hammer-ons, eventually you will be able to move each finger smoothly and independently.
The pull-off

The pull-off is the opposite of the hammer-on. Again, using the E string, hold it at the third fret. Strike the string and while the note is still ringing, release the fretting finger. If done properly, the G should be followed by an open E. If the note doesn't ring out properly, try hitting the G harder and releasing faster.
Like the hammer-on, the second note tends to be less loud than the first. To help alleviate this, a slight sideways motion of the fretting finger while pulling off will add extra vibration to the string, and give you some extra volume. Often it is hard for a beginner to accomplish, and the sideways movement helps greatly.
A pull-off looks like this:
D|---7p5--5p4--4p2--2p0--|
The trill
A trill is two alternating notes, such as an A and A#. Only the first note is struck; the rest are rapidly hammered-on and pulled off
Bending and Vibrato
Bending and vibrato are two related effects which help give extra "life" to notes, especially sustained notes, by changing their pitch. The techniques are not commonly used on the acoustic guitar or general rhythm playing. However, they are extremely important to many styles involving distorted guitar, e.g., rock or metal, even when playing rhythm (though, in that case, bends and vibratos are usually embellishments). Bending or an equivalent effect is not possible on all instruments; the piano, for example, cannot have notes that change in pitch. This is one reason why it is important to know how to bend: because you can!
This section deals with bending and vibrato using your fingers, not the different technique of using the vibrato bar. The two techniques do the same basic thing, but using the vibrato bar as a substitute for fretting-hand bending is not good practice; it is best used for very heavy bends or heavy vibratos, not slight embellishments like finger bending. It is more difficult to be subtle with a vibrato bar, and it is usually a bit out of the way for the picking hand to reach, making it harder to use. In short, while in some cases which style of bending or vibrato is used is a matter of taste, the two techniques are not interchangeable and are used for different effects.
Bending

Bending is exactly as it sounds: bending the string to the side by pushing it (towards the sixth string) or pulling it (towards the first string), often while a fretted note is ringing. The first three strings are normally pushed, and the others are normally pulled. This is particularly important on the first and sixth strings, as you do not want the string to fall off the fretboard. Whether the string is pushed or pulled, the note will be raised in pitch.
Many aspiring guitarists cannot bend properly. The sound of a bend is more important than how it is actually executed or how it looks, but a bad bending technique usually leads to a bad sound. Your favorite guitarist might bend using just his or her fingertips and you might be inclined to copy this — don't! Your hands can sound every bit as good as your hero's without copying his or her technique. There are two keys to bending properly: proper thumb positioning, and bending with the proper muscles. Do not keep your thumb behind the neck, where it usually is, but bring it up perpendicular to the neck (a position that is normally incorrect, but not in the case of bending). Keep the fingers firm. Do not bend your fingers, but push or pull with your forearm. You will hardly see your forearm move, possibly just see a couple of muscles flex. It will feel awkward at first, but if you can bend with the thumb in the proper position and without bending the fingers, you are probably doing it correctly.
Many guitarists will have trouble bending more than 1/4 step (half a semitone) or perhaps 1/2 step (one semitone) with only one finger, especially on frets close to the nut and on the thinner strings. It is much easier to bend with more than one finger, for instance, with the index finger on the first or second fret and the ring finger on the third, and pushing or pulling with both fingers in order to bend at the third fret. More fingers may be used if this is not enough. It should be possible to bend at least a full step (the pitch difference of two frets) this way.
Pre-bending
Bending, whether by pushing or pulling the string, raises the tension in the vibrating portion of the string, and thus always raises the pitch of the note. This means it is easier to slide up rather than down in pitch. To create the impression of bending down, the guitarist uses a technique called pre-bending, that is, bending before the string is struck, then strike and release the bend (either gradually or quickly, depending on the intended effect).
Bend and Release
The ideas of bending and pre-bending can be combined for a "bend and release", that is, striking a note, bending it up, then releasing it as you would with a pre-bend. This will often be perceived as a "bounce" in pitch, especially if played quickly. The reverse is also possible: pre-bend, release, and bend. Repeatedly and steadily bending and releasing is called vibrato.
Vibrato
Players of many instruments, including the human voice, use vibrato to help add expression to sustained notes. Vibrato is performed in two major ways, the first by rapidly bending the string back and forth, causing a modulation in pitch; therefore, all of the information above about bending applies here, except it is performed faster or more prolonged. Or it can be performed in a 'classical' style where one applies pressure parallel to the string towards the neck then towards the bridge repeatedly, which allows one to achieve vibrato upward and downward in pitch, albeit with a smaller change. A small, subtle vibrato might not require the assistance of other fingers; the fretting finger should be sufficient. However, for sustained vibrato or vibrato on the first or second frets, using multiple fingers for bending is a good idea.
Harmonics
Harmonics are fun sounds to produce. They can be quiet and bell-like on an Acoustic or they can be loud and squeally on an overdriven Electric.
Harmonics Introduction

When you strike a note on the guitar, the sound generated is not just one note but a series of notes. The fundamental (also called the first harmonic) is the loudest and lowest of the series and fainter notes which all have their own frequency of vibration, amplitude, and phase are heard as well. The frequencies are integer multiples of the lowest frequency. Looking at the diagram you will notice that the upper partials (this is the name given to any sine waves associated with a complex tone) follow a pattern 2,3,4,5,6,and 7 and these equal-sized sections resonate at increasingly higher frequencies. The guitar technique described below shows how to play harmonics by lightly touching the string directly over the fret. You are essentially cancelling out certain partials from being heard by not allowing that part of the string to vibrate. Pianists have no means of manipulating strings to produce harmonics unless they lift up the lid of the piano and lightly touch the string. Woodwind instruments can produce harmonics by the technique of overblowing. It must be noted that we all tend to hear or play music as a "single sensation" and that the partials present are not considered or heard as separate during that experience.
List of natural harmonics
- 12th fret - octave above open string
- 7th or 19th fret - octave plus a perfect fifth above open string
- 5th or 24th fret - two octaves above open string
- 4th, 9th or 16th fret - two octaves plus a major third above open string
There are more harmonics than these but these are the easiest to produce and the most audible. They are ordered from lowest to highest in pitch.
Natural harmonics
Natural harmonics are the easiest to produce. A good place to begin is the 12th fret of the high e string. With your fretting hand, lightly touch a finger against the string directly above the 12th fret. Do not hold it down or apply any pressure. Then strike it with your picking hand and immediately release the string; almost simultaneously. If executed properly the result should be a high-pitched, silvery note. Try it again at the 7th and 5th frets; as shown on the Natural Harmonic fretboard diagram. Each harmonic shown on the diagram will produce a sound that is higher in pitch than its fretted note counterpart. Harmonics will sound quieter and the higher harmonics may be nearly inaudible without the overdrive of an amp.

Harmonic Chords
Below are the Harmonic chords of Em and Bm. Both chords are first inversion with the third in the bass. You can play Harmonic arpeggios, add the open low E string to the Harmonic Em chord or play a melodic phrase.

Below are the Harmonic chords of G and D. Both chords are second inversion with the fifth in the bass.

A good example of the use of natural harmonics is in the song Imperium by Machine Head. Clear 5th fret harmonics can be heard enforcing the low drop B tuning.
Pinch harmonics
Pinch harmonics are also known as Artificial Harmonics though there is really nothing artificial about them. This is an advanced technique and was popularized mostly by Billy Gibbons and later Zakk Wylde, as well as many others as early as the 1970s including many Heavy Metal artists. These harmonics follow the same principles of physics as a natural harmonic; the difference being how the harmonic is produced. In this technique a note is struck in a downwards motion with the pick and in the same motion the string is touched (one might really say brushed) with the edge of the thumb that is holding the pick. You can also use the edge of the index fingernail followed by the pick.
Pinch harmonics are most effective and audible using an Electric guitar with overdrive or distortion. These harmonics are virtually inaudible when using a clean (not distorted or overdriven) amp channel with the Electric guitar or when using an Acoustic. It can sound good when correctly used even without much overdrive but it's not always clear or detectable. Use overdrive or distortion for best results especially while learning and practicing this technique. This technique takes practice to master. Beginners may need to spend some time on scales, soloing, blues, riffing, strumming patterns before they feel comfortable enough to attempt this technique. It is mostly used in soloing and intense expressive riffing.
As mentioned above, these harmonics are produced by striking a note with the pick and touching the string with the picking thumb. Grip the pick so that the tip barely peeks out between your fingertips (this is why they are called "pinch" harmonics). It's easier when you are fretting a note with the left hand. Try fretting the 5th fret of the D string and plucking the string just below the neck pick-up pole pieces (maybe 1/8" toward the bridge from the pole pieces). The position of the plucking along the length of the string is one of the most important parts of this technique. While with regular picking the position of the picking along the string can make slight variations in the sound of the note, when executing pinch harmonics the right position is vital and tiny positional differences can make entirely different harmonics. So try adjusting the picking hand just millimeters up and down the string around the area of the pick-ups.
Try imagining the pick and your picking thumb plucking the string at the same time although the thumb is really just brushing past it. Consider it to be really one motion. Try thinking of your thumb and the pick as one entity and instead of picking straight down, pick down and a little bit (millimeters) out away from the face of the guitar so your picking motion is a sort of 'letter J' out from the face of the guitar and so the thumb brushes past the string and remember that the thumb should only touch the string for an instant just like the pick does.
Try executing pinch harmonics while fretting different notes and by striking the string in slightly different places all around the pickup area of the guitar. Many kinds of harmonic ringing sounds may be produced.
Without a pick, this technique may be simulated by plucking the string with the fingertip and lightly touching it with the fingernail. Classical guitarists use this technique and it is also found in jazz finger-style guitar.
These harmonics, as opposed to natural harmonics, end up being much more practical to use while playing and when mastered can be used boldly like Zakk Wylde making the harmonic part of the riff, or subtly and possibly unintentionally to add color and character to the notes or chords while playing almost anything.
Pinch harmonics can easily and effectively be combined with other techniques, such as bending or vibrato.
To hear pinch harmonics in action check out the following:
- Ozzy Osbourne's Ozzmosis (and several other albums) features many different examples of pinched harmonics in various solos.
- In the movie Rock Star at the beginning, the lead guitarist (Nick Catanese of Black Label Society/SPEED X) in Blood Pollution (the Steel Dragon cover band) is "not hitting the squeal". The squeal they're speaking of is a pinch harmonic.
- One of the best examples of a bend and a pinch harmonic is Judas Priest's Lochness off the album Angel of Retribution at about 1:10.
- In System of a Down's hit song BYOB it is the first bend in the chorus (Every bodys going to the party) part. It is the only PH in the song, so listen carefully
Don't despair if you can't get harmonics as clear as Judas Priest or Zakk Wylde, they've got equipment made just for making sounds like that. They both have expensive high gain amplifiers and their guitars are equipped with pickups that are naturally very good at pinch harmonics. Some pickups amplify pinch harmonics better than others (some pickups hardly amplify them at all). Judas Priest and Zakk Wylde both play guitars with EMG humbuckers, which are some of the hottest pickups and some of the best at amplifying pinch harmonics. Hot pickups (EMG, Duncan JB, Duncan Live Wire, Bill Lawrence 500XL) do an excellent job of picking up pinch harmonics. Once you've practiced at home, ask to try out a guitar with "hot pickups" and a "high gain" amplifier at the local guitar shop if you want a taste(warning: it's easy to get spoiled/hooked!).
Tapped harmonics
This technique, like tapping itself, was popularized by Eddie van Halen. Tapped harmonics are an extension of the tapping technique. The note is fretted as usual, but instead of striking the string, the string is tapped at one of the frets listed in the natural harmonic list. Do not hold the string down with the tapping hand, just bounce the finger lightly on and off the fret. This technique can be extended by fretting a note, then tapping relative to the fretted note. For instance, hold the third fret, and tap the fifteenth fret, for the twelfth fret harmonic, because 12+3=15.
Other techniques
A final technique (known as the harp harmonic) is a sort of combination between the natural and tapped harmonic techniques. Fret the note normally, and place the picking hand index finger on a natural harmonic relative to the fretted note (just as in tapped harmonics). Pluck the string with another finger and release the index finger, just as if producing a natural harmonic.
Tremolo Bar Techniques
The tremolo bar was originally only found on Fender guitars, but now they are on many types of electric guitar. Unfortunately, it has an inappropriate name, because "tremolo" means a fast succession of two different tones. A more accurate but less common name is the vibrato bar, and they are also known as whammy bars.
There are several different types of tremolo bars, details of which can be found in the Anatomy of the Guitar section, but certain types can only perform certain techniques. Thus, you should make sure the tremolo bar you have can do what you want it to do, before you buy it.
In general, it is good to learn to hold the tremolo bar between your third and fourth fingers, so you can use the bar and hold a pick at the same time.
This section will provide a description of how to accomplish various techniques, but it will be up to the guitarist to discover how to perform them.
Dive Bomb
A Dive Bomb may be achieved by striking a natural harmonic then lowering the tone. An "explosion" may added by keeping the bar pressed down and flicking the low E string repeatedly.
Also, there is an alternative way to do a dive bomb, by flicking a string, dipping the bar down, tapping a harmonic, then manipulating the resulting note however you want. This technique is also known as a "Squeal", or "Dime Squeal" named after Pantera guitarist, Dimebag Darrel.
Dipping
Dipping is a technique that allows you to make note changes a little more interesting. Before you change to a higher note, use the bar to quickly lower and then raise the pitch.
Cat Purr
With this technique, a pitch is held for a beat, and then raised up a tone. The lever is moved slowly, and once you reach the upper or lower tone, you immediately hold, and then reverse direction. This results in a sound that can sounds remarkably like a cat.
Ruler Sound
If you press the tremolo bar down, and then suddenly release it upwards and quickly alternate between high ups and down, it makes a snap-away sounds, like a ruler vibrating off the edge of a table. The principle behind this is similar to the cat purr.
Windmill
The "windmill" develops if you just keep turning the tremolo bar in a circle. Naturally, the tone moves up and down at a regular pace. However, this can sound very "outer space" and can easily be over done, and you should use this sparingly.
String Choke
If the strings are really slack, you can quickly whip the tremolo bar back up until it clicks, making a string choke. Sometimes overtones will remain, and you can get some interesting sounds and harmonies. However, these tend to disappear quickly as it is drowned out by the harmonics of the new string pitch.
Tapping
Fretboard Tapping

Tapping is the short name of fretboard tapping or finger tapping, a technique where the fingers hammer down (tap) against the strings in order to produce sounds rather than striking or plucking the strings. If both the left and right hand are used then it is called two-handed tapping.
It is not clear who first developed tapping but it was certainly popularized by Eddie van Halen. Van Halen was listening to Heartbreaker by Led Zeppelin and he was quite inspired by the solo, which contained a variation of tapping. This is arguably the song that pushed Van Halen to use "tapping" frequently.
A rather different kind of independent two-handed tapping was discovered by Harry DeArmond and named "The Touch System" by his student Jimmie Webster. The "Touch System" is a complete playing method rather than a technique. Another method of independent tapping was discovered by Emmett Chapman, where the right hand comes over the fretboard and lines up with the frets like the left. The three kinds of tapping techniques are:
Interdependent tapping
Interdependent tapping is by far the most common type of tapping. It is generally used as a lead guitar technique, most commonly during solos; however, a small number of songs are entirely tapped. The player's picking hand leaps out to the fretboard and begins to tap the strings with the fingers. However, one must get the pick out of the way in order to tap. Some players do this by sticking the pick between their fingers; others simply use the middle finger to tap.
The Van Halen technique of getting rid of the pick is done by moving the pick into the space between the first and second joints of his middle finger. Eruption by Eddie Van Halen is a good example of this technique.
The Touch System

As mentioned before, this is a whole playing style and a whole book could be written about it. The first musician to play this way was pickup designer Harry DeArmond in the 1940's, who used tapping as a way to demonstrate the sensitivity of his pickups. While each hand could play its own part, DeArmond held his right hand in the same orientation as conventional guitar technique. This meant the ability of that hand to tap scale-based melody lines was limited. He taught his approach to Gretch Guitars employee Jimmie Webster, who wrote an instruction book called "The Touch System for Amplified Spanish guitar." Webster made a record and travelled around demonstrating the method. Even though it inspired a few builders (Dave bunker, for example), the Touch System was limited by the lack of equal movements for the right hand and never caught on.
The Free Hands Method
In 1969 Emmett Chapman, who had no previous knowledge of DeArmond, Webster or any other tapping guitarists, discovered that he could tap on the strings with both hands, and that by raising the neck up could align the right hand's fingers with the frets as on the left, but from above the fretboard. This made scale-based melody lines just as easy to tap in the right hand as the left, and a new way of playing a stringed instrument was born. Chapman redesigned his home-made 9-string guitar to support his new playing method, and began selling his new instrument (The Chapman Stick) to others in 1974. In 1976 Chapman published his volume of collected lessons he used for teaching guitarists and Stick players as "Free Hands: A New Discipline of Fingers on Strings."
It has been popularised by players such as Tony Levin, Nick Beggs, John Myung, Bob Culbertson, and Greg Howard, and is currently experiencing a surge in popularity due to the internet. Stanley Jordan became famous in the 1980s for using the same method on the guitar. Jordan discovered the method independently after Chapman did, was signed to Blue Note Records, and released several successful albums.The method that Chapman invented and Jordan also used allows complete self-accompaniment and counterpoint, as on piano.
Rhythm Guitar
Chords
A chord is two or more different notes played simultaneously. Most chords have three notes though. Chords derive their names from the root note; so a C chord has C for its root note and a G7 chord will have G. The interval between the root note and the third determines whether a chord is a major or minor. Chords may be strummed or the notes picked individually though beginners find strumming much easier. The more advanced technique of picking is examined in the Picking and Plucking chapter.
While chords are primarily used for rhythm guitar, basic chord knowledge can be important for lead playing as well. Knowing how chords are constructed can help when learning the lead parts of many songs since there is always a relationship between a chord and the lead part. For example, if you have to play a lead part over a C major chord (C-E-G) and you use the notes of a D flat major chord (Db-F-Ab) then the result will be very dissonant. Additionally, many lead patterns revolve around arpeggios. These are chords with their notes played in sequence (the word "arpeggio" actually means "broken chord") rather than together. For more information on arpeggios, see the Arpeggio and Sweep Picking chapter.
Chords are easy to play though understanding the theory behind chord construction (harmony) will require some understanding of scales. While it is not essential to have a knowledge of scales to be able to use this section, understanding scales will definitely improve your general musicianship. With that in mind, go ahead and learn and use these chords without worrying too much about the theory and when you have the time take a look at the page on general music theory and the page on scales.
Beginners are advised to start with open chords, which are often the easiest chords to form. Learning open chords is important because it sets the stage for learning how to form barre chords. Barre Chords are chords you form by pressing all (or some) of the strings down with the first finger. This finger acts as the barre (the same job that the nut of the guitar does when you are playing open chords). Because of this barre chords don't usually include open strings and can be moved freely up and down the neck. As you move your barre chord, the shape of the chord remains the same although all the notes change. Barring is an important technique and greatly opens up the neck of the instrument.
Different Kinds of Chords
Major chords
The most basic chord is called a triad and consists of three different notes. A major triad consists of the root, a major third, and a perfect fifth. The early study of chords should be based around how to build the tonic triad (chord) from any major scale. To build the tonic triad you take the first note of any major scale and the third note (a major 3rd) and the fifth note (a perfect fifth). Take for example building a tonic triad (chord) from the C major scale. If you look at this C major scale:
C-D-E-F-G-A-B-C
you will notice that the first, third and fifth notes of the scale are C, E, and G. The most obvious thing that most guitarists become instantly aware of is that the C major played in the first position actually involves playing 5 strings and therefore must have more notes than a triad. The C major chord shown below has these notes C, E, G, C, E. If you cancel out the doubles you are left with a C major triad. This brings us to an important rule: any chord tone (note) can be doubled without affecting the chords designation. Therefore a C major triad (C-E-G) and the first position C major chord below (C-E-G-C-E) are both still C major chords though the 5 note version will sound fuller due to the note doubling. Major chords have a characteristically bright and happy sound.
-
C major
Minor chords
The minor triad consists of a root, a minor third and a perfect fifth. The interval between the root and third is a minor third and the interval between the root and fifth is a perfect fifth. Minor chords have a dissonant quality due to the interval of a minor third. It must be remembered that we are talking about building chords from scales and that these intervals, the minor third and perfect fifth, are the interval designations from the scale which are then applied to naming the intervals in a chord. Which is why the triad intervals are not named 1st, 2nd and 3rd respectively.
Minor chords are best understood in relation to their major chord counterpart. In the example below we will use E major and E minor. When we play an E major chord, we can flatten the third of the chord by lifting the finger that is holding down the third string at the first fret, making it an open string. By altering this one note so that the interval is changed from a major third to a minor third, we have formed a new chord: E minor.
-
E major
-
E minor
Switching between major and minor chords can be relatively easy, as it involves the change of only one note. Some chord changes, for example changing between an open F major to a F minor, will need a little more effort.
Dominant Seventh chords
A minor seventh is added to a major chord. When a minor seventh is added to any major chord that major chord is changed into a dominant seventh. The dominant chord always refers to the chord built on the fifth degree of any major scale. Look at the C major scale below:
C-D-E-F-G-A-B-C
The fifth degree of the scale is G. The chord built on the fifth contains the notes: G-B-D. To change this dominant major chord to a dominant seventh you need to add a fourth note. The note you add is F (the minor seventh) which now makes: G-B-D-F. This chord has very strong need to resolve usually to the tonic. The reason the interval in G-B-D-F is called a minor seventh and not a perfect fourth is that interval designation is determined from the root of the chord being discussed. Take for example the G major scale below:
G-A-B-C-D-E-F#-G
As you can see the interval G-F# is a major seventh. You can form a minor seventh interval by lowering the seventh by a semitone: G-F. This holds true for all major seventh intervals.
At first it seems quite strange looking at the interval relationship of another key to determine the chord intervals of the key you are playing in. With practice it becomes very easy but does involve learning a few major scales.
-
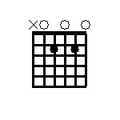 A7
A7 -
 G7
G7
Sixth chords
Add a sixth to the chord. The two chords below are major chords from the key of C with a sixth added.
-
 F6 (Subdominant in C major)
 -
 C6 (Tonic in C major)
.png)
.png)
Suspended chords
To form a suspended chord the third is replaced with either a second or a fourth. The third of a chord defines its modality - whether a chord is major or minor. By removing the third and replacing it with a second or fourth you have suspended the chord's modal quality. This creates a chord that is neither major or minor and the ear interprets the chord as harmonically ambiguous.
Suspended chords derived from a D major chord:
-
 Dsus2
Dsus2 -
D major
-
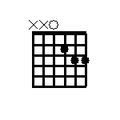 Dsus4
Dsus4
.png)
.png)
Suspended chords derived from the A major chord:
-
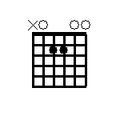 Asus2
Asus2 -
A major
-
 Asus4
Asus4
.png)
.png)
Suspending an E major chord:
-
E major
-
 Esus4
Esus4
.png)
Slash chords
Chords that are not in root position. For example, a C/G is a C chord with a bass note of G. They are also referred to as "inversions". Slash chords are always notated with their chord name first followed by the bass note.
-
 C/G
C/G -
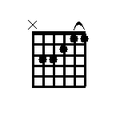 F/C
F/C
.png)
.png)
Diminished chords
These consist of a stack of minor thirds. You can extend a diminished triad (three note chord) by adding another minor third; which gives you a four note chord called a diminished seventh chord. The diminished seventh chord is notated as Co7 or dim7. Diminished seventh chords are built entirely from minor thirds, so you can move the chord shape up the neck in intervals of a minor third (three frets) and this will be exactly the same notes as the original chord but in a different order. The term "inversion" is used when chords have their notes rearranged.
-
 Edim7 - root position
 -
 Edim7 - 1st inversion
 -
 Edim7 - 2nd inversion
.png)
.png)
.png)
A half-diminished chord consists of a diminished triad with a major third on top. In other words, a half-diminished chord is a diminished triad with a minor seventh.
Diminished chords are full of tension because of the dissonance created by stacking minor third intervals and they are normally resolved to a consonant major or minor chord.
Barre Chords
Barre chords are chords that involve using one finger, usually your first finger, to press all the strings down at once on a single fret. Barring turns your first finger into a movable capo. You can then use your remaining three fingers to play open chord shapes, but in any position on the fretboard. Not all open chord shapes are easy to play with a barre, but once you have learned barring techniques, your chord vocabulary will increase and you will be able to play all along the fretboard.
Initially, barre chords are much more difficult to play than open chords. Before being able to play a barre chord, you first must train your hand be able to barre the fretboard. To do this, you take your first finger and press it lightly against the strings (applying no pressure) so that the finger covers all the strings along the same fret. Keep increasing the pressure until all the strings can be heard to sound clearly. A common mistake for beginners is to barre with full pressure which leads to hand fatigue. By lightly touching the strings and increasing the pressure in small increments, you will find that the pressure you need to apply to make the strings sound is much less than you imagine. Your thumb should be directly behind your first finger on the neck for full support. To illustrate the concept of a barre, compare the difference between the open strings (where the nut acts like a "zero" barre) and the full barre at the third fret.
-
 The nut acts as the barre
 -
 Full barre at the third fret


Six String Barre Chord
A six string barre chord is a chord in which all the strings are being played. It can be compared to E chords, because, since the guitar is tuned to E, it effectively is an open barre chord. (you can view all open chords as a form of barre chords, which do not require you to press all the 6 strings somewhere [ because you use the open strings - 0 - hence their name ]. Let us examine the form of a major six string barre chord, in this case G, along with the major E chord:
-
E major
-
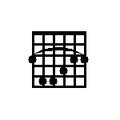 G major
.png)
In both of these chords, the relationship between the individual notes is identical, which is why the G chord is still a major chord. The difference is the root note, which determines the keys of the respective chords. By looking at the root note, we can see that the difference between all the notes of the E major and G major are three frets. But so long as the relationship remains the same, the major barre chord form can be played on any fret neck. For example, it could be played as an A major or a B major by putting it in these two positions:
-
 A major
 -
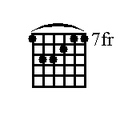 B major
.png)
.png)
The usefulness of barre chords comes from this ability to be played anywhere on the neck. Sliding the chord shape up and down the neck allows you to play many different chords relatively easily, and barre chords are a fundamental tool for rhythm guitarists since they can easily be used to create syncopated chord progressions.
As we saw earlier, the difference between a major and a minor chord is a flattened third. Using a barre chord, the transition between a major and a minor chord is relatively simple. The difference between an E major chord and E minor chord is the lifting of a single finger, thereby lowering the note by a semitone. With any barre chord that is formed using the E major shape, you can lift a single finger and play the corresponding minor chord. The minor barre chord form, shown beside the major barre chord form:
-
E major
-
E minor
-
G major
-
 G minor
.png)
The same idea can be applied to seventh chords, or any other chord you can think of.
-
 E7
E7 -
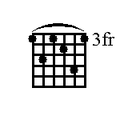 G7
G7
.png)
.png)
Five String Barre Chords
The same principles hold for five string barre chords, except instead of using the E chord shape, the A chord is used. Additionally, it should be emphasised that only five strings are played, which means that the low E string should not be allowed to sound.
-
A major
-
 C major
.png)
Chord Progressions
A knowledge of chord progressions will help you communicate and play with other musicians. Knowing the most commonly used chord progressions allows for greater enjoyment and unity when playing with other musicians.
The I-IV-V
The most common chord progression is I-IV-V. Note that Roman Numerals are used to describe these chord progressions, where the "I" chord stands for the chord on root note, the "II" for the chord on the second note of the scale, and so on. Many songs use only these three chords. If one views chords as a set of balancing scales with the root note and octave root at opposing ends it will be noted that the IV and V chords are at equal distance respectively to the root and octave root. Take for example the key of C major:
C - D - E - F - G - A - B - C
You will see that the G note (or chord) is a fifth above the root note. The note F is a fifth below the octave. This movement of a fifth is very pleasing to the human ear in its sense of balance and cohesion in relation to the root note. Another way to view chord progressions is that of a journey. In the sense that the root (or tonic) chord is the starting point and the octave root is at the end. All other points (chords) provide interest and variation with the fourth and the fifth chord occupying a special place on the journey due to them being half-way.
Many chord progressions start at the tonic (I), moves away to somewhere else, only to come back to the tonic. You can play this progression with major chords or you can substitute minor chords for the IV or V.
Applying the I-IV-V
Eddie Cochran and Buddy Holly are two artists who have used this progression extensively. Note that this chord progression uses a V7 chord. A V7 chord is just a V chord with an extra note. It is so common a device that when learning a chord progression many guitarist will play it through a few times using I-IV-V (normal V chord with no extra note) and then will play the chord progression I-IV-V7 a few times before switching back to the normal I-IV-V.
-
 E major (I)
 -
 A major (IV)
 -
 B7 (V7)


I-vi-IV-V
This progression is commonly referred to as the 50's progression, because it was common to many of the popular songs of the 1950's, notably "Stand by Me". Note that the vi chord is a tonic extension, as it contains many of the same notes as the tonic (I) chord. You may see this progression with sevenths added in a blues song (e.g., G7, e min 7, C7, D7). Here is the progression in the key of G major.
-
 G major (I)
 -
 E minor (vi)
 -
 C major (IV)
 -
 D major (V)


The I-V-I-I
This is a popular progression at the beginning of a much larger line, and can be combined with many other scale degrees.
II-V-I
As its name indicates, the progression is: IImin7, V7 and Imaj7. In a pop song, the chords might be IImin, V7, IMaj, with the first and last chord being three-note chords (triads). In jazz, all three chords are usually seventh chords. The II/V/I is important in jazz, where some songs have the progression in a number of keys.
-
 Dm7 (ii-min7)
 -
 G7 (V7)
 -
 Cmaj7 (I)


Alternatively you can change the chord type on the II, and alter the voicing of the V. Some examples are:
- IIm7b5(9)/V7alt /Imaj7
(with a V7alt, the performer alters the 9th to b9 or #9 and/or makes the 11 into #11 and/or makes the 13 into b13)
Applying the II-V-I
II-V-Is can be chained together, creating complex progressions. Here's an example that starts in C major and moves to the relative minor, a minor:
-
C major (I)
-
 Bm7b5 (II)
 -
 E7 (V)
 -
 Am7 (I)
 -
Dm7 (II)
-
G7 (V)
-
Cmaj7 (I)


 C      Bm7b5 E7   (I     ii  V)
 Am7    Dm7   G7   (I     ii  V)
 C      (etc...)   (I     etc..)
An example of complicated progression that can be created this way is the "Coltrane Changes", where the "I" chords move by Major 3rd intervals. Here's a simple example:
 Dm7  G7  Cmaj7    (ii V I  )
 F#m7 B7  Emaj7    (ii V I  )
 Bbm7 Eb7 Abmaj7   (ii V I  )
 Dm7  etc...       (I etc...)
The way the ii-V-I progression works is first that it moves by 4ths upwards, which very often produces interesting results, and the 7th goes down a half tone below and becomes the following chord's 3rd.
Minor ii-V-i
Another commonly used chord progression is the minor ii-V-i. One can derive this from the melodic minor scales shown above, while substituting a IminMaj7 for the IMaj7 chord, or by using three modes from one harmonic minor scale , which produces the following chord progression:
- ii m7 b5/ V7 / i
In the key of c minor, this would be:
- d m7 b5/ G 7 / c min
Alternate Picking
Alternate picking is an important skill, because it allows you to play more than twice as fast than with just down picking. The basic idea is that if you are picking just on down strokes, every time you bring the pick back up to stroke down again, you are missing an opportunity to hit the string again. Essentially alternate picking is more efficient, because you have to move you hand less distance to hit the next note, and it can be an important difference between hitting the note on time or struggling to reach it.
As with other guitar skills, it doesn't sound even a little difficult until you actually try and do it. It will take some time to master it and get really fast. After doing it for a long time, you will begin to notice that you are subconsciously deciding whether to alternate pick or not, depending on the underlying rhythm. Ultimately alternate picking allows you to play more efficiently, and thus faster.
Hold the pick in whichever method feels best for you. Only the top of your pick should be seen and touch the string, because when you pick you cover less distance and use less energy. Your movement should only come from your wrist, not from your whole arm, and it should be precise. There are many ways to practice alternate picking, but really it is something that you have to merge into all of your guitar playing. Being able to alternate pick at the right time is a very important step, and it is one of the barriers that separate good guitar players and people who just play guitar.
Lesson 1
To introduce yourself to alternate picking, start with a simple exercise beginning on the low E string.
e|-----------------------------------------------------------------------------1--2--3--4--------|
B|--------------------------------------------------------------1--2--3--4-----------------------|
G|-----------------------------------------------1--2--3--4--------------------------------------|
D|--------------------------------1--2--3--4-----------------------------------------------------|
A|--------------1--2--3--4-----------------------------------------------------------------------|
E|-1--2--3--4------------------------------------------------------------------------------------|


e|-----------------------------------------------------------------------------------------------|
B|-4--3--2--1------------------------------------------------------------------------------------|
G|----------------4--3--2--1---------------------------------------------------------------------|
D|--------------------------------4--3--2--1-----------------------------------------------------|
A|-----------------------------------------------4--3--2--1--------------------------------------|
E|--------------------------------------------------------------4--3--2--1--2--3--4--5-----------|
Play this pattern up and down the strings, and then up and down the whole neck. When you hit each note, you should make sure that you are always picking in the opposite direction of the previous note. Try playing faster, but always make sure you are fretting and picking each note clean to develop good habits. A metronome is a good item to help you with these sorts of exercises, because it helps you keep a steady pace. Always spend time practicing at your maximum speed, but not for the whole time; playing at an even pace is more important and builds your internal sense of rhythm.
Once you are comfortable alternate picking, try fingering some chords and pick through them, using alternate picking where appropriate. You can stumble onto some famous songs completely by accident like this.
Lesson 2
This pattern is a little more complicated, as it is a walk, where you play a repeating pattern that always starts on the next highest note.
e|------------------------------------------------------------------------------|
B|------------------------------------------------------------------------------|
G|------------------------------------------------------------------------------|
D|-----------------------------------------1-------1-2-----1-2-3---1-2-3-4------|
A|---------1-------1-2-----1-2-3---1-2-3-4---2-3-4-----3-4-------4--------------|
E|-1-2-3-4---2-3-4-----3-4-------4----------------------------------------------|
Continue the pattern up the strings, and make sure you are always alternate picking. You will start to notice when sometimes it is better to pick up or down twice in order to make the picking more efficient overall.
Lesson 3
This riff combines palm muting and alternate picking.
e|--------------------------------------------------------------------|
B|--------------------------------------------------------------------|
G|-------------2---------------2---------------2---------------2--3---|
D|-------------2---------------2---------------2---------------2--3---|
A|-0-0-0-0-0-0-----0-0-0-0-0-0-----0-0-0-0-0-0-----0-0-0-0-0-0--------|
E|--------------------------------------------------------------------|
The open notes should be muted, and you should be using alternate picking. This riff is very similar to a riff from Metallica's One.
Additional Lessons
If you want more exercises, please see other sections of this book, and perform the exercises there, except add in the alternate picking. Alternatively, you could take a song you already know, and then pick the chords using alternate picking. You will soon see how you can apply alternate picking into every part of your guitar playing.
Tremolo Picking
What is Tremolo Picking?
Tremolo means a modulation in volume; in the context of stringed instruments, usually refers to repeatedly striking or bowing a single string in a steady rhythm, especially the fastest rhythm the player can maintain. (This technique is particularly common on the acoustic mandolin.) In guitar literature, this is called tremolo picking, and one of the few places the term "tremolo" is consistently used "correctly" in guitar literature (whose convention usually reverses tremolo and vibrato). This technique has nothing to do with a "tremolo bar" (really a vibrato bar) or a "tremolo" effects box.
How to hold the Pick
Tremolo picking, though appearing hard at first, is actually quite easy. It is merely alternate picking at a faster speed. To start off, a pick makes tremolo picking much easier and is highly recommended when attempting it, but even though most people find tremolo picking much easier with a pick, it is possible without a pick. The best way to hold your pick is between your thumb and the side of the first knuckle of your pointing finger, but if you feel more comfortable holding it another way, such as with your thumb and middle finger then go ahead.
How to Pick
The movement should come mostly from the wrist. A little bit of arm movement is okay, but shouldn't be done intentionally. It is possible to tremolo with the elbow, but the wrist is actually easier and faster for most people with practice.
The motion done with the wrist should be like drawing quick zig zags, or Vs. Picking should feel just like writing. Imagine drawing as many connected V's as possible.
Do not play with your hand parallel to the strings. Pick like you write, with your wrist at an angle.
Grip
An important aspect of tremolo picking that many beginners fail to realise is that you must have a relaxed grip on the pick, as when you try to pick when holding the pick tensely, you will find that the pick hits the string harder therefore making it harder to pass through the string, causing it to sound sloppy. Maintaining a relaxed grip becomes harder when playing faster, but you will get used to it.
Things to Remember
When tremolo picking make sure you use just your wrist, as this will make it much easier to pass through the string. Also, when you pick the string, make sure your hand doesn't go to far away from it, as this will slow you down. The impact from hitting the string usually forces your hand to leave the string, but after practice, avoiding this will become easier.
It's also important to remember that many beginners start to use the thin side of the pick to tremolo, since the thin side has a smaller surface area and passes through the strings easily. This is incorrect, as the pick start to not only damage the strings, but also causes damage to the wrists, and may further start to ring other strings. Use the flat side of the pick to tremolo, not the thin border.
Rhythm
Good rhythm is almost essential to good guitar, and probably the simplest to understand. Let's start with some terms:
- Beat
- Bars
- Time signature
All bars (measures) consist of a number of beats. A very easy way to grasp the idea of bars is to learn a 12 bar blues. The time signature shows the number of beats in a bar and the note that will be used for counting. For example, 4/4 - the top of the fraction shows the number of beats and the bottom of the fraction shows the note unit used for counting; which in this case is a quarter note. 4/4 is usually referred to as common time. It may appear on the stave of printed music as either 4/4 or as a "C" as shown below. Whichever way the same information is given - the piece of music has four beats to a bar and the counting note is the quarter note.
![]()
All the notes in Western music have a fractional relationship. We know that in 4/4 time we will be using the quarter note as the reference for counting. Play an open string note slowly and repeatedly while counting in fours. Now play the open string note only when you count 1 and 3. You have just played a half note. To play eighth notes count "1-and-2-and-3-and-4-and" in the same time you would normally count "1-2-3-4". For sixteenth notes the count is "1-e-and-a-2-e-and-a-3-e-and-a-4-e-and-a". Here is a list of note values used in Western music:
- whole note
- half note
- quarter note
- eighth note
- sixteenth note
In common time a whole note consists of four quarter notes or four beats. Each half note is two beats and quarter note is one beat.
There are other possible signatures, 3/4, 2/4, 6/8, 7/4 are some. However it must be noted that over 90 percent of the music ever written has been in common time. Triple time or 3/4 is the second most used time signature. Once again the bottom of the fraction tells us that the counting note is to be a quarter note but this time each bar is to only have a count of 3. This is easily felt by playing and counting "1-2-3". Triple time may also be called "Waltz time". Since time signatures are fractional the question will arise as to what is the difference between 3/4 timing and 6/8 timing. If you come across a 6/8 time signature it is best to take this as an indication to play the piece of music "briskly" with even emphasis. It must be remembered at all times that 4/4 timing is the most widely used time signature especially so in rock and pop music.
To further apply the concept of beats, bars and time-signatures; let's play a simple chord progression. Play G and D over two bars with a 4/4 time signature.
It will look like this (each measure separated by a pipe and each beat denoted with a dash):
G         D
|- - - - |- - - -|
 v v v v  v v v v
The "v" from now on denotes a downstroke and a "^" denotes an upstroke. Here. you are playing a downstroke on each beat (each tick of the metronome) and nothing in between. Some people find it easier to practice this without playing any chord, and muting all the strings. Try that too.
Let's do some upstrokes now.
G         D
|- - - - |- - - - |
 v^v^v^v^ v^v^v^v^
Here, you are downstroking on the tick (intuitively called the 'downbeat') and upstroking in between the ticks ( the upbeat. A good way to do this is to count your beats, "one-and two and three and four" going down on the numbers and up on the ands. Most strumming patterns you can here this going on, but slightly more complicated. Make sure you are going down on downbeats and up on upbeats. A lot of people who start playing tend to not follow this, and it mixes up your rhythm badly. If you keep to this pattern, even with more complicated patterns, you will not lose track of the beat.
If you listen to the above pattern, it will start to sound boring. But it is the basis of all other patterns. When you hear a more complicated pattern, most likely the player is missing some strums. Like this:
G         D
|- - - - |- - - - |
 v^v^v^v^ v^v^v^v^
Playing Styles
Folk Guitar
Introduction

Folk music is considered to be music that originates from the people. It is not the preserve of professional composers because its themes and melodies are derived from the experiences and lives of people who usually have no professional musical training. The lyrics are usually an expression of social or personal conditions. Work songs are a common folk theme and are an excellent example of community and the lives of those who exist within that community. Sea shanties and farming songs are two types of folk music that have work related themes. It is only natural for communities to express their joy at the arrival of spring and the promise of a bountiful harvest or for sailors to celebrate their arrival home after a long time at sea.
Folk music before modern recording tended to be regional and sung in local dialects. The invention of sound recording meant that for the first time these regional songs could be captured and preserved and heard by people from different backgrounds and countries. Folk music had always been passed down orally from generation to generation but industrialization had led to the fragmentation of traditional rural communities as people moved to industrial urban towns and cities. Musicologists became very aware that the old songs were disappearing and soon there was a movement to capture the songs using the technique of field-recording. Alan Lomax is one of the most famous of these early scholars who took to the roads of America with the aim of recording folk music for the Archive of American Song of the Library of Congress. In England the work was done by the composer Percy Grainger.
Despite all these changes, folk music will always have its place in society. The form that the music takes may change but never the reason for its existence.
Playing Folk Music

The recording of an old Lead Belly (Huddie Ledbetter) song "Goodnight, Irene" by The Weavers in 1949 revived general interest in folk music and gave rise to a new movement in the 1950s that was called the American folk music revival. The next decade saw the distinction between popular music and folk music becoming blurred. In the US and many other countries, folk music and folk guitar became very popular and musicians like Bob Dylan wrote contemporary folk music that encapsulated the feelings and politics of the 1960s. This style most often uses an acoustic guitar, open chords, simple chord progressions and vocals. You can play folk guitar with a pick, or by finger picking. This style is simple, yet diverse enough to let you play a variety of tunes.
Folk music evolved during the 1960s into folk-rock and the electric guitar started to take on the role once reserved for the acoustic guitar. However many of the 1960s rock bands also featured acoustic guitar songs on their albums. These songs are not "folk music" in an historical sense but they are a modern adaption of the older folk style and are now generally referred to as "acoustic music". Often they use the same progressions as older folk songs but incorporate a catchy strumming pattern, rhythm or singing style. Here's a short list of songs that have a folk influence:
- House Of The Rising Sun - The Animals
- The Times They Are A Changing - Bob Dylan
- Sloop John.B - The Beach Boys
These are songs that have become immensely popular, such that many people can sing them communally though they may need prompting to remember the next verse. Although these songs can often be performed on an acoustic guitar, they are not quite "folk". You are encouraged to learn these songs and perform them with the view of encouraging others to sing along.
This section will provide the basics of folk guitar. By taking open chords and learning some common (and important!) chord changes, you will learn the principles of folk guitar.
E to A
-
E major
-
A major
This is an E major changing to an A major. This is one of the easiest progressions to play since the chord forms are so similar.
C to G
-
C major
-
G major
This is a C major changing to a G major.
D to G
-
D major
-
G major
This is a D major changing to a G major.
F to C
-
F major
-
C major
This is a F major changing to a C major.
Am to C
-
A minor
-
C major
This is an A minor changing to a C major.
Em to G
-
E minor
-
G major
This is an E minor changing to a G major
Dm to Am
-
D minor
-
A minor
This is a D minor changing to an A minor
Blues

Introduction
The blues is an American form of music whose origins can be traced back to the African-American communities of the southern states in the early 1900s. Its a music of African performance aesthetics played upon European instruments that not only draws upon a remembered African tradition but also alters the standard technique of each instrument. The uniqueness of this cultural exchange is the result of using established Western musical instruments, such as the tempered piano and fixed-valve trumpet, in a distinctly African micro-tonal and rhythmic context. The opening trumpet solo of "West End Blues", played by Louis Armstrong on a fixed-valve trumpet, illustrates all the points so far stated. In contemporary African music modern instruments of European origin are combined with traditional instruments. The guitars on the song "Djam Leelii" by the West African musicians Baaba Maal and Mansour Seck are the result of the same aesthetic approach. Baaba Maal is firmly rooted in the culture of Senegal and Louis Armstrong in the culture of America. The differences between the two artists reflects the importance of American culture to the development of the blues yet the link to African aesthetics is there for all to hear. The punctuation of percussion at certain points, the rhythmic variation of a single motif, the independence of each musician to temporarily introduce a melodic or rhythmic counterpoint to another part, and the space afforded to improvisation.
The twelve bar blues
The twelve bar blues is a simple chord progression that can be easily transposed to different keys. Each box in the diagram below represents one bar with four beats. The roman numeral inside the box indicates which chord is to be played for that bar.
| I | I | I | I |
| IV | IV | I | I |
| V | IV | I | I |
Below are the chords of the key of C major. The I is the tonic chord for which the key is named.
| I | II | III | IV | V | VI | VII | I |
| C | Dm | Em | F | G | Am | Bdim | C |
Substituting the roman numerals with the chords from the key of C major we see that I is a C major chord, IV is an F major chord and V is a G major chord. This is how the boxes look after replacing the roman numerals with the chord names:
| C | C | C | C |
| F | F | C | C |
| G | F | C | C |
Note that the three minor chords and the one diminished chord of the key of C major are not used. The twelve bar blues exercise above consists of only the primary chords.
Basic blues shuffle rhythm
This exercise is a twelve bar blues shuffle in A. Observe that the lower note in each bar is always an open string and will be one of the roots of the primary chords I, IV or V.
.png)
The minor pentatonic and blues scales
The minor pentatonic scale is a five note scale. It can be derived from the natural minor scale by omitting the second and sixth which in this exercise are the notes B and F. The notes of the A minor pentatonic scale are:
A, C, D, E, G, A
In any key, the pattern of intervals in between the notes of this scale is (in half-steps, or guitar frets):
3, 2, 2, 3, 2
So the second note, in this case C, will always be 3 half-steps, or 3 frets, higher than the first note, A. The third note is 2 half-steps or frets higher than the second, and so on. The exercise below allows you to visually map all the notes of the A minor pentatonic scale on the low E string up to the twelfth fret:

Here are two octaves of the A minor pentatonic scale in the 5th position:

The blues scale below is the A minor pentatonic scale with the addition of a flatted fifth. The addition of the diminished fifth introduces an element of dissonance and tension to the scale. In this exercise the flatted fifth blue note acts as a chromatic passing note which resolves to a consonance. Observe that you always refer to the scale degrees of the minor pentatonic scale by the interval names of the natural minor scale. The fourth note of the scale below retains the designation of a fifth whether it is diminished or perfect. The omission of the second and sixth note of the natural minor scale to form the minor pentatonic scale does not alter the interval relationship between the A and E which remains a perfect fifth.
Exercise 1

Exercise 2

Exercise 3
Playing The Blues Using Only Seventh Chords
You can use seventh chords when playing the blues. Try the 12 bar blues in A using the chords below. No fingering has been given for the D7 and E7 since they have the same fingering as a C chord.
-
 A7
A7 -
 D7
D7 -
 E7
E7
.png)
.png)
.png)
Further blues exercises can be found in the appendix Blues Exercises
Slide Guitar
Introduction
A slide is a metal/glass/ceramic tube which fits over a finger (most commonly the ring finger or little finger, but any will work). If you wish to experiment with slide guitar, but do not have a slide, objects ranging from lighters and glass bottles to sections of metal pipe and batteries can work just as well, and in some cases provide entertainment and stage presence to a performance. Do not press the string down. The slide rests on the string, not enough to give fret buzz, but enough to stop the string buzzing against the slide. Some players will lightly deaden the string behind the slide with a trailing finger to stop any unwanted vibrations.

Practice getting a crisp note without sliding first. Because the slide rests on the strings, the slide playing a single note should be directly above the fret, not behind it as with the fingers. Usually the slide guitarist keeps the slide moving backwards and forwards slightly to create a vibrato effect.
A common technique found in slide guitar is playing fingerstyle as opposed to the use of a pick or plectrum. The benefits of fingerstyle playing includes the ability to more easily pick the desired strings, while using the other fingers to dampen the other strings from undesired vibration. Raising the action of the guitar is also recommended. The normal low action, which is ideal for playing lead in standard tuning, is counter-productive when playing slide because of string buzz and lack of a clear sounding note. For this reason many guitarists have a second guitar where they raise the action to such a height to make it almost unplayable using normal technique. This high action guitar is permanently kept in an "open tuning" and is used exclusively for slide playing. Note that raising (or lowering) the action means that the intonation of the guitar has to be re-set. This can simply be done with a guitar tuner and just involves turning the string adjuster until the open string and its octave at the twelfth fret (fretted and harmonic) produce exactly the same note. Basically the needle or display of an electronic guitar tuner should settle exactly dead center regardless of whether you are playing an open high E string or fretting its octave at the twelfth fret. A guitar that is correctly set up will show this on all strings. Setting the action of electric guitars is very easy due to the string adjusters; however, acoustic guitars have their intonation set at the factory and don't have string adjusters. Adjusting the action of an acoustic should be left to a guitar shop or luthier who specializes in repair and maintenance.
Though slide guitar is often played in open chord tunings, Open G and Open D being the most common, playing slide in standard tuning is also possible and can add a new dimension to your playing. Slide guitar has always provided a fascinating approach to playing the guitar and the sound of the slide has found a home in genres such as rock and country.
History
One of the earliest mentions of slide guitar is in W.C.Handy's autobiography "Father Of The Blues":
"As he played, he pressed a knife on the strings of the guitar in a manner popularized by the Hawaiian guitarists who used steel bars"
This is also one of the earliest references to the blues. As you can tell from the quote above the use of the slide in no late-comer to the blues genre and there is large body of work from the 1920s to the present day. No guitarist can confuse the slide playing of Duane Allman with that of Robert Johnson. Each period informs of itself the dictates of taste and style.
1930s
Robert Johnson is cited as the first great slide guitarist. Other famous blues performers had comer before him, Blind "Lemon" Jefferson was a major entertainer during the 1920s but Robert Johnson is considered to be the first major exponent of the slide. During his life-time he only recorded a handful of tracks and though known locally for being a fine entertainer; the world-wide fame that is associated with his name now is more down to later blues fans and guitarists who have sought the roots of the blues.
Rock Guitar
Country and Western
Introduction

Country music is an American genre of music that can trace its roots back to earlier European folk songs that the arriving immigrants brought with them. It developed in the Appalachians and surrounding states; changing the forms and sounds of the earlier folk songs until the music reflected the conditions that these early American settlers experienced. The music itself has never stopped absorbing elements from other genres such as blues, ragtime, jazz, rock and contemporary folk. It is this vitality that has kept country music at the heart of American culture.
History
Country music, like most early folk music, was passed down orally from generation to generation; with each adding to the existing tradition. The guitar, being cheap and portable, was ideal for country musicians and from the earliest days has been associated with the music.
It was the invention of the phonograph and radio that led to the creation of the first national country stars The Carter Family. The Carter Family also sung gospel, Victorian ballads and vaudeville songs. The guitar solo in their song "Wildwood Flower" is an early example of characteristics that are still to be found in country lead breaks.
Country guitarists also absorbed elements from the blues and slide guitar started to be featured shortly after the success of the Carter Family. Jimmie Rodgers (1897-1933) was the first solo star of country music and his guitar style is a mixture of country alternating bass and the blues form.
Country music took on some on the elements of the big band era of the 1930s. The growth of bigger bands that included instruments such as drums and saxophones led to the creation of Western Swing. Whereas the music of the Carter Family and Jimmie Rodgers had retained some of the earlier folk ballad qualities; Western Swing was primarily for dancing.
Guitars
Acoustic guitars have been a firm favourite for country musicians since the 1920s. The open resonating sound of these guitars suit the country and western chordal style. The Gibson L-5 was popular, the instrument played by Maybelle Carter, as were Martin guitars. It must not be overlooked that Gibsons and Martins are professional marque guitars and that many players would have started on cheaper models by other manufacturers.
The Dobro Resonator guitar was also used from the 1930s onwards. Its unique timbre appealed to country guitarists and its volume allowed it to be heard amongst the expanding line-up of instruments.
Other instruments that are commonly used in country music are the fiddle and banjo.
Exercise One
This exercise uses these chords:
-
G
-
C
-
D
This is an exercise for alternating the bass. It is recommended that this exercise be played without a plectrum. Use the thumb of your right hand to play the alternating bass notes. The right hand fingers must also form a "claw" and be placed on the three treble strings to start this exercise. The ring finger of the right hand always takes the highest note. After playing the bass note with your thumb; slightly lift your right hand fingers to sound the treble strings. Do not pluck or pull away your right hand. A slight lift of your right hand index, middle and ring finger is enough to sound the chord and then return your hand back for the next lift. Practice this exercise slowly for accuracy especially placing the claw correctly and ensuring that after the lift the fingers are only millimeters away and ready to be placed again. There should be no movement of the forearm or wrist; all the work is done by the fingers. The left hand holds down the chords as shown above. Most tab exercises will have chord diagrams that show the chords to be used.

Essential Country Guitarists and Recordings
- The Carter Family - a long career has led to many Carter Family recordings. The original Carter Family line-up recorded between 1927 and 1941 for the Victor label. Many of the original Carter Family radio performances are in the public domain and can be found online for listening or download.
- Jimmie Rodgers - his first hit record was "Blue Yodel (T for Texas)". The first country solo artist to achieve national fame in the US.
- Hank Williams - the writer of "Your Cheating Heart" and "Hey, Good Lookin"
- Willie Nelson - the country performer and song-writer who wrote "Crazy" which was a world-wide hit for Patsy Cline.
- Chet Atkins - one of the architects of the Nashville sound. A guitarist and arranger of wide skills who has performed on the records of Elvis Presely and the Everley Brothers as well as issuing his own solo releases and duos with the guitarist Jerry Reed.
- Leon McAuliff - one of the great Western Swing steel guitarists. Played with Bob Wills' Texas Playboys.
Metal
This article uses musical notation called tablature. If you are inexperienced in reading tablature, you might want to visit this page

Metal is a genre of music that stemmed from rock in the late 70's. Today, there are many sub-genres of heavy metal that share similarities and differences. Guitars in heavy metal are almost always distorted and are often downtuned.
Techniques
These are some techniques that are mostly unique to metal or hard rock.
Power Chords
A major element of heavy metal is the use of power chords. Standard tuning of a guitar is (from the thickest string to the thinnest) E,A,D,G,b,e Power chords in this tuning can be performed as follows:
  e|----------------| A power chord consists of a root note, its higher octave, and the lower note's fifth.
  b|----------------|
  G|----------------|
  D|2-5-7---2-5-7---| <-----Octave
  A|2-5-7---2-5-7---| <-----Fifth
  E|0-3-5---0-3-5---| <-----Root
Not always, however, does a power chord have to have an octave. It may be simply the root and fifth.
Drop D and Drop Tunings
In dropped tunings, such as dropped D (D,A,D,G,b,e), power chords are more easily played by lowering the bottom (thickest) string two semi-tones. In dropped D, this note is a D. The same riff, transposed and played in dropped D follows:
  e|----------------|
  b|----------------|
  G|----------------|
  D|2-5-7---2-5-7---| <-----Octave
  A|2-5-7---2-5-7---| <-----Fifth
  D|2-5-7---2-5-7---| <-----Root
Playing in this tuning makes it possible to use only one finger to fret all three strings, allowing faster and more complex riffing.
Palm Muting
Also, in metal, palm muting plays a large role, although it is also used in other genres. Palm muting is placing the side of your palm, while playing, close to or on the bridge, and lightly muting the strings. This, combined with heavy distortion, creates a thick, "chug" sound. Just one example of this occurs in DevilDriver's "I Dreamed I Died."
  X's are placed on the line underneath notes which are to be muted.

  C#|--------------------------------|--------------------------------|
   A|--------------------------------|--------------------------------|
   E|--------------------------------|--------------------------------|
   B|0--------------00-0-0-3=========|0--------------00-0-0-6=========|
  F#|0--------------00-0-0-3=========|0--------------00-0-0-6=========|
   B|0--------------00-0-0-3=========|0--------------00-0-0-6=========|
                    xx x x                           xx x x
Pinch Harmonics
Used in lots of kinds of metal, but more in death metal or extreme metal, pinch harmonics create a "screaming" or "squealing" sound. They are sometimes referred to as "Squealies," and mostly are played on the higher strings of the guitar. To perform a pinch harmonic usually requires the use of a plectrum, or pick. The technique involves holding the pick between the thumb and index, lower on the thumb than normal. By doing this, the bottom of the thumb is closer to the strings, and when a note is hit, the thumb should barely touch the vibrating string.
  e|----------------|
  b|----------------|
  G|----------------|
  D|3-2-3-2-3-2-3*--| Often, pinch harmonics are shown by placing an asterisk next to the note that is a harmonic.
  A|3-2-3-2-3-2-----|
  D|3-2-3-2-3-2-----|
Exercises
Here are some tabs that will help you train and condition your fingers.
Power Chords
Here's a basic power chord sequence, no palm muting.
  e|----------------------------------------------------------------|
  B|----------------------------------------------------------------|
  G|----------------------------------------------------------------|
  D|0-3-2-1-0-1-2-3-0-3-2-1-0-3-6-3-0-5-3-6-0-5-3-6-0-5-3-6-0-6-9-5-|
  A|0-3-2-1-0-1-2-3-0-3-2-1-0-3-6-3-0-5-3-6-0-5-3-6-0-5-3-6-0-6-9-5-|
  D|0-3-2-1-0-1-2-3-0-3-2-1-0-3-6-3-0-5-3-6-0-5-3-6-0-5-3-6-0-6-9-5-|
Here's a similar riff, a little harder.
  e|------------------------------------------------------------------|
  B|------------------------------------------------------------------|
  G|------------------------------------------------------------------|
  D|0-3-2-1-0-1-2-3-0-3-2-1-0-3-6-3-0-5-3-6-0-3-5-6-0-5-3-6-0-10-12-13| <-\
  A|0-3-2-1-0-1-2-3-0-3-2-1-0-3-6-3-0-5-3-6-0-3-5-6-0-5-3-6-0-10-12-13| <-Understand this is "10", "12", 13"
  D|0-3-2-1-0-1-2-3-0-3-2-1-0-3-6-3-0-5-3-6-0-3-5-6-0-5-3-6-0-10-12-13| <-/
An even tougher riff, using palm muting.
  e|----------------------------------------------------------------|
  B|----------------------------------------------------------------|
  G|----------------------------4-------------5-7-8-----------5-7-8-|
  D|003-2-1-001-2-3-003-2-1-003-4-3-003-6-3-005-7-8-0-5-3-6-0-5-7-8-|
  A|003-2-1-001-2-3-003-2-1-003-2-3-003-6-3-003-5-6-0-5-3-6-0-3-5-6-|
  D|003-2-1-001-2-3-003-2-1-003---3-003-6-3-00------0-5-3-6-0-------|
    xx      xx      xx      xx      xx      xx      x       x
A riff that requires clever use of fingers:
   B|----------------|
  F#|----------------|
   D|--------------7-|
   A|----------------|
   E|223-5-3-6-3-225-|
   A|223-5-3-6-3-22--|
     xx          xx
Fast Riffing
 |
|
| Problems listening to this file? See media help. | |
  e|--------------------------------| Remember to start slowly and build up speed once you understand the riff.
  B|--------------------------------|
  G|--------------------------------|
  D|--------------------------------|
  A|----------5-----------5-0-3/6---|
  D|0-3-6-0-6---0-3-6-0-6---0-3/6---|
    x x   x x   x x   x x   x
  e|--------------------------------|
  b|--------------------------------|
  G|--------------------------------|
  D|0-0-0-3/6-0-0-0-----0-1/3-0-1---| Note: You may find it easier to slide from 3 to 6 with your middle finger
  A|0-0-0-3/6-0-0-0-----0-1/3-0-1---| rather than your index.
  D|0-0-0-3/6-0-0-0-3/6-0-1/3-0-1---|
    x x x     x x x     x        ^^^
                                 Hold note
This riff does not only involve power chords:
  e|--------------------------------|
  b|--------------------------------|
  G|--------------------------------|
  D|--------------------------------|
  A|----2---1---2-----------5-2-2-3-|
  D|2-2---2---2---2-2-2-2-2-5-2-2-3-|(x2)
    x x   x   x   x x x x x   x x


  e|--------------------------------|
  b|--------------------------------|
  G|--------------------------------|
  D|----0-------0-------------------|
  A|----0---4---0-----------3-0-0-1-|
  D|0-0---0-6-0---0-0-0-0-0-3-0-0-1-|(x2)
    x x   x   x   x x x x x   x x
Pinch Harmonics
Metal Styles
This section should explain some differences between many genres of metal and provide example riffs in the style of each.
Progressive Metal
Progressive metal tends to use long, dramatic song structures as well as unusual time signatures. Typically progressive metal draws influence from both metal and progressive rock. There is no defining progressive metal sound, and many progressive metal bands also fit within other genres. Some examples include Neurosis, Fates Warning, Dream Theater and Opeth.
Death Metal
Death metal evolved out of thrash metal. Death metal tends to use a lot of dramatic tempo and key changes as well as atonal chromatic riffing. The genre is famous for its distinct vocal style; called the "death grunt" which is a low, growling form of singing that often make lyrics very hard to make out. Some examples include Origin, Necrophagist, Cannibal Corpse, Suffocation, Deicide, Behemoth and Death. Another variant of Death Metal is melodic Death Metal. Some examples include Amon Amarth, In Flames, The Black Dahlia Murder and Dethklok.
B|--------------------------------|
G|--------------------------------|
D|--------------------------------|
A|--------------------------------|
E|----4---3-----------4---3-------|
B|2-3---3---2-0-1-2-3---3---2-0-1-|
Doom Metal
Doom metal focuses on very slow tempos and atmospheric riffs, with the purpose of creating an eerie and depressive sound. This is probably the metal subgenre with less palm muting and "chug" riffs. Some examples include Candlemass, Cathedral, Funeral, Paradise Lost and Solitude Aeternus.
Black Metal
Black metal is death metal's faster, grimmer sounding cousin. Instead of focusing on being as heavy as possible black metal tends to focus on atmospheric riffs. Some black metal uses keyboards to add a symphonic sound. Some examples of black metal include: Mayhem, Darkthrone, Burzum, Emperor, Gorgoroth, Cradle Of Filth and Celtic Frost.
Grindcore

Grindcore is not (by common misconception) a form of metal. It is a punk sub-genre before all else, although it has had a great influence on the more extreme sub-genres of metal, most notably Brutal Death Metal It is characterized by blisteringly fast and abrasive riffs and downtuned guitars, usually detuned to Drop-C. The band that pioneered this sub-genre of punk was Napalm Death with their album "Scum".
Speed Metal
Speed metal, as the name indicates, focuses greatly on speed. Speed metal is generally considered the precursor to thrash metal (as seen with the first Megadeth and Metallica albums), focusing more on NWOBHM-style riffs at an increased than general thickness of guitar tone. Still, speed metal is an ill-defined genre and is usually paired with power metal. Despite insistence from some metal fans, DragonForce and acts that focus on shredding are not speed metal.
Thrash Metal
Thrash metal started as a hybrid of speed metal and thrash, an offshoot of hardcore punk. Thrash metal tends to employ fast, gallop picked rhythms and complex, technical parts. Some examples of thrash metal are Megadeth, Slayer, Anthrax, Metallica, early Sepultura and Metal Church. Some examples of thrash/thrashcore/crossover thrash are Dirty Rotten Imbeciles, Stormtroopers of Death, Municipal Waste and Charles Bronson.

Alternative/Groove Metal
Groove metal/post-thrash evolved out of thrash metal. Groove metal bands tend to include slow, chunky riffs alongside more thrash oriented riffs. Groove metal was rather successful during the mid-90s and spawned nu-metal. Some examples of groove metal are Pantera, DevilDriver, later Sepultura and Lamb of God.
Metalcore
Metalcore is hardcore punk with metal influences. Metalcore evolved in New York. As New York Hardcore bands added beatdown parts and gradually added more and more metal influences the common 'tough guy' sound became more and more heavy. Some metalcore bands are Shai Hulud, Botch, Killswitch Engage and Throwdown.
Jazz
Jazz basics
Jazz chords:
Early jazz bands used the banjo as an accompaniment instrument because its loud volume gave it the ability to be heard, unamplified, against brass and percussion. As an acoustic instrument, the banjo was limited to a rhythmic role.
The electric guitar eventually replaced the banjo mainly due to its extended range and improvements in timbre and the volume boost provided by amplification. The early jazz guitarists played block chords to provide the rhythmic support that was once the role of the banjo. They had to adopt an economic chordal style to match some of the fast tempos they were expected to play. This involved three or four note chords and this legacy is to be found in all jazz guitar styles. Here are three movable exercises illustrating the basic jazz chord vocabulary:
Exercise one: Four note jazz chords in root position
-
 G major
 -
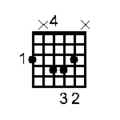 G maj7
 -
 G7
G7 -
 G6
G6
.png)
.png)
.png)
.png)
Exercise two: four note jazz chords in first inversion
-
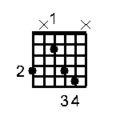 E major
 -
 E maj7
 -
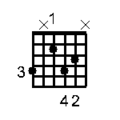 E7
E7 -
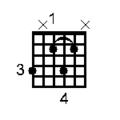 E6
E6
.png)
.png)
.png)
.png)
Exercise three: three note jazz chords in second inversion
-
 C major
 -
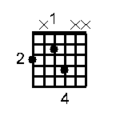 C maj7
 -
 C7
C7 -
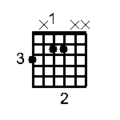 C6
C6
.png)
.png)
.png)
.png)
Note that in each of the above exercises there is a change of only one note to form the next chord and that this change takes place on one string.
Jazz forms
The two main forms in Jazz are the twelve bar blues and the thirty-two-bar ballad. The "rhythm changes" chord progression is a 32-bar form.
The thirty-two-bar ballad will normally take the sectional formː
A - A - B - A
Each section consisting of eight bars. Section B is sometimes described as the bridge and will usually modulate to a related key eventually returning to the home key towards the end of the section. Each section can respectively be labelledː
Statement - Statement - Development - Recapitulation (Return of Statement)
A famous thirty-two bar ballad is "Misty" by Erroll Garner with lyrics written by Johnny Burke. Using the lyrics from the Sarah Vaughan version of "Misty" and taking into account the four bar instrumental introduction we can separate the sections into their respective componentsː
A (Statement)ː
"Look at me. I'm as helpless as a kitten up a tree. And I feel like I'm clinging to a cloud. I can't understand. I get misty just holding your hand"
A (Statement)ː
"Walk my way. And a thousand violins begin to play. Or it might be the sound of your hello. That music I hear. I get misty the moment you're near"
B (Development)ː
"You can say that you're leading me on. But it's just what I want you to do. Don't you notice how hopelessly I'm lost. That's why I'm following you"
A (Recapitulation)ː
"On my own. Would I wander through this wonderland alone. Not knowing my right foot from my left. My hat from my glove. I'm too misty and too much in love"
Jazz style
Jazz rhythms are meant to swing. While not all jazz consists of swinging rhythms, some may have a straight eighth note feel, it is important to become familiar with this style of playing. Swing is a difficult style to notate because it involves pulling and pushing against the beat and therefore students approach jazz by listening to the music first. If you are new to jazz then the song "My Favorite Things" from the musical The Sound Of Music is a good place to start. Listen to John Coltrane's jazz version and compare it against the original soundtrack version. You will notice that the original version swings less and that Coltrane's version lasts longer. Jazz musicians are expected to be able to improvise and this is exactly what Coltrane does by extending the song's harmony and melody beyond its original form. The drums and piano in Coltrane's version swing in comparison to the backing instruments of the original. Swing may be difficult to notate on manuscript paper but it is easy to hear in performance.
The use of octaves is a common technique in jazz guitar. Once a jazz guitarist has learned the notes to a melody they will then play the same melody using octaves. Audiences hear octaves as a single melodic line and therefore using octaves is a highly effective technique for reinforcing the melody line. Jazz guitarists are also very adept at playing scales backwards. The jazz guitarist Kenny Burrell on the album Midnight Blue uses simple minor pentatonic scales to great effect starting on their highest note and descending through the scale to the lowest note. Playing scales backwards is a technique that provides for surprise openings, unusual bridges and tension releasing.
Many famous early jazz guitarists cited horn players as a major influence. The rise of jazz coincided with the development of the radio and gramophone and early recordings of jazz played a major role in developing the main stylistic elements of the genre. Louis Armstrong's "West End Blues" (Louis Armstrong and his Hot Five - 1928) is considered one of the masterpieces of early jazz and cemented the role of the brass soloist. Jazz guitarists from that period took note and soon it became standard practice for guitarists to copy horn riffs.
Charlie Christian (Benny Goodman Band 1939 - 1941) is still considered by many as one of the great players of the instrument with many of his riffs displaying horn-like qualities. Christian also played a role in the development of Be-Bop participating in jams with Dizzy Gillespie and Theolonius Monk at Minton's Playhouse in New York (1941) which were recorded by a jazz fan. These recordings represent the transition from Swing to Be-Bop and offer a rare chance to hear the informal after-hours meetings of some of the greatest players in jazz.
A good jazz guitarist will normally have a few horn riffs in his vocabulary. Try playing along to a Miles Davis or John Coltrane recording and preferably choose a slow tempo ballad which will allow you time to hear and emulate. Brass instruments are melodic instruments and therefore, unlike the guitar, horn players cannot form chords. This means that horn players develop very strong melodic capabilities and this provides an ideal opportunity for a guitarist to improve their solo lines.
The sound of the city. The age of the automobile. The wireless radio and electric neon lights. Jazz must be placed in its social context. Duke Ellington's "Take the A Train" invokes a New York train journey and the pace of urban life. A listener's response to the Miles Davis and Gil Evans interpretation of the slow movement from "Concierto de Arunjuez", the most popular guitar concerto in the Classical repertoire, can only conclude that the style is jazz but the themes are Spanish. Music transcends geography and time offering the listener's imagination new ground to traverse.
The study of jazz styles is the study of context. The importance of this should be borne in mind to avoid dismissing certain jazz styles. The validity of "Early Autumn" by Woody Herman is equal to the validity of "Take The A Train" by Duke Ellington. The soulful sound of "Mercy Mercy Mercy" by Cannonball Adderley is no less jazz than the live performance in Berlin of "How High The Moon" by Ella Fitzgerald. Context must be extended to take into account the length of career and the artist's complete output. The later work of Billie Holiday was marred by personal problems and is not a true indication of her artistry. The popularity of Louis Armstrong and his later commercial pop music does not tell you why he was so important to the development of Jazz.
The black-tie Sinatra singing "My Way" in his later years masks the original vocal phrasing that he developed with the Tommy Dorsey Band that Miles Davis based his own trumpet style upon. To know that Benny Goodman acquired some of his music charts from Fletcher Henderson provides the opportunity to discover Chu Berry and Coleman Hawkins. Context provides the means to see that jazz style is not exclusively or independently developed by genius or any one group or person. Two versions of "Sugar Foot Stomp", as performed by Fletcher Henderson, will illustrate the style analysis of early Jazz stated in the introduction - block chords, fast tempos, and the change from banjo to guitar - "Sugar Foot Stomp" recorded in 1925 by Fletcher Henderson with banjo played by Charlie Dixon and the 1931 version recorded by Fletcher Henderson under the name Connie's Inn Orchestra with guitar played by Clarence Holiday.
Exercise one
The following exercise is a single chorus of the twelve bar blues with a solo in the style of Charlie Christian. It is a simplified version of the first chorus from "Profoundly Blue" and is transposed down a semi-tone from the original key of E flat.

You can tune your guitar up a semi-tone to compensate for the transposition. Play the Charlie Christian version and tune your open D string up a semi-tone to E flat which is the key of the original recording. Tune the rest of the strings to the open D string.
Movement exercises
These three exercises lend themselves to the 12-bar blues form. They are designed to aid movement along the fretboard and to give the student the chance to practice applying one chord on each beat of a bar.
Exercise one
-
 G major
 -
 C major
 -
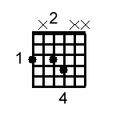 G7
G7 -
 C major
.png)
.png)
.png)
.png)
Exercise two
-
 C major
 -
 F major
 -
 C7
C7 -
 F major
.png)
.png)
.png)
.png)
Jazz Movement Exercise Three
-
 D major
 -
 G major
 -
 D7
D7 -
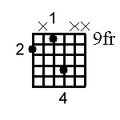 G major
.png)
.png)
.png)
.png)
Essential guitarists and recordings

The following list of influential jazz guitarists illustrates the major stylistic changes in Jazz ranging from Swing to Progressiveː
- Django Reinhardt was gypsy guitarist born in Belgium who played swinging jazz lines on a Maccaferri acoustic guitar. His signature tune was the Debussy inspired "Nuages" whose opening motif alludes to the Impressionist composer's "Prelude to the Afternoon of a Faun".
- Charlie Christian was the first guitarist to popularize the electric guitar as a solo instrument in jazz. Listen to the recordings he made with Benny Goodman in the late 1930s, including "Solo Flight."
- Tal Farlow brought the harmonic and melodic innovations of the Bebop style of jazz to the guitar. His mid-1950s recordings are recommended listening.
- Jim Hall brought a motif-based style of improvisational development to the jazz guitar. His recordings with Bill Evans are an excellent starting point.
- Wes Montgomery is renowned for his horn-like single lines, innovative octaves, and chord solos. The three essential Wes Montgomery recordings, all from the early 1960s, are The Incredible Jazz Guitar of Wes Montgomery, Full House, and Smokin' At The Half Note.
- George Benson is known for his improvisation as well as his more popular later works. Listen to his work with organists Jack McDuff and Dr. Lonnie Smith or the album Live At Casa Caribe.
- Pat Martino is known for his fluid single-line improvisation. A good introduction to his playing is Live At Yoshi's, featuring organist Joey DeFrancesco and drummer Billy Hart.
- Joe Pass was a great improvisor, but he is known especially for his solo chord-melody arrangements of jazz standards. Essential listening includes the Virtuoso series of recordings which showcases his solo pieces.
- John McLaughlin is known as a pioneering jazz-rock guitarist. His work in the 1970s with the Mahavishnu Orchestra should be considered essential listening.
- John Scofield is known for his angular lines and use of dissonance. For new jazz listeners, his two recordings with Medeski Martin and Wood are probably the best introduction to his playing.
- Allan Holdsworth is a jazz-rock guitarist known for his peerless technique and his unique approach to harmony. Believe It, a mid-1970s jazz-rock album by the New Tony Williams Lifetime, and None Too Soon, a more straight-ahead jazz album by Holdsworth, are both essential listening.
- Pat Metheny is a modern Jazz guitarist whose popularity has never diminished his art. His collaboration with Steve Reich on "Electric Counterpoint" is a notable example of his commitment to creativity. The Pat Metheny Group debut album, Bright Size Life, features the electric bassist Jaco Pastorius.
Classical Guitar

Classical Guitar
The classical guitar was preceded by the lute, vihuela and five-string baroque guitar. This legacy is reflected in the repertoire of the Classical guitar which ranges from the Estampie, a thirteenth century dance, to the modern twentieth century masterpiece La Catedral by Agustín Barrios. One of the greatest past masters of classical guitar, Andres Segovia:
"The strongest advice I give to my pupils is to study music properly from the beginning to the end - like the career of a sergeant or a physician, it is the same. It is a shame that most guitarists are absolutely clean of this knowledge. My advice is to study music properly and not to omit any knowledge of music and not to be very impatient about giving concerts. He who is impatient mostly arrives at his goals late. Step by step is the only way"
Quote from Segovia! A 13-part series aired on National Public Radio. First aired April 1983 and produced by Larry Snitzler (Classical Guitarist) and hosted by Oscar Brand (Musicologist/Folk Guitarist).
Classical guitar studies are designed to develop sight-reading skills at the optimum speed. Classical guitarists use standard works to learn from; especially the works of Fernando Sor (1778–1839), Mauro Giuliani (1781-1829), Matteo Carcassi (1792-1853) and Francisco Tárrega (1852–1909). For complete beginners the author Frederick Noad has provided the books Solo Guitar Playing One and Two. Book One assumes that the student has no previous experience of reading music and the lessons have been carefully arranged with this in mind.
The Parts Of The Classical Guitar

Equipment

Foot-stool
A foot-stool allows the left leg to be raised when the student is sitting. The early classical guitarists explored all the various playing positions and the seated position with a foot-stool was found to give the greatest access to the fretboard while also allowing barres to be played with ease.
Music stands
A music stand allows the guitarist to maintain the correct playing position and also ensures that the music is at eye level. Despite its usefulness a music stand is usually one of the last items that guitarists buy. Placing a book on the edge of the bed or on the floor means that the guitarist is looking down at the music and is constantly having to adjust their head and body position to scan the guitar neck when changing chords. Placing the music on a stand at eye level ensures that the guitarist only has to glance at the neck to check for correct finger placement.
Metronome
A metronome is an ideal tool for improving timing. A wooden metronome provides an organic click which is pleasing to play along with for extended periods. Many guitarists warm up by playing scales to a metronome.
Nails
The classical guitarist plays without a plectrum. The right hand produces sound. Although the quality of tone is determined by both hands, the type of tone and the volume are controlled primarily by the right hand. There are seven ingredients that go into tone production: 1. Nail length and shape; 2. Choice of stroke: free stroke (tirando) or rest stroke (apoyando); 3. Hand position and the angle of fingers to the strings; 4. How the fingertip and nail approach the string; 5. How the fingertip and nail prepare on the string; 6. Finger pressure against the string; 7. The release of the fingertip and nail from the string.
Each of these ingredients influences all the others. One will generally determine what come next. For instance, your choice of rest stroke or free stroke will determine your hand position, and therefore the angle of the finger to the string.This will then determine how the finger approaches the string, and thus how the finger will prepare on the string. All of these contribute to the security of the fingers on the string and your ability to apply the appropriate pressure; and the pressure inevitably affects how the string will be released. The length and shape of the fingernail effects how successfully you will be able to carry out all of the various parts of the stroke.
If the nail is too long, the speed and ease with which the fingertip and nail can go through the string is considerably diminished. This is because resistance has been increased. A bad nail shape can also create undesirable resistance against the string and can cause some interesting but unsavory sounds. The reason we play with our fingernails at all is to assist us in securing and controlling the string, to enhance volume and tone. So it is important to grow and shape [the nails] in a way that will make it easier to play and sound good. Scott Tennant: Pumping Nylon 2nd Edition Copyright 2016 by Alfred Music pg 56
Therefore it is essential that your nails should be considered. Professional guitarists may use a nail hardening solution, such as Mavala, which can be purchased from any chemist. The nails should be filed with a fine-grade nail file. Professional guitarists always file their nails in one direction only; never back and forth. This ensures a much cleaner tone.
Guitar case
Your guitar should be kept in a case when you are not playing it. A hard body case will offer the most protection to the instrument.
Learning To Read Music
Learning to read music involves mastering reading one note at a time. It is common to find second-hand music books with the letters of the notes handwritten above each note. The idea that you can learn to read music by deciphering a single piece of music that you like should be discarded.
The early stage of learning to read music involves only the open strings. The idea is to introduce the notation for the fretted notes after the notation for the open strings has been mastered. The first day might involve starting with the notation for the open high e (thinnest string), followed by the B string, then the G string and so on. When a student can read the notation for the open strings comfortably the notation for the first three frets of the high e string is introduced and then the first three frets of the B string and so on. The early stages of mastering the open strings does not allow for extended phrases to be played though once the fretted notes are introduced the guitarist will find much of melodic value and interest.
At an advanced stage of reading music the guitarist should note that familiarity with their own sheet music collection can be counterproductive. It is not unusual to find that a guitarist who has used the same sheet music to learn a piece suddenly struggles when the same piece is presented from another publication. Fonts, staff spacing and even elements as benign as paper size and colour can cause difficulties in sight-reading. You should vary your sight-reading by using different publications.
At some point a piece of seemingly simple music may prove too difficult to play. It is not uncommon to find beginner's books with studies where certain passages in the music present a technical challenge that the beginner has yet to master. This is simply a reflection of the author's own advanced technique and a minor lapse in the author's desire to provide studies of value to the beginner. If at any time a study presents a passage of music that is difficult to execute then move to the next study.
Standard Works
Please note that the following list of works will not teach you how to read music. For that purpose you need to use the three Noad books: Playing the Guitar and Solo Guitar Playing 1 and 2 which have proved very popular with teachers and self-taught guitarists.
25 Etudes op. 60 - Matteo Carcassi
This work contains a series of studies designed for intermediate players. Consisting of arpeggio and scale studies this work has served generations of players with its inventiveness and melodies. Though didactic in purpose Carcassi has provided audience-delighting studies that form part of the repertoire of many professional and amateur players. A highly regarded edition of Op. 60 was published by Zerboni with revisions by Ruggero Chiesa.
Espanoleta - Gaspar Sanz (Pujol Transcription)
The Espanoleta by Sanz is deservedly famous. Its simplicity and beauty is accessible to the early-stage guitarist who can read music in the first position. Its common to find a transcription of the Espanoleta in many sheet music compilations and tuition books; including Playing The Guitar by Frederick Noad. The Pujol transcription is a simpler arrangement than the Noad transcription and provides the guitarist with practice in recreating Baroque ornamentation.
The Guitarist's Hour Books 1, 2, and 3 (Walter Gotze)
These collections of studies for beginners consists of pieces by Sor, Carulli, Aguado and many others. They are designed to encourage the student to observe note duration as well as providing an introduction to the works of Sor and Carulli. These progressively graded studies are ideal for metronome practice. Though most of these studies can be found in other compilations; the choice and arrangement of the studies in all three Guitarist's Hour books are exemplary with regards to progressing the beginner's technique.
Greensleeves - Francis Cutting
Francis Cutting was an English lute composer whose patronage eventually led to a position in Denmark. Greensleeves was a popular song in the fifteenth century. The Cutting lute variation has been transcribed for guitar and is part of the beginner's repertoire being easy to play with a recognisable melody. Greensleeves was made widely popular in the twentieth century by the orchestrated version "Fantasia on Greensleeves" by Ralph Vaughan Williams. A modern romantic interpretation of "Fantasia on Greensleeves" by Neville Marriner and the Academy of St.Martin is recommended.
Other Works
Harmony - Walter Piston revised by Mark Devoto
The revised edition of this standard University text is a complete overview of Western harmony. Limiting itself to the common practice of the Classical Period it provides a clear and concise introduction to harmony.
The Classical Guitar: Its Evolution, Players and Personalities Since 1800 - Maurice J. Summerfield
This work presents a comprehensive overview of the personalities that shaped the history of the classical guitar. It includes biographies of all the major classical guitarists of the past and present. Extensive use of images brings the biographies alive and its comprehensive coverage places this work at the forefront of Classical Guitar literature.
Ways To Improve Interpretation
Playing along to recordings is an ideal way to improve your interpretation. At the end of Solo Guitar Playing One is a short ternary piece called "Adelita" by Tarrega which Julian Bream has recorded. After memorizing "Adelita " the student should play along to the Bream recording as it will improve their interpretation of the piece and will impart a deeper understanding of the popular Salon style primarily associated with Chopin.
The famous "Leyenda" by Albeniz is a technical challenge for any guitarist. Transcribed for guitar from the original piano work it has become part of the classical guitar's repertoire. On film we have two master classical guitarists performing "Leyenda" - Segovia at the Alhambra Palace and John Williams in the Concert from Seville. Due to the popularity of the piece it regularly appears in compilations though it must be noted that original transcriptions of "Leyenda" are personal expressions of the transcriber's own technique. The two guitarists mentioned have chosen to adapt the piece to their own technique and a visual analysis by the student of both performances is recommended.
Many classical pieces have their origins in the dances of the past. The Bourrée was a popular dance that became part of the Baroque Suite. The Canarios and Écossaise are further examples of dance forms that the classical guitarist will come across. The Canarios was originally a lively jig associated with the Canary Island and the classical guitarist will be expected to play a Canarios at a lively tempo. Beginners will find that a small amount of historical investigation into the origins of the pieces they find in the books recommended in this chapter will prove invaluable to interpretation and will help demystify some of the time signatures and tempos given.
Classical Guitarists
- David Russell
- Fernando Sor
- Ferdinando Carulli
- John Williams
- Julian Bream
- Christopher Parkening
- Andres Segovia
- Ida Presti
Flamenco

Introduction
Flamenco is one of the folk music genres of Spain. In Spain the word flamenco is not just associated with the guitar but also the people, songs and dances of Spain. The history of flamenco follows that of Spain. When the Moors ruled Southern Spain they brought with them their instruments and the most important of these was the Oud. This eastern lute is still to be found all over the world but in Spain it collided with European ideas and flamenco is the product. Flamenco is woven into the life of the region of Andalucia where it originated and the people actively engage in the songs and dances. The guitar has always been the main instrument used in flamenco to support the dancers and singers due its percussive timbre. The early flamenco guitarists very rarely played solo; their role was purely to provide music for the dancers and singers. The rise of the solo flamenco guitarist is a late development and many of the great flamenco soloists are also renowned for their ability to accompany singers and dancers.
Flamenco Guitar

The modern classical guitar and its physical development can be traced back to the Spanish guitar-maker Torres. Alongside the classical guitar is the flamenco guitar. The flamenco guitar has the same history and the greatest luthiers in Spain have always made both types of guitar. The main structural difference the flamenco guitar has in relation to the classical guitar is a thinner body. This creates a timbre that is sharp and percussive. This is considered the ideal sound with which to accompany dancers. The flamenco guitar also has wooden tuning-pegs, which is the traditional method of construction for all early guitars. The need for the classical guitar to be able to be heard in a concert hall and the demand for greater resonance from classical composers; means that the classical guitar has left behind the use of wooden tuning-pegs and its body size has increased in comparison to the flamenco guitar. In many respects the flamenco guitar is similar in construction to the guitars of earlier centuries.
Flamenco Artists
Paco de Lucia and Sabicas are two flamenco guitarists that students of the guitar should be aware of. Both have played a major part in the changes of this evolving art form. Sabicas developed the technique of tremolo and Paco de Lucia extended the harmonic framework with his use of jazz chord voicings. Juan Martin is a flamenco guitarist who keeps the traditional forms sharply in focus and provides the clearest guide for beginners wishing to study the various flamenco forms.
Flamenco Forms
The flamenco forms have been developed over a long time. There is a distinction of terms when flamenco forms are described. When flamenco vocal forms are described they are called "cantes" and the guitarist forms are called "toques". Each flamenco form has certain rhythmic and tonal qualities that encapsulate the form and flamenco guitarists are expected to have a knowledge of the origin and usage of these.
- Bulerías
- Soleares
- Seguirillas
- Tientos
Flamenco Chord Progression
This is a very common chord progression that most guitarists who wish to learn flamenco start with.
-
A minor
-
G major
-
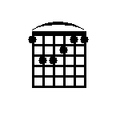 F major
 -
E major
.png)
A descending one octave Phrygian mode starting from the note "E" which can be played over the above chord progression.
.png)
Flamenco Technique
- Golpe - the Spanish word for "tap". This technique involves "tapping" the body of the guitar to produce a percussive sound. The third finger of the right-hand strikes the table of the guitar with the nail and flesh. Flamenco guitars have a "golpeador" (plastic cover) which protects the wood of the guitar during the use of this technique
- Rasgueo - this is the most common strumming technique for flamenco. The right-hand is formed into a closed fist with the thumb resting against the guitar or low E string for support, and each finger is flicked out one at a time (4-stroke rasgueo) to sound the strings with the nails. A common variation is to use the technique with only the index finger. The index finger is also used for the up-stroke which only strikes the treble strings after the completion of the 4-stroke rasgueo.
General Guitar Theory
Tone and Volume
3 zones of distortion
The starting point for dialing-in various electric Rock guitar tone is not a crystal-clean full-range amplifier and speaker, but rather, a tube power amp pushing a guitar speaker that has limited frequency response, with the power tubes on the edge of breakup.
With power-tube distortion, and to a lesser extent with preamp tube distortion or solid-state distortion pedals, there are three zones: Clean, Compressed, and Distorted, somewhat corresponding to the terms Clean, Crunch or Rhythm, and Lead. The Clean zone ranges from literally clean with linear response, to the beginning of warmth and some smoothing and coloration. The Compressed zone ranges from slightly warm, smoothed, and colored, into slightly audible distortion. The Distorted zone runs from slight breakup to full distortion. Mathew laframboise
Controlling distortion voicing
An electric guitar has a volume control and tone control. The volume control almost always has a side-effect on equalization as you turn it down, affecting the pre-distortion equalization (EQ). The tone control reduces the amount of treble, affecting the pre-distortion EQ and thus the distortion voicing.
For increased control of the pre-distortion EQ, place an equalizer pedal in-between the guitar and the first distortion stage such as a distortion pedal or the guitar amp's built-in preamp. Switch between all the pickup settings, in conjunction with changing the distortion settings and EQ settings, to use the full range of basic sounds or "tones" the amp can produce.
The preamp Gain control on the distortion channel of the amp, or the Distortion control on a distortion pedal, sometimes has a side-effect of changing the equalization and thus the distortion voicing. In that case, you can use a lower distortion setting combined with a higher volume setting prior to the distortion stages, to dial-in a different distortion voicing with the same amount of distortion.
The tone stack on a standard tube amp is in-between the preamp distortion and the power-tube distortion. Thus the tone stack acts as the final part of shaping the preamp distortion voicing and also shapes the power-tube distortion voicing, together with the Master Volume control, which affects the amount of power-tube distortion voicing. For maximum power-tube distortion, set the tone controls and Master Volume to maximum, which is equivalent to bypassing them entirely.
When setting the preamp distortion, learn all the ways to adjust the equalization before the preamp distortion, including the guitar's volume and tone controls, a wah pedal, an equalization pedal, and any other volume or tone controls prior to the distortion stage. These affect the distortion voicing. More treble causes the treble to predominate in the complex clipping, resulting in a glassy liquid breakup tone; more bass prior to a distortion stage causes a dry, crusty breakup tone.
The same principles hold for controlling the power-tube distortion voicing. Learn all the ways to affect the equalization and level prior to the tube power amp, but after the preamp distortion.
Obtaining distortion independently of volume
To get power-tube distortion quietly or independently of volume level, use a power attenuator or an amplifier that has a built-in power attenuator, or a built-in power-supply based power attenuation (Power Scaling, Power Dampening, a Sag circuit, or a Variac).
It is possible to further voice the power-tube distortion by placing a dummy load (usually a power attenuator set entirely to use its built-in dummy load), an equalizer, and then a solid-state power amp between the power tubes and the guitar speaker.
A guitar speaker is a complex dynamic filter and transducer. Line-level cabinet simulators attempt to simulate this complex dynamic sound.
In the recording studio, the amp head and speaker cabinet are typically separated and the miked speaker cabinet is placed with microphones in a soundproofed isolation booth or in the live room. Either location is a soundproofed room separate from the control room where the mic signals return and the full-range monitor speakers reside for listening to the resulting power-tube distortion sound or loud quasi-clean amp sound at a controlled volume. In a home studio, the guitar speaker is sometimes placed in an isolation box with microphones.
Place one or two microphones near the guitar speaker. If you use two microphones, this causes some complex comb filtering; be prepared to swing the mixer's equalization for the two channels around very freely, because the effects of comb filtering are unpredictable. If you use a single microphone, setting the mixer's equalization is more straightforward.
Writing Songs
Now that you've got some skill and control over the guitar, you want to start writing and performing your own songs. But all your famous artists have such amazing, complicated songs, it's hard to know where to begin.
This page is a general guide to writing songs on the guitar. Although it won't necessarily teach you to write a Top 40 hit, it will give you some general ideas on how to write an effective song. If you haven't already, please read the Singing and Playing section.
General Tips
- Keep it simple. The most popular, catchy tune on the radio is probably the simplest, most oft reproduced melody in the world. But that doesn't stop you from humming it all day, does it? Never forget that when some people hear "a complex, thought-provoking piece", others hear "an over complicated mess."
- Have confidence. Your song may not be the best in the world, but a gutsy, less talented performer is always more admired than an amazing performer that is too shy to get a single note out.
- Keep trying. If you don't "figure it out" immediately, that doesn't mean that you never will. If something sounds terrible, try the opposite, or only use the second half of whatever your work on. The key is to keep trying different things until something clicks.
- Don't get frustrated. If absolutely nothing is clicking, then just come back to it later. Record whatever you have, take a break, and play it again later. The song isn't going anywhere you aren't going, and it'll still be there the next day.
- "Borrow" someone else's melody. Often the best melody is the one that already exists. The history of music (and any art, really) is checkered with people taking bits and pieces from other artists and adding their own spin to it. However, this doesn't mean you should just copy some famous song and call it your own, because chances are someone else will notice. Other songs should be used as a source of ideas, not something you can photocopy.
- Ask someone else. You might be stuck in the same rut, but that doesn't mean anyone else is. Ask another musician (or even a regular person) what they think might fit well. Sometimes the advice will be surprising. With this method you have to be careful of copyright issues, especially if you make it big.
Turning Chords into Songs
Often players come up with a catchy riff or two, and they're not sure how to develop it into more. Songs typically are built up in layers; for example, in a band, one guitarist creates a riff, and another adds a catchy lick over top, the bass player brings in something to support it and the drummer keeps time and adds some interesting rhythms. Even though the first guitar part might still be the same, it is ultimately the contribution of the other parts that turns a few chords into a song.
The most important thing to remember when writing a song is that very little sounds good completely on its own, and generally it requires at least more than one part to make things interesting. There are many ways to add a second part to a song. For instance, some players (especially those that can finger pick) can simultaneously play a bass line on the thicker strings and a melody on the thin strings. Really complicated riffs can also sound good on their own, however these tend to be difficult to write and you may not have enough technical skill for complicated writing.
Another player can also add depth to a riff. For example, a bass player can add another sound texture, and having two players allow them to bounce melodies off one another. The song Dueling Banjos from the movie Deliverance is a good example of how two players can create an interesting, purely instrumental song.
But if none of these options are available to you, or perhaps you only like to compose songs alone, there is always one other layer you can add to any progression; your voice. Amazing singing can turn even the simplest progression into a groundbreaking song
Creating Melodies and Hooks
The main melody, often called the "hook" in popular, radio friendly music, is the catchy, often repeated words and melody that makes the song most memorable. In most songs, especially modern music, the hook is contained somewhere in the chorus. However, this is not always true, as some songs use hooks in the verses, or put hooks in both the verse and chorus.
In general, it is much easier to put words to a melody, rather than a melody to some words. Words tend to have their own syncopation, and this can make it tough to make them fit with an irregular strumming pattern. Already having words is also tough because generally the author does not want to change them.
There are certain cases where putting music to words is a better option. For instance, a rhyming poem or free verse with a regular meter can easily be made a song. Simple chord progressions lend themselves well to these sorts , especially the I - IV - V and IV - V - I.
Often when you are creating a song, a chord progression comes easily, but it is tough to figure out what goes over top. Even if it seems difficult, there are many ways to make things easier for yourself.
- Record a chord progression, then play it back and try to hum or whistle a melody over top. Often this is enough to get things started and get you unstuck. You can accomplish the same thing by just playing the progression over and over again, but it takes a surprising amount of coordination to play a new riff and spontaneously invent a melody.
- Record a chord progression, and then try to solo on top of it. This is similar to the first method, but actually using the fretboard can help you figure out what notes work best.
- Isolate a particular part of the progression and repeat it over and over until you come up with some sort of start. it is best to use at least two chord changes, because just strumming the same chord all the time is uninteresting, and it tends to make coming up with a melody even more difficult.
Another approach is to begin with a melody form, and then put chords behind it to turn it into a song. This may be more challenging, especially if you already have a chord progression you really enjoy, but sometimes approaching a problem from a different angle can make things easier overall.
For instance, in the well known 'Danny Boy' or 'Derry Air' as it is sometimes called, the 'hook' is found where the melody appears to try to surge forward into the chorus and the words "But come ye back" accompany that surge in chord progression.
Use a Method
It is recommended that you work following some simple procedures instead of just trying to come up with something remarkable from scratch. Here are some guidelines on how to work step by step in order to be more efficient.
- Choose or come up with a scale for the song before you start working on it. Although experienced guitarists might be able to follow a scale subconsciously, thus skipping this step, it is better for beginners to use a scale so as to avoid inconsistencies and to set a mood for the piece. Keep experimenting with scales until you find one that suits the tone you want to give and then start working on the song. Note that you can change scales for different parts of the song, what you shouldn't do is change scale in the middle of a single riff or melody. Also keep in mind that when you are more confident with your guitar you can break away from the scale and use notes not included in it, but the best way to work is to play along the predefined scale and play an odd note only when you want to add a different tone. This usually results in a more original melody, but is hard and might result in sounding like random notes if not used properly.
- Keep in mind the desired result. You won't get a very good result by simply coming up with random riffs. You must always focus on what you want to create. For example, you might want to create a complicated, original riff for the intro to attract the listener's attention or you might prefer a more melodic but less memorable intro. Either way, you must always have the goal in mind instead of composing aimlessly and keeping the riffs that sound good. This way you won't end up with a style you didn't intend to create.
- Start simple. If, for example you want a complex riff you should start with a very simple melody and then modify it gradually, by expanding it, for example, or altering the rhythm, until you get the desired result. This will not always give better results, but it's easy for beginners.
Also see the Writing Effective Songs wikibook for more help.
{Playing With Others
Almost as soon as you start playing the guitar, you start to meet many other guitarists. Eventually, you will wind up playing with some of them, in some sort of informal jam sessions, where friends play anything that tickles their fancy.
Playing with others is helped incredibly by having some basic knowledge of music theory along with some amount of talent or skill. This is especially true if you intend to improvise a melody or chord progression. this section will provide the basics of considerate playing, along with some tips on how to keep playing interesting.
The Makeup of a Band
Even if you never intend to play in a large group, it's still important to know the basic divisions of a band, because you never know what might happen tomorrow. Learning about how a band works can also help you learn new songs from popular groups, as well as improve your knowledge of general music theory, and your appreciation for music.
As explained in the lead guitar and rhythm guitar section, guitar playing essentially breaks down to two, somewhat overlapping categories; rhythm and lead (sometimes called melody). In a band, the rhythm guitar is more generally associated with the drums, bass, background vocals and less prominent instruments, while the melody guitar would be related to the lead vocals or any other lead instrument.
Thus, when you are playing only with two people, almost immediately one player provides the chords and groove of a song, while another play contributes a melody that complements the song's progression. With more people playing, this division becomes less strict, and players can shift from playing more of less prominent parts.
In general, it is almost always better to play with more than two people, because with more people, whatever piece you are playing is less likely to fall apart when the first person screws up. If you only play with one other person, consider including a metronome or a mp3 drum track in the background. Electronic accompaniment helps you keep a steady pace, and helps you learn to not "rush" or "drag" in the group.
Proper Playing Attitudes
The most important thing to remember about playing with others can be learned by carefully listening to any piece of recorded music: Every player contributes to the song with an appropriate tone and volume, and never plays in excess of that. Essentially this just means you shouldn't try to outplay and outshine everyone else in the group, because no one likes a showoff. It doesn't matter how good you are (or think you are), you should never play so much that it drowns everyone else out.
If not overplaying is the most important thing about jamming, then the second most important is listening. The key to improvisation is to listen to the interplay of all the other instruments, and to add to that whatever sounds best. Listening is, unfortunately, a very neglected skill among beginning musicians, and really, most musicians in general.
A common tendency, especially among those who have just begun to get a solid foundation in scale theory and technique, is to noodle around aimlessly on the fretboard with little or no regard for the shape of the song that is being played, or the structure of the arrangement. This is a huge mistake, and it leads to music that no one wants to listen to; worse yet, it does nothing to develop the musician who plays it.
Pay attention to the music that is being played around you. Add to it only when it is necessary. You should begin to hear the lines that you want to play before you play them. What you are shooting for here is something akin to the old koan about sculpting: the figure is already in the marble, and you are just trying to release it.
It is also important to make sure that you do not take up too much "space" in the arrangement, which is to say, do not play so loudly that other instruments must fight to be heard. This is especially a problem for rhythm guitarists in jam sessions, who must be careful not to drown out soloists.
Staying in the Right Key
Perhaps the most important thing to do when playing with others is to remember what key you are in. The "key" of a piece is essentially the scale of notes that the song uses, but it also affects what the correct chords are to play on each note. Suppose there is only yourself and another guitarist playing, and the other guitarist is playing rhythm. The chord progression they are playing determines the key of the song, which naturally suggests certain notes for you, the lead guitarist.
Even if you have absolutely no knowledge of music theory, everyone can generally tell when you play a wrong note. Although advanced players can often add in "wrong" notes for colour (known in music theory as an accidental), for beginners it is important to know what notes are in what keys, so they can use the most appropriate notes.
For example, the rhythm guitarist might be playing a three chord blues riff in the key of B minor. Even if you didn't know the key, often the first and last chord of a progression can be good indicators of commonly used keys. At the very least, the general tone of the progression will be enough to indicate if it is a major or minor key. in this case, once you knew the key, you could immediately start soling in any B minor scale, such as the B minor pentatonic scale. However, since music is creative, it is impossible to be "limited", and you also have available a number of other soloing scales, like the pentatonic scale or any of the modes. For example, the Phrygian mode has traditionally been the "Spanish scale". Modes are much more complex and require knowledge of music theory to get the most benefit from them.
Improvising
There is also a basic approach to improvising which is more simple than playing over a chord accompaniment. It also predates Western tuning systems and chords. It is produced by playing a moving melody on one higher-pitched string, while leaving a lower note ringing on another "open", or lower-pitched (unfretted) string. The static bass note is referred to as a "pedal tone". The lower note drones or stays the same and the upper note moves, creating both simple harmonic and melodic motion. Traditional instruments which have fewer strings and a smaller range than the guitar use this technique. It can be heard in many musical styles in both Eastern and Western musical traditions including those with guitar.
This technique can be found both within Western tuning systems which use 12 semitones per octave as well as beyond in more complex Eastern tuning systems. Therefore before attempting to improvise a solo over a chord progression or a series of chords in a particular key, it is useful to practice playing simple melodies on one (upper) string to familiarize your ear with the intervals, or distances between those fretted notes and a static open, un-fretted (lower) string below it which is sounding simultaneously. Another advantage of this is that with each pair of notes you play, different intervals are sounded. Your ear begins to detect these and this is a basic form of ear training.
Well-known Improv Bands
- The Grateful Dead
- Throbbing Gristle
- The Jimi Hendrix Experience
- Led Zeppelin
- King Crimson
- Can (band)
- Particle_(band)
- The Disco Biscuits
- Widespread Panic
- Cream_(band)
- Dave Matthews Band
- Moe (band)
Recording Music
So you've been practicing and practicing, and finally, you're ready to record your first demo. But where to begin? Should you go to a professional studio, or just try to do it yourself at home? What kind of equipment and software will you need? Although everyone talks like they could write and record an entire album in a weekend, recording is a surprisingly tricky and detailed job. Remember that professionals go to school to learn how to record musicians.
This page is a guide for musicians that already have their own songs and are ready to record them. It will cover the basics of the recording process, what to expect with a professional studio, and outline an ideal home recording setup.

What Gets Recorded When
Drums: Generally speaking, it's a good idea to record the drums and percussion first. This will help all the other recording musicians follow the right beat, instead of the drummer having to follow the other off-beat musicians.
Bass: Should be recorded second, as it's the middle ground between the basic beat of the drums and the chords of the rhythm guitar.
Rhythm Guitar: Gets recorded third, as it's the foundation for the lead guitar.
Lead Guitar: Follows the rhythm guitar, and will give direction to some of the vocalist's melodies.
Vocals: Very last, as the vocalist will be able to wrap melodies around the bass and rhythm guitar's chords, and the lead guitarist's soloing melodies. Vocals are sometimes recorded as a "guide track" to help the other musicians "feel" their way and then at the final stage is replaced with a more focused performance.
All in this order, of course, assuming you don't have the space and tools to make a live recording.
Mixing
When it comes to mixing volume levels and other audio dynamics, one needs to take several things into consideration. First, which instruments should be heard the most? In a guitar-focused rock band, one may want to give the lead or rhythm guitar more prominence. In funk or dance music, the bass may want to be given more space. However, certain instruments may also need more focus at different times in the song. If there is a banjo playing in the background in a rock song, but it eventually gets a solo part, one may want to increase the volume at the point of the solo.
The second thing to consider is special effects and left-right panning. Should the guitar be given a delay effect at some parts? Perhaps the bass may need a flange effect, or backing vocals should pan from left to right during the bridge?
Another important thing to keep in mind is the master volume level. At no point in your song should the listener need to abruptly turn down the volume for fear of breaking his/her speakers!
Professional Studio
Although you have more "creative control" in a personal setting, having professional sound technicians taking care of the recording make things much, much easier.
Personal Studio
Based on your budget and space available, your home recording studio layout and design will vary. What really affects your home studio is the type of instrumentation you intend to record. For a guitarist, you could use a computer, audio interface, amplifier, guitar and a dynamic mic. For more advanced music composition, you could add a hardware mixer, keyboards, drum machines, variety of different microphones, VST software and percussion instruments.
Putting together a small studio at home is relatively inexpensive compared to the price of hiring a professional studio. The power of modern computers gives you a huge variety of recording options and the computer has become the centre of home recording and pro studios. Pro studios buy extra audio processing equipment like expensive compressors and outboard effects which will always give them an advantage over home recording but with a modest investment the home studio can produce a recording quality that most people would find acceptable. All professional musicians usually prepare demo versions of their songs before they go into a costly professional studio and this should also apply to your working method.
Equipment

- Condenser microphones are generally used for recording acoustic guitars and dynamic microphones are more suitable for putting up close to the amplifier speaker. Try not to buy cheap microphones on the basis that the technology used is simple and therefore a cheap microphone will match a microphone like the Shure SM57 (industry standard microphone for recording electric guitar amplifiers and snare drums); the extra cost is reflected in the higher audio quality of your recordings.
- An audio interface is essential for instruments and microphones. Plugging a microphone directly into the computer's microphone input or a guitar into the line-in input produces poor quality results due to the fact that a computer's soundcard and microphone/line inputs are generally not intended for serious recording projects. Audio interfaces can be an external box using USB or Firewire or an internal PCI card with break-out jacks.
- The PC you use determines the amount of tracks you can record. A laptop can be useful for portable recording but they rarely match the usefulness of a high specification PC. You should aim for a minimum of 4GB of RAM and the fastest processor that you can afford. Audio recording and playback places a heavy demand on the computer's resources and this can lead to timing errors, glitches and less tracks but this has become less of an issue with multiple processor machines. Recording software usually comes with a "multiple processor" enabled option and you should check for this when choosing between software packages.
- A good guitar is essential. An entry-level guitar should be replaced with a good quality guitar after a guitarist has mastered open chords and a few scales. This usually means within a year or so from the day they started playing. Guitarists tend to become attached to their first guitar and the danger in this is that the guitar itself hinders the development of higher skills. An entry-level guitar will always sound like an entry-level guitar when recorded. * A good rule is to find out what some of your favorite guitarist plays and play them all through a few different amps. You will then be able to see which feels best to you, and not what the "norm" is. That being said, there is a reason Gibson and Fender are the most popular brands to own. Just remember to find a guitar that you like, and if you like how it plays and sounds, its all up to you.
Recording Environment
This is an odd subject. Most studios are specifically designed for sound, and are built to get the best quality sound available. However, some of the most famous albums ever where recorded in buildings that were never designed for music. It all comes down to what sounds good to you.
That being said, you never want a square/rectangle room to record in. Always try and uses as much sound dampening possible, so that you can get the best quality with what you have. As long as there is no reverb (unless wanted), the recording should be adequate.
PC or Mac?
This is more a preference than which is better. Certain people are accustomed to Windows, others feel that an Apple is easier to operate. However, most professionals use Macs, but it is not uncommon for some major studios to use PCs. There are a variety of specialized Linux distributions dedicated to the purpose as well, utilizing real-time kernels for lower latency and faster processing of audio input.
Recording Software
There are many companies that supply music recording software (DAW - Digital Audio Workstation). Professional studios tend to use Pro Tools by Avid. Pro Tools is expensive and usually needs to be run on a computer that is built for editing, and are high performance computers such as a Mac Pro/Alienware, or a custom built PC. However, any basic PC/Mac can run it.
There is a learning curve associated with music software and it will take time before you achieve results that match your expectations. A good example is the virtual mixing desk; one aspect of the software that matches its hardware version down to every detail. On a virtual mixer you can assign auxiliary sends and returns, route audio, set instruments in the stereo field, balance volumes, automate changes and much more.
All recording software allows you choose a software driver from a multiple list. If you have bought an audio interface and installed the software, then choose that driver to achieve lower latency. Latency is caused by the analogue to digital conversion of the audio signal and by the processing that takes place before it is sent to your audio outs on your virtual mixing desk. This can be quite disconcerting to the guitarist; a sense of striking the string but not hearing the sound until milliseconds later. This is usually overcome by the audio interface offering direct monitoring. This bypasses the software and provides you with a signal that is not processed. This has its drawback in that you cannot use any software effects but these can be applied to your audio track afterwards.
Here is a list of sound drivers:
MME: early Microsoft driver that still appears as a default in driver drop-down menus. Low performance makes this unsuitable for DAWs.
DX: Microsoft multi-media driver designed for improved graphics and sounds. Offers high latency and is therefore not suitable for DAWs.
WDM: later Microsoft driver that offers improved performance over MME
ASIO: developed for high performance and low latency. This driver is recommended for DAWs. ASIO is not a Microsoft driver and it is essential to check that the DAW you buy supports the protocol.
Direct injection
Direct Injection is one of the most hotly debated decisions when recording the sound of guitar. On one hand, if truly direct (that is, does not goes through any amplifier or effects), the extremely clean signal is a blessing for the audio engineer, as he will now have some thing that can be easily manipulated with any effects. On the other hand, some people say that there are no rescue for such a clean signal, no matter what effects were inserted.
Effects to use
Whether you use direct injection or mikes, using computer or traditional 4-tracks, insert the effect while recording or after the recording, you will need to have some to bring life to the otherwise sterile sound.
- Distortion - what makes electric guitar sound great? Distortion, that's what. When combined with proper amount of compression, the sound will be much smoother.
- Compression - In terms of direct injection, compression of an audio signal can help produce a smooth distortion; this effect also produce a sustain on the sound.
- Delay/Echo/Reverb - provide a front-back aural dimension
- Stereo chorus - provide left-right aural dimension.
Some DI-boxes that is specifically designed for recording may also have additional circuitry, to help mimic the sound of some certain cabinet and the position of the mike.
Alternatively, if you can get a hold of a Pre-Dunlop era Rockman, it provides all the tools and setup needed to produce some of the best direct-injected recorded Guitar.
Tips for Recording
- Don't get frustrated! - If you can't get something to sound right, just take a break. Go and do something that is not music related and then try again.
- Re-amping - If your midi tracks sound a bit lifeless then re-amping can put some "air" into the mix. Play the midi track through your amplifier and record back into the DAW onto a separate track.
- Creating a great guitar solo - the professionals may "comp" a solo from many different takes. Jimmy Page (Led Zeppelin) and David Gilmour (Pink Floyd) are two guitarists who utilize this method of merging the best sections of alternative takes.
- Backup your projects - essential to save and back-up your music projects. Music projects tend to grow quite big as you gain proficiency in developing songs and backing up your work is essential if you don't want to lose earlier takes that you may wish to return to.
Tuning Your Ear
Almost as important as learning how to tune your guitar is learning how to tune your ear. Most people do not have "perfect pitch", which is an umbrella term for anyone who is really accurate at determining or singing notes. Although you can naturally be more or less inclined to hear correct pitches, this is a skill that can be learned, and there are several ways of learning it. However, the truth of the matter is that no one is absolutely "perfect" when it comes to pitch, and indeed, many songs you listen to could be deliberately composed slightly sharp or flat.
Some guitar players prefer their instruments not to be exactly tuned, because it gives some extra texture. Tuning the thinner strings slightly sharp can make chords sound brighter, while tuning thicker strings down slightly can give chords some "bite". Another important reason to learn to tune your ear is that one day you will sit down to jam with someone, and have no tuner available, and you will be forced to tune to one another. This is especially true if you have a band, and you are playing live shows; being able to quickly adjust your instrument can be the difference between a great performance and a terrible one.
Using a Human Voice
If you are in a band, and you have a singer that can never quite hit those notes perfectly, sometimes it is easier to retune your guitar rather than try to retune the singer. Learning to tune your strings to a note someone is singing is a valuable skill, and is surprisingly similar to other regular tuning methods, especially if you can tune to a piano.
First the singer should sing a note, preferably an A or an E, and in the most comfortable range of their singing voice. If they can sing high notes, or different notes on command, it is sometimes easiest to tune each string to the singer, and then quickly do some fine adjustments to make sure the guitar strings are consistent.
Using Dissonance
Players that have been playing for a long time begin to learn what a chord or interval is "supposed" to sound like. Sometimes this is because a favourite song starts with this chord, or because they always play a particular chord type (like a power chord, major barre chord, etc.).
With this method of tuning, you simply play the appropriate chord, and then adjust your strings until it sounds "right". For example, switching into Drop D tuning is often easy for many people, because the open power chord has a certain tone when it is properly tuned. Power chords are especially easy to tell when they are out of tune, because they contain only two notes.
Chords for Tuning
These are some common chords that players use to tell if their guitar is properly tuned.
The power chord is a useful tool in tuning as well as it mimics the natural overtone series of the guitar. Playing a note and a fifth above it, on a piano for example, will allow you to more precisely tune your instrument.
Harmonica and Guitar Combo

The harmonica is an instrument that has found favour with many guitarist. The idea evolved from the blues and country and western musicians of the early part of the 20th century. The role the harmonica plays in providing another timbre has appealed to many artists. Musicians such as Bob Dylan and Neil Young have used the combination to great effect.
Harmonicas exist in four varieties: diatonic, chromatic, tremolo and chord. The chromatic can play along to music in any key but is harder to master than the diatonic version. The diatonic harmonica is made to play in one key and is easier to learn but you will need to buy more than one. The guitar's natural key is E; so buying a diatonic harmonica in the key of E major would be ideal. The other diatonic harmonicas you should aim to add to your collection is G major and C major. Diatonic harmonicas are cheap and it shouldn't take long before you have a collection of harmonicas that cover every key. The tremolo harmonica is like a diatonic, yet it vibrates and has more vibrato than usual harmonicas. It is used for orchestra too.Chord harmonicas are very big and may require multiple people to play and can be even used in the orchestra at times.They add a touch to a lot of things really.Chord Harmonicas are very cool,yet very expensive too and they can run in the thousands when it comes to cost.Some good Chord Harmonicas can cost you $2,000 or more depending on the company selling them.

To play both instruments, one would need a way to hold the harmonica while the hands chord and strum the guitar. This is done by the harmonica holder, which goes around the neck, allowing the harmonica to be always in front of your mouth. However, there are a few things to keep in mind:
- Instead of moving the harmonica itself, you will now move your head in order to play the notes. Due to this limitation the solos you "blow" will be slower than if you had the harmonica cupped in your hands.
- Hand-related effects, such as hand vibrato, will be unavailable. Also, due to the lack of hands, there will be no additional resonance from the cupped hands.
Furthermore, since one is multitasking, it's best to know how to play both instruments individually very well, in order to spend less time trying to find each note and chord. When you buy your first harmonica, spend some time learning to play it with your hands. Try playing along to the recordings of Little Walter and Sonny Boy Williamson.
The harmonica will usually be played in the 2nd position (of course one can try other positions). Often the guitar plays the chords, while the harmonica provides the melody. This is because guitars have a much lower octave range than the harmonica; furthermore, guitarists can play chords in different keys easily. Since the harmonica is played in a higher pitch range, this makes it suitable for melodic lines. Another factor is the timbre of the harmonica tends to cut through the sound of resonating guitar chords. Still, this should not stop you reversing the roles, as long as it sounds pleasing.
It is possible to play chromatic harmonicas with a guitar. This can be done with the following:
- Valved Diatonic or XB-40
- Tombo S-50.
- Take off the mouthpiece of a straight tuned chromatic harp. However, one may need to make sure the body's edge is smooth
- Note: both S-50 and this method require using the lips to block the non-sounding row; S-50, due to greater distance between rows, is easier at this.
- Use the handless chromatic; essentially a special mouthpiece that move up and down between the rows, controlled by the movement of the head.
Equipment
Guitar Accessories
This page is a list of common (and uncommon) accessories you can get for guitar. It is not a buying guide, but it will give you an idea of what to expect in your local guitar shop. While they are not all necessary for playing guitar, some of them are extremely useful and are a good investment.
Picks
Picks are probably the most frequently bought guitar accessory. There are several reasons, but mostly it is because there are so many types of picks, and picks are so easily lost. When you go to the guitar store, you are overwhelmed by the agony of choice, and this is especially true for the beginner.
Picks are probably as old as guitars themselves, although most modern picks are made out of plastic, or sometimes metal. Apart from shape and size of the picks, its strength and the material used to make it are important, because these affect the "feel" of playing with the pick.
Up until about the 70's, most picks were made out of horn or turtle shell. Turtle shell was generally better, because it allowed some flexibility when hitting the strings. However, over time this was devastating the turtle population, and now most picks are made of nylon or plastic. Generally nylon picks have the same properties of the turtle shells, and plastic picks are thicker and denser. However, the general disadvantage of plastic picks is that they wear out quickly, especially if you play fast and hard.
Since the guitar industry constantly experiments with new materials, you might walk into the guitar shop and find something completely exotic. For example, you can buy picks made from hard leather, which are outstanding for classical guitars because of the soft feeling.
Selecting the correct pick for you depends above all on what style of guitar you want to play. Lead or rhythm? Will you be slowly strumming chords, or chugging away on distorted power chords? Each style is most easily accomplished with a particular type of pick. Generally speaking, how hard a pick you use depends on how hard your strings are. Heavier strings will require thicker picks, and vice versa. The shape of the pick determines how much operating area you have to use. For example, rhythm guitarists usually use blunter, larger picks, and lead guitarists use pointier picks so they can more precisely hit individual strings.
If you use hard picks, you will get a hard sound out of the strings, especially with metal picks. Generally the thicker the pick the less "give" there will be when you strum a chord. However, because no two companies manufacture picks with the same material, Company X's 0.76 mm pick will feel different than Company Y's 0.76 mm. Above all, remember that you should always select a pick based on your ability to handle it. You can only play well with a pick if it fits well in your hand.
Picks for the guitar typically range in thickness from the ultra thin 0.38 mm to the really thick 1.14 mm, although bass picks can be thicker. A mid range pick would be something about 0.76 mm thick. Beginners will usually prefer softer picks until they can learn to hold them securely.
Aside from the thickness and mass of the pick, there also exist different pick types. There's the finger pick, which fits over your fingers with a ring (thumb-pick is special because it's angled), and even your normal picks may have different shapes, such as shark-fin (better at chord), sharppoint, etc.
Strings
Each type of guitar uses its own type of strings. Strings are specifically designed for a type of guitar to give it a particular sort of sound. The differences between string types affect the guitar's tone, and it is not recommended to use a set of strings not made for your guitar. Not only would the result not sound good, but attempting to string a guitar with the wrong kind of strings would be difficult, frustrating, and might damage your instrument.
Three of the best and most popular brands of guitar strings for both acoustic and electric guitar are currently Ernie Ball, D'Addario, and Elixir. Ernie Balls and D'Addarios are much cheaper than Elixirs, but Elixirs will keep their bright tone for months (which is why they are higher-priced). But Elixirs can break as easily as any other strings, so they are perhaps best left to people who have been playing a long time and rarely snap strings. The difference between the other two brands is a matter of taste; try them both.
A classical guitar has three bronze wound strings and three strings made out of nylon, which are the higher pitched.
A set of strings for a steel string acoustic has four bronze wound strings and two silvered steel strings, the steel ones being the thinnest and highest pitched.
A set of electric guitar strings are similar to an acoustic guitar's, except the strings are made of nickel instead of bronze and steel. Often there are three wound strings and three nickel strings, but you can also get four wound and two nickel.
The two most common gauges for the high E string in electric guitars are .009 inches and .010 inches (these measurements appear to be used often even in countries using the metric system). Often a whole set of strings is referred to by the gauge of the high E string, e.g., "nines" or "tens" for .009 and .010 gauges respectively. The beginning guitarist is recommended to start with .009s; many professionals also use this gauge, so many guitarists never "outgrow" it.
However, if you wish to try something new, you may want to try out .010 gauge strings once you get used to the lighter .009s. This is only recommended after you have been playing for a while, as your calluses need time to form, and your fingers need to get stronger. This procedure also applies to strings above the .010 range. There are also .011, .012, and .013 gauge strings readily available from all of the manufacturers mentioned above. The benefit of higher gauge strings is tone. If you are planning on playing metal guitar, or any other genre that uses a lot of distortion or overdrive, you probably will not notice a difference in the sound. Alternatively, if you are playing blues or rock, a higher gauge string will give you a heavier, "dirtier" sound, very preferable to these types of music. Stevie Ray Vaughan is notorious for using very heavy gauge strings (some sources claim .014 gauge), contributing a lot to his signature tone.
Tuning Aids

Electronic tuners are a quick, accurate, and precise method of tuning. A tuner can be used in two ways, either through a built in microphone which detects sound, or by directly jacking in an electric guitar. When a note is played, the tuner determines the note you are playing, and then represents visually how sharp or flat the note is. Most models use a combination of lights and a display screen to indicate the tone of the note.
Electronic tuners can be easily drowned out by background noise when you do not jack directly into them. Because of this, they are best used in a quiet environment.

A tuning fork is a piece of U-shaped metal that, when struck, emits a particular tone. Tuning forks are good because, unless bent, they will always emit the same note. The most common tuning forks resonate at either an A, at a frequency of 440 hertz, or C. Using a tuning fork is generally recommended for more advanced players. You can buy a tuning fork that sounds the note E. Many guitarists prefer this due to the fact that the guitar's lowest and highest strings are both E.
To use a tuning fork, gently strike it against the heel of your hand and it will vibrate. Then, set the base of the fork against the body of the guitar if it is acoustic. The sound of the fork will be amplified through the guitar, and you can use it to tune your strings. If you have an electric guitar, you must hold the tuning fork to your ear, and then tune your strings. It is important not to strike the fork against a hard surface, as this may bend the fork out of tune.
If you are using an A tuning fork, then you should tune first to the harmonic on the A string. However, you can also use the 5th fret on the low E string, the 7th fret of the D string, the 2nd fret on the G string, or the 5th fret on the high E string. All of these frets produce an A, although some are in a higher octave.
A pitchpipe is much like a tuning fork, in that it only plays one note and that note is used for tuning. To use a pitchpipe, you blow through the end like a whistle. Traditional breath powered pitchpipes are notoriously unreliable, because temperature changes can affect the note that they play. You can also purchase electronic pitchpipes, which emit notes through a speaker. Some electronic tuners also have this feature.
Cables
Cables are used to connect two sound devices together, like a guitar and an amplifier. There are many different types, each for a different purpose, and it is good for a guitarist to familiarize themselves with some common types.
String Crank
A string crank is essentially a handle with a rotating cap, designed to fit over top of a tuning peg. It makes unwinding strings much quicker, and some also have a slot to help remove the pegs near the bridge that hold the strings in the body.
Slide

A slide or bottleneck is a ceramic, glass or metal cylinder, usually worn on the fingers rather than held in the hand. The term slide is in reference to the sliding motion of the slide against the strings, while bottleneck refers to the original material of choice for such slides, which were the necks of glass bottles.
Instead of altering the pitch of the strings in the normal manner (by pressing the string against frets), a slide is placed upon the string to vary its vibrating length and pitch. This slide can then be moved along the string without lifting, creating continuous transitions in pitch.
Capo

A capo (short for capotasto, which is Italian for "head of fretboard") is a device used for shortening the strings, and hence raising the pitch of the guitar. Capos are used to change the key and pitch of a guitar sound without having to adjust the strings with the tuning keys. It was invented by the Flamenco guitarist Jose Patino Gonzalez.
-KayEss-1.jpeg)
Flamenco and folk guitar make extensive use of the capo, while it is used very rarely, if at all, in styles like classical guitar and jazz. Capos are useful and good to have, but sometimes they prevent a player from properly learning how to play barre chords. Capos and barre chords both have their uses, and there certainly is no reason you cannot learn to use both.
There are several different styles of capo available, but the basic method is the same; a rubber covered bar pressed down on the strings, and it is fastened on the neck with a strip of elastic or some sort of clamping mechanism. Some special capos can fret individual strings at individual frets, enabling a player to create an open tuning, or have two fretting bars, allowing you to quickly change from one tuning to another without having to move the capo itself.
A simple version can be made with a pencil and a rubber band. Lay the pencil (preferably one with flat surfaces) across the strings at the desired fret, and holding it in place by wrapping the rubber band around both ends and underneath the fretboard.

Because of the different techniques and chord voicings available in different keys, chords played with a capo may sound different. For example, placing the capo at the second fret and strumming a C major chord-shape sounds different than strumming an open D major chord. Although both of these produce the same chords, they each have a different tone and texture. Capos also change the timbre of the strings as the scale length is shortened, making the guitar sound more like a mandolin. Capos give you a greater varieties of sounds you can achieve on the guitar, using open chords and alternate tunings.
A capo is almost essential for older twelve string guitars because manufacturers would strongly recommend that the instrument not be tuned above a tone below standard guitar tuning to reduce stress on the neck. Modern 12-strings can be tuned up to pitch with ultra light gauge strings, but many players still prefer to tune a tone lower and use a capo to play in tune with six-string or bass guitars.
Metronome
.jpg)
A metronome is a device that produces a regulated audible beat, and/or a visual pulse, used to establish a steady tempo. Tempos are measured in beats-per-minute (BPM), and a metronome is invaluable for setting a proper pace, especially when practicing. Although it is possible to buy metronomes with moving parts, most modern ones are electronic.
Sophisticated metronomes can produce two or more distinct sounds. A regular "tick" sound indicates the beat within each measure, and another, distinct sound (often of a different timbre, higher pitch or greater volume) indicates the beginning of each measure. A tempo control adjusts the amount of time separating each beat (typically measured in beats per minute), while another, discrete, control adjusts the meter of the rhythm and thus the number of beats in each measure. This number is an integer often ranging from one to six, though some metronomes go up to nine or higher. Some devices also have options for irregular time signatures such as 5/4 or 7/8, in which other distinct sounds indicate the beginning of each subgroup of beats within a measure.
Music Stand
When reading music, it's best to use a music stand, as it can be set up at a proper angle. Furthermore, with a sturdy collapsible stand, one can have a reliable platform anywhere.
Effects Pedals
Effects pedals are electronic or digital devices that modify the tone, pitch, or sound of an electric guitar. Effects can be housed in effects pedals, guitar amplifiers, guitar amplifier simulation software, and rackmount preamplifiers or processors. Electronic effects and signal processing form an important part of the electric guitar tone used in many genres, such as rock, pop, blues, and metal. All these are inserted into the signal path between an electric instrument and the amplifier. They modify the signal coming from the instrument, adding "effects" that change the way it sounds in order to add interest, create more impact or create aural soundscapes.
Guitar effects are also used with other instruments in rock, pop, blues, and metal, such as electronic keyboards and synthesizers. Electric bass players use bass effects, which are designed to work with the low-frequency tones of the bass.
Distortion-related effects

Distortion is an important part of an electric guitar's sound in many genres, particularly for rock, hard rock, and metal. A distortion pedal takes a normal electric guitar signal and combine harmonic multiplication and clipping through the use of analog circuitry to create any number of sounds ranging from a mild vintage blues growl to a 1960s psychedelic fuzz sound to the sound of an highly overdriven tube amp in a metal band. Distortion is essential to the powerful sound of heavy metal music.
There are several different types of distortion effects, each with distinct sonic characteristics. These include overdrive/distortion (or vacuum tube-style distortion), overdrive/crunch, fuzz, and hi-gain.
Overdrive Distortion
Overdrive distortion is the most well known of all distortions. Although there aren't many electronic differences between a distortion an overdrive, the main audible one is that a distortion does exactly as the name suggests; distorts and clips the signal no matter what volume is going through it, the amount of distortion usually remains relatively the same. This is where an overdrive differs. Most overdrives are built to emulate the sound of a tube amp overdriving and therefore give the player control of the clipping through dynamics. This simply means that the effect gives a clean sound for quieter volumes and a more clipped or distorted sound for louder volumes.
While the general purpose is to emulate classic "warm-tube" sounds, distortion pedals such as the ones in this list can be distinguished from overdrive pedals in that the intent is to provide players with instant access to the sound of a high-gain Marshall amplifier such as the JCM800 pushed past the point of tonal breakup and into the range of tonal distortion known to electric guitarists as "saturated gain." Although most distortion devices use solid-state circuitry, some "tube distortion" pedals are designed with preamplifier vacuum tubes. In some cases, tube distortion pedals use power tubes or a preamp tube used as a power tube driving a built-in "dummy load." Distortion pedals designed specifically for bass guitar are also available. Some distortion pedals include:
- MXR Distortion+: A distortion which is capable of having a very subtle, soft clipping, right through to a heavily overdriven sound favoured by many modern day heavy and death metal guitarists.
- Pro Co Rat
- Boss DS-1 Distortion
- Marshall Guv'nor
- Line 6 Dr. Distorto
- T-Rex Engineering|T-Rex Engineering's Bloody Mary
- Digitech Hot Head
- Danelectro FAB Distortion
Overdrive/Crunch

Some distortion effects provide an "overdrive" effect. Either by using a vacuum tube, or by using simulated tube modeling techniques, the top of the wave form is compressed, thus giving a smoother distorted signal than regular distortion effects. When an overdrive effect is used at a high setting, the sound's waveform can become clipped, which imparts a gritty or "dirty" tone, which sounds like a tube amplifier "driven" to its limit. Used in conjunction with an amplifier, especially a tube amplifier, driven to the point of mild tonal breakup, short of what would be generally considered distortion or overdrive, these pedals can produce extremely thick distortion sounds much like those used by Carlos Santana or Eddie Van Halen. Today there is a huge variety of overdrive pedals, and some of them are:
- Ibanez Tube Screamer (TS-9 and TS-808): an overdrive which was built to work with the harmonics of a push-pull tube amp. This effect was made famous by blues guitarist Stevie Ray Vaughan but was and is used by hundreds of prominent guitarists since it's invention.
- BOSS SD-1 Super Overdrive
- BOSS BD-2 Blues Driver
- BOSS OD-3 Overdrive
- Line 6 Crunchtone
- DigiTech Bad Monkey
- N-audio Firesound V3
- Danelectro FAB Overdrive
Fuzz

Fuzz was originally intended to recreate the classic 1960's tone of an overdriven tube amp combined with torn speaker cones. Oldschool guitar players (like Link Wray) (citation needed) would use a screwdriver to poke several holes through the paperboard part of the guitar amp speaker to achieve a similar sound. Since the original designs, more extreme fuzz pedals have been designed and produced, incorporating octave-up effects, oscillation, gating, and greater amounts of distortion.
Some classic fuzzbox pedals include:
- Sola sound MK 2 tonebender
- Univox supa-fuzz
- Mosrite fuzzrite
- Dallas Arbiter Fuzz Face: This was a favorite of Psychedelic rocker Jimi Hendrix who shot this pedal to stardom as he did himself.
- Electro Harmonix Big Muff: Probably the most popular fuzz effects ever designed, the Big Muff is also often used as a sustain pedal and sounds excellent in combination with a wah wah.
Hi-Gain
Hi-Gain (descended from the more generic electric guitar amplification term high-gain) is the sound most used in heavy metal. High gain in normal electric guitar playing simply references a thick sound produced by heavily overdriven amplifier tubes, a distortion pedal, or some combination of both--the essential component is the typically loud, thick, harmonically rich, and sustaining quality of the tone. However, the Hi-Gain sound of modern pedals is somewhat distinct from, although descended from, this sound. The distortion often produces sounds not possible any other way. Many extreme distortions are either hi-gain or the descendents of such. The Mesa Boogie Triple Rectifier Series of amps are an example.
Some Hi-Gain Pedals Include:
- BOSS MT2 Metal Zone
- DigiTech Death Metal
- Danelectro FAB Metal
- Electro Harmonix Metal Muff with Top Boost
- MXR Dime Distortion: Used by Dimebag Darrell.
- Suhr Riot
Power-tube pedal
A Power-Tube pedal contains a power tube and optional dummy load, or a preamp tube used as a power tube. This allows the device to produce power-tube distortion independently of volume; therefore, power-tube distortion can be used as an effects module in an effects chain.
Power attenuator
A Power attenuator enables a player to obtain power-tube distortion independently of listening volume. A power attenuator is a dummy load placed between the guitar amplifier's power tubes and the guitar speaker, or a power-supply based circuit to reduce the plate voltage on the power tubes. Examples of power attenuators are the Marshall PowerBrake and THD HotPlate.
Filtering-related effects
Equalizer

An equalizer adjusts the frequency response in a number of different frequency bands. A graphic equalizer (or "graphic EQ") provides slider controls for a number of frequency region. Each of these bands has a fixed width (Q) and a fixed center-frequency, and as such, the slider changes only the level of the frequency band. The tone controls on guitars, guitar amps, and most pedals are similarly fixed-Q and fixed-frequency, but unlike a graphic EQ, rotary controls are used rather than sliders.
Most parametric EQ pedals (such as the [1] Boss PQ-4) provide semi-parametric EQ. That is, in addition to level control, each band provides either a center frequency or Q width control. Parametric EQs have rotating controls rather than sliders.
Placement of EQ in a distortion signal processing chain affects the basic guitar amp tone. Using a guitar's rotary tone control potentiometer is a form of pre-distortion EQ. Placing an EQ pedal before a distortion pedal or before a guitar amp's built-in preamp distortion provides preliminary control of the preamp distortion voicing.
For more complete control of preamp distortion voicing, an additional EQ pedal can be placed after a distortion pedal; or, equivalently, the guitar amp's tone controls, after the built-in preamp distortion, can be used. An EQ pedal in the amp's effects loop, or the amp's tone controls placed after preamp distortion, constitutes post-distortion EQ, which finishes shaping the preamp distortion and sets up the power-tube distortion voicing.
As an example of pre-distortion EQ, Eddie Van Halen places a 6-band MXR EQ pedal before the Marshall amplifier head (pre-distortion EQ). Slash places a Boss GE-7, a 7-band EQ pedal, before his Marshall amp. This technique is similar to placing a Wah pedal before the amp's preamp distortion and leaving the Wah pedal positioned part-way down, sometimes mentioned as "fixed wah," (pre-distortion EQ), along with adjusting the amp's tone controls (post-distortion EQ).
If a dummy load guitar-amp configuration is used, an additional EQ position becomes available, between the dummy load and the final amplifier that drives the guitar speaker. Van Halen used an additional EQ in this position. This configuration is commonly used with rackmount systems.
Finally, an EQ pedal such as a 10-band graphic EQ pedal can be placed in the Insert jack of a mixer to replace the mixer channel's EQ controls, providing graphical control over the miked guitar speaker signal.
Equalization-related effects pedals include Wah, Auto-Wah, and Phase Shifter. Most EQ pedals also have an overall Level control distinct from the frequency-specific controls, thus enabling an EQ pedal to act as a configurable level-boost pedal. Some EQ pedals include:
- MXR M-108 10-band Equalizer
- BOSS GE-7 Equalizer
Wah-wah

A wah-wah pedal is a moving bandpass filter whose frequency center is controlled by the musician via a rocker pedal. This filter boosts the frequencies in the instrument signal around the moving frequency center, allowing the musician to emphasize different areas of the frequency spectrum while playing. Rocked to the bass end of the spectrum, a wah-wah pedal makes a guitar signal sound hollow, without upper harmonics. On the other end of the sweep, the filter emphasizes higher-end harmonics and omits some of the low-end "growl" of the natural instrument sound. Rocking the pedal while holding a note creates a sound that goes from growl to shriek, and sounds like a crying baby, which is how the effect got its name and also the reason behind the Crybaby line of wah-wah pedals. The wah-wah pedal, used with guitar, is most associated with 1960s psychedelic rock and 1970s funk. During this period wah-wah pedals often incorporated a fuzzbox to process the sound before the wah-wah circuit, the combination producing a dramatic effect known as fuzz-wah.
Some wah-wah pedals include:
- Dunlop Cry Baby
- VOX V847 Wah Wah
- Danelectro Trip-L Wah
Auto-Wah / Envelope Filter

An Auto-Wah is a Wah-wah pedal without a rocker pedal, controlled instead by the dynamic envelope of the signal. An auto-wah, also called more technically an envelope filter, uses the level of the guitar signal to control the wah filter position, so that as a note is played, it automatically starts with the sound of a wah-wah pedal pulled back, and then quickly changes to the sound of a wah-wah pedal pushed forward, or the reverse movement depending on the settings. Controls include wah-wah pedal direction and input level sensitivity. This is an EQ-related effect and can be placed before preamp distortion or before power-tube distortion with natural sounding results. Auto-Wah pedals include:
- Electro-Harmonix Q-Tron
- MXR M-120 Auto Q
- Keeley Electronics Nova Wah
- Danelectro French Fries Auto-Wah
- Mu-Tron III
Talk Box
Early forms of the talk box, such as the Heil Talk Box, first appeared in Country Music circles in Nashville in the 1940',s 1950's, and 1960's, by artist like swing band pedal steel player Alvino Rey, Link Wray ("Rumble"), Bill West, a Country Music steel guitar player and husband of Dottie West, and Pete Drake, a Nashville mainstay on the pedal steel guitar and friend of Bill West. Drake used it on his 1964 album Forever, in what came to be called his "talking steel guitar." The device used the guitar amplifier's output to drive a speaker horn that pushed air into a tube held in the player's mouth, which filters and thereby shapes the sound leading to a unique effect. The singer and guitarist Peter Frampton made this effect famous with hit songs such as "Do You Feel Like We Do" and "Show Me the Way," as did Joe Walsh on "Rocky Mountain Way." On Van Halen's cover of "You Really Got Me" Eddie Van Halen uses a talk box after the guitar solo to make a sound similar to a person having sex. Newer devices, such as Danelectro's Free Speech pedal, use a microphone and vocoder-like circuit to modulate the frequency response of the guitar signal. Some Talk Boxes include: The Dunlop Heil Talk Box, Rocktron Banshee, and Peter Frampton's own company,Framptone.
Volume-related effects
Volume pedal
A Volume pedal is a volume potentiometer that is tilted forward or back by foot. A volume pedal enables a musician to adjust the volume of their instrument while they are performing. Volume pedals can also be used to make the guitar's notes or chords fade in and out. This allows the percussive plucking of the strings to be softened or eliminated entirely, imparting a human-vocal sound. Volume pedals are also widely used with pedal steel guitars in country music. It has also been used to great effect in rock music; the Pat McGee Band's live version of "Can't Miss What You Never Had" on General Admission illustrates what the pedal is capable of. Some volume pedals are:
- Ernie Ball Stereo Volume Pedal
- Boss FV-50H Foot Volume
- VOX V850 Volume Pedal
Auto-Volume/Envelope Volume
Just as an Auto-Wah is a version of a Wah pedal controlled by the signal's dynamic envelope, there is an envelope-controlled version of a volume pedal. This is generally used to mimic automatically the sound of picking a note while the guitar's volume knob is turned down, then smoothly turning the knob up, for a violin-like muted attack. An example is:
- Boss SG-1 Slow Gear
Tremolo
Tremolo is a regular and repetitive variation in gain for the duration of a single note, which works like an auto-volume knob; this results in a swelling or fluttering sound. This effect is very popular in psychedelic and trip-hop music. The speed and depth of the flutter are usually user-controlled.This is a volume-related effects pedal. This effect is based on one of the earliest effects that were built into guitar amplifiers. Examples include:
- Demeter TRM-1 Tremulator
- Boss TR-2 Tremolo
- Electro-Harmonix Worm
- Line 6 Tap Tremolo
- Danelectro Cool-Cat Tremolo
Compressor

A compressor acts as an automatic volume control, progressively decreasing the output level as the incoming signal gets louder, and vice versa. It preserves the note's attack rather than silencing it as with an Envelope Volume pedal. This adjustment of the volume for the attack and tail of a note evens out the overall volume of an instrument. Compressors can also change the behaviour of other effects, especially distortion. when applied toward the guitar, it can provide a uniformed sustained note; when applied to instruments with a normally short attack, such as drums or harpsichord, compression can drastically change the resulting sound. Another kind of compressor is the optical compressor which uses a light source (LED or lamp) to compress the signal.
Some compressor pedals are:
- Boss CS-3 Compression Sustainer
- MXR M-102 DynaComp
- Diamond Compressor (optical compressor)
- Line 6 Constrictor
- T-Rex Engineering's CompNova
- Electro-Harmonix Black Finger (optical compressor)
- Aphex Punch Factory Optical Compressor
- TC Electronic Hypergravity Compressor (parallel compressor)
Time-based effects
Delay/Echo

A Delay or Echo pedal creates a copy of an incoming sound and slightly time-delays it, creating either a "slap" (single repetition) or an echo (multiple repetitions) effect. Delay pedals may use either analog or digital technology. Analog delays often are less flexible and not as "perfect" sounding as digital delays, but some guitarists argue that analog effects produce "warmer" tones. Early delay devices actually used magnetic tape to produce the time delay effect. U2's guitarist, The Edge, is known for his extensive use of delay effects. Some common Delay pedals are:
- Boss DD-6 Digital Delay
- Boss DD-20 Giga Delay
- Line 6 DL-4 Delay Modeler
- Line 6 Echo Park
- T-Rex Engineering's Replica
- TC Electronic Flashback Delay
- Danelectro FAB Echo
Another technology that is used in Delay units is a feedback circuit, consisting of a tracking oscillator circuit to hold a note of the last interval, and after amplifying the signal, send it back to the input side of the delay. While it was first associated with Boss DF-2 Super Feedbacker & Distortion, currently, the signal feedback circuit is employed by Delay pedals, and if used under "hold" mode (As in Boss DD-3) it will provide a sustain effect instead of a simply delay effect.
Looping
Extremely long delay times form a looping pedal, which allows performers to record a phrase or passage and play along with it. This allows a solo performer to record an accompaniment or ostinato passage and then, with the looping pedal playing back this passage, perform solo improvisations over the accompaniment. The guitarist creates the loop either on the spot or it is held in storage for later use (as in playback) when needed. Some examples of loops effects are:
- Boss RC-1 & RC-3 Loop Stations
- Boss RC-300 Loop Station
- DigiTech JamMan Looper
- Boomerang Looper
- TC Electronic Ditto
Reverb

Reverb is the persistence of sound in a particular space after the original sound is removed. When sound is produced in a space, a large number of echoes build up and then slowly decay as the sound is absorbed by the walls and air, creating reverberation, or reverb. A plate reverb system uses an electromechanical transducer (actuator), similar to the driver in a loudspeaker, to create vibration in a plate of sheet metal. A pickup captures the vibrations as they bounce across the plate, and the result is output as an audio signal. A spring reverb system uses a transducer at one end of a spring and a pickup at the other, similar to those used in plate reverbs, to create and capture vibrations within a metal spring. Guitar amplifiers frequently incorporate spring reverbs due to their compact construction. Spring reverberators were once widely used in semi-professional recording due to their modest cost and small size. Due to quality problems and improved digital reverb units, spring reverberators are declining rapidly in use. Digital reverb units use various signal processing algorithms in order to create the reverb effect. Since reverberation is essentially caused by a very large number of echoes, simple DSPs use multiple feedback delay circuits to create a large, decaying series of echoes that die out over time.
Examples of reverb pedals include:
- DigiTech DigiDelay
- Electro-Harmonix Holy Grail
- Boss RV-5 Digital Reverb
- Line 6 Verbzilla
Modulation-related effects
Rotary Speaker
Before such effects are available electronically, these are accomplished by the use of Rotary speakers, by spinning the speakers and/or place a rotating baffle in front of it. This creates a doppler effect, and depend on the speed of the rotation, translate into phasing, flanging, chorus, vibrato, or even tremolo.
- Leslie Speakers: This is a unit that contains a bass speaker that blare into a rotating baffle, and a horn speaker that rotate like a siren. Originally designed for Hammond organs, they are also favored by guitarist; some say that no electronic effects can duplicate its sounds.
- Fender Vibratone: This is a simplified version of Leslie Speaker, containing only a 10" speaker that blare into a rotating baffle.
All the electronic-based effects can duplicate the sound of a rotating speakers, as all the following effects differ based on speed, volume, and modulation. In fact, it is not uncommon for a pedal to be capable of doing two or more of modulation effects.
Phase Shifter (Phaser)

A Phase Shifter creates a complex frequency response containing many regularly-spaced "notches" in an incoming signal by combining it with a copy of itself out of phase, and shifting the phase relationship cyclically. The phasing effect creates a "whooshing" sound that is reminiscent of the sound of a flying jet. This effect dominates the sound in the song Star Guitar by Chemical Brothers. The song was not played with any guitars but you can hear the phasing effect. The instrument being phased was actually a synthesizer. Some electronic "rotating speaker simulators" are actually phase shifters. Phase shifters were popular in the 1970s, particularly used with electric piano and funk bass guitar. The number of stages in a phase shifter is the number of moving dips in the frequency response curve. From a sonic perspective, this effect is equalization-oriented. However, it may be derived through moderate time-based processing. Some phaser pedals include:
- MXR M-101 Phase 90
- BOSS PH-3 Phase Shifter
- Electro-Harmonix Small Stone
- Moog] MF-103 12 Stage Phaser
- DigiTech Hyper Phase
Vibe (Univibe)
A Vibe or Univibe pedal reproduces the sound of a rotating speaker by synchronizing volume oscillation, frequency-specific volume oscillation, vibrato (pitch wavering), phase shifting, and chorusing in relation to a non-rotating speaker. The modulation speed can be ramped up or down, with separate speeds for the bass and treble frequencies, to simulate the sound of a rotating bass speaker and a rotating horn. This effect is simultaneously a volume-oriented effect, an equalization-oriented effect, and a time-based effect. Furthermore, this effect is typically related to chorus. Some vibe pedals also include an overdrive effect, which allows the performer to add "tube"-style distortion. This effect is the most closely related to a rotary speaker. Some Vibe-only pedals include:
- BBE Soul Vibe
- Voodoo Lab Microvibe
Some vibe-chorus pedals include
- Dunlop Univibe
- Dunlop Rotovibe
- BBE Mind Bender
Vibrato
A vibrato pedal cyclically changes the pitch of the signal, giving the impression that the guitar is out of tune. The depth of the effect, the speed and the overall level of the effect can be controlled by potentiometers. Although similar in name and able to achieve similar sounds at high speed settings, a vibrato is different from a Vibe pedal.
Examples of vibrato-only pedals:
- TC Electronic Shaker Vibrato
- Malekko Omicron vibrato
- Subdecay Siren pitch vibrato
- Zvex Verter Instant LoFi Junky
- Boss VB-2w Vibrato
Some chorus and modulation pedals inclue a vibrato section that can be combined with chorus, vibe or rotary.
Flanger
A Flanger simulates the sound effect originally created by momentarily slowing the tape during recording by holding something against the flange, or edge of the tape reel, and then allowing it to speed up again. This effect was used to simulate passing into "warp speed," in sci-fi films, and also in psychedelic rock music of the 1960s. Flanging has a sound similar to a phase-shifter, but different, yet is closely related to the production of chorus.
The first pedal-operated flanger designed for use as a guitar effect was designed by Jim Gamble of Tycobrahe Sound Company in Hermosa Beach, CA, during the mid 1970s. Last made in 1977, the existing "Pedalflangers" appear occasionally on eBay and sell for several hundred dollars. A modern "clone" of the Tycobrahe Pedalflanger is sold by Chicago Iron.Famous users of this Flanger effect include Randy Rhoads and Eddie Van Halen, coincidentally they both used the MXR M-117R flanger and Eddie Van Halen even has his own signature model now.
Examples:
- Boss BF-3 Stereo Flanger
- Line 6 Liqua Flange
- MXR M-117R Flanger
- Danelectro FAB Flange
- Electro Harmonix Deluxe Electric Mistress

Chorus
Chorus splits your guitars signal in two, then second signals pitch is then delayed and/or modulated in pitch and mixed back in with the dry signal. The effect sounds like several guitarists playing the same thing at the same time resulting in a wide swelling sound. Some common chorus pedals are:
- Boss CE-1 Chorus Ensemble (the original chorus effect pedal, and first device released by Boss)
- Boss CH-1 Super Chorus
- Electro-Harmonix Small Clone
- Ibanez CF-7 Chorus/Flanger
- Line 6 Space Chorus
- MXR M-134 Stereo Chorus
- TC Electronic Stereo Chorus /Flanger /Pitch Modulator
- Danelectro FAB Chorus
Rotary Speaker Simulator
Despite the numerous different analog devices, it is very rare for them to be able to duplicate all aspects of a Leslie speaker. Thus, Rotary Speaker Simulator are always going to be digital, utilizing modelling algorithms to model the relations between the rotating horns and bass baffle. And how the sound bounce around the cabinet. As Leslie also have an amplifier section, most of these typically have overdrives to simulate that aspect. Some of these pedals can even accept keyboard's input.
- Boss RT-20 Rotary Ensemble Pedal: This is one of the few pedals that is capable of modelling all aspect of a Leslie Speaker.
- Line 6 Rotomachine: Also a modelling pedal, it is available in a compact pedal size.
- DLS Roto-Sim: Hybrid of analog with DSP modelling.
Pitch-related effects
Pitch Shifter/harmonizer
Pitchshifters change the pitch of the note played via a user-specified amount. The range of pitch deviation depends on the equipment used, but many pedals are capable of raising and lowering the pitch two octaves above and below the fundamental pitch. The amount of pitch deviation can be set or controlled via a foot pedal (which typically offers smooth, continuous pitch control). Typically, such function will be used with the original signal, resulting in a Harmonizer: the pitch is altered and combined with the original pitch to create two or more note harmonies. These harmonies are typically programmed in discrete integer multiples of the fundamental tone. When used with an expression pedal, it provides a smooth, abeit slightly digital, bend-like effect. Pitch shifters can also be used to electronically "detune" the instrument. Some examples are:
- Digitech Whammy
- Boss PS-5 Super Shifter
- Electro Harmonix Harmonic Octave Generator
Octaver

An Octaver mixes the input signal with a synthesised signal whose musical pitch is an octave lower or higher than the original. Effects that synthesize intervals besides octaves are referred to as harmonizers or pitch shifters. These are frequently used in bands without a bass player. Octave Up pedals include:
- Ampeg Scrambler
- Electro Harmonix POG (Polyphonic Octave Generator)
Octave Down pedals include:
- Boss OC-3 Super Octave
- Electro-Harmonix Octave Multiplexer
Octave fuzz

An Octave fuzz is a fuzz with an analog octave (up or down). The Octavia is one of the first octave pedals ever produced. Unlike octavers, the level of the octave cannot be controlled separately from the fuzz: increasing the gain makes the octave louder.
Octave up fuzzes include:
- Roger Mayer Octavia
- Chicago Iron Tycobrahe Octavia
- Catalinbread Octapussy
- Electro Harmonix Octavix
- Fender Blender
- Foxx Tone Machine
Octave down fuzzes include:
- MXR M-103 Blue Box
Other effects
Feedbacker/Sustainer
While audio feedback in general is undesirable due to the high frequency overtone, when controlled properly, it can provide true sustain of the sound (instead of using a distortion/compressor to make quiet notes louder, or a feedback of a signal in a circuit as in a delay unit). Several approaches have been used to produce guitar feedback effects, which sustain the sound from the guitar:
- The most primitive form, as used by Jimi Hendrix, is to use the feedback created when the guitar is played in front of a loudspeaker.
- The neck pickup is used as a driver to push the strings based on the bridge pickup, such as the Sustainiac Sustainer and Fernandes Sustainer.
- A string driver can be mounted on a stand as in the Vibesware Guitar Resonator, which is driven by the selected guitar pickup(s). Feedback start, stop and harmonics can be controlled here by positioning the drivers distance to the strings and the position along the guitar neck while playing.
- A signal amplifier that powers a headstock transducer, which in turn send feedback vibration down the string, as in Sustainiac's Model C.
- A handheld string driver can contain a pickup and driver, as in the EBow.
- A dedicated high-gain guitar amp can be used in the control room, without a microphone, as a footswitch-controlled string feedback driver. The microphone is placed on the speaker cabinet of the main guitar amp in the isolation booth or live room.
Switcher/Mixer (or "A/B" pedal)
A switcher pedal (also called an "A/B" pedal) enables players to run two effects or two effects chains in parallel, or switch between two effects with a single press of the pedal.
Some switcher pedals also incorporate a simple mixer, which allows mixing the dry guitar signal to be mixed with an effected signal. This is useful to make overly processed effects more mild and natural sounding. Examples of the use of the mixer function include:
- A wah can be mixed with dry guitar to make it more mild and full-bandwidth, with less volume swing.
- A compressor can be mixed with dry guitar to preserve the natural attack of the dry signal as well as the sustain of the compressor.
- Two overdrive pedals can be blended together.
- A strong phaser effect can be mixed with dry guitar to make it more subtle and musical.
Some examples of switcher pedals include:
- Dunlop A/B pedal
- Loop Master
Some examples of Switcher/mixer pedals include:
- BOSS LS-2 Line Selector
Noise Gate
A noise gate allows a signal to pass through only when the signal's intensity is above a set threshold, which opens the gate. If the signal falls below the threshold, the gate closes, and no signal is allowed to pass. A noise gate can be used to control noise. When the level of the 'signal' is above the level of the 'noise', the threshold is set above the level of the 'noise' so that the gate is closed when there is no 'signal'. A noise gate does not remove noise from the signal: when the gate is open, both the signal and the noise will pass through.
Noise gates are also used as an effect to modify the envelope of signals, removing gradual attacks and decays.
Examples of noise gate pedals include:
- BOSS NS-2 Noise Suppressor
- MXR M-135 Smart Gate
Boosters
There are three types of boosters.
- The first are signal boosters. These give a gain boost to the signal running through it and appear to make the guitar louder. They are known as clean boosts.
- The second are frequency boosters. These are similar to the signal boosters but instead of boosting the whole signal, they boost one specific frequency range. These include treble boosters.
- The third are harmonic boosters. These boost certain harmonics within the wave and can sometimes give a gritty, octave sound (in either direction)
A boost pedal can be used to make the guitar louder (set up last in the effect chain, often in the effects loop of a distorted amp), or to increase the gain of an overdriven amplifier. Before distortion, a booster only increases the saturation, not the volume.
Bass Effects
Sound conditioner
Bass effects that condition the sound, rather than changing its character are called "sound conditioners." Gain booster effects pedals and bass preamplifier pedals increase the gain (or volume) of the bass guitar signal. Bass preamplifiers for double basses are designed to match the impedance of piezoelectric pickups with the input impedance of bass amplifiers. Some double bass preamplifiers may also provide phantom power for powering condenser microphones and anti-feedback features such as a notch filter (see "Filter-based effects" section below).
Volume pedals are volume potientiometers set into a rocking foot treadle, so that the volume of the bass guitar can be changed by the foot. Compression pedals affect the dynamics (volume levels) of a bass signal by subtly increasing the volume of quiet notes and reducing the volume of loud notes, which smooths out or "compresses" the overall sound. Limiters, which are similar to compressors, prevent the upper volume levels (peaks) of notes from getting too loud, which can damage speakers. Noise gates remove hums and hisses that occur with distortion pedals, vintage pedals, and some electric basses.
Bass Distortion
Bass distortion effects preamplify the signal until the signals' waveform "clips" and becomes distorted, giving a "growling", "fuzzy" or "buzzing" sound. Until the late 1980s, distortion effects designed specifically for electric bass' low range were not commonly available in stores, so most electric bass players who wanted a distortion effect either used the natural overdrive that is produced by setting the preamplifier gain to very high settings or used an electric guitar distortion pedal. Using the natural overdrive from an amplifier's preamplifier or a guitar distortion effect has the side effect of removing the bass' low range (low-pitched) sounds. When a low-range note is amplified to the point of "clipping", the note tends to go up an octave to its second harmonic, making deep bass notes sound "tinny".
In the 1990s and 2000s, bass distortion effects became widely available. These effects contained circuitry which ensured that the low-range bass signal was maintained in the distorted bass tone. Bass distortion is used in genres such as metal, thrash, hardcore, and punk.
Bass "overdrive" effects use a vacuum tube (or digitally-simulated tube modelling techniques) to compress the top of the signal's wave form, giving a smoother distorted signal than regular distortion effects. Regular bass distortion effects preamplify the signal to the point that it develops a gritty or "dirty" tone.
Fuzz bass effects are sometimes created for bass by using fuzzbox effects designed for electric guitars. Fuzzboxes boost and clip the signal sufficiently to turn a standard sine wave input into what is effectively a square wave output, giving a much more distorted and synthetic sound than a standard distortion or overdrive. Paul McCartney of The Beatles used fuzz bass on "Think for Yourself" in the 1966 album "Rubber Soul"
Filtered based effects
Filter based effects for bass include equalizer, phase shifter, wah and auto-wah.
A bass equalizer is the most commonly used of these three effects. It adjusts the frequency response in a number of different frequency bands. While its function is similar to a tone controls on an amplifier, such as rudimentary "bass" and "treble" frequency knobs, it allows for more precise frequency changes. A rack-mounted bass equalizer, for example, may have ten sliders to control the frequency range encompassed by a regular "bass" frequency knob.
In comparison with an electric guitar equalizer, a bass equalizer usually has a lower frequency range that goes down to 40 Hz, to accommodate the electric bass' lower range. Some bass equalizers designed for use with extended range basses go even lower, to 20 Hz. Equalizers can be used to change the tone and sound of the electric bass. If the instrument sounds too "boomy", the bassist can lower the frequency which is overly resonant, or if there is too much fingernail or pick noise, the higher frequencies can be reduced.
Notch filters (also called band-stop filters or band-rejection filters) are sometimes used with double basses. Notch filters are filters that allow most frequencies to pass through unaltered, while attenuating those in a specific range to very low levels. Notch filters are used in instrument amplifiers and preamplifiers for acoustic instruments such as acoustic guitar, mandolin, and bass instrument amplifiers to reduce or prevent feedback. While most notch filters are set manually by the user, there are also automatic notch filters which detect the onset of feedback and notch out the frequency before damaging feedback begins.
Bass Phase Shifters create a complex frequency response containing many regularly-spaced "notches" in an incoming signal by combining it with a copy of itself out of phase, and shifting the phase relationship cyclically. The phasing effect creates a "whooshing" sound that is reminiscent of the sound of a flying jet.
Bass chorus
Bass chorus effects use a cycling, variable delay time that is short so that individual repetitions are not heard. The result is a thick, "swirling" sound that suggests multiple instruments playing in unison (chorus) that are slightly out of tune. Bass chorus effects were more common in the late 1980s, when manufacturers such as Peavey included chorus effects in its bass amplifiers. In the 1990s and 2000s, more sophisticated bass chorus effects devices were created which only apply the swirling chorus effect to the higher parts of the bass tone, leaving the instrument's low fundamental untouched.[5]
Multi-Effects unit
A multi-FX unit is a single effects device that can perform several guitar effects simultaneously. Such devices generally use digital processing to simulate many of the above-mentioned effects without the need to carry several single-purpose units. In addition to the classic effects, most have amplifier/speaker simulations not found in analog units. This allows a guitarist to play directly into a recording device while simulating an amplifier and speaker of his choice.

A typical digital multi-effects pedal is programmed, with several memory locations available to save custom user settings. Many lack the front-panel knobs of analog devices, using buttons instead to program various effect parameters. Multi-effects devices continue to evolve, some gaining MIDI or USB interfaces to aid in programming. Examples include:
- Tech 21 Sans Amp - A line of analog effects with distortion and speaker simulation capability.
- Line 6 POD XT Live
- Behringer V-Amp Pro
- DigiTech RP series
- DigiTech GNX series
- Boss ME-20, ME-50, GT-6, GT-8
- Zoom G2, G3, G5 series
- Vox Tonelab series
- Roland VG series
- Korg AX series
The quality of sound that is a major feature of separate pedals can never be matched by a multi-effects unit but they are ideal for a guitarist on a budget.
Cables
Since you are likely to encounter cables at some point in your guitar playing career, it is important learn about them. This is especially true if you play the electric guitar. With the electric guitar, the use of an amplifier is essential and the cable is the only connection that links the two together. So in order to ensure a good sound, you need to use the proper cabling, unless using wireless connectivity.

Audio Cables

Jack Plugs
Plugs and Jacks are one style of connector used to connect audio equipment together. Jacks are the "female" side of the connection into which Plugs - the "male" side of the connection - are inserted. Anyone who has ever used a set of headphones is familiar with at least one type of jack. A jack is simply the end of a cable that lets it connect to another audio device. They come in many different sizes, but for guitarists the most important ones are these:
- 3.5mm mono - small microphones and LINE Out or LINE In small audio devices (z. B. sound map)
- 3.5mm stereo - headphones and LINE Out or LINE In small audio devices (e.g. sound map).
- 6.3mm mono - LINE Out or LINE In larger audio devices (guitar amplifier, mixers, etc.), e-guitar, Send or Return of effects equipment, microphones and loudspeakers.
- 6.3mm stereo - combining Send and Return with effects devices, Stereo microphones and headphones.
Plugs and Jacks are often referred to among audio professionals as "tip-sleeve" or "tip-ring-sleeve" connectors. If one looks closely at plug at the end of a typical set of headphones, one will note that there are white or black plastic rings separating metal surfaces. Each of those metal surfaces is connected to a wire that is used to send audio from one side to another. The notch found in the tip of the connector is used to give the connection some resistance to being inadvertently disconnected (though it hardly compares to the positive locking of the XLR connector following).
The 6.3mm (or 1/4" as it's commonly referred to) mono connector is commonly used for connecting a guitar to an amplifier. Since a guitar, from an audio point of view, really has no sense of left-to-right difference, only two wires are needed, so this mono or "tip-sleeve" connector is fine for the job. The tip carries the audio signal, while the sleeve carries the ground side of the audio signal.
Looking at a pair of typical headphones for a portable music player, one finds three metal sections. The 3.5mm stereo or tip-ring-sleeve connector uses the tip for left-hand audio, the ring for right-hand audio and the sleeve for ground. Look further at a set of headphones for a smartphone like Apple's EarPods, and one finds four metal sections: tip for left-hand audio, ring for right-hand audio, little sleeve for control signals produced by the volume/play-pause controller, and big sleeve for ground.
Choosing Good Cables
Choosing the right cable for an electric guitar is all about preserving the tone that the luthier and you have worked so hard to create. Many different styles of patch cables are available in differing lengths and using different brands of connectors, cable and jackets. A good patch cable has been made with the rigours of guitar playing in mind: It will use high quality connectors (look for Neutrik or Switchcraft on the connectors themselves as two high quality brands), will be constructed using high quality cable, and will often offer some strain relief using a reinforcing sleeve or spring-type arrangement at the point where connector and cable meet. A good cable will lay flat when fully extended with no tendency to curl or twist. When connected between the guitar and amplifier, the connections should feel solid, with no excessive play or looseness. There should be no appreciable noise added to the sound of the guitar, and when the guitarist grasps the connector body while connected to the guitar and amplifier there should not be an increased hum heard.
Patch cords often come with rubberized jackets, fabric jackets or vinyl/polyvinyl jackets. The first two are particularly good as the main guitar-to-amplifier connection, while the third is more suited to use between effects units or from the effects units to the amplifier. The choice between rubberized and fabric jackets mainly comes down to personal preference, though, the rubberized cables are somewhat easier to clean off should they come in contact with sticky or damp substances common in some performance locations.
Good patch cables will be priced in the US$20-40 range for a 3-meter cable. A good quality cable will have a lifespan of five to ten years if properly cared for.
XLR plugs

These plugs are very durable and they are the plug of choice for professional recordings, and non-professional recordings. Nearly all professional stages and sound studios are equipped with XLR connections... some home studios have XLR connections, thanks to the invention of retail outlets. Loudspeakers and mixers are also often connected with these cables too
The plugs have a catch mechanism, which prevents inadvertent separation of a patch cord. In order to be able to pull a XLR plug from the socket, you have to press the release mechanism. A XLR connection always consists of 3 phases. One phase transfers the mass while the other two transmit the audio signal. Usually one of the two audio signals is misphased in transfer, in order to remove any effects from signal distortion.
MIDI Cables

Right now, the 5 pronged MIDI cable are always used for data transfer, but originally they were intended for use with high quality stereo equipment. At that time this 5- pronged cable represented a variant to Stereo, which existed beside the identical, 3 pronged mono execution.
Today these cables are used almost exclusively for the transmission of MIDI control signals between MIDI capable music instruments, amplifiers and computers. Since it does not depend on fast data transmission rates, shielding of the individual wires inside the cable is not necessary.
Polyphonic or Hexaphonic Guitar Cables
In order to transfer each string to a guitarsynth, polyphonic guitar effect or guitar2MIDI, a few different connectors have been used, but the one introduced by Roland/BOSS in 1989 has clearly turned into a standard. Its a DIN 13pin as it has been used in car radio before and apart from the 6 strings (pin 1...6) it contains the standard mono output (pin7), a volume control (pin8), an up/dn switch (pin10/11) and +-7V (pin 12/13). A problem is that ground flows only through the weak housing contact.
Other polyphonic connectors:
- 7pin Lemo, used by ARP Avatar guitar synth (1977)
- 24pin rectangular used by Roland before the 13pin DIN (1977-88)
- Neutricon used by Paradis Guitars (1985-96)
- subD used by Photon (around 1984)
- multiplexed stereo 1/4" used by Shadow GTM (around 1984)
- RJ45 Ethernet style used by Gibson Digital Guitar (since 2005)
Other Cables
Power Cables
Warning: All these cables and connectors are intended for a high supply voltage! Changes or repairs to such cables can be dangerous! Power cables for music equipment are commonly called "jug cables" in New Zealand, because they were the same as the power cord for an electric water jug!
Mains Power Cable

A three slot conductor plug designed to International Electrotechnical Commission (IEC) specifications. Sometimes called a "kettle plug" or "kettle lead". The kettle lead is designed for use with mains power outlets.
Bass Guitar
Bass guitars have similar design features to other types of guitar but scaled up: thicker strings, longer neck and larger body, etc. This allows lower notes to be created when the strings are tuned to a playable tension. They are sometimes categorized as guitars but are also categorized as a separate instrument.
Although there are many variations, the standard bass guitar has four strings tuned EADG, from lowest pitch string to highest, one octave lower than the bottom four strings of a guitar in standard tuning. The next most common variant is the five string, tuned BEADG. While the bass guitar can be played like an oversized guitar, by playing chords, this chordal style is rare on bass. Rather, bass is often used to play single notes. Bass also draws much inspiration from double bass playing, notably the smooth quarter note style calked "walking bass" which is used in jazz, blues and country. The electric bass has a vocabulary of playing styles and music all of its own, including slapping and popping.
Slapping And popping
One of the distinguishing features of the bass guitar is the percussive slap style. It is most associated with funk, but it is also used in sone pop, jazz fusion and nu metal styles. It is typically distinct to the bass guitar, although it has been used on acoustic guitars by skillful players.
Slapping is accomplished by percussively striking the string - usually E or A on a standard tuned bass - with the left hand side of the thumb (for a right-handed player). This is done towards the neck of the bass. The thumb is then pulled away as quickly as possible, to create a distinct, "fretty" noise.
Popping is accomplished by curling the fingertip of the index or middle finger under the string - usually the D or G string. The string is then plucked to create a similar sound to slapping on the thicker strings. This is, again, performed towards the neck of the bass. Fretting hand and playing hand muting and percussive "ghost notes" are a key part of the distinctive sound of slapping and popping.
Different tunings
The "standard" bass is a 4 string bass, tuned EADG (low to high). Other variations of this tuning include DADG ("drop D") and rarely iiCGCF. These lower tunings are often used in metal and heavier music, as they extend the instrument's range lower. Altering the tuning of a bass to a lower range (or any other fretted instrumented) by reducing string tension can cause problems that new players should be aware of: looser strings are more prone to "fret buzz", in which a string rattles on the fretboard, producing a sound that is usually unwanted. Loosening strings also alters the tension on the neck, which can lead to warping the neck.
To achieve a clear tone on notes lower than standard tuning, a standard five string bass adds a low B string, with the bass normally tuned BEADG (low to high). Some players may restring a 4-string bass as BEAD, leaving off the high G. There are thick strings that go even lower in range, however these are typically found only on specialty instruments.
Bass runs
Bass runs or "fills" are used to add interest and to transition frommone chord to another. For example if one wants to change from a C chord bassline to an Am chord bassline, they could do a scalar run that adds a B note to connect the C to the A.
Maintenance
Guitar Maintenance and Storage
Properly maintaining a valuable guitar keeps it valuable. Guitars can take a lot of abuse, especially if you play live shows and tour, and even if it pretty much "sounds the same," lack of maintenance may suddenly render the instrument unplayable. You don't need to carefully examine a guitar every day, but occasional check ups keep it good-sounding and ready to play.
Storage
The easiest way to take care of your guitar is to store it properly. The more expensive the guitar, the better your storage should be. It is generally accepted that the air humidity should be neither too high nor too low, thus somewhere in the 45-55% range, and the temperature of the area should be about 65-75 °F (18-24 °C). These two factors are the biggest threat to an instrument, because changes in moisture and temperature can cause permanent warping of the neck and other critical parts. For guitars made out of solid wood, it is advised to use a humidifier to prevent cracks and damage from weather change.
On the other hand, guitars made out of multi-layered(plywood) wood, typically in budget guitars, can withstand relatively more humidity and temperature changes. Keeping the guitar in a case away from direct sunlight can help with increasing the life of the guitar.
Storing Environment
The surest way to keep your guitar in good shape is to remember this simple rule: Do not expose the guitar to any climate condition that you would not want to be exposed to. If you keep this in mind, your instrument will likely last years and years.
Avoid large or rapid changes in humidity. Like your body, the guitar gets used to the climate it is in, and suddenly changing it causes stress. Humidity is the most dangerous thing that attacks an instrument, because when wood gets wet, the cell walls become softer and it is more easily bent. Often, the strings themselves are enough to bend the neck. Also, if the humidity stays way too low, then the wood will crack and the structure will weaken.
Temperature on its own is less damaging to the guitar. Wood is generally tolerant to changes in temperature, and for the most part it expands and contracts together. Extreme temperatures or rapid temperature changes, however, can cause serious damage, especially when combined with extreme humidity. Changes in temperature also affect strings, especially nylon strings. A significant change in temperature typically detunes the strings. Other areas to watch for temperature related damage are any glued joins, like where the neck meets the body, or the fretboard attaches to the neck.
Never expose your instrument to extreme temperatures for a long time. For instance, leaving your guitar in a car in the summer all day, or leaving it outside overnight are sure ways to completely destroy your instrument. Also keep the guitar out of direct sunlight as much as possible, because it makes the wood more brittle and can change the color of the instrument.
Keeping your instrument strung and in tune is another good way to make sure that you don't harm your instrument. Strings put tension on the neck. Excessive tension may make the neck bow if the guitar isn't kept in tune.
Methods of Storage
First, a simple tip: If one is playing the guitar and wishes to put it briefly aside to look for songs or notes or the like, then the best repository is the couch, the bed, or the floor (with carpet or with the guitar bag as a cushion). The basic rule reads: What lies down, cannot fall down. A guitar gets most of its scrapes because one leans it against a wall, or against a table edge, and then it is knocked over from the slightest contact or draft of air. If one had put it down, this would not have happened.
Wall Hooks
These are most often seen on the walls of guitar stores that must display dozens of instruments in a small amount of wall space. These are good, because they keep the guitar out of the way but openly displayed. These are just a U-shaped piece of metal, covered in rubber or soft plastic.
The piece screws to the wall, and the headstock rests snugly between the two pieces of metal. In regards to plasterboard walls be sure to drill into the timber studs. The weight of the guitar poses no risk to the neck or headstock. When you select a spot to hang a guitar, avoid outside walls. These are subject to more temperature change, which can risk damage to the instrument.
Guitar Stands
For the most part, guitar stands look similar to a wall hook, except instead of all the weight being on the headstock, most is on the bottom of the body and the neck is mostly supported to keep the guitar standing straight.
Each type of guitar has a specialized type of stand. For example, an Ovation guitar, which has a rounded plastic back, requires a differently shaped stand than a Fender Stratocaster or a regular acoustic guitar. Regardless of what type of stand you get, you should always make sure that it holds your guitar firmly. Some stands also have a locking device, which adds an extra level of security.
One problem you might encounter (although it is rare) is that the lacquer used on your guitar has a reaction with the rubber used to coat the stand. When you buy a new stand, you should examine the guitar every few days and look for discolorations or weak spots. As is often the case, serious guitar damage is easiest to stop before it starts.
Cases

There are two main kinds of guitar case, gig bags and hard cases. Gig bags are a favorable kind of keeping, because they give a good amount of protection, and they are also light to carry. Some often have backpack style shoulder straps. Gig bags do not protect against temperature changes very well. Hard cases, in contrast, provide excellent protection against temperature, humidity and physical damage. Hard cases are also essential for taking a guitar on an air plane, or for long journeys.
Compared to other methods of storing, cases are by far the most secure, and this is especially true of hard cases. If the guitar is secured properly in the case (almost) nothing can happen to it under standard conditions.
The biggest (and perhaps only) disadvantage of a case is that you cannot openly display your instrument the way you can on a wall hook or stand. Price is also a disadvantage, because although gig bags can be bought relatively cheaply, hard cases are expensive. Still, a cheap bag for an expensive guitar is a poor investment.
When you buy a case, you absolutely have to make sure that the guitar fits in the case. Gig bags are a little more forgiving, but you will not get a guitar to fit properly in a hard case that is too small. When you pick up the case, give it a little bit of a shake, and you should not feel or hear the guitar moving around very much.
Cabinets
Storing a guitar in a glass-front cabinet shows it off, and can help keep it at the proper humidity while being quickly accessible. The cost and required floor space may not be practical for most guitarists. One alternative is Musik Tent™, an Instrument Humidor that is portable and lightweight that uniformly humidifies, stores and displays guitars in wet and dry environments.
Maintenance
Body
The body often takes the most abuse, simply because it is the biggest target. To help keep a fine instrument in good condition, wipe it down with a soft cloth after playing. Don't use water-based furniture sprays. You can buy specially treated cloths and sprays for guitars at almost any music store. Dirt, sweat, and often small nicks and scrapes can just be cleaned up with a cloth, little bit of warm water. Murphy's Oil Soap can be used to clean the whole guitar. Wipe the strings with a clean cloth. Some guitarists advocate wiping the strings with warm water, but be sure to protect the fingerboard from moisture. Consider wiping your guitar strings off every time you play. Oils and dirt left on your strings make them asymmetrical—as opposed to evenly cylindrical vibrating bodies. They may even wear out a bit faster. A soft, natural fiber or "microfiber" cloth works the best and is safest for the finish. Clean the frets as you do the rest of the guitar. If necessary, carefully use 0.001 steel wool to get grime off the fingerboard next to the frets. You can also gently go over the frets to take off any minor nicks.
If you have a stained or lacquered body, you can treat it with a little bit of furniture polish. However, if you have a guitar with an untreated body, be extremely careful with polish. For these types, it is better to find some sort of cleaning oil or wax, since they help prevent hair-line cracks from developing. After cleaning, the body must be absolutely dry, because if the wood gets over-moistened, the tone of the guitar will begin to degrade.
Neck and Fretboard
The neck is probably the most important part of the guitar, especially if you want to play it for a long time. Unless the guitar is stored for extended periods of time, the tension of the strings will always be pulling against the neck and stretching it away from the body. If stored for a long period of time, strings should be loosened, to reduce the tension on the neck. If the guitar gets moist, this neck warping happens even faster. Sometimes warping can be fixed by adjusting the truss rod, but this only prolongs the death of the instrument, and can't really fix the problem.
You can also oil or wax the fretboard, but you should first determine whether the fretboard is stained or painted, and use the appropriate protection. Always remember that using too much cleaner is always worse than using no cleaner at all, and always rub it in slowly.
Another drastic way to repair a warped neck on acoustic guitars is take all the strings off, and place a small glass of water into the body. Then, keep the body in place and put a small amount of weight (1 or 2 pounds) on the neck and let it bend back into the proper shape. When it has been corrected, remove the water, keep the weight on and let the guitar dry. Hopefully the neck will remain in the correct position, however it will be much more prone to warping from that point on. Since this procedure is somewhat accident prone, some manufacturers offer special instrument air moisturizers, which you can put in a case, or on a specific area of the neck. These generally allow for a higher rate of success.
The fretboard is usually made from untreated wood, and it should be cleaned regularly, before dirt begins to build up. Usually a good time to do this is when you change your strings, which should be every month or two. You need to clean the wood between the frets, and the simplest way is using a clean damp cloth or some very fine steel wool. Use some water with a little bit of detergent to make cleaning easier. If you use steel wool, you can also clean up the edges of worn frets, which is important because smooth frets improve the life of your strings. If the frets are really worn down, they can be replaced, but this is generally not a good project to undertake yourself.
It is very important that the neck is not wet after cleaning, because water damages the structure of the neck. Your cleaning cloth should be damp, not soaking wet. After cleaning, you can also apply a coat of furniture polish to seal the wood.
Strings
A set of strings wear down slowly, if you maintain them properly. Since regular playing does some amount of damage to the strings, it's a good idea to change regularly. Full sets of strings should be replaced at the same time. If you only replace one string, the others are likely to break soon, the strings will have different tones, and the opened pack of strings will begin to corrode. When changing a set of strings, some guitarists recommend replacing them one at a time, rather than removing all strings at once, to maintain tension on the neck (i.e., remove and replace the first string, then the second, then the third, etc.).
If you do not clean your strings, they may become dull, and even begin to rust. Dirty strings also damage the frets themselves, because the grime and rust makes the strings more coarse. There are many types of string cleaners. Pharmacies sell boxes of individually wrapped alcohol-saturated pads. These are excellent for occasionally deep-cleaning strings, but protect the fingerboard.
If you clean your strings infrequently, you can just as easily use glass cleaner to release the sweat from the strings. It's easiest to soak a cloth in window cleaner, and then slip the cloth behind, and clean the whole length of each string individually. You can tell when a string is cleaned when you rub the string and the cloth is still clean. Also, you shouldn't let the cleaner remain on the strings, because residue might damage the string too. As always, protect the fingerboard from moisture. When finished, wipe the strings with a dry cloth.
Tuning Mechanisms
Tuning mechanisms are usually chromed, gold-plated, anodized, or burnished steel. Since steel rusts, especially when it contacts sweat, these pieces should be cleaned periodically. Properly oiled mechanisms work smoothly and help keep the strings in tune.
To prevent rust, clean and oil parts regularly. You can use commercial machine oils from any hardware store, but baby oil or petroleum jelly works too. Too little lubricant is better than too much—adding more is easier than removing excess. Two drops is often enough. Avoid making contact with the wood parts of the guitar because the oil could stain or discolor. Electrical components (switches, sockets, potentiometers, etc.) can also go bad if the oil gets in them.
Many tuning machines have a screw in the knob that controls how easily they turn. The knobs should be snug, with no free play, but they should not be so tight that they are difficult to turn. Care should be taken not to over-tighten, as this may break plastic tuner buttons or may strip the screw thread and require repair or replacement.
Adjusting the Guitar
Many beginning or even intermediate guitarists are unaware that their guitar should be "set up". The adjustments described in the adjustment subsections below (along with restringing and tuning) are called a "set up".
What difference does a set up make?
When a guitar is set up properly:
- the guitar will feel and sound its best
- all the strings will sound with exactly the notes they are supposed to
- all notes will sound correct when played at each fret up and down the neck
- the guitar will be as easy as possible to play
- strings will break less frequently.
If a guitar plays easily and sounds its best then it's easy for the player to feel successful.
When a guitar is not set up properly:
- the guitar may not feel or sound quite right
- some notes may sound correct while some others may sound sharp or flat
- the guitar may be difficult to play
- strings will break more often
- damage to the instrument could be incurred unwittingly by the player
When to Set Up?
When a guitar is brand new and fresh from the factory it may or may not have had these adjustments done. As a rule, a guitar should be set up when first purchased (used or new) and again when switching string gauges. Consider getting a set up anytime the guitar sounds or feels different than it used to. Perhaps after a guitar travels (altitude changes, pressure changes, and humidity can affect the wood in the guitar) and just like changing oil in a car it is a good idea to get a set up every now and then for maintenance purposes (perhaps twice a year).
Poor set up may be obvious to a player or it might not. In some cases the guitar may be unplayable because it hasn't been set up. A maladjusted guitar can cause strange quirks, for instance frets near the bottom of the neck being too sharp, or can even cause damage (e.g., by using .012 gauge strings on a nut designed for .009 strings, and the tension messes up the nut), and it can easily frustrate the player when their playing is perfectly correct yet things still don't sound right.
In particular if your guitar ever becomes difficult for you to play, a set up will probably help.
It is not absolutely required to set up a guitar, but it is nonetheless a good idea, especially if the guitar is to be taken to the stage. Some people never get their guitar set up. Some get their guitar set up even when nothing previously seemed wrong with it, then find such a dramatic change in the guitar's playability and sound that they wish they had set it up sooner.
How to get a Set Up
These adjustments should generally be done by a professional, qualified repair person. They require precision instruments, some hard to find tools, a steady hand, quite a bit of time and know-how.
Virtually all musical instrument stores will be able to perform a professional set up. Some will do the job better than others. Call a local music store and ask them "Do you do set ups for electric (or acoustic) guitars and how much would you charge?". Getting a set up will probably cost from $30 to $75 USD.
Adjustments
Adjusting action at the bridge
This is a simple adjustment that can usually be performed without professional assistance. The bridge saddles should be lowered if the string action is too high, that is, the strings are too far up off the fretboard. In some cases it may be desirable to raise the saddles for a higher string action.
Most electric guitars have two small screws on the saddle which can be used to raise or lower the saddle. Some saddles have screws that can be rotated using the fingers; others require an allen key. Lower the saddles too much and the strings might rattle against certain frets (this may or may not be inconsequential on an electric guitar; listen through an amplifier). In more extreme cases, pressing a string against one fret might actually fret the string against a different fret, usually the one under the intended one. In both cases, filing the frets might alleviate the problem if the saddle really should be that low. Otherwise, simply raising the saddle a small amount on the side with the problem should be fine.
Filing frets
The frets go with the shape (or contour) of the neck radius (9, 12", 16", etc.) Frets can determine how the notes on your guitar sound (i.e. intonation) and over time and use playing a fretted instrument the frets will begin to wear out by either changing the shape of the crowns (the top of the frets, and they are changed by being flattened out or mis-shaped)or the frets will begin to leave their slots. Fret work should be done by someone with experience doing this kind of job because this is a job that can lead to worse problems on your guitar such as your tonation being worse, action may be higher, strings may buzz out, and it may require that multiple frets be replaced or further repaired. Frets come in a variety of sizes as well making them each different to work on and there are special tools available to do this line of work but many are expensive and without proper training may not be used correctly.
Filing the nut
Filing the nut should only be done by a qualified repair person and is used to reduce pressure at the nut to allow a heavier gauge of strings to be used. It may not be necessary if the new strings are detuned lower (e.g., when switching from .009's to .010's, the nut will need no adjustment if the guitar is tuned to Eb-Ab-Db-Gb-Bb-Eb instead of E-A-D-G-B-E).
Neck/truss rod adjustment
This particular adjustment has been known to ruin guitars when performed incorrectly, so here referral to a professional repair person is highly recommended. A guitar will need a truss rod adjustment if the neck is not straight. One way to check the straightness of the neck is to play 12th and 19th harmonics on the low and high strings. After sounding each harmonic, fret the note there and play it again: it should be exactly the same pitch. If it is not, the neck may be in need of adjustment. However, this may be indicative of an intonation problem as well, which can be fixed without the aid of a repair person; see below. If adjusting the intonation does nothing for you, give the guitar to a repair person.
Adjusting intonation
You may notice each string on the bridge sits in a "saddle". Depending on your setup, you might notice the saddles may be in different positions: some might be pushed forward and others might be pushed back, sometimes slightly. The positioning of the saddle effectively changes the length of the vibrating string. Tune the guitar to concert pitch with the aid of an electronic tuner, making sure the open strings are perfectly in tune. Play the 9th and 12th fret harmonics, then play the fretted notes. If the fretted notes are sharp, the string is too short and the saddle needs to be pushed back toward the base of the bridge. If the note is flat, the string is too long and the saddle needs to be pushed up toward the nut. Repeat this procedure for each string. Adjusting the intonation should be done every few months or at least twice a year (Every six months interval).
Stringing the Guitar
Aside from the physical shape of the guitar body, strings are the most important thing for determining the sound of a guitar. New strings sound bright and full, while old strings tend to sound dull and dead. Many guitarists believe that strings should be changed regularly, not just when they break. This is because sweat and dirt corrode the strings, and over time this degrades their sound quality. Other guitarists believe that new strings sound much worse than old ones, feeling that a string's tonal quality only improves over time. Individual string quality may vary drastically from string to string.
When one breaks a string, all of the strings should be changed at once. This is especially true if the newer string is of a different brand or gauge. The string's manufacturing process, thickness and age all affect its tone, and one new string being played with a bunch of old strings can make your guitar sound strange. Players should be advised that guitars are usually set up for a particular gauge of string. The guitar will still function fine with a different gauge of strings, however for optimal sound, the guitar may need to be adjusted. See the chapter on adjusting the guitar for more details.
Because there are several different types of guitar, and each type is designed differently, each type has its own method of stringing. The type of strings you use mostly depends on what style of music you play and how long you've been playing. Thinner strings are generally preferred by beginners, but many experienced players prefer the feel of thin strings over thicker strings. Please see the guitar accessories section for details on different types of strings.
The first thing you always need to do when stringing a guitar is to take off the old strings. You should never just cut the strings of a tuned guitar in half, because the sudden release of tension on the neck can damage the guitar. Instead, always turn the tuning pegs to decrease tension, until the string is so loose that it doesn't produce a note when struck, then cut or unwind them. In most cases, the string is bent at the end where it was inserted, to insure that it would stay during tuning. Unbend the string, then pull it out of the peg hole. If the peg end of the string is too bent or curled from the winding, cut the string on a straight part of the string. This will make it easier to remove the string from the hole at the other end and reduce the risk of scratching the body or the bridge while trying to get it out. Slide the string out of the bridge at the bottom end of the guitar. Some people string one at a time to make sure the neck sustains tension, or they just take all of the strings off at the same time.
Stringing Acoustics
Standard guitars typically have a ball-head peg at the bridge section. This peg has a hollow shaft, with a groove that allows the string to come out from the peg.
Typically, the process is as follows:
Unwinding the string
- Pick one of the strings, usually either the first or sixth string, and begin loosening it. If you have a string winder, put the rectangular box over the tuning peg and unwind the string.
- Once the string is loose enough, pull the peg out of the bridge. If you have a string winder, it will have a notch that can fit underneath the head to pull it out.
Attaching the string
- The guitar string should have a ball (or cylinder) end. Put that into the bridge hole.
- Push the ball-head peg back in. as you do, pull on the string so that the peg can hold the string tightly on the bridge end.
- Find the hole on the winder, and place the string through it, leaving about 5cm out on the other side. For the thicker strings, it is recommended to bend it a bit.
- Use one hand to hold the string so that the section between this hand and the peg is tight. Wind one wound.
- Check the tightness again, and try to divert the string so that it wind UNDERNEATH the winder hole. Then wind it until you have the string encircle the machine head two to three times.
- Tune from here.
Twelve String Acoustic
It has the same principle to the sixth string. But every two strings were tuned with the same sound, one octave apart. *(RDT)
Classical Guitar
To unstring a classical guitar one method is:
- Loosen the string by turning the tuning peg
- Then at the bridge push the string back into the hole a little, this will loosen the "knot" enough to unknot and pull the string out of the hole.
- Then feed the string around the peg loop by loop until the last hoop which is inserted through the hole in the peg is available, push the string out of the loop, then pull the loop out of the hole.
To string a classical guitar one method is reverse of the unstringing
- Bend about an inch of string at one end to form an open loop, push that through the peg hole, wrap the other end of the string around the peg and through the loop, then pass it down the guitar body to the bridge and into the hole there.
- Loop back to the neck (about two or three inches) and twist back around the string, then you can put two or three twists in which should end up on top of the bridge, pull the string from the middle of the guitar to draw the twists taut.
- Then wind the peg to tighten the string. You should take it easy when tuning up for the first time to give the string time to "settle in", you may also find that the string may go out of tune easily for a day or two as it beds in.
Stringing Electrics
For the 6th string (the low E), take the string out of the package and insert the end through the bridge of the guitar. Pull it all the way through until the ball at the end of the string stops it from being pulled further. This is optional: Make a kink in the string to insure that it will not slip away from the turning of the peg, (usually about one or two inches from the peg). Wind the string around halfway and insert the end through the hole. Pull the string to add tension, so the string will stay around the peg during tuning. Turn the tuning peg to increase tension until the string is around the desired pitch, to make certain it will stay on properly. Check that the string is in the notch in the nut and the bridge, if it is not, decrease tension on the string until you can move it into the notch, tune it back up. Do this for the rest of your strings and you are done!
Another method:
String the low E and other strings as mentioned. Align the tuning peg's hole with the direction of the string and slip it through the peg in the direction of the headstock. Facing the guitar with the headstock to your right, pull the string taut with your left hand.
With your opposite thumb and forefinger, twist the string in an "s" at the twelfth fret so that it touches both sides of the twelfth fret. You will have to let some of the string out to do this. This method tells you the optimum length of the string to wind around the tuning peg.
Hold the string with your right hand below the tuning peg so that the pointy end is sticking out the other side. Slowly tighten the peg so that the string is winding on the INSIDE of the headstock -- inside right for E A D, and inside left for G B E. Allow the string to wind once underneath itself, and then wrap it over top of itself the rest of the way. Make sure you hold tight as you go so that there is little slippage later.
If possible, hold the string with your right thumb and middle finger while regulating the pressure on the string with your right index finger.
Tips
- Note that taking off all strings at once is not recommended if you have:
- a floating tremolo system (e.g. Floyd Rose II), which can be difficult to get the tremolo angle back to the right level when restrung;
- a bridge which is not fixed (one that will just fall off when the strings are removed)
- Try not to bend the string in the same place excessively otherwise the string will break at the bend
Appendices
Dictionary
Alternate Tunings

Many guitar players use alternate tunings, which differ from standard tuning. The use of alternate tunings (non-standard tunings) are found throughout the history of the classical guitar and are a major factor in the playing of blues slide guitar. Many alternate tunings involve downtuning ("dropping") strings.
Dropped tunings
Dropped D (DADGBE)
The most common alternate tuning is the dropped D (or "drop D") tuning. The lower E string is tuned down to a D. This tuning allows one to play power chords on the fourth, fifth and sixth strings with only one finger, and of course allows for lower bass notes. Used commonly in heavy metal, but also in nearly every other form of guitar music.
Waylon Jennings used this frequently, even dropping to D with the use of a scruggs banjo tuner on his famous telecaster in the middle of a song.
Drop C tuning CGCFAD
This progressive tuning is used in metal but often used by bands who stick with 6 string guitars to achieve an extra deep tone. Bands such as CydeDish, Deftones, System of a Down, KSE, August Burns Red and As I Lay Dying.
Drop B (BF#BEG#C#)
Alternatively, you can tune to BF#BEG#C#, if you are looking for a deep heavy hitting sound. This tuning is mostly used by nu-metal bands like Slipknot, August Burns Red, many deathcore bands, and some death metal bands.
Drop A (AEADF#B)
Alternatively, you can tune to AEADF#B, if you are looking for a deep heavy hitting sound. This tuning is mostly used by nu-metal bands like Slipknot, August Burns Red, many deathcore bands, and some death metal bands.
Double dropped D (DADGBD)
Similar to Dropped D above, for this tuning just drop both 'E' strings a full tone. Neil Young often tunes his guitars this way.
Regular tunings


Among alternative guitar-tunings, regular tunings have equal musical-intervals between the paired notes of their successive open-strings. Regular tunings simplify the learning of the fretboard of the guitar and of chords by beginning students. Regular tunings also facilitate improvisation by advanced guitarists.
Guitar tunings assign pitches to the open strings of guitars. Tunings can be described by the particular pitches that are denoted by notes in Western music. By convention, the notes are ordered from lowest to highest. The standard tuning defines the string pitches as E, A, D, G, B, and E. Between the open-strings of the standard tuning are three perfect-fourths (E-A, A-D, D-G), then the major third G-B, and the fourth perfect-fourth B-E.
In contrast, regular tunings have constant intervals between their successive open-strings:
- 4 semitones (major third): Major-thirds tuning,
- 5 semitones (perfect fourth): All-fourths tuning,
- 6 semitones (augmented fourth, tritone, or diminished fifth): Augmented-fourths tuning,
- 7 semitones (perfect fifth): All-fifths tuning
For the regular tunings, chords may be moved diagonally around the fretboard, indeed vertically for the repetitive regular tunings (minor thirds, major thirds, and augmented fourths). Regular tunings thus appeal to new guitarists and also to jazz-guitarists, whose improvisation is simplified. On the other hand, some conventional chords are easier to play in standard tuning than in regular tuning.
Major thirds tuning

[[Image:First and second inversions of C-major chord on six-string guitar with major-thirds tuning.png|right|thumb|alt=The C major chord and its first and second inversions. In the first inversion, the C note has been raised 3 strings on the same fret. In the second inversion, both the C note and the E note have been raised 3 strings on the same fret.|Chords are inverted by shifting notes three strings on the same fret.
Major-thirds tuning was introduced by jazz-guitarist Ralph Patt in 1964. All of the intervals between its successive open strings are major thirds; in contrast, the standard guitar-tuning has one major-third amid four perfect-fourths.
Major-thirds tuning reduces the extensions of the little and index fingers ("hand stretching"). Major and minor chords are played on two successive frets, and so require only two fingers; other chords—seconds, fourths, sevenths, and ninths—are played on three successive frets. For each regular tuning, chord patterns may be moved around the fretboard, a property that simplifies beginners' learning of chords and that simplifies advanced players' improvisation. In contrast, chords cannot be shifted around the fretboard in the standard tuning E-A-D-G-B-E, which requires four chord-shapes for the major chords. There are separate chord-forms for chords having their root note on the third, fourth, fifth, and sixth strings. Major-thirds tuning repeats its octave after every two strings, which again simplifies the learning of chords and improvisation; Chord inversion is especially simple in major-thirds tuning. Chords are inverted simply by raising one or two notes three strings. The raised notes are played with the same finger as the original notes.
All fourths tuning
_tuning_for_six_string_guitar.png)


- E-A-d-g-c'-f'
This tuning is like that of the lowest four strings in standard tuning. Consequently, of all the regular tunings, it is the closest approximation to standard tuning, and thus it best allows the transfer of a knowledge of chords from standard tuning to a regular tuning. Jazz musician Stanley Jordan plays guitar in all-fourths tuning; he has stated that all-fourths tuning "simplifies the fingerboard, making it logical". Contemporary players are also moving to fourths tuning, noted players include Alex Hutchings and Tom Quayle.
- Eb-Ab-Db-Gb-B-E
A less commonly used version of fourths tuning is retaining the regular tuning on the first and second strings (E and B) and lowering the other strings by a semitone. This version can make playing classical pieces more accessible.
Augmented fourths tuning
All fifths tuning
New Standard Tuning (CGDAEG)

[[Image:C major chord in new standard tuning.png|thumb|left|C major chord in new standard tuning ![]() Play (help·info).]]
Play (help·info).]]

 Play (help·info).
 Play (help·info).
The tuning, invented and introduced by Robert Fripp of King Crimson, is: C(6th) - G(5th) - D(4th) - A(3rd) - E(2nd) - G(1st).
Basically this tuning is efficient because it utilizes the tuning that is common is a cello (CGDA) , violin, and mandolin (both GDAE), in which it is in fifth, from a low C. The second string is a fourth up from the B to an E, and the first string is a minor third up from the E to a G.
Since the lowest five strings are tuned in fifths, typical fingerings for chords and scales used on the violin, cello, and mandolin are applicable here. The minor third between the top strings allow denser chords in the high range of the scale, and easier access to some elementary chord tones (typically the thirteenth for chords with the root note on the sixth string, and the ninth and flat ninth for chords with the root note on the fifth string, see chord). NST has a greater range than the Old Standard Tuning, approximately a perfect fifth (a major third lower and a minor third higher).
Scales across two strings in NST also line up nicely into coherent tetrachords or four-note patterns that have a visually rational relationship (whole and half-tone relationships have a remarkable symmetry that can be easier to learn than the OST whose intervals from 6 to 1 have the (inconsistent) major third thrown in the middle of the scale.
Open tunings
Open A (EAC#EAE)
Alternatively you could tune the guitar to EAC#AC#E
"Slide" Open A (EAEAC#E)
This tuning is identical to Open G tuning but with every string raised one step, or two frets
Open C (CGCGCE)
Used notably by Devin Townsend in his bands Strapping Young Lad and Devin Townsend Project.
Open D (DADF#AD)
Open D, like all open tunings, produces a major chord (in this case, D major) when all strings are strummed. Drop the sixth, first, and second strings down two semitones, and the third string one semitone. It is also called "DAD-fad" after its notes.
Uses the same chord shapes as Open E but is easier on a guitar neck as the strings are detuned lessening the tension.
Open D is a common tuning for folk, blues, and slide guitar. A variation of this tuning is open d minor. Open D minor is tuned DADFAD, meaning the only change is that the F# is tuned down to an F.
Chord shapes
Here are some handy chord shapes: G/D: (020120) Em7/D: (022120)
Open E (EBEG#BE)
Used by Cat Stevens and a popular choice for slide guitarists. Strumming in the open position yields a Emajor chord. You can easily play any chord by barring across the neck at different fret positions. This does however have some disadvantages; mainly that it is slightly more difficult to play minor chords. Some artists overcome this by tuning to EBEGBE. This allows both minor and major chords to be played easily. Because tightening the strings more than is intended can break the strings or put unneeded stress on the neck, many players opt to tune in Open D and put a capo on the second fret; the result is the same.
Open C6 (CACGCE)
This tuning is rarely used. It has been used by Jimmy Page on "Bron-Yr-Aur", "Friends", and "Poor Tom". J. M. Smig uses this tuning on "Fingers In The Forest".
Open G (DGDGBD)
This is sometimes referred to as "Spanish Tuning", popular with slide guitarists. Tune the 1st and 6th strings down to D, and the 5th string to G.
Keith Richards uses this tuning extensively after 1968. (See Brown Sugar, Honky Tonk Women, Start Me Up) He also removes the 6th string (low E in standard tuning) because the root of the chord is on the 5th string in Open G.
Miscellaneous tunings
DADGAD
DADGAD (pronounced as a word: "DAD-gad"), one of the most versatile tunings, is named after the tuning of its strings. The sixth, second, and first strings are dropped two semitones to D, A, and D. Strumming all the strings open forms a Dsus4 chord; fretting the second fret of the third string (or muting the third string) produces a D5 chord, or D power chord. Most songs for DADGAD are in D major, or in G major with a capo at the fifth fret. Jimmy Page of Led Zeppelin played Kashmir in this tuning.
DADADD
This is essentially one huge power chord. Each string neatly divides the scale in half and it is easy to make simple patterns then repeat them anywhere on the fretboard.
Standard E-flat (EbAbDbGbBbeb)
In this tuning, each string is tuned down a half step, or one fret. This is a popular tuning throughout the history of blues and rock, and many modern bands perform with it. Stevie Ray Vaughn frequently used this tuning with heavier strings to get a full, rich tone.
Standard D (DGCFAD)
Made popular by death metal band Death. Commonly used in metal today.
Standard C (CFBbEbGC)
Used by John Petrucci on 3 songs from Dream Theater’s Train Of Thought.
External Links
Guitar Resources
- WholeNote.com On-line guitar community, tabs, reviews, and interactive lessons.
- GuitarWiki.com Wiki based guitar resource with lessons, chord library, music theory, a gear section and tabs.
- Wiki Guitar Wiki Guitar site with tablature, lessons, resources, articles, and forums.
Guitar Lessons
- Free Online Guitar Lessons Free video guitar lessons for kids & adults
- IGDB.co.uk Guitar lessons, chord charts, useful links, and how to set-up your guitar.
- GuitarNationLive.com Learn, play and master your guitar with comprehensive guitar lessons. Topics range from complete beginners to advanced.
- Rhythm-Patterns.narod.ru Sight-reading rhythm patterns, offers rhythmic exercises for guitarists (notes+MIDI)
- Guitar Tuning Tips has information on basic tuning, along with alternative guitar tunings.
Guitar Software and Hardware
- www.power-tab.net Useful guitar tab editor named Powertab that lets you play back the song as MIDI.
- GuitarFX.net Guitar effects software for PC.
- TuxGuitar Open-source tablature editor for Linux, Windows and Mac.
Guitar Tablature & Chords
Tabs
- ClassicalGuitarTabs.com Tabs and guitar forum.
- Guitaretab.com Has a large guitar archive without too many ads.
- Ultimate-guitar.com Over 200,000 guitar tabs, bass tabs and chords. Also features lessons, columns, forums and news updates.
- 911tabs.com A tab database.
- Powertab Archive A collection of tab files for Powertab editor.
Chords
- HowToTuneAGuitar.org Chord Finger Over 1800 guitar chords, organized by type of key. As well 8 Chord Inversions for each chord
- ChordChart.ro Learn to play any song, by learning basic guitar chords
- All-Guitar-Chords.com Comprehensive scale, chord, progression database, with a very good interface. Also includes a jamming machine allowing you to practice with backing tracks.
Authors
This book has no authors other than the public: it is open for anyone and everybody to improve. Therefore, this is more properly a list of acknowledgements of contributors than a list of authors. Whoever we are, this is where we get to brag about our accomplishments in writing this book.
List of major contributors
- Kef Li Eric Marcus X-Schecter is the esoteric pen name of the former primary author of (er, contributor to) this book. He is, in his own words, not entirely qualified to write this book: he is learning as much as the readers are! He plays the electric guitar in the fingerpicking style exclusively, and has written a small number of songs. He currently enjoys writing and transcribing guitar tablature for the Power Tab Archive.
- Sluffs, added chord diagram images to the Chord Reference section
- Daniel made various minor contributions.
- GABaker, who has had a lot trouble tuning cheap guitars, contributed to the section on tuning.
- NickPenguin helped redesign many sections, helped translate content from the German guitar wikibook and created the Guitar template.
- Michael Hoffman explained classic techniques for shaping distortion tones and controlling distortion independently from listening volume, on the Tone and Volume page.
- Meemo created and added much content to the different types of guitars section and added the paragraph on stringing guitars, which seemed important until he read the list of external tutorials...
- Sameer Kale Did a good bit of the Chords section a while ago, started off the Rhythm section, along with adding a few bits to ther places. He doesn't know why such a page as this exists, but does not want to be left out.
- Kiefer.Wolfowitz edited Alternate Tunings, attempting to incorporate his material from English Wikipedia (not from w:Guitar tunings but rather from w:Regular tunings, w:Major-thirds tuning, and w:Ralph Patt).
- Others (add your name and description if you made a major contribution)
- Various anonymous persons.
License
GNU Free Documentation License
As of July 15, 2009 Wikibooks has moved to a dual-licensing system that supersedes the previous GFDL only licensing. In short, this means that text licensed under the GFDL only can no longer be imported to Wikibooks, retroactive to 1 November 2008. Additionally, Wikibooks text might or might not now be exportable under the GFDL depending on whether or not any content was added and not removed since July 15. |
Version 1.3, 3 November 2008 Copyright (C) 2000, 2001, 2002, 2007, 2008 Free Software Foundation, Inc. <http://fsf.org/>
Everyone is permitted to copy and distribute verbatim copies of this license document, but changing it is not allowed.
0. PREAMBLE
The purpose of this License is to make a manual, textbook, or other functional and useful document "free" in the sense of freedom: to assure everyone the effective freedom to copy and redistribute it, with or without modifying it, either commercially or noncommercially. Secondarily, this License preserves for the author and publisher a way to get credit for their work, while not being considered responsible for modifications made by others.
This License is a kind of "copyleft", which means that derivative works of the document must themselves be free in the same sense. It complements the GNU General Public License, which is a copyleft license designed for free software.
We have designed this License in order to use it for manuals for free software, because free software needs free documentation: a free program should come with manuals providing the same freedoms that the software does. But this License is not limited to software manuals; it can be used for any textual work, regardless of subject matter or whether it is published as a printed book. We recommend this License principally for works whose purpose is instruction or reference.
1. APPLICABILITY AND DEFINITIONS
This License applies to any manual or other work, in any medium, that contains a notice placed by the copyright holder saying it can be distributed under the terms of this License. Such a notice grants a world-wide, royalty-free license, unlimited in duration, to use that work under the conditions stated herein. The "Document", below, refers to any such manual or work. Any member of the public is a licensee, and is addressed as "you". You accept the license if you copy, modify or distribute the work in a way requiring permission under copyright law.
A "Modified Version" of the Document means any work containing the Document or a portion of it, either copied verbatim, or with modifications and/or translated into another language.
A "Secondary Section" is a named appendix or a front-matter section of the Document that deals exclusively with the relationship of the publishers or authors of the Document to the Document's overall subject (or to related matters) and contains nothing that could fall directly within that overall subject. (Thus, if the Document is in part a textbook of mathematics, a Secondary Section may not explain any mathematics.) The relationship could be a matter of historical connection with the subject or with related matters, or of legal, commercial, philosophical, ethical or political position regarding them.
The "Invariant Sections" are certain Secondary Sections whose titles are designated, as being those of Invariant Sections, in the notice that says that the Document is released under this License. If a section does not fit the above definition of Secondary then it is not allowed to be designated as Invariant. The Document may contain zero Invariant Sections. If the Document does not identify any Invariant Sections then there are none.
The "Cover Texts" are certain short passages of text that are listed, as Front-Cover Texts or Back-Cover Texts, in the notice that says that the Document is released under this License. A Front-Cover Text may be at most 5 words, and a Back-Cover Text may be at most 25 words.
A "Transparent" copy of the Document means a machine-readable copy, represented in a format whose specification is available to the general public, that is suitable for revising the document straightforwardly with generic text editors or (for images composed of pixels) generic paint programs or (for drawings) some widely available drawing editor, and that is suitable for input to text formatters or for automatic translation to a variety of formats suitable for input to text formatters. A copy made in an otherwise Transparent file format whose markup, or absence of markup, has been arranged to thwart or discourage subsequent modification by readers is not Transparent. An image format is not Transparent if used for any substantial amount of text. A copy that is not "Transparent" is called "Opaque".
Examples of suitable formats for Transparent copies include plain ASCII without markup, Texinfo input format, LaTeX input format, SGML or XML using a publicly available DTD, and standard-conforming simple HTML, PostScript or PDF designed for human modification. Examples of transparent image formats include PNG, XCF and JPG. Opaque formats include proprietary formats that can be read and edited only by proprietary word processors, SGML or XML for which the DTD and/or processing tools are not generally available, and the machine-generated HTML, PostScript or PDF produced by some word processors for output purposes only.
The "Title Page" means, for a printed book, the title page itself, plus such following pages as are needed to hold, legibly, the material this License requires to appear in the title page. For works in formats which do not have any title page as such, "Title Page" means the text near the most prominent appearance of the work's title, preceding the beginning of the body of the text.
The "publisher" means any person or entity that distributes copies of the Document to the public.
A section "Entitled XYZ" means a named subunit of the Document whose title either is precisely XYZ or contains XYZ in parentheses following text that translates XYZ in another language. (Here XYZ stands for a specific section name mentioned below, such as "Acknowledgements", "Dedications", "Endorsements", or "History".) To "Preserve the Title" of such a section when you modify the Document means that it remains a section "Entitled XYZ" according to this definition.
The Document may include Warranty Disclaimers next to the notice which states that this License applies to the Document. These Warranty Disclaimers are considered to be included by reference in this License, but only as regards disclaiming warranties: any other implication that these Warranty Disclaimers may have is void and has no effect on the meaning of this License.
2. VERBATIM COPYING
You may copy and distribute the Document in any medium, either commercially or noncommercially, provided that this License, the copyright notices, and the license notice saying this License applies to the Document are reproduced in all copies, and that you add no other conditions whatsoever to those of this License. You may not use technical measures to obstruct or control the reading or further copying of the copies you make or distribute. However, you may accept compensation in exchange for copies. If you distribute a large enough number of copies you must also follow the conditions in section 3.
You may also lend copies, under the same conditions stated above, and you may publicly display copies.
3. COPYING IN QUANTITY
If you publish printed copies (or copies in media that commonly have printed covers) of the Document, numbering more than 100, and the Document's license notice requires Cover Texts, you must enclose the copies in covers that carry, clearly and legibly, all these Cover Texts: Front-Cover Texts on the front cover, and Back-Cover Texts on the back cover. Both covers must also clearly and legibly identify you as the publisher of these copies. The front cover must present the full title with all words of the title equally prominent and visible. You may add other material on the covers in addition. Copying with changes limited to the covers, as long as they preserve the title of the Document and satisfy these conditions, can be treated as verbatim copying in other respects.
If the required texts for either cover are too voluminous to fit legibly, you should put the first ones listed (as many as fit reasonably) on the actual cover, and continue the rest onto adjacent pages.
If you publish or distribute Opaque copies of the Document numbering more than 100, you must either include a machine-readable Transparent copy along with each Opaque copy, or state in or with each Opaque copy a computer-network location from which the general network-using public has access to download using public-standard network protocols a complete Transparent copy of the Document, free of added material. If you use the latter option, you must take reasonably prudent steps, when you begin distribution of Opaque copies in quantity, to ensure that this Transparent copy will remain thus accessible at the stated location until at least one year after the last time you distribute an Opaque copy (directly or through your agents or retailers) of that edition to the public.
It is requested, but not required, that you contact the authors of the Document well before redistributing any large number of copies, to give them a chance to provide you with an updated version of the Document.
4. MODIFICATIONS
You may copy and distribute a Modified Version of the Document under the conditions of sections 2 and 3 above, provided that you release the Modified Version under precisely this License, with the Modified Version filling the role of the Document, thus licensing distribution and modification of the Modified Version to whoever possesses a copy of it. In addition, you must do these things in the Modified Version:
- Use in the Title Page (and on the covers, if any) a title distinct from that of the Document, and from those of previous versions (which should, if there were any, be listed in the History section of the Document). You may use the same title as a previous version if the original publisher of that version gives permission.
- List on the Title Page, as authors, one or more persons or entities responsible for authorship of the modifications in the Modified Version, together with at least five of the principal authors of the Document (all of its principal authors, if it has fewer than five), unless they release you from this requirement.
- State on the Title page the name of the publisher of the Modified Version, as the publisher.
- Preserve all the copyright notices of the Document.
- Add an appropriate copyright notice for your modifications adjacent to the other copyright notices.
- Include, immediately after the copyright notices, a license notice giving the public permission to use the Modified Version under the terms of this License, in the form shown in the Addendum below.
- Preserve in that license notice the full lists of Invariant Sections and required Cover Texts given in the Document's license notice.
- Include an unaltered copy of this License.
- Preserve the section Entitled "History", Preserve its Title, and add to it an item stating at least the title, year, new authors, and publisher of the Modified Version as given on the Title Page. If there is no section Entitled "History" in the Document, create one stating the title, year, authors, and publisher of the Document as given on its Title Page, then add an item describing the Modified Version as stated in the previous sentence.
- Preserve the network location, if any, given in the Document for public access to a Transparent copy of the Document, and likewise the network locations given in the Document for previous versions it was based on. These may be placed in the "History" section. You may omit a network location for a work that was published at least four years before the Document itself, or if the original publisher of the version it refers to gives permission.
- For any section Entitled "Acknowledgements" or "Dedications", Preserve the Title of the section, and preserve in the section all the substance and tone of each of the contributor acknowledgements and/or dedications given therein.
- Preserve all the Invariant Sections of the Document, unaltered in their text and in their titles. Section numbers or the equivalent are not considered part of the section titles.
- Delete any section Entitled "Endorsements". Such a section may not be included in the Modified version.
- Do not retitle any existing section to be Entitled "Endorsements" or to conflict in title with any Invariant Section.
- Preserve any Warranty Disclaimers.
If the Modified Version includes new front-matter sections or appendices that qualify as Secondary Sections and contain no material copied from the Document, you may at your option designate some or all of these sections as invariant. To do this, add their titles to the list of Invariant Sections in the Modified Version's license notice. These titles must be distinct from any other section titles.
You may add a section Entitled "Endorsements", provided it contains nothing but endorsements of your Modified Version by various parties—for example, statements of peer review or that the text has been approved by an organization as the authoritative definition of a standard.
You may add a passage of up to five words as a Front-Cover Text, and a passage of up to 25 words as a Back-Cover Text, to the end of the list of Cover Texts in the Modified Version. Only one passage of Front-Cover Text and one of Back-Cover Text may be added by (or through arrangements made by) any one entity. If the Document already includes a cover text for the same cover, previously added by you or by arrangement made by the same entity you are acting on behalf of, you may not add another; but you may replace the old one, on explicit permission from the previous publisher that added the old one.
The author(s) and publisher(s) of the Document do not by this License give permission to use their names for publicity for or to assert or imply endorsement of any Modified Version.
5. COMBINING DOCUMENTS
You may combine the Document with other documents released under this License, under the terms defined in section 4 above for modified versions, provided that you include in the combination all of the Invariant Sections of all of the original documents, unmodified, and list them all as Invariant Sections of your combined work in its license notice, and that you preserve all their Warranty Disclaimers.
The combined work need only contain one copy of this License, and multiple identical Invariant Sections may be replaced with a single copy. If there are multiple Invariant Sections with the same name but different contents, make the title of each such section unique by adding at the end of it, in parentheses, the name of the original author or publisher of that section if known, or else a unique number. Make the same adjustment to the section titles in the list of Invariant Sections in the license notice of the combined work.
In the combination, you must combine any sections Entitled "History" in the various original documents, forming one section Entitled "History"; likewise combine any sections Entitled "Acknowledgements", and any sections Entitled "Dedications". You must delete all sections Entitled "Endorsements".
6. COLLECTIONS OF DOCUMENTS
You may make a collection consisting of the Document and other documents released under this License, and replace the individual copies of this License in the various documents with a single copy that is included in the collection, provided that you follow the rules of this License for verbatim copying of each of the documents in all other respects.
You may extract a single document from such a collection, and distribute it individually under this License, provided you insert a copy of this License into the extracted document, and follow this License in all other respects regarding verbatim copying of that document.
7. AGGREGATION WITH INDEPENDENT WORKS
A compilation of the Document or its derivatives with other separate and independent documents or works, in or on a volume of a storage or distribution medium, is called an "aggregate" if the copyright resulting from the compilation is not used to limit the legal rights of the compilation's users beyond what the individual works permit. When the Document is included in an aggregate, this License does not apply to the other works in the aggregate which are not themselves derivative works of the Document.
If the Cover Text requirement of section 3 is applicable to these copies of the Document, then if the Document is less than one half of the entire aggregate, the Document's Cover Texts may be placed on covers that bracket the Document within the aggregate, or the electronic equivalent of covers if the Document is in electronic form. Otherwise they must appear on printed covers that bracket the whole aggregate.
8. TRANSLATION
Translation is considered a kind of modification, so you may distribute translations of the Document under the terms of section 4. Replacing Invariant Sections with translations requires special permission from their copyright holders, but you may include translations of some or all Invariant Sections in addition to the original versions of these Invariant Sections. You may include a translation of this License, and all the license notices in the Document, and any Warranty Disclaimers, provided that you also include the original English version of this License and the original versions of those notices and disclaimers. In case of a disagreement between the translation and the original version of this License or a notice or disclaimer, the original version will prevail.
If a section in the Document is Entitled "Acknowledgements", "Dedications", or "History", the requirement (section 4) to Preserve its Title (section 1) will typically require changing the actual title.
9. TERMINATION
You may not copy, modify, sublicense, or distribute the Document except as expressly provided under this License. Any attempt otherwise to copy, modify, sublicense, or distribute it is void, and will automatically terminate your rights under this License.
However, if you cease all violation of this License, then your license from a particular copyright holder is reinstated (a) provisionally, unless and until the copyright holder explicitly and finally terminates your license, and (b) permanently, if the copyright holder fails to notify you of the violation by some reasonable means prior to 60 days after the cessation.
Moreover, your license from a particular copyright holder is reinstated permanently if the copyright holder notifies you of the violation by some reasonable means, this is the first time you have received notice of violation of this License (for any work) from that copyright holder, and you cure the violation prior to 30 days after your receipt of the notice.
Termination of your rights under this section does not terminate the licenses of parties who have received copies or rights from you under this License. If your rights have been terminated and not permanently reinstated, receipt of a copy of some or all of the same material does not give you any rights to use it.
10. FUTURE REVISIONS OF THIS LICENSE
The Free Software Foundation may publish new, revised versions of the GNU Free Documentation License from time to time. Such new versions will be similar in spirit to the present version, but may differ in detail to address new problems or concerns. See http://www.gnu.org/copyleft/.
Each version of the License is given a distinguishing version number. If the Document specifies that a particular numbered version of this License "or any later version" applies to it, you have the option of following the terms and conditions either of that specified version or of any later version that has been published (not as a draft) by the Free Software Foundation. If the Document does not specify a version number of this License, you may choose any version ever published (not as a draft) by the Free Software Foundation. If the Document specifies that a proxy can decide which future versions of this License can be used, that proxy's public statement of acceptance of a version permanently authorizes you to choose that version for the Document.
11. RELICENSING
"Massive Multiauthor Collaboration Site" (or "MMC Site") means any World Wide Web server that publishes copyrightable works and also provides prominent facilities for anybody to edit those works. A public wiki that anybody can edit is an example of such a server. A "Massive Multiauthor Collaboration" (or "MMC") contained in the site means any set of copyrightable works thus published on the MMC site.
"CC-BY-SA" means the Creative Commons Attribution-Share Alike 3.0 license published by Creative Commons Corporation, a not-for-profit corporation with a principal place of business in San Francisco, California, as well as future copyleft versions of that license published by that same organization.
"Incorporate" means to publish or republish a Document, in whole or in part, as part of another Document.
An MMC is "eligible for relicensing" if it is licensed under this License, and if all works that were first published under this License somewhere other than this MMC, and subsequently incorporated in whole or in part into the MMC, (1) had no cover texts or invariant sections, and (2) were thus incorporated prior to November 1, 2008.
The operator of an MMC Site may republish an MMC contained in the site under CC-BY-SA on the same site at any time before August 1, 2009, provided the MMC is eligible for relicensing.
How to use this License for your documents
To use this License in a document you have written, include a copy of the License in the document and put the following copyright and license notices just after the title page:
- Copyright (c) YEAR YOUR NAME.
- Permission is granted to copy, distribute and/or modify this document
- under the terms of the GNU Free Documentation License, Version 1.3
- or any later version published by the Free Software Foundation;
- with no Invariant Sections, no Front-Cover Texts, and no Back-Cover Texts.
- A copy of the license is included in the section entitled "GNU
- Free Documentation License".
If you have Invariant Sections, Front-Cover Texts and Back-Cover Texts, replace the "with...Texts." line with this:
- with the Invariant Sections being LIST THEIR TITLES, with the
- Front-Cover Texts being LIST, and with the Back-Cover Texts being LIST.
If you have Invariant Sections without Cover Texts, or some other combination of the three, merge those two alternatives to suit the situation.
If your document contains nontrivial examples of program code, we recommend releasing these examples in parallel under your choice of free software license, such as the GNU General Public License, to permit their use in free software.