Blender 3D: Noob to Pro/Simple Cloth Animation
Jump to navigation
Jump to search

|
|
Applicable Blender version: 2.63. |
In this tutorial, we will be making a simple skirt, and using the cloth physics system to make it fall in realistic-looking folds.
Making the Skirt Mesh
[edit | edit source]- Open Blender and delete the default cube, if you aren't looking down on the scene, press NUM7 .
- Shift + A → Add → Mesh → Circle
- The circle will be created, and in the Tool Shelf on the left you should see a panel appear for adjusting its settings. Set the number of vertices to about 12.
- Switch to Edit Mode with Tab . All the circle’s vertices should be initially selected; if not, use A to select them all.
- Press E to extrude a second copy of the vertices; press S Shift + Z to scale the extruded vertices in the X and Y directions. These will make up the hem of the skirt; scale it out to as large as you like. Note that this is positioning the skirt out flat horizontally, instead of hanging down as you would expect; Blender’s cloth animation system will take care of that, and this positioning gives maximum opportunity for the skirt to fall in dramatic folds.
- Now we will need to subdivide the mesh. The physics can only act on actual vertices, so the more of these we have, the more realistic the cloth effect will be. Select all vertices in the skirt, press W and select the “Subdivide” option. A panel will appear in the Tool Shelf for controlling the settings for the subdivision operation; set the number of cuts to, say, 4.
- While you’re at it, switch to OBJECT mode and look in the Tool Shelf for a pair of “Shading” buttons titled “Smooth” and “Flat”
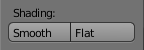 , and click on “Smooth”.

Creating the Vertex Group
[edit | edit source]- Now we have to specify that the waist of the skirt will stay fixed in place as it falls: deselect all vertices, and select the innermost ring of vertices. The quickest way to do this is to hold down Alt + Shift and click with RMB on one of the edges bordering the hole in the middle. With the entire ring of vertices selected, go to the Mesh Object Data context
 in the Properties window, find the “Vertex Groups” panel, and click the + sign to create a new group. This will initially be called “Group”; perhaps give it a more meaningful name (like “Waist”), and click “Assign” to put the selected vertices into the new group.
Animating the Skirt
[edit | edit source]- Tab out of Edit Mode into Object Mode. The skirt should still be selected.
- Go to the Physics tab
 in the Properties window (last icon in the row at the top). This will just show a few buttons to begin with
  .
. - Click the “Cloth” button; a whole lot of other settings should appear, most of which can be left at their default values (make sure the checkbox at the top of the “Cloth Collision” panel is checked). However, check the box titled “Pinning”; now you can click in the field just below it to bring up a popup menu of all the vertex groups in the mesh; this should just contain the one entry named “Waist” you created earlier, so select that.
- Now the magic happens ... rotate the view to an oblique one to give yourself a good view of the process, and hit Alt + A . You should now see the skirt fall from its horizontal position to a more natural vertical one, developing some folds in the process.
- After the animation has run through at least one complete cycle, hit ESC to stop it.

Prior to Keeping the Folds
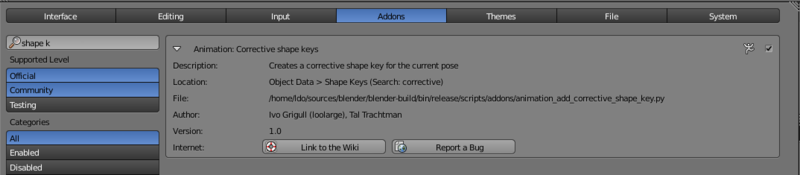
[edit | edit source]Before doing the next step, we need to enable one of the standard addons that come with Blender. This will let us make a copy of any stage of the physics simulation into a separate object.
Go into the User Preferences window and bring up the “Addons” tab. Look for the “Animation Corrective shape keys” addon (typing “shape k” into the search box should be enough to find it).

Enable it. Now back to the 3D view...
Keeping the Folds
[edit | edit source]- Use the left- and right- arrow keys to step through the animation one frame at a time, until you find a position for the skirt that you like.
- When the 3D view is showing a nice shape for the skirt, go to the mesh data tab in the Properties window, and look for the “Shape Keys” panel. Click with LMB on the down-arrow just below the + and - signs, and in the menu that appears, you should see the item “Create duplicate for editing”
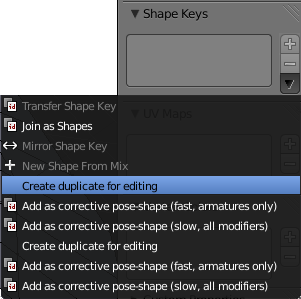 . Select that.
 - It looks like nothing has happened, but in fact you now have a second copy of the skirt mesh, “baked” into the position corresponding to the current frame of the animation. Try using the arrow keys to move through the animation, and you will see the baked copy remain in the chosen position.
- At this point, you can delete the original animated skirt mesh (or move it to another layer for future reuse), leaving the nicely-folded copy.


Extra Practice
[edit | edit source]- You will notice at some points during the animation, the folds of cloth pass right through each other, which is of course impossible with real cloth. To prevent this, you could go to the “Cloth Collision” panel in the Physics tab, and click the “Self Collision” checkbox. Rerun the animation ( Alt + A ) to see the difference; what other effects does it have?
- Maybe the folds don’t look realistic enough. Go back to the original mesh, bring up “Subdivide” again and subdivide it by a couple more levels. Rerun the animation ( Alt + A ). It should take a bit longer for the first cycle, but do the results look better?
- This YouTube tutorial might also help: http://au.youtube.com/watch?v=mgYhZ3hWwTQ happy animating!