Blender 3D: Noob to Pro/Build a skybox
|
|
Applicable Blender version: 2.49. |
Prologue
[edit | edit source]One way to add a realistic feeling to your 3d environment in a game engine is to create a skybox. A skybox is a large cube which has on its inside a projection of a 360° environment. When the player (camera) is inside this environment, the scene is rendered with the illusion of being inside a gigantic world. This is a similar effect to Quicktime VR (see http://www.fullscreen360.com/ for examples). And, by setting up the skybox as a simple cube shape, you place the least amount of strain on the graphics engine. It's a great advantage for your game with very little overhead.
This tutorial will show you how to create skyboxes relatively easily from panoramic photos. My favorite part is, you can do it easily using free tools such as Blender and the Gimp.
Using the Gimp to manipulate images is not really in the scope of this tutorial... check out some other page on using that software. You should have an understanding of how to edit images and apply alpha channels. (You could also use the Gimp to apply a polar coordinate texture to your rectangular image in order to create a fisheye image. Hint: it's not the sphereize filter.)
Gather your graphics
[edit | edit source]You can take panoramic images yourself using a regular digital camera and a tripod. A quick way to accomplish this is to draw marks on your tripod base at every 30 degrees (think of the hours on a clock face). Make a single mark on the swivel of your tripod to allow you to line up your shots -- twelve shots at 30 degrees each. Then, using a program such as the Gimp or the incredibly cool Autostitch to merge the photos into one big panorama.
Or, if you're lazy like me, you can just grab photos online to use as templates to create original images. There are also many places you can download non-copyrighted photos for free as well. One resource for cloudy sky textures, as well as panoramic photography instructions, is Philippe Hurbain's site Philo's Home Page. This tutorial will use a fisheye sky photo from his copyright-free Panoramic Skies images collection.
You'll also probably want a photo for your ground, unless you prefer to use real models such as buildings in your skybox. This earlier chapter on creating landscapes can be incorporated into setting up your skybox. However, this tutorial will use the sky photo for the top half of our world, and a panoramic landscape with an alpha channel for the bottom half. I've created a ground image using copyright-free textures obtained from Accustudio.
Here are the images I'll be using (you'll want to use images with higher resolution): Note that the sky has trees, etc.
Note: I've outlined the horizon of the ground texture with an alpha channel which will allow me to place the ground mesh right against the sky mesh with a very natural feel.
Create a dome for the sky
[edit | edit source]Open a new file in Blender. Your default new file will probably be a two-unit cube in the center of the screen, with a single light source and a camera. You can delete the light source because we won't be needing it. Leave the cube, because that is what will become our skybox.
The cube will be the center of our environment, so use Object->Snap->Cursor To Selection if your cursor is not centered. Then, from the top view [KEYPAD-7], Use [KEY-SPACEBAR] to insert a new mesh; make it a UV sphere. I find a 32-segment, 32-ring sphere to be sufficient. We create the sphere from the top view because that is the projection from which we want to add the sky texture.
Scale up the sphere so it resembles a large "arena" in comparison to your cube, and select and delete the lower half of the vertices, using the front view [KEYPAD-1] and [KEY-B] to create a bounding box. It helps if "Select Visible" is turned off so you can select all of the vertices in one go.
Turn on proportional editing with [KEY-O], then select the bottom row of vertices and scale them up with [KEY-S] so that the bottom of the sphere gets a bell shape. Because the projection of the sky texture will be from the Y-axis (ceiling) we need the bottom faces of the sphere to be at an angle, to catch the texture. (Faces perpendicular to the projection will look like smears.) Alter the influence of proportional editing with [KEY-PAGEUP] and [KEY-PAGEDOWN]. Linear or Sharp falloff works best with the sphere shape.
Now you're ready to add your sky texture to this mesh. In the Materials menu, create a new material and a new texture. Be sure to set your material not to receive shadows by clicking the "Shadeless" button. Then, in the Texture menu, set the texture type to Image, and click the Load Image button to insert our sky texture. Back in the Materials->Texture->Map Input menu, you may need to scale your image to get rid of the distorted textures at the edges of the fisheye by setting the Size to, say, 0.950 for X, Y and Z.
At this point, if you wish, you can reposition the camera and render the scene to see how your sky mesh looks.
Create a dome for the ground
[edit | edit source]I found it easiest to move the sky dome to a new layer with the [KEY-M] move to layer command. Then you can select the cube, Object->snap cursor to selection if you need to, select the top view [KEYPAD-7] and insert another UV sphere just as before -- except this time, remove the top hemisphere of vertices. I left an extra row of vertices at the "equator", scaled up, to function as a "billboard" to display the horizon of our ground texture with the alpha channel. This sphere should be slightly smaller than the sky hemisphere.
This time, I will apply the ground texture with a tube projection, so it is projected onto the mesh horizontally [Materials panel | Map Input tab | Tube button]. Because I have an alpha channel on this texture, I click "Use Alpha" in the Texture menu and Map To -> both Col and Alpha buttons [Materials Panel | Map To Tab | -> both Col and Alpha buttons]. You will also need to set ZTransp in the Mirror Transp menu [Materials Panel | Links and Pipelines Tab | ZTransp button] so that your alpha channel shows up in the envmap (which will become your skybox), and Alpha to 0 [Materials panel | Material tab | A slider ] to allow the masked areas to be transparent. (Alpha channels appear to require Z buffering to appear on procedural textures.) Also, you may need to adjust the offset of the ground texture (Y-axis), so that the horizon appears properly on the "billboard" area of your ground hemisphere.
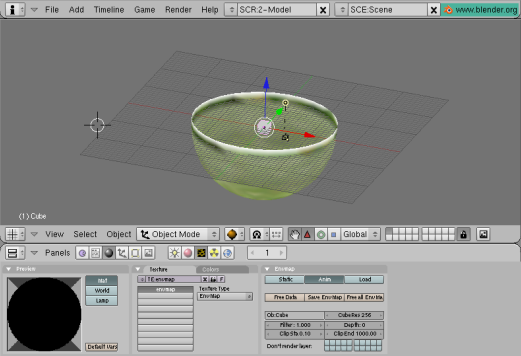
Again, you can reposition the camera and render the scene to make sure everything is properly aligned. Be sure to activate the layer where you moved the sky mesh. Your results will look similar to the following image. Set OSA on in the render screen for best results. Also, use higher resolution images with cleaner alpha channels -- the image below is rather blurry and you can see a halo around the horizon.
Render the environment map
[edit | edit source]The last step is to use the procedural Envmap texture to project the dome textures onto the cube, which will become our skybox. Select the cube and create a new material. Set the material to "Shadeless" [Materials Panel | Materials Tab | Shadeless button]. Add a new texture and make its type Envmap. Set the CubeRes [Envmap tab | CubeRes setting ] to whatever you want the resolution of your skybox to be (512 is a good resolution for a game; 1024 or 2048 are fairly high-res; I stuck with low-res for this tutorial). If your sky & ground hemispheres are very physically large, you may also need to increase the ClipEnd value to include all of the faces. You may want to set the Envmap calculation to Anim so you don't have to keep freeing envmap data if you're experimenting. (Anim automatically clears Envmap data with every render, otherwise you must click 'Free Data' to reset the Envmap.)
Once you've created the Envmap texture, you should be ready to render the Envmap for your skybox. If you want to set your file format such as JPG or PNG, you should do that first. Then, simply go to the render screen and click "Render." Again, make sure all layers are visible. The rendering window appears. First, Blender renders the environment map of the cube. Afterward, the camera view is rendered, at which point you can hit [KEY-ESCAPE] to stop rendering -- we are only interested in the environment map which is already complete.
Select the cube again, then get to its texture menu. You will see the newly-rendered Envmap on the sample texture. Click "Save EnvMap" in the texture menu to save the rendered Envmap.
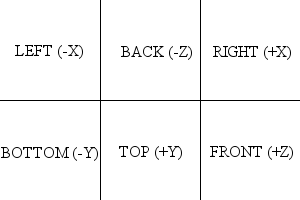
Blender environment maps are saved as a 3x2 matrix of squares, as seen here:
The cube faces are in the following order.
You can now load this image as an envmap texture in a new cube, which you can incorporate into your game as a skybox. This file can also be edited in the Gimp to remove any unwelcome artifacts such as trees, buildings, jet trails, etc. Also, because I used a tube projection on the lower hemisphere, in the bottom face of the envmap you see a strange star shape at the "pole." You'll most likely have a floor in your game, so you probably won't see that face anyway, but sticklers can avoid it with clever use of the Filters->Distorts->Polar Coords filter in the Gimp or Filter->Distort->Polar Coordinates (Polar to Rect.) in Photoshop. Patching also works well.
To make the skybox appear as a static background in your game, vertex-parent it to the current active camera object.
Video Tutorial
[edit | edit source]Ira Krakow's Blender 2.49 Skybox Tutorial: http://www.youtube.com/watch?v=azkk3JrM5Es


