Blender 3D: Noob to Pro/Advanced Tutorials/Advanced Animation/Guided tour/Mesh/Shape
|
|
Applicable Blender version: 2.4x. |
Shape Key?
[edit | edit source]Shape keys are modifications of the original mesh that you can animate and mix with each other. Previously called Relative Vertex Keys (RVK), one of their major uses is to create facial expressions.
The idea behind Shape keys is simple. The basic, undeformed mesh you start with is the "Basis" shape. You can add a variety of different versions of this shape and store each one as a Shape Key for use in an animation (other software sometimes refers to these as "morph targets"). You can't add or delete vertices as Shape Keys only store the positions of vertices and not the creation/deletion of them.
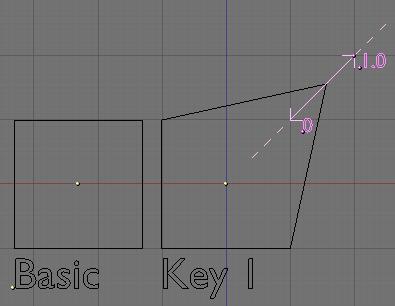
Ok, to start out, take a plane. I'll add a new shape to it and move a vertex away:
When I play with the influence, this key has over the basic shape, the result will be as follows (0.5 in this example):
If I play with the slider from 0 to 1, Blender will gradually apply the Key 1 shape with a constantly varying amount of deformation. So from 0 to 1, it will slide from the basis shape to the Key 1 shape. The movement of the vertices is linear from start position to end position and you can even set an influence greater than 1 or lower than 0 and Blender will extrapolate the movements of the vertices relative to the basis shape (marked as a dotted line above). This feature allows you to set general shapes such as a smile and then exaggerate the shape without needing to remake it.
The GUI
[edit | edit source]
Shape Keys step-by-step
[edit | edit source]Here's a hand-held walk-through of how shape keys are used.
Start with the default cube or a more interesting mesh of your choice.
1: Select your object in Object mode. Go to F9 Editing window. Find and select the "Shapes" panel. Press the "Add Shape key" button. This adds a key called "Basis" and this stores the "basic" mesh in its undeformed state. Make sure the "Relative" button is pressed (should be default).
2: Press the "Add Shape key" button again. It now says "Key 1" and you have a slider and some other settings. Go into Edit Mode, grab a vertex and move it. Exit Edit Mode. The mesh returns to normal but you've just added a real Shape key and Blender has stored it.
3: Repeat step 2 for as many different shapes as you like. You can rename the keys to whatever you want. Normally you create each new shape by first selecting the "Basis" key but if you select an existing key from the list and immediately press "Add Shape Key" then enter Edit Mode, the mesh will already be deformed. This is useful for making similar but unique keys.
Using Shape Keys
[edit | edit source]1: Starting on frame 1, select each key one by one from the pop-up list (or go to the Action Window, press the sliders button and select the Keys from the list there) and click on the slider and move the slider forward then back to zero. Sometimes just clicking on the slider at the zero point is enough to set the key.
2: Move forward ten frames, select Key 1 from the list and move the slider to 1.00. You'll see your object deform. Move more frames and slide another key. And so on and so on. You can move them forwards and/or backwards as you move through the frames and they'll just add together if they have to. Each time you move the slider, you set a keyframe for that Shape Key.
IMPORTANT NOTE:
[edit | edit source]You should add shape keys to a finished mesh. Don't work on a mirrored mesh or a partially finished model. Adding geometry (vertices, faces, loops, joining etc...) can result in the loss of the shape keys or to unpredicatable results. Not always, but probably when you least expect it. There are scripts available to make some of these things possible.
That's the basics. Note that shapes will constantly transform between keys so if you set a key at frame 1 to zero and at frame 10 you set the slider to 1 then at frame 5 the slider will be at 0.5 - which you may or may not want. If you want it to hold shape for a while before changing (e.g. staying at zero until frame 7), you'll need to set a key at the beginning and end of the time frame you want it to stay the same (So you would set it a zero at the start, then zero again at frame 7 then to one at frame 10). You can also edit the IPO curves (use Shapes pop-up) to really mess with the transformations.


