Trainz/Tutorial for incorporating normalmaps using Blender (TRS2009)
Welcome to the tutorial on applying a normalmaps to you textured asset using the 3D program Blender. It can be found at http://www.blender.org/download/get-blender/. Just download the platform version you need. The version at the time of this writing is Blender 2.48a. During the installation it will require you to download and install the Python Engine : Python 2.5.4. You must use this version because the newer python version have changes that will have adverse affects with this version of Blender. You can download it from http://www.python.org/download/releases/2.5.4/ . Be sure you use the one for your platform and processor (i.e. windows x86 processors is python-2.5.4.msi, Win64-AMD64 uses: python-2.5.4.amd64.msi.) Download and install, follow the install directions. You will also need for this tutorial the zip file located at and unzip it to you desktop. Putting it on the desktop will help prevent a loading error in the tutorial. You will need to download “normalmap tutorial” from the DLS <kuid2:86627:2350:1> and rename the normalmap_tutorial.zip.txt file to normalmap_tutorial.zip then unzip it to get the blender source file used in this tutorial. If you upload anything based on this tutorial please give credit to the mesh creator JohnWhelan, you may not upload the textures. The texture for the tutorial, ssa.tga, is to be found in the asset_body folder of the normalmap tutorial asset.
This tutorial is written to demonstrate the application of normalmaps to textures on assets used in the Trainz simulation program. (TS2009). It is not written for beginners to Blender or novice creating assets for trainz. There are other very good tutorials for learning the basic in the trainz wiki and the Blenders online tutorial webpages. I suggest starting with http://en.wikibooks.org/wiki/File:Blender_3D-_Noob_to_Pro_-_Beginner_Tutorials.pdf This is a downloadable PDF file that takes you from the very beginning to Pro state in a few days. It is a fun tutorial full of invaluable tricks and tips. Then follow-up with http://en.wikibooks.org/wiki/Trainz/Tutorial_for_Blender . An excellent tutorial on creating assets in blender for use in Trainz.
Now...those of you that haven't been chased off....here we go.
If you have not open blender yet do so now.
Now, open the blend file entitled "normalmap_tutorial.blend". It should be location in the folder on the desktop called normalmap test. After it finishes loading right click on a part of the mesh that has the original texture already applied. Marked in red is a good spot for the purpose of this tutorial.
Click on the shading button marked with blue or hit F5. Then, click the texture button marked in red or hit F6.
Click on an empty map slot below the slot holding the original texture; marked in blue. Then, click the Add New button; marked in red. Now, type in a name in the slot marked yellow and hit Enter. Next, click the type button and select "Image" from the list; mark with green.
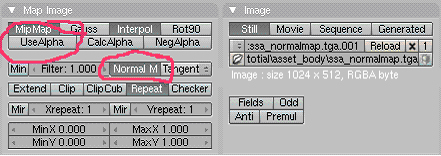
This will bring up the map image controls, pictured below. Click the Load button marked in red.
Navigate to the folder that has the normalmap. In the case "Desktop/Nornal Tutorial/asset_body/load/". Choose ssa_normalmap.tga, marked in red. Then click Select Image, marked in blue.
Under the Map Image tab click on the Normal Map button to tell blender it is a normalmap. Since, we are not using an alpha with the normalmap you can deselect UseAlpha button. Leave all else at default.
Click on the material button marked in red below. No shortcut key for this one.
![]()
You will notice the "preview" image changed to show the normalmap instead of the original texture. This is because we have not finished telling Blender how to place the normalmap.
In the Texture tab showed above, click the slot with the normal in it; mark in red. Next, under the Map Input tab click UV button mark in blue. Since the original texure is laid out using UV this will make the normalmap match the layout. Next, in the Map To tab we will unset the "Col" color button and set the "Nor" normalmap button. Note: the Nor button has 3 states, unset, set 1 and set 2. Do not use the 3rd state as it will render the normals in the opposite directions. Sinking the image "in" instead of "out". Finally, we set how strong the effect will appear in trainz; marked with yellow. Somewhere near the middle is good. You can experiment with this control til you are happy with how it looks in trainz. The built-in renderer may not always be trustworthy for our use.
Save your work and export the mesh to trainz and have a look. Happy creating.


