Blender 3D: Noob to Pro/Modelling a Mug using Spinning and Extrusion
Appearance
This tutorial will get you to use two common modelling methods, spinning and extrusion. We will make a mug and then, in the second part, tweak the materials so that it has highlights, reflections and diffusions like a real mug. This tutorial assumes that you know your way around Blender by now. So long as you've modelled a couple of things before you should be fine.
Begin
[edit | edit source]- Start a new Blender session and delete the default view.
- Now go into front view. (NUM1 key)
- Add a mesh circle with about 12 vertices.
- Rightclick on one vertex and delete it to break the circle. You should have a string of vertices left.
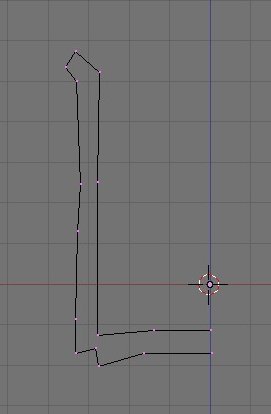
- Arrange the vertices into a shape like in the picture. This is a cross-section for half of the mug.
- You might notice I have more than 12 vertices in my pic. To add a new one select the one you want to connect it to, hold CTRL and click the left mouse button (LMB).
- Try to make sure that your two vertices for the two ends are as close to the middle as you can get them. If they are a little bit off, don't worry we will fix this after we spin the mug. Also, make sure to put enough vertices on the outside. These will be where your handle comes out so if you're going for close to a real thing pay attention to these, although again you will be able to edit them later.
Spinning
[edit | edit source]- To make the mug 3D, we will need to spin it. In editing tab, see editing tools, under "spin" button, there are three settings. Set rotation to 360, steps to 12 and keep turns at 1. Press NUM7 for top view then press "spin".
- This is what it should look like.
- Now to make it look pretty, see the "modifiers" tab. Add a subsurf modifier and set it to one or two levels. Now press "set smooth" in Links and Materials to make it really smooth. Press tab to jump out of edit mode and admire your handiwork.
- Now you may notice a crease in the shading of your mug at the moment. Go back into edit mode, select all the vertices, press w and select "Remove Doubles". This should sort it out. This happens because we spun the vertices 360 degrees, and a copy of the vertices was made on top of iteself. Also, the vertices at the bottom of the mug will not be properly lined up, and therefore we won't have a solid 3d shape at the moment. Press NUM7 to go into top view, and zoom in a lot and you should see a ring of vertices.
- Select only these and press w, select merge and "at center". They should turn into a single vertex. Now press ctrl-num7 for the reverse top view (bottom). Do the same.
Extruding the Handles
[edit | edit source]- Now for the handles, which we will do by extrusion. Select any four vertices as in the picture.
- Press E and pull them out a little with the mouse.
- Select the lower two vertices of the now selected face and pull them up a little using the G button. Now do the same for the bottom.
- Go back to the top end of the handle. Select this face and extrude it again. Now rotate it down, then grab it and move it in a bit. Repeat until you get something like this.
- Switch to face select mode and select the two faces at each end of your (nearly-)handle, as shown.
- Now press x and select faces. Switch back into vertex select mode and select the four outer vertices like in picture. Press f to make a new face. Repeat for the 3 other sides until your mug has one whole handle.
- Now you may now be thinking that your mug is too fat or too tall or the handles are too thick. Never worry, we can easily fix this. If you want to make your mug taller, for example, go into side view with the NUM1 key. select everything and note the axis in the lower left corner of the 3d window. Choose whichever is pointing up, then press S then that key(i.e. X, Y, or Z). You should see a line going up, meaning that your scaling is constrained in that direction. Move the mouse until it looks nice. You can also adjust the shape of the handle by moving the vertices that control it.
- Heres a final model. Coming soon, making this render realistically using materials.
Materials
[edit | edit source]( Unfinished)
- Ok, here's a mug i did before with a simple 3point lighting setup and a plane to put it on. Note the lack of oversampling, 50% size and X and Y parts. All of these will make our render faster without compromising (much ) quality ( though you will want to turn oversampling on for your final render) Also note that the xml option is turned off in the yafray settings, which means that the X and Y settings actually apply for Yafray.
First add a new texture to the mug. Do this by going to the Materials tab under Shading. Go to the color sliders and pick a good color by clicking on col and choosing one you like. I like white, but you can choose whatever you want. If you want to add a texture, do so by following the guide in the texture tutorial.


