VirtualBox/Print version
| This is the print version of VirtualBox You won't see this message or any elements not part of the book's content when you print or preview this page. |
The current, editable version of this book is available in Wikibooks, the open-content textbooks collection, at
https://en.wikibooks.org/wiki/VirtualBox
Basics
This page applies to version 5.2 and newer of Oracle VM VirtualBox.
VirtualBox
[edit | edit source]Oracle VM VirtualBox is an x86 virtualization software package maintained by Oracle Corporation as part of its family of virtualization products. VirtualBox is installed on an existing host operating system.
The physical computer hardware and operating system you have before you install VirtualBox is the "host computer" and "host operating system".
Inside the VirtualBox application, you can create many virtual machines sometimes called "guest computers" which act much like physical computer hardware, except you can't touch it because it's all simulated inside your real physical computer hardware.
Within the VirtualBox application, additional guest operating systems, each known as a Guest OS, can be loaded and run, each with its own virtual environment.
The currently supported host operating systems include Linux, Mac OS X, Windows XP, Windows Vista, Windows 7, Solaris and OpenSolaris. However, there is also a port to FreeBSD (only OSE version).
Hypervisors
[edit | edit source]Hypervisors are a type of software that manage virtual machines which are, in theory, emulated PCs. Thus, hypervisors can be seen as a type of emulator, in which one system pretends to be another by translating its code into something that can be executed.
Because the IBM PC's architecture, x86, is a complex instruction set by design, it is able to do complex operations that allow it to efficiently emulate other platforms. But how about x86 itself?
In x86, software runs in privilege levels (often called rings) and are organized by the operating system. Operating systems will often run their portion of the code (the kernel) in as low of a level as possible so that it can effectively manage the system and the userspace-- ring 0, thus referred to as the kernel mode. Standard software (like executable files you download from websites) run in ring 3, referred to as the user mode.
VirtualBox virtualizes x86 and does very little emulation of the user mode; instead of translating every instruction on-the-fly, it emulates ring 0 by relocating the virtual kernel code to ring 1 and traps instructions when the kernel or software calls for I/O access (i.e. drivers). There are other specific situations that the developers had to work around, but the rest of the software runs almost unmodified, allowing for near-bare-metal performance of software in many cases.
VirtualBox uses code based on QEMU, but it is not a QEMU fork. QEMU has KVM which allows for it to employ similar practices to VirtualBox, but it also targets a wide variety of platforms outside of x86 (such as PowerPC, ARM, and SPARC) that VirtualBox does not.
Hosts emulating Guests
[edit | edit source]In the context of virtualization, your main computer is called the host. It has access to physical components like the monitor, the keyboard and mouse, and the hard disk. When running an operating system in VirtualBox, a guest does not have that same access. It's instead replaced with virtual components that are managed by the hypervisor and the OS kernel, like virtual hard disks on the filesystem. VirtualBox allows you to interface with the guest using an emulated keyboard, mouse, and monitor that's as close to generic as possible so that the operating system has the correct drivers. If those drivers are not part of the operating system, VirtualBox will also include Guest Additions that install integrations with the host like clipboard sharing and dynamic resolutions (where the OS will resize the display to the window).
Host CPU requirements
[edit | edit source]SSE2 (Streaming SIMD Extensions 2) support is required for host CPUs in order for VirtualBox to work.
Virtual Media
[edit | edit source]Within VirtualBox you will encounter the Virtual Media Manager. This is a list of disks VirtualBox has previously used with guests. The three types-- hard disks, optical disks, and floppy disks-- are memorized and grouped by the manager, and can be removed or copied if needed. When these images cannot be detected at the program's start, it will notify the user.
The list of supported hard drive formats are:
VDI(Virtual Disk Image): VirtualBox's native format.VMDK(Virtual Machine DisK): Designed by VMware.VHD(Virtual Hard Disk): Previously Connectix's format for Virtual PC, but now used by Microsoft. On a Windows host, these files can be mounted natively in the Disk Management utility.[note 1]
VHDX(Virtual Hard Disk Extended): Microsoft's format for Hyper-V.
HDD(Hard Disk Drive): Parallels' native format. VirtualBox does not support versions newer than 2, citing lack of documentation on the format. Parallels includes utilities to downgrade the format, however.QCOW(Quick Copy-On-Write): Previously QEMU's native format; it's since been succeeded by QCOW2. QCOW2 support is read-only in VirtualBox.QED: An experimental successor to QCOW that has since been deprecated. Support is only included for compatibility with existing images, and it is recommend to convert to another format.
Floppy disks are a special case as they hold a low amount of data and thus, do not need a special image format to save disk space or speed up the machine.
There are two file extensions, FLP and IMG, that are often used, but the amount of distinctions between these types are almost entirely zero. Floppy disk images are actually raw formats, as they completely preserve the data of the disk but not the physical aspects.
Dynamic Allocation and Compacting
[edit | edit source]Dynamic allocation is used in situations where saving space is crucial to your workflow, in which the image uses less space on the disk than it is assigned.
When you delete a file on any computer, the hard disk doesn't actually wipe its sectors (bigger files would take longer to delete if that was the case). Instead, it marks the sectors where the data was stored as overwritable, so that the space is freed. This explains why data recovery is possible; recovery software will search through "empty" sectors for data. To cut down the size of a virtual disk, you need software that will write null values to the empty sectors so that it becomes redundant, thus becoming a pattern that can be compressed. Disks can be compacted using the CLI tool VBoxManage.
File sharing
[edit | edit source]Files may be shared between the host and guest systems through the guest additions, or otherwise through conventional methods such as SMB and FTP. Should the guest system lack networking capabilities, files can be shared by creating ISO 9660 disc images in an optical disc authoring tool for insertion into the virtual optical disc drive.
The Files
[edit | edit source]The files for your VirtualBox VMs can be found at:
- Windows:
%USERPROFILE%\VirtualBox VMs - Linux:
~/VirtualBox VMs
You can quickly access a VM's folder by right-clicking on it from VirtualBox and selecting "Show in File Manager".[note 2]
The barebones components of a guest's folder includes:
- A .
vboxfile. This makes up all the details of the system itself, such as the specs, which images and devices are routed where, etc. - A hard disk image
Other components may include:
- A .
vbox-prevfile. This is a backup copy of the .vboxfile. - A Logs folder. This contains logs of the machine in case anything goes wrong.
- A Snapshots folder. This contains snapshots.
Notes
[edit | edit source]
Installation
VirtualBox can be downloaded from the official website at virtualbox.org. The main page has a big blue download button that takes you to the download page. From there, you can select your system.
Installation/Windows
Supported Windows host operating systems (64 bit)
[edit | edit source]- Windows 8.1
- Windows 10 RTM (1507 / 2015 LTSB) build 10240
- Windows 10 Anniversary Update (1607 / 2016 LTSB) build 14393
- Windows 10 Fall Creators Update (1709) build 16299
- Windows 10 April 2018 Update (1803) build 17134
- Windows 10 October 2018 Update (1809 / 2019 LTSC) build 17763
- Windows 10 May 2019 Update (19H1 / 1903) build 18362
- Windows 10 November 2019 Update (19H2 / 1909) build 18363
- Windows Server 2012
- Windows Server 2012 R2
- Windows Server 2016
- Windows Server 2019
Download
[edit | edit source]The VirtualBox installer can be downloaded from the official VirtualBox website. You might want to compare the checksums to verify the integrity of downloaded packages. The SHA256 checksums should be favored as the MD5 algorithm must be treated as insecure!
Installation
[edit | edit source]Run the downloaded installer and follow the on-screen instruction to install Oracle VM VirtualBox. You can opt to add a desktop and start menu shortcut.
NOTE: Your network connections (including the Internet connection) will be interrupted for a short time while the installer installs VirtualBox network drivers.
Installation/Linux

Specific Instruction Vary depending on your distribution. The first step is to download the version that is correct for your distro. However, Debian and Red Hat based systems now have an automatic install/update option for the OSE.
Officially supported Linux distributions
[edit | edit source]- Ubuntu 18.04 LTS, 19.03 and 19.10
- Debian GNU/Linux 9 ("Stretch") and 10 ("Buster")
- Oracle Linux 6, 7 and 8
- Red Hat Enterprise Linux 6, 7 and 8
- Fedora 30 and 31
- Gentoo Linux
- SUSE Linux Enterprise server 12 and 15
- openSUSE Leap 15.1
Note that Linux 2.4-based host OSes are no longer supported.
Installation for Debian Systems
[edit | edit source]These include Debian and Ubuntu
Building a Kernel Mod
[edit | edit source]Installation for Ubuntu
[edit | edit source]Open a terminal and type
   sudo apt-get update
   sudo apt-get install virtualbox
and follow the prompts.
Installation for Red Hat based Systems
[edit | edit source]These Include Red Hat Enterprise Linux (RHEL), CentOS, and Fedora.
PUEL Edition
[edit | edit source]After downloading the rpm file for your distro, there are a number of methods of installation.
1. Double Click on the file, it should install VirtualBox 2. In a Terminal using YUM
Using YUM in a Terminal
[edit | edit source]Load up a terminal and change directory to the one where you saved the rpm. To continue beyond this point you will need root privileges. You will either need to be logged on as root (not recommended), su to root, or use sudo (if you have that configured). The following assumes that you are using sudo. If you are logged on as root or you used su then the instructions will work as shown. However, you may also exclude the "sudo" in front of the commands.
In the terminal type
sudo yum localinstall *name*.rpm --nogpgcheck
Replace *name* with the name of the rpm file.
Yum will load up and check for dependencies. After doing that it should ask if you want to install VirtualBox. Type 'Y' (without quotations) to continue. VirtualBox will now be installed on your machine.
Building a Kernel Mod
[edit | edit source]Other
[edit | edit source]Building a Kernel Mod
[edit | edit source]Building a Kernel Mod
[edit | edit source]In order to run VirtualBox requires a Kernel Mod. VirtualBox installed a script that can build the mod for you. In order to do this you will require the Kernel Development Tools and GCC to be installed on your machine. Assuming you have those you may continue by running the following command in a terminal:
sudo /etc/init.d/vboxdrv setup
If all is successful the script to successfully compile and initialise a VirtualBox Kernel Mod. This mod should load automatically each time you reboot your host computer.
NOTE: You will need to rebuild the mod (using the script mentioned above) every time you update the Kernel.
Further reading
[edit | edit source]
Installation/macOS
Supported Mac OS hosts
[edit | edit source]- 10.13 (High Sierra)
- 10.14 (Mojave)
- 10.15 (Catalina)
Note that Intel hardware is required for VirtualBox to function on Mac OS hosts.
Download
[edit | edit source]The VirtualBox installer can be downloaded from the official VirtualBox website. You might want to compare the checksums to verify the integrity of downloaded packages. The SHA256 checksums should be favored as the MD5 algorithm must be treated as insecure!
Setting up a Virtual Machine
Prevent malware infection by downloading software only from its licensed distributor. Avoid ready-made installation images or virtual disk images, as they may contain malware.
Setting up a Virtual Machine/Windows
Remarks
[edit | edit source]- Please check the images. They are not perfectly aligned!
- As Windows is not open-source, no screenshots of Windows are present here to prevent any kind of copyright infringement.
Create Installation Media
[edit | edit source]Using Media Creation Tool (for Windows 10 VM)
[edit | edit source]- Download the Media Creation Tool from the Microsoft Official Website.
- Run the Media Creation Tool.
- Select the Installation Media Type. Choose "Create a bootable disk image".
- Choose file destination.
- Wait for a while. The download size is typically around 4.7 GB. When the creation of installation media completes, you will be redirected to the file destination. You should see a .iso file in that folder.
For other versions of Windows
[edit | edit source]- Download the Windows disk image from a trustworthy source. If you are not using a Windows host machine, the download link for the Media Creation Tool will be replaced by the direct download link of the official .iso file.
- Compare the checksum (if available) to verify the integrity of the disk image file.
Install in VirtualBox
[edit | edit source]- Open VirtualBox

- Press "New" Button on the Left Upper Corner

- You will see the screen on the right. Enter a suitable name for the Virtual Machine. Also, Choose "Windows" for "Type" and your downloaded version for "Version".
- For Memory, choose a suitable value (usually more than 2048 MB).
- As shown on the right, choose "create a virtual hard disk".

- Select "VDI"
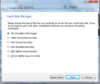
- Select "Dynamically Allocated".
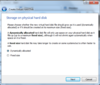
- Select the name and a suitable size (at most 50GB, this is the maximum size of virtual machine)for the virtual storage.Also, create a file location.
- After that, a virtual machine will be created. However, do not boot.

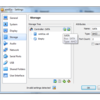
- Go to "Storage" Section.

- Add a SATA Controller.
- Choose Add Optical Hard Drive.
- Choose the .iso file created above.
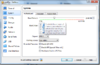
- Go to "System" Section.
- Set the Boot Order to: Optical Hard Drive, Hard Disk
- Go to "Network" Section.
- Tick the "Enable Netork Adapter Checkbox" and the "Cable Connected" checkbox. (The latter checkbox is in the Advanced Section).
- Quit Settings and Boot by clicking "Start".
- You will see a installation screen. Click "Install Now".
- Then enter the product key in the spaces provided. Otherwise, click "I don't have a product key". This enables you to have limited functions.
- Accept End User License agreement.
- Wait for Installation.
- After installation completes, shut down machine and go to Settings.
- Go to "Systems" Section and revert boot order.
- Click "Processor" tab and set the number of CPUs.
- Go to "Display" Section and set the video memory to maximum value.


Great! You have finished the setup. Explore as much as you want.
Resize
[edit | edit source]Here is the DOS command for six gigs (the size must be in megabytes):
"C:\Program Files\Oracle\VirtualBox\VBoxManage" modifyhd "MyVMPath.vdi" --resize 6000
NB: you may need to resize the internal VM partition after, for example to enlarge "/" in Linux :
- boot with gparted
- move the other partitions at the disk end
- then resize /
FAQ
[edit | edit source]The Windows installation page doesn't allow me to skip product key entry. How to skip this?
[edit | edit source]If this is the case, it would be quite complicated.
- First, you will need to mount the iso file by your own means: Windows does not have built-in function to unpack iOS files. But there is a software called Virtual CD-ROM Control Panel. If you are using OS X, mount it by "Disk Utility".
- Open the .iso file and search for a file called "ei.cfg".
- If this file exists, open with Notepad/TextEdit. Otherwise, create a CFG file. (Save it as "All Files" and type "ei.cfg" for name.
- Type the following (type all content as is if bracketed in [], write by instructions if bracketed in {}):
   [Edition ID]
   {Edition you desire (e.g. Home/Professional)}
   [Channel]
   {OEM/Retail}
   [VL]
   {0/1}
- For any other problems, see this Microsoft page
- Save this file and you should see the "Skip for now" option.
Setting up a Virtual Machine/Ubuntu
Once you have VirtualBox installed on your host computer -- it doesn't matter if your host OS is Linux, MacOS, or something else -- setting up an Ubuntu virtual machine is easy.
(This was tested installing Ubuntu Desktop 20.04 LTS as a guest in VirtualBox-6.1 on a Windows 10 host. Other versions and other hosts should work similarly.) (For Ubuntu 14.04.1 LTS, see https://en.wikibooks.org/w/index.php?title=VirtualBox/Setting_up_a_Virtual_Machine/Ubuntu&oldid=3656915 ).
host operating system pre-install steps
[edit | edit source]- Go to http://www.ubuntu.com/ , hit the "download" link, and pick whichever version of Ubuntu you want to try out in a virtual machine. For example, you may want to try Ubuntu Desktop 20.04 LTS. Download it to your host computer. Don't wait until it is done, which may take a few minutes -- continue with the following while it's downloading.
- Start the Oracle VM VirtualBox Manager.
- Hit the starry blue "New" icon.
- Name the virtual machine. (Many people give woefully uncreative names like "testUbuntu20")
- Choose Type: Linux. (Ubuntu is one kind of Linux. Remember, this is the guest operating system running inside the virtual machine, not your host operating system).
- Choose Version: Ubuntu (64 bit).
- The default is 1024 MB RAM -- bump this up to at least 2048 MB RAM for Ubuntu 17.10 or later.[1]
- Hit the "Next" or "Create" button a few times (2048 MB RAM, keep the default 10 GB hard drive file -- you can make these bigger or smaller later), until you see an icon for your virtual machine in the left sidebar of the Oracle VM VirtualBox Manager.
- (Optional: If your purpose for setting up this machine is to practice installing Ubuntu on a RAID array in a safe sandboxed environment, set up additional virtual hard drive images now under Settings >> Storage).
- Click on the icon for that virtual machine ("testUbuntu20") and hit the big green arrow "Start" icon.
- Has the download finished yet? When it's done downloading, you should have a file that ends in ".iso" in your downloads folder.
- a file like "ubuntu-20.04.2.0-desktop-amd64.iso" file
- The "Select start-up disk" window should pop up. Hit the little folder icon next to the drop-down box to bring up the "Optical Disk Selector" window. If the ISO image you just downloaded isn't already visible, hit the big green plus sign ("+") to bring up a file chooser. Then pick the ISO image you just downloaded and hit "open". In the "Optical Disk Selector" window, click on the ISO image you just downloaded and hit "Choose". Then click the "start" button.
- A window saying something like "testUbuntu20 [Running] - Oracle VM VirtualBox" should pop up. It takes a minute or so for the Ubuntu LiveCD to boot up inside that window. Eventually it should show a big "Welcome" window with two big options: "Try Ubuntu" or "Install Ubuntu". We hit the "Install Ubuntu" option.
- (By default, we'll be running in a tiny 800x600 pixel "virtual monitor" window for a while -- we'll fix the screen resolution later).
installing inside the virtual machine
[edit | edit source]The previous steps created .vdi file that acts like a fresh, empty hard drive. Now we're going to install Ubuntu on it, exactly the same we would on a physical machine with a physical fresh, empty hard drive.
- We pick the "Install Ubuntu" option.
- We choose keyboard layout, etc., hitting "Continue" a few times.
- (Optional) When you reach the "Installation Type" window, there's also an "Advanced Features..." button here if you want full-disk encryption.[2] (The "Encrypt my home folder" option[3] has apparently been removed,[4] in response to bug #1756840.[5]).
- You are at the "Installation Type" window, still inside the "testUbuntu14 [Running] - Oracle VM VirtualBox" window, right? We accept the default "Erase disk and install Ubuntu" and hit the "Install Now" button.
- ... Hit the "Continue" button a few more times ...
- After entering your user name and password and hitting "continue", Ubuntu will take many minutes install.
- Write down that password on a sticky note. We'll need it later.
- Eventually you see the "Installation Complete" message. Hit the "Restart Now" button.
- If you see the "Please remove the installation medium, then press ENTER:" message, go ahead and press ENTER -- VirtualBox should remove the (virtual) CD (actually a ".iso" file) automatically.
- Typically Ubuntu shows a few text logging messages as it shuts down.
- If it appears to hang on that shutdown screen, at the top of the "testUbuntu20 [Running] - Oracle VM VirtualBox" window, hit the "close window" icon and choose "Power off the machine", OK. Then Open up the Oracle VM VirtualBox manager. The "testUbuntu18" VM currently has the "Powered Off" icon, right? Select the VM, and hit the green arrow "start" icon.
- It may take Ubuntu a minute to boot up the first time from a cold start. (VirtualBox *should* have automatically ejected the ISO image, so you should *not* see the two big "Try Ubuntu" or "Install Ubuntu" options from the LiveCD ISO image).
- When you see a bar with the username you typed in earlier, click it and type the password you wrote on the sticky note earlier.
- If you see a "Connect Your Online Accounts" window, click "skip" for now.
- Since this is the first time Ubuntu 18 has booted, you'll see the "What's new in Ubuntu". Check out the new features, click "Next" a few times, then "Done".
- Typically the "Software Updater" window pops up saying "Updated software ... do you want to install it now?" You may as well click the "Install Now" button.
- Another way to install updates: press Ctrl+Alt+T to open a terminal window, then type
sudo apt update && sudo apt upgrade
then hit enter to install updates.[6]
- If you see the message "... is not in the sudoers file. This incident will be reported.", it may be related to a minor glitch in "Unattended Guest OS Install". There are several ways to fix this by adding your username to the sudo group.[7]
- Hey, remember that password we wrote on a sticky note earlier? Type it in and hit the Authenticate button.
- This may take a few minutes -- minimize the Updater window and continue with the following while it's downloading and installing updates.
So, are we finished installing?
return to the host operating system for further installation steps
[edit | edit source]Next we install the Guest Additions.
Please go to VirtualBox/Guest Additions/Ubuntu and follow the instructions there.
(optional) If you have a very high-resolution monitor (high-DPI screen), the icons and default text in Ubuntu may look tiny and hard to read. One fix: In VirtualBox Manager, choose a VM, click the "Settings" gear, choose the "Display" tab from the left sidebar, and change the "Scale Factor:" to 200% (from the default of 100%).
Sharing folders with host OS
[edit | edit source]To share folders between the host and the guest OS,
- In the host OS open the Oracle VM VirtualBox Manager
- choose the guest VM in the left sidebar
- choose Settings in the right sidebar
- choose "Shared Folders"
- In the upper-right side, pick the folder with the plus sign ("+"),
and in the file-picker window that pops up, choose the folder you want to share. (There's options here for "Read-only" and "Make Permanent"). (If you leave the "Mount Point" blank, the folder will be mounted under "/media/" and the same folder-name as in the host OS).
- Inside the virtual machine, open the "files" application from the left sidebar.
- You should see the folder you selected earlier. Click on that folder to mount it.
- If you get "You do not have the permissions necessary",
in the guest VM open a terminal with Ctrl+Alt+T and run[8][9][10][11]
sudo adduser $(whoami) vboxsf
reboot
A few things you can do with this virtual machine
[edit | edit source]If your purpose for setting up this machine is to practice administering RAID arrays -- setting up a new RAID array, failing, operating while degraded, adding empty hard drives to the array, rebuilding, scrubbing, etc. -- in a safe sandboxed environment, you can add and remove additional virtual hard drive images at any time in the VirtualBox Manager under Settings >> Storage.
You can easily move this virtual machine to some other computer -- even a computer running a completely different host operating system. (One exception: 64-bit Ubuntu will not run on 32-bit hardware. 32-bit Ubuntu, however, runs fine on both 64-bit Intel processors and 32-bit Intel processors.)
An operating system inside a virtual machine may see several hard drives. Typically they are all actually ".vdi" files stored on a single host hard drive. But some people tweak the VirtualBox settings so that the operating system can directly access (perhaps in read-only mode) physical drive(s), so the hard drive that guest operating system sees is, in fact, a physical hard drive.
Many people disable the "fading windows" effect and other pretty effects by installing "CompizConfig Settings Manager" and turning off "effects" and "Enhanced Zoom Desktop".
Many people install and use a "fast, lightweight" window manager such as GNOME Flashback (Metacity)[12] or XFCE,[13]
To try out Xubuntu (with XFCE), at the command line type "sudo apt-get install xubuntu-desktop gksu leafpad synaptic" (not including the quotes). Then press enter, type your password, then press enter again. It takes a few minutes for Ubuntu to download and install the Xubuntu stuff. Then log out of Ubuntu. At the login window, click the logo next to your user name, and pick "Xubuntu session".
Some people install zRam for better performance with limited RAM. This is a single command in Ubuntu 12.04 and newer: open a terminal window, and run[14]
sudo apt-get install zram-config
Using ssh to access an Ubuntu virtual machine
[edit | edit source]Inside the virtual machine window, you can open a terminal window and ssh to some other server -- that's all installed by default.
Often people want to access a text terminal on an Ubuntu server from a Windows box -- that takes a few more steps:[15][16]
- Make sure the openssh-server is installed:
- Open the Ubuntu Software Center from the left sidebar, type "openssh-server" in the search sidebar, and click the install button.
OR
- Open a terminal window from the left sidebar, and run the command
sudo apt-get install openssh-server
- Edit the config file
sudo vim /etc/ssh/sshd_config
- Find the line that says "PasswordAuthentication", and make sure it says
PasswordAuthentication no
then save that file and exit.
- restart the ssh server
sudo /etc/init.d/ssh restart
- Install PuTTY on the Windows box. (This works more-or-less the same as the "ssh" command installed by default in Ubuntu).
- Get the IP address of the Ubuntu box: At the top of the virtual screen there's an icon that allegedly looks like an internet connection; pull it down and choose "Connection information".
- Most likely the IP address will begin with "10." or "192.", a local address that is not usable outside the local network.
- (FIXME: is this really the Right Thing to Do?) In the Oracle VM VirtualBox Manager, select the virtual machine, choose the big yellow gear "Settings", choose "Network" on the left side, and change the "Attached to:" from "NAT" to "Bridged Adapter", and hit OK.
- Get the IP address of the Ubuntu box again: At the top of the virtual screen there's an icon that allegedly looks like an internet connection; pull it down and choose "Connection information". (This will almost certainly be a different IP address than the one you saw before enabling "Bridged Adapter").
- Run PuTTY on the Windows box, and type the "Bridged Adapter" IP address in the "Host Name or IP address" box, and hit Enter.
You should be able to log into the virtual machine now.
USB
[edit | edit source]You may want to access some physical USB device from inside the virtual machine. (For example, you may want to run the Android SDK sandboxed inside a virtual machine, and then give it access to upload to a physical mobile phone).
- In the VirtualBox manager, select the virtual machine, and then click on "Settings", then choose "USB".
- ̈(optional) Choose USB 3.0 and click "OK" to save. (can only do this when the virtual machine is "powered off").
- start the virtual machine
- Plug in the USB peripheral device
- In the VirtualBox manager, select the virtual machine, and then click on "Settings", then choose "USB" (again).
- To pass *all* USB devices to the virtual machine, click the far right USB icon with the circle, then press OK.
- To pass only *selected* USB devices to the virtual machine, click the far right USB icon with the plus sign. A list of all the currently-plugged-in USB devices should pop up. Choose one to add, then press "OK". (Repeat for any other devices you want to pass through).
The Ubuntu OS in that virtual machine should now automatically connect to those physical USB devices.
Booting the virtual machine from a physical bootable USB stick...[17]
increase virtual hard drive size
[edit | edit source]To increase the virtual hard drive size, so Ubuntu sees a (virtually) larger hard drive, [FIXME]
Further reading
[edit | edit source]- Using Ubuntu Linux
- "How to run an Ubuntu Desktop virtual machine using VirtualBox 7" has a good explanation of the "Unattended Guest OS Install" feature.
- Ubuntu wiki: ISO testing with VirtualBox
- "How to install Virtualbox guest additions on Ubuntu 14.04".
Setting up a Virtual Machine/Mac OS X
Disclaimer
[edit | edit source]Mac OS X and newer versions have had a long standing clause in their software license agreements that permits the use of macOS only on computers made by Apple.[18] If Apple has released a version above Sonoma, confirm eligibility by referring to the given agreement for the new OS version at this link.
Otherwise, performing anything in this guide could run you into legal trouble with Apple. For non-Mac users, proceed at your own risk.
Compatibility
[edit | edit source]macOS Catalina 10.15.2 and 10.15.3 (and possibly every later version) are only compatible with VirtualBox version 6.1.4 or greater.
Installation script
[edit | edit source]The following installation script:
- ...is free and open-source
- ...requires only VirtualBox with its Extension Pack and dependencies that can be easily installed in a single command with most open-source package managers
- ...downloads macOS Catalina, Mojave and High Sierra directly from Apple's servers
- ...installs macOS without modifying the original Apple binaries and without third-party bootloaders
- ...creates a VM that is compatible with OpenCore and can be exported (with manual modifications) to KVM/QEMU for near-native performance
- ...runs on Linux, Windows (WSL 1, Cygwin), and macOS
https://github.com/myspaghetti/macos-guest-virtualbox - Push-button installer of macOS on VirtualBox
Manual installation
[edit | edit source]The manual installation requires access to the Mac App Store through an existing installation of macOS.
Create ISO Installation Media (not working to create iso for macOS version 12+)
[edit | edit source]- Download the macOS Installer file from the App Store[19] (OS X El Capitan and Sierra is downloadable from Apple's website).
- When download finishes, find the app, right-click and select "Show Package Contents".
- Inside the sub-folder Contents/SharedSupport you will find a InstallESD.dmg file, Right click and copy it to the desktop or your file of choice
- Open "Disk Utility"
- Choose Images > Convert
- In the window, choose the InstallESD.dmg and the disk type to be "DVD/CD-R master for export". Also choose the name for installer disk and the final destination (if it lets you). Then click "Convert".
- After the conversion completes, you will see a .cdr file in your destination folder.
- Open "Terminal"
- Enter
hdiutil convert /Your/Path/To/YourCdrFile.cdr -format UDTO -o /Your/Path/To/macOSInstaller.iso(for file paths, You can also just click and drag an item into the terminal to automatically type the file path, use left and right arrow keys to navigate) - Press enter and wait for the process to complete.
- Check your output folder for the file
- The file outputted will have the extra extension of dmg once this process is completed. Simply rename the File to .iso, it will ask you if you want to keep this title just say yes. (if your file isn't like this ignore this step)
Installation in VirtualBox
[edit | edit source]- Open VirtualBox. Click "new"
- Type the name for virtual machine and Mac OS X for type. Choose your version (if you have Mojave or Catalina, choose Mac OS X (64 bit)).
- Select memory size.
- Select "Create Virtual Disk Now"
- Choose VDI for format.
- Select storage name and size. The size should be at least 32 GB.
- Go to "Settings"
- Go to "Storage" Tab
- In the SATA controller, click "Add Optical Disk".
- Insert the .iso file.
- Go to "Display" tab.
- Set video memory to maximum value.
- Quit "Settings"
- Boot by clicking "Start".
- When it boots, you will see some data being displayed.
- This part needs clarification - UEFI Interactive Shell loads, but nothing happens. If you use the command "exit" you can shift to the EFI menu, but changing the settings doesn't seem to affect the progress of the UEFI Interactive Shell, which stops at the Shell> prompt.
- After a while, you will need to choose the language for installation. Choose your own language.
- Then you will be asked where to install macOS.
- On the upper-left corner, you will see a "Utilities" button. Click it and select "Disk Utility".
- You will see a window with different storages on the left. Choose "VBOX HARDDISK Media". Note: You may have to select View/View All Devices
- Erase the Storage by clicking the "Erase" button on the top.
- You will be prompted to enter the name for the storage. Enter your desired name and continue.
- Wait for the process to complete. Then quit Disk Utility.
- You will find a new storage media, which is like a hard disk. Choose that storage for the installation of OS X to install.
- After installation completes, the virtual machine will automatically shut down. Go to "Settings".
- Go to the "Storage" section to eject the .iso file.
- Boot virtual machine again.
- Choose system language.
- Choose allow location or not.
- You will be asked to enter your Apple ID. Even if you have an Apple ID, do not enter now.
- Accept EULA of macOS.
- Restore Time Machine Backups (if you have)
- You will see the main page of OS X, open App Store.
- Enter your Apple ID and sign in...
There should be 2 scenarios...
- Scenario 1: You will sign in within a short time. Congratulations! You have done it!
- Scenario 2: It took ages. Stop signing in and check the references below. [19]
References
[edit | edit source]- ↑ "Ubuntu Installation/SystemRequirements" says "2048 MiB RAM (system memory) for virtualised installs."
- ↑ EFF. "Privacy in Ubuntu 12.10: Full Disk Encryption".
- ↑ Dustin Kirkland. "Ubuntu’s Encrypted Home Directory: A Canonical Approach to Data Privacy".
- ↑ https://ubuntuforums.org/showthread.php?t=2397546 "Installation doesn't ask to encrypt home folder on 18.04"
- ↑ "Ubuntu ecryptfs-utils package bug #1756840".
- ↑ Abhishek Prakash. "16 Things to do After Installing Ubuntu 20.04". 2020.
- ↑ "How can I make my own account a sudoers on VirtualBox?".
- ↑ "How to access a shared folder in VirtualBox?".
- ↑ "File permission issues with shared folders under Virtual Box (Ubuntu Guest, Windows Host)".
- ↑ Jack Wallen. "How to share folders between guest and host in VirtualBox".
- ↑ VirtualBox forums. "HOWTO: Use Shared Folders".
- ↑ Pjotr. "Do this first in Ubuntu 14.04 LTS"
- ↑ Pjotr. "Turn Ubuntu 14.04 into Xubuntu 14.04"
- ↑ Andrew. "Increased performance in Linux with zRAM (virtual swap compressed in RAM)"
- ↑ Ubuntu. "SSH/OpenSSH/Configuring".
- ↑ "Enable SSH in Ubuntu 14.04 Trusty Tahr".
- ↑ "How to Boot VM From USB Stick".
- ↑ Apple Inc. "SOFTWARE LICENSE AGREEMENT FOR macOS Sonoma" (PDF). § 2B(iii). Retrieved 2024-04-24.
...subject to the terms and conditions of this License and as permitted by the Services and Content Usage Rules set forth in the Apple Media Services Terms and Conditions (...) ("Usage Rules"), you are granted a limited, non-transferable, non-exclusive license (...) to install, use and run up to two (2) additional copies or instances of the Apple Software, or any prior macOS or OS X operating system software or subsequent release of the Apple Software, within virtual operating system environments on each Apple-branded computer you own or control that is already running the Apple Software, for purposes of: (a) software development; (b) testing during software development; (c) using macOS Server; or (d) personal, non-commercial use.
- ↑ a b https://support.apple.com/en-us/HT201475
Setting up a Virtual Machine/macOS Mojave
This page may fit the criteria for speedy deletion for this reason:
The information here is redundant and already exists on the more generalized Mac OS X page. Please share your thoughts.
Do you think this page should be kept or doesn't fit the criteria? Want to discuss this with more people? You can continue to edit this page, which may save it from deletion if improved. Administrators: Please check the page history, page log, and especially the last edit, before deleting. |
Installation script
[edit | edit source]The following installation script:
- ...is free and open-source
- ...requires only VirtualBox with its Extension Pack and dependencies that can be easily installed in a single command with most open-source package managers
- ...downloads macOS Catalina, Mojave and High Sierra directly from Apple's servers
- ...installs macOS without modifying the original Apple binaries and without third-party bootloaders
- ...creates a VM that is compatible with OpenCore and can be exported (with manual modifications) to KVM/QEMU for near-native performance
- ...runs on Linux, Windows (WSL, Cygwin), and macOS
https://github.com/myspaghetti/macos-guest-virtualbox - Push-button installer of macOS on VirtualBox
See also
[edit | edit source]
Guest Additions
The VirtualBox Guest Additions are a plugin which improves the interoperability between the host and the hosted systems.
Guest Additions/Windows
Here we install the Guest Additions[1].
- Go to the host operating system. At the top of the VM window, choose Devices >> "Insert Guest Additions CD image...". Then, VirtualBox simulates inserting a CD into the simulated optical drive of the VM.
- If you need to eject this, you can either restart the VM or click on Devices >> optical drives >> eject.
If you didn't add a Windows shared folder into the "configuration" menu of the VirtualBox graphical interface[2], you can do it in Command Prompt with:
VBoxManage sharedfolder add "VMName" --name "SharedName" --hostpath "C:\Users\Public\Documents\SharedFolderPath".
Linux guest
[edit | edit source]The Guest Additions CD should be read from the guest OS like this[3]:
- sudo mount /dev/cdrom /media/cdrom
- cd /media/cdrom
- sudo ./VBoxLinuxAdditions.run
Then, just mount the Windows folder from Linux[4]: mkdir ~/vboxshare sudo mount -t vboxsf SharedName ~/vboxshare
That's it, you can browse your Windows files: ls ~/vboxshare
References
[edit | edit source]
Guest Additions/Ubuntu
Here we install the Guest Additions on an Ubuntu guest system running inside Virtualbox.[1]
This chapter assumes you already have Ubuntu installed in a VirtualBox virtual machine, perhaps using the process described in VirtualBox/Setting up a Virtual Machine/Ubuntu.
(This was tested on Ubuntu Desktop 20.04 LTS as a guest in VirtualBox-6.1 on a Windows 10 host. Other versions and other hosts should work similarly.)
- Go back to the host operating system. At the top of the "testUbuntu20 [Running] - Oracle VM VirtualBox" window, choose Devices >> "Insert Guest Additions CD image..."
- (VirtualBox simulates inserting a CD into the simulated optical drive of the VM, and Ubuntu auto-mounts that CD under "/media/a/").[2]
- When Ubuntu gives the "VBox... Would you like to run it?..." pop-up window, hit "run".
- Hey, remember that password we wrote on a sticky note earlier? Type it in and hit the Authenticate button.
- Ubuntu pops up a new terminal window and takes a minute to install and start up "VirtualBox Guest Additions".
- At this point, with a fresh Ubuntu 20.04 LTS install, it typically says "This system is currently not set up to build kernel modules. Please install the gcc make perl packages from your distribution." If that happens,
- Inside the Ubuntu 20 VM, open up a terminal with Ctrl+Alt+T . Inside that terminal run: (What is build-essential? see https://superuser.com/questions/151557/what-are-build-essential-build-dep )
    sudo apt update
    sudo apt install build-essential
    reboot
- (Earlier advice also recommended installing "dkms" and perl, but apparently that is no longer necessary).
- (Earlier advice also recommended installing gcc and make, but apparently they are already included with build-essential).
- When the VM starts up again, right-click the CD image on the desktop (if you don't see it, look in the left bar, at the bottom), and Eject.
- Install the Guest Additions again from the beginning.
- Inside the Ubuntu 20 VM, open up a terminal with Ctrl+Alt+T . Inside that terminal run:
- At this point, with a fresh Ubuntu 20.04 LTS install, it typically says "This system is currently not set up to build kernel modules. Please install the gcc make perl packages from your distribution." If that happens,
- When there are no errors and the last line of that terminal window says "Press Return to close this window...", click inside that window and press Return.
- Go back to the host operating system. At the top of the "testUbuntu20 [Running] - Oracle VM VirtualBox" window, most people find it convenient to enable Devices >> Shared Clipboard >> Bidirectional.
- Shut down the virtual machine from the tiny triangle icon in the upper right corner, the power icon, "Power Off" >> Power Off >> Power Off.
- Open up the Oracle VM VirtualBox manager. The "testUbuntu20" VM currently has the "Powered Off" icon, right? Select the VM, and hit the green arrow "start" icon.
- (Now when you look under "/media/a/", the "Guest Additions CD image" is still there -- do I need to do something to "take it out of the (virtual) drive"? If so, how?)
- (optional) To automagically resize the size of the virtual monitor to fill the "testUbuntu20 [Running] - Oracle VM VirtualBox" window whenever you stretch or shrink that window,
- At the top of the "testUbuntu20 [Running] - Oracle VM VirtualBox" window, choose View >> Auto-resize Guest Display.
- When you installed the Guest Additions (as described above), that option should have been enabled. There is apparently two separate bugs that can keep it greyed out even after installing the Guest Additions and rebooting:[3][4]
- Some people suggest editing a "
/etc/X11/xorg.conf" file, but that file apparently no longer exists in Ubuntu14. - Some people suggest using apt-get to (re)install guest additions, uninstalling that version, and then re-install the guest additions again from the VirtualBox ISO:[5]
- Inside the virtual machine, open a terminal window and run "
sudo apt-get install build-essential dkms virtualbox-guest-additions-iso". Hit "y" to continue. - Next, uninstall the guest additions: "
sudo apt-get remove --purge virtualbox-guest-additions-iso". (We only installed it to pick up a bunch of dependencies; it's probably the wrong version for whatever version of VirtualBox you have running on your host). - At the top of the "testUbuntu14 [Running] - Oracle VM VirtualBox" window, choose Devices >> "Insert Guest Additions CD image..." and re-install it, as described above.
- Reboot
- wait a minute until the GUI desktop comes up
- At the top of the "testUbuntu20 [Running] - Oracle VM VirtualBox" window, choose View >> Auto-resize Guest Display.
- Inside the virtual machine, open a terminal window and run "
References
[edit | edit source]- ↑ VirtualBox manual. "Guest Additions".
- ↑ Ask Ubuntu. "How do I install Guest Additions in a VirtualBox VM?".
- ↑ VirtualBox bug tracker. "Ticket #1591 (closed defect: fixed)": "auto-resize guest display is greyed out".
- ↑ "virtualbox resolution above 800x600".
- ↑ "Screen Resolution, VirtualBox Guest Additions, Ubuntu, and You".
Guest Additions/Mac OS X
Sorry, no Guest Additions are provided for Mac OS X.