RAC Attack - Oracle Cluster Database at Home/Wrap-up OS Installation
Jump to navigation
Jump to search
Linux Install (e)

Prev: Hardware and Windows Preparation
Linux Install (e)
- Create VM
- Prep for OS Installation
- OS Installation
- Wrap-up OS Installation
- Create RAC Attack DVD
- Prep for Oracle
Next: Create Cluster
Tip: If you are familiar with the unix command-line, then we recommend connecting through SSH in addition to using the VMware console. You can then copy-and-paste many commands from this handbook! Until we configure networking, VMware will assign the address 192.168.78.128.
-
Login as the user root with password racattack.

-
GNOME is the graphical window environment installed by default in OEL. First, disable GNOME CD automount. Go to the menu System >> Preferences >> Removable Drives and Media.

-
Uncheck all of the options under Removable Storage and click Close.

-
Open a terminal window from the menu Applications >> Accessories >> Terminal.

-
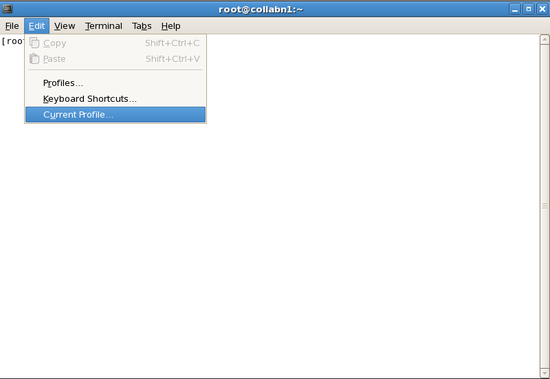
From the menus, open Edit >> Current Profile.
-
In the Title and Command tab, check the box for Run command as a login shell, then close the dialog.

-
The editor "gedit" is a simple graphical editor – similar to notepad – and it can be used to edit files on Linux. If you are going to use gedit, then it is helpful if you open Edit > Preferences to disable text wrapping and enable line numbers.

-
In a terminal window as the root user, shutdown and disable anacron then run it manually with no delay.
[root@collabn1 ~]# service anacron stop
Stopping anacron: [ OK ]
[root@collabn1 ~]# chkconfig anacron off
[root@collabn1 ~]# chkconfig --list anacron
anacron 0:off 1:off 2:off 3:off 4:off 5:off 6:off
[root@collabn1 ~]# anacron -n
 It should not cause any problems for you, but be aware that several CPU and I/O intensive jobs will run in the background for about 10 minutes while you continue with this lab (e.g. updatedb and makewhatis). You might notice some slight system performance degradation. You can always use the program top to see what is currently running.
- In a terminal window as the root user, shutdown and disable the automounter. [root@collabn1 ~]# service autofs stop Stopping automount: [ OK ] [root@collabn1 ~]# umount /media/* [root@collabn1 ~]# chkconfig autofs off [root@collabn1 ~]# chkconfig --list autofs autofs 0:off 1:off 2:off 3:off 4:off 5:off 6:off
- In a terminal window as the root user, shutdown and disable the apple zeroconf service (avahi). [root@collabn1 ~]# service avahi-daemon stop Shutting down Avahi daemon: [ OK ] [root@collabn1 ~]# chkconfig avahi-daemon off [root@collabn1 ~]# chkconfig --list avahi-daemon avahi-daemon 0:off 1:off 2:off 3:off 4:off 5:off 6:off
-
If any of the small CD images in the status bar do not have a green dot, then click on the CD image and choose "Connect to [RAC11g] iso/... on Server". If a window opens showing the CD contents then make sure to close the window.

-
Create two CDROM directories named cdrom and cdrom5.
 Make sure to use these names because many later steps in this handbook will reference them!
[root@collabn1 ~]# cd /mnt
[root@collabn1 mnt]# mkdir cdrom
[root@collabn1 mnt]# mkdir cdrom5
- Add entries to /etc/fstab for all CD's and then mount them. If you are in a class then you will probably have two CD's. If you are not in a class then you will probably have only one. [root@collabn1 ~]# ls /dev/cdrom-* /dev/cdrom-hda /dev/cdrom-hdb [root@collabn1 ~]# gedit /etc/fstab /dev/cdrom-hda /mnt/cdrom iso9660 defaults 0 0 /dev/cdrom-hdb /mnt/cdrom5 iso9660 defaults 0 0 [root@collabn1 mnt]# mount cdrom [root@collabn1 mnt]# mount cdrom5
- Install the additional required RPM's cd /mnt # From Enterprise Linux 5 CDROM 2 rpm -Uvh */*/compat-libstdc++-33* rpm -Uvh */*/libaio-devel-0.* rpm -Uvh */*/unixODBC-2.* rpm -Uvh */*/unixODBC-devel-2.* # From Enterprise Linux 5 CDROM 3 rpm -Uvh */*/sysstat-7.* # Additional required packages which are already installed: # From Enterprise Linux 5 CDROM 1 rpm -Uvh */*/binutils-2.* rpm -Uvh */*/elfutils-libelf-0.* rpm -Uvh */*/glibc-2.*i686* rpm -Uvh */*/glibc-common-2.* rpm -Uvh */*/libaio-0.* rpm -Uvh */*/libgcc-4.* rpm -Uvh */*/libstdc++-4.* rpm -Uvh */*/make-3.* # From Enterprise Linux 5 CDROM 2 rpm -Uvh */*/elfutils-libelf-devel-* rpm -Uvh */*/glibc-headers* rpm -Uvh */*/glibc-devel-2.* rpm -Uvh */*/libgomp* rpm -Uvh */*/gcc-4.* rpm -Uvh */*/gcc-c++-4.* rpm -Uvh */*/libstdc++-devel-4.*
- Eject the cdrom [root@collabn1 mnt]# eject /mnt/cdrom
-
Return to the Summary tab in the VMware console. From the Status box, choose to Install VMware Tools. Click the Install button to begin.

-
Install VMware client tools and run configuration tool.
You must perform this step in the VMware Console; do not use PuTTY or any other terminal program.
[root@collabn1 mnt]# mount /mnt/cdrom
mount: block device /dev/cdrom-hda is write-protected, mounting read-only

[root@collabn1 mnt]# rpm -ivh /mnt/cdrom/VMwareTools-7.7.5-156745.i386.rpm
Preparing...                ########################################### [100%]
   1:VMwareTools            ########################################### [100%]

The installation of VMware Tools 7.7.5 for Linux completed successfully.
You can decide to remove this software from your system at any time by
invoking the following command: "rpm -e VMwareTools".

Before running VMware Tools for the first time, you need to
configure it for your running kernel by invoking the
following command: "/usr/bin/vmware-config-tools.pl".

Enjoy,

    --the VMware team


[root@collabn1 cdrom]# vmware-config-tools.pl
...
Choose NO to skip the VMware FileSystem Sync Driver (vmsync)
Choose display size [12] – 1024x768
Mounting HGFS shares will probably FAIL, but this is ok.

-
Run the network commands. (You can cut and paste the commands into the terminal.) Next, run vmware-toolbox and enable clock synchronization.

-
Logout from your session.

- Unmount the VMware Tools image: umount /mnt/cdrom Using VMware Infrastructure web interface, mount Oracle Enterprise Linux from [RAC11g-iso] data store. Mount it: mount /mnt/cdrom


