Guitar/Structure of the CAGED scale shapes

This page is currently being translated from Germans Wikibooks into English. • Expect some errors and inconsistencies. •Images has to be repainted. The German fingering ZMRK = imrp (Z = Index, K = small Finger = pinKy •Some German words in pictures has to be translated. • Assisted the translator because he is not a native speaker. Feel free to correct mistakes and style. • The Wikitorians among you may help me with the peculiarities of English Wikibooks. (how do you handle things, what are your preferd templates...). •delete {:Guitar/under construction - in translation}if you think the translation is largely error-free and good enough.• Be patient. The translation of the finished German lesson (links in the navigation) will take time. |
Structure of the major and minor scales according to a slightly modified CAGED system
[edit | edit source]Hopefully you have read the previous introduction to the major scales, where the upcoming lessons were already outlined.
This course is about improvising melodically over simple songs set in major and natural minor keys.
Here we want to learn the division of the fingerboard according to the CAGED system, which can be learned quickly, especially for beginners in the subject of 'improvisations in major and minor'. First we break down the major scale into manageable units, then we build each of the five CAGED scales from the individual parts
The 5 CAGED scales
[edit | edit source]We want to learn the following five scales in this course.


We assign the major scales to a barre chord, which is also the basic chord (tonic) of the scale.
The sequence of the chord, pentatonic or major scale shapes of the same name ('shapes') follows a certain order, which can be easily remembered using the mnemonic "CAGED".


The barre chords can be easily derived from the basic chords.


The only important thing for the CAGED system is the position of the fundamental tones in relation to the respective chord or scale.

You already know basic tones from your beginners' lessons. And you should already be familiar with the principle of chord shapes from the bare chords.
The stupid thing about the mnemonic 'CAGED' is that it actually only works problem-free for major chords or major pentatonics. With minor, the mnemonic reaches its limits. And the mnemonic doesn't describe many of the connections that you learned about in the circle of fifths (e.g. when you took the (German) workshop on how to pick out chords ).
So it may not really surprise you that here in the Wikibooks we have alternative names for the obviously missing shapes. If you know barre chords, and if you can do something with the phrase: "grasp the A major like an F barre on the 5th fret!" , you shouldn't have any problems with it.
The names of the scales are derived from the following simple scales in the first frets:


All chords known from the simple keys mentioned above, bass lines and the like can largely be transferred to the corresponding 5 CAGED scales, almost as if the scale had been moved to a higher position using a capo.
The double naming (or the modification of the CAGED system) is explained again in the corresponding lessons, or described as a summary in the chapter (German) Form Systematics.
Orientation on the fretboard
[edit | edit source]To ensure that a scale doesn't just remain a dot image, you first need a landmark. A very good method is the intervals of the major scale.

- You determine the basic chord of the major scale (1).
- Barré chords can help you to find the position of the root notes.
- As soon as you know where the fundamental note is, move the scale on the fingerboard until the (1) is on the fundamental note. Then you can improvise to the piece using the major scale.
- Think of it like this: Draw the fretboard on a piece of paper (landscape format). Put it in a clear sleeve. Draw the circles with the intervals on it using foil fonts. Now you can pull the sheet out until the (1) comes to rest on the required fundamental note. That's how we did it before the time when there wasn't an app for everything.
Later you derive the natural minor scale from the major scale, in which the sixth (6) of the scale becomes the fundamental note. There are also some songs in which the second (2) or fifth (5) becomes the fundamental note. Then you don't play major or minor, but Doric (2) or Mixolydian (5).
You do this in much the same way as a music reader. This first determines the major scale based on the accidentals and then the actual key or mode based on the chords and tones.
How the intervals then behave relative to the new fundamental note (as demonstrated in the introduction to the major patterns for the minor key) does not have to be of interest to you for the time being. We'll take a closer look at the 3-note per-string scales. It can wait until then.
Find the “square”
[edit | edit source]Take a closer look at the major scale. We ignore all colors and numbers here. Notice anything about the scale?

You should actually notice the notes that are a little closer together or that don't have an empty fret between them. Then you should notice that two of the slightly closer intervals are usually exactly on top of each other. To get a general idea of how to memorize the scales, I recommend you look for the “square”.

More precisely, you are looking for the semitone steps in the scale.
- to repeat
A semitone step is the pitch distance from one fret to the next;
and with a whole tone step there is still a fret in between, which is usually not fingered.
So pay attention to the distance between 3 and 4 and the distance between j7 and 1.

The semitone steps for the key of C major can be represented quite clearly on a piano keyboard. You should know the spacing of the semitone steps from the structure of a scale. There is no black key between the notes E and F and between the notes B and C (note that our B is called H in German and some other languages). There is no fret between the notes E/F and B/C on the guitar's fretboard. And the fundamental note C is one of the tones in semitones.
The semitone steps are well arranged on the guitar board as a small "square" (square). You can find this very easily, even if the scale only consists of black dots, or someone has numbered it strangely (or relative to the chord root). Once you have found the "square", you can easily find the root note of the major scale. From your perspective as a guitar player, the "1" is always at the top right of the "square". As soon as the fundamental note (1) is found, the remaining intervals arise automatically. You can orientate yourself very well on the basic tones of the simple major and minor chords.
Now it pays off that you know where the root notes are in the simple chords. You simply have to know these basic tone patterns by heart. But you don't need to know much more to clearly assign a scale to a chord shape .
| Chord shapes (short definition) | ||||||||||||||
|---|---|---|---|---|---|---|---|---|---|---|---|---|---|---|
A chord shape on the guitar is (usually) a barre chord. Its name comes from the easier-to-grip basic chords, almost as if you had placed a capo in the corresponding fret instead of the barre index finger and fingered the simple chord.
|


Three fingerings
[edit | edit source]Two of the following three fingerings can be derived from the “square”.
1st Fingering
[edit | edit source]
The “square” is on the left in this fingering.
| Fingering | Intervals | |
|---|---|---|

|

|

Practice this on all string positions
- Note
- The numbers here indicate the intervals of a major scale. The 7 is a major seventh. Unfortunately the software (Lilypond) cannot generate j7.


- Note!
When switching between the G and B strings, the lower part of the fingering must be moved one fret to the right. (Why? Later!) Everything is back to normal between the B and E strings


The Roman 3 (III) or the Roman 4 (IV) are information for the frets. But which fret you start practicing on is completely up to you. Maybe first practice in a higher position (from the 5th fret) where the distance between the fingers is as comfortable as possible. Later you can practice in lower positions (1-5), where you have to spread your fingers a little more.
Move up and down the individual notes and try to get the fingering into your fingers. No melody, no solo, no improvisation, no rhythm or anything else is required yet.
- For example

In the second step, you can try to always start and end your dubbing with the number 1. Note that you only practice the first fingering on 2 strings. No longer! Only on the second pass does the next pair of strings come on, and then the one after that.

Then you can play around with the intervals. (e.g. skip every 2nd tone...)

The first attempts are not about replaying tablature, but simply about experimenting. We start playing small motifs after the first jingling around.
Exercises
[edit | edit source]The following exercises often contain a series of one or two bar sequences. A sequence is a motif that repeats itself at different pitches.
There are also excerpts from classical pieces, folk songs, children's songs, etc. The simple structure or familiarity of the melodies should make practicing easier. This means you don't have to decipher every single note from the tablature, but your fingers find their position more easily in anticipation of the melody.
One bar sequences
[edit | edit source]
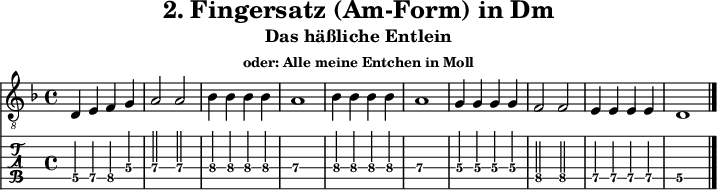
Note that the root note (1) is under the middle finger (i.e. on the second fret of this fingering). When doing your free improvisation in major, it's best to start with (1). You can find the fundamental note C here in the 8th fret on the E string under the middle finger.
A power chord (e.g. C5) or a normal chord at the end is optional (i.e. optional). A chord like this calibrates your ear to the root note of the key you are currently playing. However, you have to think about how you get from the chord back to the fingering. This is sometimes easier, sometimes more difficult. Therefore, a chord is intended for later repetition. At the beginning, the basic note is sufficient as a conclusion.
| Tip:
|
In the C major scale, not only learn the intervals |
|---|


Half-bar sequences
[edit | edit source]
This time you have half-measure sequences that are repeated once. Even without knowledge of music, you can follow the progression and repetitions of the sequences more easily using the sheet music than using the tablature; especially if you listen to the exercise at the same time. The optional power chord at the end stabilizes the fundamental tone again. You can find the fundamental note F in the 8th fret on the A string.

A bird wanted to get married
[edit | edit source]
Here I found a relatively well-known German children's song that fits the 1st fingering perfectly.
The tone durations are difficult for those unfamiliar with notes to read. But if you know the piece or have listened to it several times, it is not an insurmountable difficulty. The root note Bb can be found in the 8th fret on the D string.

Half-bar sequences with changes of position
[edit | edit source]
In the G shape there is a change of position between the G and B strings. You always have to come up with a strategy for when and how best to change positions.
If you're lucky, you'll find a hint in the sheet music showing how you can change the position conveniently. I recommend that you use your middle finger where the 2 is above the notes.
- (1 = index, 2 = middle, 3 = ring, 4 = pinky, 0 = open string)
Consider such advice only as a suggestion, because there is no binding rule as to how the change of position should take place. If you practice the same sequences a few strings higher or lower, it becomes easier. By the way, you can practice every single exercise on all string positions.

warm-up (before singing)
[edit | edit source]
Many people who have ever sung in a choir are familiar with these two motifs. Unfortunately, many songs do not correspond exactly in their range to one of the full three fingerings or the scales that follow later. Most of the time only excerpts from the patterns are needed. In the first motif, for example, the major seventh (j7) before the fundamental is missing.
The second motif contains the major seventh (j7). The second motif calibrates the choir to the key required. Here only chord tones are played in an ascending or descending tone sequence (also called arpeggios). The A7 chord contains both the leading tone (j7), which leads to the root note (1), and the buttress tone (4), which moves towards the major third (3). With the two exciting tones that want to resolve to the basic chord, the choir is placed in the major key. Here I don't need to explain to you where the fundamental note D is.

2nd Fingering
[edit | edit source]
The “square” is on the right in this fingering.
| Fingering | Intervals | |
|---|---|---|

|

|
Practice this on all string positions too.


- Attention!
For the 2nd fingering, the lower fingering must also be moved one fret to the right between the G and B strings. Again, everything is normal between the B and E strings!
For the 2nd fingering, the lower fingering must also be moved one fret to the right between the G and B strings. Again, everything is normal between the B and E strings!


Excursus: Switch between the G and B strings
[edit | edit source]Do you still remember tuning the guitar?

You played almost all the strings at the 5th fret and tuned them as pure fourths. Therefore, all fingerings on the strings tuned in fourths look the same. You just went from the G to the B string on the 4th fret. That's a major third. Accordingly, the intervals between the two strings G and B always have one fewer fret, which means that the intervals on the B string slide one fret further to the right.
| "Normal" intervals between strings tuned at the 5th fret | "Slipped" intervals between the G and B strings | |
 (Ausschnitt) |

|
Here is a little anticipation of a later lesson. We need this “module” to slide from one scale shape to the next one. ..
Rondeau (excerpt)
[edit | edit source]
The one-bar sequence was taken from a Rondeau by JS Bach that you can repeat as desired. You can find the root note C again in the 8th fret on the E string; this time under the pinky.

| Tip:
|
Leave your fingers there for as long as possible. Leave the index finger as the middle finger and little finger follow. If you take the little finger away again, the middle finger is already in place. If you remove the middle finger, the index finger is already in place. |
|---|
| Tip:
|
In the C major scale, not only learn the intervals 1 - 3 4 |
|---|
"The ugly duckling" or "All my ducklings" [1] in minor
[edit | edit source]
The previous exercise was in major, and here we use the same fingering in minor. As you can see and hear, a fingering or a pattern cannot be clearly assigned to a single key. The final note or the final chord (here the note D or the chord Dm) determines the key. The keynote D here is the sixth (6) of the underlying major pattern. It can be easily derived from the tuning tone in the 5th fret of the A string.
If there are two note stems above a number in a tablature, this is a sign of a half note that lasts two beats. Since this looks very unusual for many guitarists, bar lines in the tablature are often omitted. In this case, the duration of the tone can be determined solely from the note values.
The Vltava (main motif)
[edit | edit source]
The sequence of tones (more precisely the intervals) of the following exercise is almost exactly the same as the previous one, just at a different tone level. But with the different rhythm it is very similar to the main motif of the composition "The Vltava" by Bedrich Smetana (without an upbeat and rhythmically simplified).
Even if it only goes up and down the minor scale (as in the 7th exercise), you will hopefully notice how much the beat and rhythm make a difference to the effect. If you later think that your improvisations sound boring, then you should focus more on rhythm. You can also work a little with batting patterns.

Sasha (simplified)
[edit | edit source]
The song "Sascha" is played here on the G and B strings. We have to come up with strategies as to which fingering we use best for changing positions.

The melody is easier to play on the other string positions.
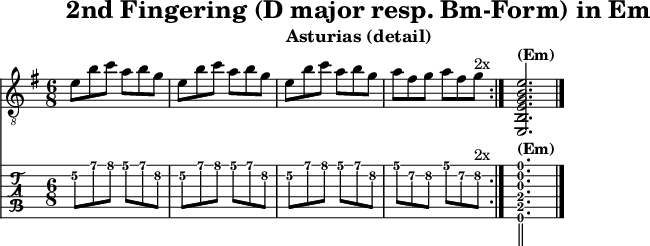
Asturias (detail)
[edit | edit source]
The whole piece of Asturias is a masterpiece. But you might be happy to know that it won't be long before you can at least do a little demonstration of the first few bars of the piece. This is just a preliminary exercise.
1st Fingering comes above the 2nd Fingering
[edit | edit source]The second fingering always follows immediately below the first fingering. (Of course only if there are other strings above this fingering.)
I'll explain later how the scale names come about. Suffice to say, it has something to do with the position of the fundamental note (1).
- F-Form

- Bb-Form

- D-Form

As you can see, the first fingering with the "square" on the right always comes first, and then comes the fingering with the "square" on the left. They are always one above the other.
Burlesque
[edit | edit source]- F-Form

Only between the G and B strings does a position change one fret to the left. Otherwise the three fingerings are the same.
So far you have nothing more to learn than two fingerings, that the first comes before the second, and that there is a change of position between the G and B strings. You must take this change of position into account in all future scales.
- G-Form

- C-Form

Of course, half of the first or second fingering is missing if it doesn't go any further up or down.
As you might already suspect, you already have 5 excerpts from the five scales that we will take a closer look at.
With the 1st and 2nd fingering and the change of position you have already grasped a large part of the CAGED scales.
Later in your repertoire you will only need excerpts from each of the 5 CAGED scales. There are extremely few pieces that have exactly the tone range of a competent CAGED scale or that of one of the 3 fingerings. That's why I don't have attractive exercise examples ready for all scales and scale sections, but I sometimes have to offer you some dry exercises.
Hopefully you already have a vague idea of why it's worth learning the scales in their entirety.
3th Fingering
[edit | edit source]Does not contain a “square”
| Fingering | Intervals | |
|---|---|---|

|

|
This fingering is not an independent fingering at all. The upper part of the 3rd fingering is actually the lower part of the 2nd fingering. Likewise, the lower part of the 3rd fingering is also the beginning of the 1st fingering. What is important about this fingering is the transition between the end of the 2nd fingering through the 5 and 6 to the 1st fingering. During the third fingering there is a change of position to the left. Here it is important to pay particular attention to the position of the fingers.
Especially if you don't just play the scale up and down (which you most likely practice at the beginning), this "5-6 transition" always requires a lot of thought until you know how to place your fingers most skillfully.
Practice fingering on the top string position and one string position lower!
- D-Form

- G-Form

- Note!
If you slide one string position lower with the 3rd fingering, then we have to take into account the change in position between the G and B strings again. We have just learned that the third fingering involves a change of position to the left. The transition between the G and B strings also results in a change of position to the right. So one change in position is canceled out by the other. Fingering is ultimately made easier by eliminating position changes, but at the beginning you have to think a little more about how the individual position changes affect the third fingering.
- C-Form

- F-Form

You always have to take the matter of the change of position during the 3rd fingering and the change of position between the G and B strings into account. This may sound a bit complicated when you first read it, but it reduces the entire structure of the five main major scales to 4 building blocks. The 1st to 3rd fingering and the change in position between the G and B strings. But that's all you need to know about the formal structure.
- Bb-Form

In der Bb-Form geht der 3. Fingersatz natürlich nicht weiter als bis zur E-Saite.
A II-V-I-Progression
[edit | edit source]- D-Form

A simple tone sequence over a 2-5-1 progression. The chord tones are mostly on the heavy beats (on beats!?).
- A, C, E, G belong to Am7
- F#, D, C, A belong to the D7
- B, D, G belong to the G major chord.

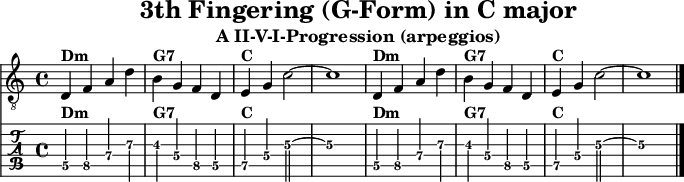
A II-V-I-Progression (arpeggios)
[edit | edit source]- G-Form

Here are simple arpeggios (harp-like chord tones) of a 2-5-1 progression. The basic harmonic structure becomes clearer if you only play the chord tones. Arpeggios (chord breaks) are more demanding exercises because you have to be familiar with the scale in order to find the chord tones. The three fingerings are not as easy to discover in arpeggios as in more melodic exercises. If an exercise is too difficult for you, postpone it until a later repetition.
A Doric melody
[edit | edit source]- C-Form

The transition between the G and B strings cancels out the change in position of the third fingering, which simplifies the fingering. Instead of taking a long and laborious process to determine the intervals of the Dorian scale, we proceed as with the minor scale. With the Dorian scale we simply set the root note to (2) of the major pattern. You should have no problem finding the root note E.

A Mixolydian melody
[edit | edit source]- F-Form

Here too, the two changes in position at the transition between the G and B strings cancel out with the change in position in the third fingering, which simplifies the fingering here too. This key is Mixolydian, because the root note is the fifth (5) of the major pattern, which again shows that the pure fingering says nothing about the mode.

The notes A and D together form a power chord (reversal of D and A). D and A form the frame interval of the D major chord. (D+F#+A). More important than the starting note of a melody is the ending note, and the fact that you perceive the note D or the chord D major as the tonal center.
| Tip:
|
Although the scales are presented in CAGED order, I recommend starting the lessons with the D/Bm and G/Em forms, where the 3rd fingering is complete and the position changes do not cancel each other out . How the position changes of the 3rd fingering cancel each other out with the transition of the G and B strings is best learned in the 2nd step. |
|---|
1 over 2 over 3 over 1...
[edit | edit source]If you were to spin the system further, you would get the following:
- Second fingering
- First fingering
- Third fingering
- Second fingering
- First fingering
- Third fingering
- Second fingering
Of course, there is no 12-string guitar where each string is tuned to fourths, but this is a good exercise that you should do with the help of a piece of paper and a pencil. In principle, you will find all of the major scales of the guitar here (if you only pick 6 neighboring strings).
There's just the catch with the transition between the G and B strings.
The 3 fingerings always follow one another in a specific order.
- 1st fingering is above the 2nd fingering
- the 3rd fingering connects the lower end of the 2nd fingering with the upper end of the first fingering.
- Between the G and B strings, everything shifts one fret to the right.
That's all you need to know for the 5 main scales. 3 fingerings that always meet in a certain order and change positions between G and B.
With this you will now work out one scale shape after the other. You will see that you will soon have the 5 main types in there.
- Final note
And before you ask yourself: In addition to the 5 main forms of the CAGED system, there are a few minor types known as 3-notes-per-string scales and Berkelee scales, and others such as the pentatonic and the blues scales. Scala. But we'll save all of those for later. Don't rush anything! Now it's the turn of the CAGED scales.
Each of the following five CAGED scales actually consists of just the three fingerings learned above!

Summary
[edit | edit source]- As soon as you have found the "square",
- It's very easy to get into the 1st and 2nd fingerings.
- With each of these fingerings, the keynote of the scale (and with a little practice all other intervals as well) can be determined very easily.
- The 1st fingering is above the 2nd fingering.
- The 1st and 2nd fingerings are connected by the 3rd fingering.
- The third fingering usually involves a change of position to the left.
- There is a change of position to the right between the G and H sides.
- The position changes of the 3rd fingering and the position changes of the GH string transition can cancel each other out, making fingering easier.
| Tip:
|
After you have done all the exercises on this page, you can try playing each individual exercise on each string position as a repetition. You can even try learning the note names on the fretboard, as demonstrated in the next lesson. |
|---|
Vorlage:Navigation hoch Template:Navigation zurückhochvor
- ↑ Allusion to a fairy tale by the Brothers Grimm along with a well-known German children's song.