Guitar/CAGED connect scales

From Wikibooks, open books for an open world
Jump to navigation Jump to search

Connect CAGED scales[edit | edit source]

Clipboard

To do:
This lesson was created in a German guitar forum and needs to be proofread, stylistically revised and reformatted. If possible, the ASCII TABS should be replaced by more attractive graphics. Rework animation.


Let's say you're improvising in G major. You picked the first CAGED scale you found with the root note in the 3rd fret on the E string.

G major (E- or F-shape)

\version "2.14.2"

\markup
  \override #'(fret-diagram-details . ( (number-type . roman-upper)
  (finger-code . in-dot) (orientation . landscape))) {
%% s:3 = 3x so groß
%% f:1 zeigt Finger als Kreise 
%% f:2 zeigt Finger neben den Saiten 
%% 6-3-2 Saite-Bund-Finger/Intervall 
%% 4-o zeigt 4. Saite offen

\fret-diagram #"s:3;f:1; 
1-2-7;1-3-1;1-5-2;
      2-3-5;2-5-6;
3-2-2;3-4-3;3-5-4;
4-2-6;4-4-7;4-5-1;
5-2-3;5-3-4;5-5-5;
6-2-7;6-3-1;6-5-2;"
}
\paper{
     indent=0\mm
     line-width=180\mm
     oddFooterMarkup=##f
     oddHeaderMarkup=##f
     bookTitleMarkup = ##f
     scoreTitleMarkup = ##f}

Now let's assume that the singer is currently singing in your pitch and you notice that it clashes with your solo. This is what happens when the singer and guitarist are both at the same pitch.

You decide to leave this tonal spectrum to the singer (good choice!) and try to play your entire improvisation in a higher register so that the singer's voice and your improvisation can be clearly distinguished from each other.

But how do you get to a higher register quite elegantly without having to think for a long time about which chord, which fret, which scale?

From the (E)F to the D shape[edit | edit source]

My tip: orientate yourself again on the semitone steps or the square.


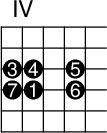
G major 2nd fingering (D shape)

\version "2.14.2"

\markup
  \override #'(fret-diagram-details . ( (number-type . roman-upper)
  (finger-code . in-dot) (orientation . landscape))) {
%% s:3 = 3x so groß
%% f:1 zeigt Finger als Kreise 
%% f:2 zeigt Finger neben den Saiten 
%% 6-3-2 Saite-Bund-Finger/Intervall 
%% 4-o zeigt 4. Saite offen

\fret-diagram #"s:3;f:1; 
3-2-2;3-4-3;3-5-4;
4-2-6;4-4-7;4-5-1;"
}
\paper{
     indent=0\mm
     line-width=180\mm
     oddFooterMarkup=##f
     oddHeaderMarkup=##f
     bookTitleMarkup = ##f
     scoreTitleMarkup = ##f}

Here is a suitable transfer point for you that costs you almost nothing to think about. You don't have to worry about scale shapes and chords because they arise all by themselves.

The Slide module

On one of the two strings (D or G string) you simply slide two frets further.


\version "2.14.2"

\markup
  \override #'(fret-diagram-details . ( (number-type . roman-upper)
  (finger-code . in-dot) (orientation . landscape))) {
%% s:3 = 3x so groß
%% f:1 zeigt Finger als Kreise 
%% f:2 zeigt Finger neben den Saiten 
%% 6-3-2 Saite-Bund-Finger/Intervall 
%% 4-o zeigt 4. Saite offen

\fret-diagram #"s:3;f:1; 
3-2-2;3-4-3;3-5-4;3-7-5;
4-2-6;4-4-7;4-5-1;4-7-6;"
}
\paper{
     indent=0\mm
     line-width=180\mm
     oddFooterMarkup=##f
     oddHeaderMarkup=##f
     bookTitleMarkup = ##f
     scoreTitleMarkup = ##f}

How you do this is completely up to you. You can slide two frets further with your index finger

E -|---|---|---|---|---|---|---|---|---|-
H -|---|---|---|---|---|---|---|---|---|-
G -|---|-i-|==>|-i-|-m-|---|-p-|---|---|-
D -|---|-i-|==>|-i-|<m>|---|-p-|---|---|-
A -|---|---|---|---|---|---|---|---|---|-
E -|---|---|---|---|---|---|---|---|---|-

or slide your little finger further

E -|---|---|---|---|---|---|---|---|---|-
H -|---|---|---|---|---|---|---|---|---|-
G -|---|-i-|---|-m-|-p-|==>|-p-|---|---|-
D -|---|-i-|---|-m-|<p>|==>|-p-|---|---|-
A -|---|---|---|---|---|---|---|---|---|-
E -|---|---|---|---|---|---|---|---|---|-

and just drag the other fingers along.

'p' means here pinky and not (span.) pulgar (thumb) like the classical fingering for plugging. Better would be maybe 'q' for meñique. However, you can't please everyone.
G major (1st fingering on the 4th fret)

\version "2.14.2"

\markup
  \override #'(fret-diagram-details . ( (number-type . roman-upper)
  (finger-code . in-dot) (orientation . landscape))) {
%% s:3 = 3x so groß
%% f:1 zeigt Finger als Kreise 
%% f:2 zeigt Finger neben den Saiten 
%% 6-3-2 Saite-Bund-Finger/Intervall 
%% 4-o zeigt 4. Saite offen

\fret-diagram #"s:3;f:1; 
3-4-3;3-5-4;3-7-5;
4-4-7;4-5-1;4-7-6;"
}
\paper{
     indent=0\mm
     line-width=180\mm
     oddFooterMarkup=##f
     oddHeaderMarkup=##f
     bookTitleMarkup = ##f
     scoreTitleMarkup = ##f}

It doesn't really matter which string you slide on. It is clear that you ended up in the first fingering. Strum around a bit in the first fingering to get some orientation.

The second fingering must now follow downwards. Note the change in position between the G and B strings. For now you don't need to worry about what scale you're actually in, just strum around and only have the three fingerings and the change of position in mind.

G major (D-shape section)

\version "2.14.2"

\markup
  \override #'(fret-diagram-details . ( (number-type . roman-upper)
  (finger-code . in-dot) (orientation . landscape))) {
%% s:3 = 3x so groß
%% f:1 zeigt Finger als Kreise 
%% f:2 zeigt Finger neben den Saiten 
%% 6-3-2 Saite-Bund-Finger/Intervall 
%% 4-o zeigt 4. Saite offen

\fret-diagram #"s:3;f:1; 
1-5-6;1-7-7;1-8-1;
2-5-6;2-7-7;2-8-1;
3-4-3;3-5-4;3-7-5;
4-4-7;4-5-1;4-7-2;"
}
\paper{
     indent=0\mm
     line-width=180\mm
     oddFooterMarkup=##f
     oddHeaderMarkup=##f
     bookTitleMarkup = ##f
     scoreTitleMarkup = ##f}

By now you just know that it is the D major shape. After some practice, you will recognize the typical shapes straight away. There are only 5 CAGED scales.

Complete the scale with the 3rd fingering.

G major (D-shape)

\version "2.14.2"

\markup
  \override #'(fret-diagram-details . ( (number-type . roman-upper)
  (finger-code . in-dot) (orientation . landscape))) {
%% s:3 = 3x so groß
%% f:1 zeigt Finger als Kreise 
%% f:2 zeigt Finger neben den Saiten 
%% 6-3-2 Saite-Bund-Finger/Intervall 
%% 4-o zeigt 4. Saite offen

\fret-diagram #"s:3;f:1; 
1-5-2;1-7-3;1-8-4;
2-5-6;2-7-7;2-8-1;
3-4-3;3-5-4;3-7-5;
4-4-7;4-5-1;4-7-2;
5-5-5;5-7-6;
6-5-2;6-7-3;6-8-4;
"
}
\paper{
     indent=0\mm
     line-width=180\mm
     oddFooterMarkup=##f
     oddHeaderMarkup=##f
     bookTitleMarkup = ##f
     scoreTitleMarkup = ##f}

This makes it quite easy to slide from one scale to the other. Here it was from (E)F form to D form.

From the D to the C shape[edit | edit source]

Let's say it's still too low, or you want to take your improvisation up a notch and play even higher.

Where is the best point to slide now?

G major (2nd fingering below)

\version "2.14.2"

\markup
  \override #'(fret-diagram-details . ( (number-type . roman-upper)
  (finger-code . in-dot) (orientation . landscape))) {
%% s:3 = 3x so groß
%% f:1 zeigt Finger als Kreise 
%% f:2 zeigt Finger neben den Saiten 
%% 6-3-2 Saite-Bund-Finger/Intervall 
%% 4-o zeigt 4. Saite offen

\fret-diagram #"s:3;f:1; 
1-5-2;1-7-3;1-8-4;
2-5-6;2-7-7;2-8-1;
"
}
\paper{
     indent=0\mm
     line-width=180\mm
     oddFooterMarkup=##f
     oddHeaderMarkup=##f
     bookTitleMarkup = ##f
     scoreTitleMarkup = ##f}

Of course where the next square is on the right. Here you slide again exactly as described above

G-DUR (slide module below)

\version "2.14.2"

\markup
  \override #'(fret-diagram-details . ( (number-type . roman-upper)
  (finger-code . in-dot) (orientation . landscape))) {
%% s:3 = 3x so groß
%% f:1 zeigt Finger als Kreise 
%% f:2 zeigt Finger neben den Saiten 
%% 6-3-2 Saite-Bund-Finger/Intervall 
%% 4-o zeigt 4. Saite offen

\fret-diagram #"s:3;f:1; 
1-5-2;1-7-3;1-8-4;1-10-5;
2-5-6;2-7-7;2-8-1;2-10-2;
"
}
\paper{
     indent=0\mm
     line-width=180\mm
     oddFooterMarkup=##f
     oddHeaderMarkup=##f
     bookTitleMarkup = ##f
     scoreTitleMarkup = ##f}

Jingle around in the first fingering again for a while and think about how you have to continue upwards.

G major (2nd fingering below)

\version "2.14.2"

\markup
  \override #'(fret-diagram-details . ( (number-type . roman-upper)
  (finger-code . in-dot) (orientation . landscape))) {
%% s:3 = 3x so groß
%% f:1 zeigt Finger als Kreise 
%% f:2 zeigt Finger neben den Saiten 
%% 6-3-2 Saite-Bund-Finger/Intervall 
%% 4-o zeigt 4. Saite offen

\fret-diagram #"s:3;f:1; 
1-7-3;1-8-4;1-10-5;
2-7-7;2-8-1;2-10-2;
"
}
\paper{
     indent=0\mm
     line-width=180\mm
     oddFooterMarkup=##f
     oddHeaderMarkup=##f
     bookTitleMarkup = ##f
     scoreTitleMarkup = ##f}

Above the first fingering comes the third fingering, but there is still the change of position between the G and B strings.

G major (C-shape section)

\version "2.14.2"

\markup
  \override #'(fret-diagram-details . ( (number-type . roman-upper)
  (finger-code . in-dot) (orientation . landscape))) {
%% s:3 = 3x so groß
%% f:1 zeigt Finger als Kreise 
%% f:2 zeigt Finger neben den Saiten 
%% 6-3-2 Saite-Bund-Finger/Intervall 
%% 4-o zeigt 4. Saite offen

\fret-diagram #"s:3;f:1; 
1-7-3;1-8-4;1-10-5;
2-7-7;2-8-1;2-10-2;
3-7-5;3-9-6;
"
}
\paper{
     indent=0\mm
     line-width=180\mm
     oddFooterMarkup=##f
     oddHeaderMarkup=##f
     bookTitleMarkup = ##f
     scoreTitleMarkup = ##f}

At this point at the latest you will notice that you are in the C-shape scale. Once you've done the preliminary exercises, you'll be reminded of the lower half of the C major scale. (see: German )

In the C major form there is no change of position because this is canceled out between the G and B strings with the third fingering. So simply add the second fingering upwards and the first fingering above.

G major (C shape)

\version "2.14.2"

\markup
  \override #'(fret-diagram-details . ( (number-type . roman-upper)
  (finger-code . in-dot) (orientation . landscape))) {
%% s:3 = 3x so groß
%% f:1 zeigt Finger als Kreise 
%% f:2 zeigt Finger neben den Saiten 
%% 6-3-2 Saite-Bund-Finger/Intervall 
%% 4-o zeigt 4. Saite offen

\fret-diagram #"s:3;f:1; 
1-7-3;1-8-4;1-10-5;
2-7-7;2-8-1;2-10-2;
3-7-5;3-9-6;
4-7-2;4-9-3;4-10-4;
5-7-6;5-9-7;5-10-1;
6-7-3;6-8-4;6-10-6;
"
}
\paper{
     indent=0\mm
     line-width=180\mm
     oddFooterMarkup=##f
     oddHeaderMarkup=##f
     bookTitleMarkup = ##f
     scoreTitleMarkup = ##f}

From the C to the (A) Bb shape[edit | edit source]

Now you want to move one more layer from the C shape.

Climb up the bass strings to the next square.

G major (slide module 7th fret)

\version "2.14.2"

\markup
  \override #'(fret-diagram-details . ( (number-type . roman-upper)
  (finger-code . in-dot) (orientation . landscape))) {
%% s:3 = 3x so groß
%% f:1 zeigt Finger als Kreise 
%% f:2 zeigt Finger neben den Saiten 
%% 6-3-2 Saite-Bund-Finger/Intervall 
%% 4-o zeigt 4. Saite offen

\fret-diagram #"s:3;f:1; 
4-7-2;4-9-3;4-10-4;4-12-5;
5-7-6;5-9-7;5-10-1;5-12-2;

"
}
\paper{
     indent=0\mm
     line-width=180\mm
     oddFooterMarkup=##f
     oddHeaderMarkup=##f
     bookTitleMarkup = ##f
     scoreTitleMarkup = ##f}

And here the same game starts again.

From now on it will be quite tight for your fingers. If the frets are no longer accessible for you (especially for classical or acoustic guitar players), simply move back to the fretboard and practice the further changes in a different key. How about we continue with C major?

C major (1st fingering A or Bb shape)

\version "2.14.2"

\markup
  \override #'(fret-diagram-details . ( (number-type . roman-upper)
  (finger-code . in-dot) (orientation . landscape))) {
%% s:3 = 3x so groß
%% f:1 zeigt Finger als Kreise 
%% f:2 zeigt Finger neben den Saiten 
%% 6-3-2 Saite-Bund-Finger/Intervall 
%% 4-o zeigt 4. Saite offen

\fret-diagram #"s:3;f:1; 
4-2-3;4-3-4;4-5-5;
5-2-7;5-3-1;5-5-2;
"
}
\paper{
     indent=0\mm
     line-width=180\mm
     oddFooterMarkup=##f
     oddHeaderMarkup=##f
     bookTitleMarkup = ##f
     scoreTitleMarkup = ##f}

We continue downwards with the second fingering. However, there is also the change in position between the G and B strings.

C major (A- or Bb-shape excerpt)

\version "2.14.2"

\markup
  \override #'(fret-diagram-details . ( (number-type . roman-upper)
  (finger-code . in-dot) (orientation . landscape))) {
%% s:3 = 3x so groß
%% f:1 zeigt Finger als Kreise 
%% f:2 zeigt Finger neben den Saiten 
%% 6-3-2 Saite-Bund-Finger/Intervall 
%% 4-o zeigt 4. Saite offen

\fret-diagram #"s:3;f:1; 
2-3-2;2-5-3;2-6-4;
3-2-6;3-4-7;3-5-1;
4-2-3;4-3-4;4-5-5;
5-2-7;5-3-1;5-5-2;
"
}
\paper{
     indent=0\mm
     line-width=180\mm
     oddFooterMarkup=##f
     oddHeaderMarkup=##f
     bookTitleMarkup = ##f
     scoreTitleMarkup = ##f}

First, jingle around with this second fingering for a while and memorize the change in position of the A- or Bb-shape, because it inevitably also occurs in the next higher position.

If necessary, you can complete the scale yourself.

From the (A-)Bb- to the G-shape[edit | edit source]

But let's not stay here for long, just move on to the next slide point.

The slide module between the G and B strings

Despite the change in position, the slide works exactly as you did before. Nothing changes in the fingering on the corresponding string where you want to slide.

C major (1st fingering G shape)

\version "2.14.2"

\markup
  \override #'(fret-diagram-details . ( (number-type . roman-upper)
  (finger-code . in-dot) (orientation . landscape))) {
%% s:3 = 3x so groß
%% f:1 zeigt Finger als Kreise 
%% f:2 zeigt Finger neben den Saiten 
%% 6-3-2 Saite-Bund-Finger/Intervall 
%% 4-o zeigt 4. Saite offen

\fret-diagram #"s:3;f:1; 
2-5-3;2-6-4;2-8-5;
3-4-7;3-5-1;3-7-2;
"
}
\paper{
     indent=0\mm
     line-width=180\mm
     oddFooterMarkup=##f
     oddHeaderMarkup=##f
     bookTitleMarkup = ##f
     scoreTitleMarkup = ##f}

It's just a good thing that we've already had the change of position behind us. This makes it easier to fill the scale downwards with part of the second fingering.

C major (G-shape section)

\version "2.14.2"

\markup
  \override #'(fret-diagram-details . ( (number-type . roman-upper)
  (finger-code . in-dot) (orientation . landscape))) {
%% s:3 = 3x so groß
%% f:1 zeigt Finger als Kreise 
%% f:2 zeigt Finger neben den Saiten 
%% 6-3-2 Saite-Bund-Finger/Intervall 
%% 4-o zeigt 4. Saite offen

\fret-diagram #"s:3;f:1; 
1-5-6;1-7-7;1-8-1;
2-5-3;2-6-4;2-8-5;
3-4-7;3-5-1;3-7-2;
"
}
\paper{
     indent=0\mm
     line-width=180\mm
     oddFooterMarkup=##f
     oddHeaderMarkup=##f
     bookTitleMarkup = ##f
     scoreTitleMarkup = ##f}

The 3rd fingering follows upwards, which leads into the 2nd fingering on the E string.

C major (G-shape)

\version "2.14.2"

\markup
  \override #'(fret-diagram-details . ( (number-type . roman-upper)
  (finger-code . in-dot) (orientation . landscape))) {
%% s:3 = 3x so groß
%% f:1 zeigt Finger als Kreise 
%% f:2 zeigt Finger neben den Saiten 
%% 6-3-2 Saite-Bund-Finger/Intervall 
%% 4-o zeigt 4. Saite offen

\fret-diagram #"s:3;f:1; 
1-5-6;1-7-7;1-8-1;
2-5-3;2-6-4;2-8-5;
3-4-7;3-5-1;3-7-2;
4-5-5;4-7-6;
5-5-2;5-7-3;5-8-4;
6-5-6;6-7-7;6-8-1;
"
}
\paper{
     indent=0\mm
     line-width=180\mm
     oddFooterMarkup=##f
     oddHeaderMarkup=##f
     bookTitleMarkup = ##f
     scoreTitleMarkup = ##f}

From the G to the (E-) F-shape[edit | edit source]

To get to the next slide point, you have to move all the way up to the bass strings.

C major 2nd fingering (G-shape)

\version "2.14.2"

\markup
  \override #'(fret-diagram-details . ( (number-type . roman-upper)
  (finger-code . in-dot) (orientation . landscape))) {
%% s:3 = 3x so groß
%% f:1 zeigt Finger als Kreise 
%% f:2 zeigt Finger neben den Saiten 
%% 6-3-2 Saite-Bund-Finger/Intervall 
%% 4-o zeigt 4. Saite offen

\fret-diagram #"s:3;f:1; 
5-5-2;5-7-3;5-8-4;
6-5-6;6-7-7;6-8-1;
"
}
\paper{
     indent=0\mm
     line-width=180\mm
     oddFooterMarkup=##f
     oddHeaderMarkup=##f
     bookTitleMarkup = ##f
     scoreTitleMarkup = ##f}

Now slide in the bass strings.

C major slide module above

\version "2.14.2"

\markup
  \override #'(fret-diagram-details . ( (number-type . roman-upper)
  (finger-code . in-dot) (orientation . landscape))) {
%% s:3 = 3x so groß
%% f:1 zeigt Finger als Kreise 
%% f:2 zeigt Finger neben den Saiten 
%% 6-3-2 Saite-Bund-Finger/Intervall 
%% 4-o zeigt 4. Saite offen

\fret-diagram #"s:3;f:1; 
5-5-2;5-7-3;5-8-4;5-10-5;
6-5-6;6-7-7;6-8-1;6-10-2;
"
}
\paper{
     indent=0\mm
     line-width=180\mm
     oddFooterMarkup=##f
     oddHeaderMarkup=##f
     bookTitleMarkup = ##f
     scoreTitleMarkup = ##f}

You can now simply fill it up further down

C major 1st fingering (F-shape)

\version "2.14.2"

\markup
  \override #'(fret-diagram-details . ( (number-type . roman-upper)
  (finger-code . in-dot) (orientation . landscape))) {
%% s:3 = 3x so groß
%% f:1 zeigt Finger als Kreise 
%% f:2 zeigt Finger neben den Saiten 
%% 6-3-2 Saite-Bund-Finger/Intervall 
%% 4-o zeigt 4. Saite offen

\fret-diagram #"s:3;f:1; 
5-7-3;5-8-4;5-10-5;
6-7-7;6-8-1;6-10-2;
"
}
\paper{
     indent=0\mm
     line-width=180\mm
     oddFooterMarkup=##f
     oddHeaderMarkup=##f
     bookTitleMarkup = ##f
     scoreTitleMarkup = ##f}

This closes the circle.

C major (F-shape)

\version "2.14.2"

\markup
  \override #'(fret-diagram-details . ( (number-type . roman-upper)
  (finger-code . in-dot) (orientation . landscape))) {
%% s:3 = 3x so groß
%% f:1 zeigt Finger als Kreise 
%% f:2 zeigt Finger neben den Saiten 
%% 6-3-2 Saite-Bund-Finger/Intervall 
%% 4-o zeigt 4. Saite offen

\fret-diagram #"s:3;f:1; 
1-7-7;1-8-1;1-10-2;
2-8-5;2-10-6;
3-7-2;3-9-3;3-10-4;
4-7-6;4-9-7;4-10-1;
5-7-3;5-8-4;5-10-5;
6-7-7;6-8-1;6-10-2;
"
}
\paper{
     indent=0\mm
     line-width=180\mm
     oddFooterMarkup=##f
     oddHeaderMarkup=##f
     bookTitleMarkup = ##f
     scoreTitleMarkup = ##f}

Exercise[edit | edit source]

There are certainly countless other ways to switch from one position to the other. You will probably use (barre) chords as a guide. But there is hardly a simpler method that works equally well with all five CAGED scales, allowing you to slide from one scale to the next and conquer the entire fretboard of the guitar.

You don't need to pay attention to much more than the three fingerings, the transition between the G and B strings, and the slide at the semitone steps.

Example[edit | edit source]

Find a fairly long song that stays in one key, and you'll see how much fun it is to wander back and forth across the entire fretboard during the song.

G G Am _ G G Am _ F F G _ G G Am The key is A minor.
Reminder

You'll definitely be able to easily figure out how to slide back from one scale to the other.

Have fun trying.


Template:Navigation up Template:Navigation zurückhochvor