Blender 3D: Noob to Pro/Intro to Bezier Curves/Original
Bezier curves
[edit | edit source]You wanted curved lines? Well here is how to get them, using Bezier curves.
- First start a new Blender project, and delete the default cube.
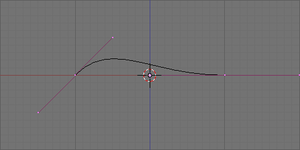
It should look like this. - Press: 'SPACE - Add - Curve - Bezier Curve' to create a new curve.

As you can see, there is a black, curvy curve on your screen, inside what looks like a normal mesh (purple). Well you wouldn't be far wrong with that interpretation, because that is effectively what a Bezier curve is!
- Try selecting the vertices and moving them as we have done previously. You should notice they behave much like a normal mesh does, but with a few important differences. Firstly, there are two types of point here, a 'control' point, and a 'handle' point. The control points define where each section of the curve has to start and finish, while the two pink handles help guide the curve between them.
By now you should have discovered you can drag the points around using the GKEY, and that the handles are fixed in position relative to their control point. This is not the only maneuvre however, so here is a list of things you can do to the curve to modify it:
- Grabbing: You can drag the points around separately or in groups.
- Rotating: Using the RKEY, you can rotate a control point around with your mouse. This is different from a mesh, as rotating the control point will move its handles too.
- Scaling: Using the SKEY, you can scale either an individual handle, or a whole control point at once. This changes how strongly a handle influences the curve's shape, not its direction.
Whatever you do to the defining points, Blender calculates the curve so it flows smoothly from one end to the other. When you leave Edit mode, only the black curve will remain visible, so don't worry about your control points getting cluttered!
Extending your curve
[edit | edit source]So far your curve has only two control points, but in order to build up more complex shapes you will need to add many more! There are quite a few ways to do this, but lets start with the basics:
- Extruding: Much like a mesh, you can use EKEY to extrude one end of your curve with a new control point. Select an end control point (not a handle, this will cause you a few problems) and press EKEY, then LMB when it is in the correct location. The new point will have an exact copy of the handles of your old point, so you will have to rotate and adjust it accordingly.
- Note you can use CTRL+LMB to achieve the same effect.
- Subdividing: Instead of adding onto the end of you curve, you can also split up sections of it into more control points, and here's how:
- Select two adjacent control points using RMB.
- Press the WKEY, and select Subdivide from the popup menu.
- The segment should now have a new control point mid-way between the first two, that sits exactly on the curve that already existed. Now you can add more shape to this section using the new point.
Filling your curve
[edit | edit source]So far we have been working with a continuous curve, with a definite beginning and end. But what you can do is turn this wiggly line into a wiggly shape.
- Select any part of the curve in Edit mode, and press the CKEY. This will connect your last control point back to the first, and fill in the shape.
- If you cannot see any fill, you are probably in wire-frame mode. Press the ZKEY to recover.
- If you have weird results, say fill leaking out from the curve or empty sections, you have probably got a couple of parts of the curve crossing themselves. Curve sections should never cross if you are making them into a filled shape!
Handle types
[edit | edit source]Thus far with curves, whenever you move a handle around its partner will move too to make the curve flow smoothly through the control point. This is not the only way to do things however, so here is a list of the different things you can set them to do:
- Linked rotation (Pink handles): Both handles always point in opposite directions. This leads to a smooth curve.
- Free rotation (Black handles): The handles can be moved independently of each other, you can form corners and sharp bends in the curve. Switch between these two modes using HKEY.
- Automatic (Yellow handles): The handles are linked in rotation, and automatically rotate and scale to form the nicest (mathematically speaking) smooth curve through your points. Use SHIFT+HKEY to switch to this mode. If you try to move a handle, both will default back to Linked rotation.
- Vector (Green handles): The handles act as vectors, with each pointing directly towards the next control point. This leads to completely straight edges, so you can construct polygons. The hotkey is VKEY. If you move a vector handle, it will default to Free rotation, but the other will stay as a vector.
- Note, each handle from a control point can be assigned a separate type independently (excluding Auto). Just select only the handle vertex instead of the control vertex.
Combining curves
[edit | edit source]As well as having one single filling curve in your object, you can combine several unconnected curves to create more complex shapes.
- Firstly create a filled shape, as described earlier.
- Now, stay in Edit mode and 'SPACE - Add - Curve - Bezier Curve' to create a new curve on top of your existing one.
- Manipulate the new curve so it fits inside the larger shape somehow, this will not work if the lines intersect.
- Making sure only the new curve is selected, fill it with CKEY.
You should see that the space enclosed by the inner curve is no longer filled. You can continue by adding more curves inside a larger one, or even a larger one around them all.
Extruding
[edit | edit source]You may have noticed you can only modify the curve in two dimensions, and now its time to explore the third dimension! Extruding is where you define a two dimensional 'profile' shape, and it is 'swept' through space to create a volume.
Simple Extrude
[edit | edit source]If you want to make your curve 3d, the fastest way is to use the extrude slider. This simply extends your curve backwards by the specified distance to make a 3d object.
- Make a curve and fill it: Use the steps above to create something simple, and fill it in using CKEY.

- Set the extrude depth: Find the 'Curves and Surfaces' box in the Editing tab of the Buttons window. There is a slider on the right hand side called Extrude. Set the Extrude depth to something other than 0, and probably less than 1.


Behold, your 2d curve has transformed into a neat 3d structure. The great thing is, you can still edit the curve as if it were just 2d, and the changes will update in real time.
Bevel
[edit | edit source]Now you have an extruded shape, you should start playing around with some of the other curve settings on offer, so here is a description of how the Bevel depth and Bevel resolution sliders work.
Try setting the Bevel depth to a small value, say 0.02. This will cut off all of the sharp edges, and give a bevelled effect all around the shape.

As you may guess, Bevel resolution decides how many times the algorithm divides up an edge. Higher values than 0 result in smooth curves rather than sharp edges, but dramatically increase the number of vertices in the shape.
Try setting the resolution to 3 or 4, you should see an effect like this:

Bevel Objects
[edit | edit source][Noob: I couldn't understand what this topic was supposed to do. Could someone explain better and include images? Thanks...][2ND NOOB: I couldn't understand this either. Heck, I don't even have a typable feild in 'Curve and Surface'... Help on this section would be extremely useful...]
This technique allows for much more sophisticated extending of our curves into 3d. Basically, we can create a new curve which will be extruded all the way around our main shape.
- Create a curve: Once again, make a filled shape like our friend the smiley.
- Create a bevel object: Add a new curve and return to Edit mode, leaving it as the default shape.
- Assign the bevel to the curve: Type the name of the second curve (Default is Curve.001, or just Curve if you used a circle before) into the relevant box in the 'Curve and Surface' menu.
DON'T PANIC if you end up with a useless mess! This is expected, as we have yet to understand how the bevel object works.
Basically, the curve we created as a Bevel object is used to define the shape of the edge around our filled shape.
- The height of each part of the Bevel object above or below the local X axis is how far in front or behind the filled shape to extrude from the flat curve.
- The distance to the left or right on the local Y axis is how far towards or away from the center of the shape to pull each bit of the curve.
For our purposes, we want very little variation in the width of the bevel. This will hopefully solve the problem of all sorts of bits of the shape overlapping each other.
The default curve also starts and stops on the x-axis, we want to move the start and end points so one is higher than the other. (Preferably either side of the x-axis too, we don't want the extruded shape too far away from its curve).
Assuming you have kept the default new curve for your bevel object:
- Move the left-most point down a whole large grid-square, and right until it is two or three small squares from the main axes.
- Move the other point up a whole grid square, and left until it is roughly on the blue center-line.
- Modify the control handles if you feel it's necessary.
This should leave your shape looking nice and neat, extruded quite a long way with a smooth curving edge. Experiment with the shape, see what works and what doesn't!
- NB: The sliders for Extrude, Bevel depth and Bevel resolution are not used once a bevel object is in place.
(To come: Closed shape Bevel Objects)
Front and Back
[edit | edit source]When we have used the CKEY to connect the two ends of a curve together, as expected it also fills the curve with a solid shape. Now we are in 3d, however, we will sometimes want only the sides of the shape, not the filled faces on either side. Note that this only works on extruded shapes, flat curves don't really have a front or back do they?
- Create a filled, extruded shape: Follow the process above, for speed just use an extrude depth.
- Disable Front and Back: Click both 'Front' and 'Back' in the 'Curve and Surface' menu to disable them.
Now you should be able to see right through the curve! Cool isn't it.
- NB: You can disable just one of the faces and leave the other intact if you like.