VirtualBox/Setting up a Virtual Machine/Windows
Jump to navigation
Jump to search

Remarks[edit | edit source]
- Please check the images. They are not perfectly aligned!
- As Windows is not open-source, no screenshots of Windows are present here to prevent any kind of copyright infringement.
Create Installation Media[edit | edit source]
Using Media Creation Tool (for Windows 10 VM)[edit | edit source]
- Download the Media Creation Tool from the Microsoft Official Website.
- Run the Media Creation Tool.
- Select the Installation Media Type. Choose "Create a bootable disk image".
- Choose file destination.
- Wait for a while. The download size is typically around 4.7 GB. When the creation of installation media completes, you will be redirected to the file destination. You should see a .iso file in that folder.
For other versions of Windows[edit | edit source]
- Download the Windows disk image from a trustworthy source. If you are not using a Windows host machine, the download link for the Media Creation Tool will be replaced by the direct download link of the official .iso file.
- Compare the checksum (if available) to verify the integrity of the disk image file.
Install in VirtualBox[edit | edit source]
- Open VirtualBox

- Press "New" Button on the Left Upper Corner

- You will see the screen on the right. Enter a suitable name for the Virtual Machine. Also, Choose "Windows" for "Type" and your downloaded version for "Version".
- For Memory, choose a suitable value (usually more than 2048 MB).
- As shown on the right, choose "create a virtual hard disk".

- Select "VDI"
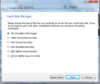
- Select "Dynamically Allocated".
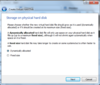
- Select the name and a suitable size (at most 50GB, this is the maximum size of virtual machine)for the virtual storage.Also, create a file location.
- After that, a virtual machine will be created. However, do not boot.

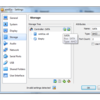
- Go to "Storage" Section.

- Add a SATA Controller.
- Choose Add Optical Hard Drive.
- Choose the .iso file created above.
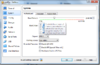
- Go to "System" Section.
- Set the Boot Order to: Optical Hard Drive, Hard Disk
- Go to "Network" Section.
- Tick the "Enable Netork Adapter Checkbox" and the "Cable Connected" checkbox. (The latter checkbox is in the Advanced Section).
- Quit Settings and Boot by clicking "Start".
- You will see a installation screen. Click "Install Now".
- Then enter the product key in the spaces provided. Otherwise, click "I don't have a product key". This enables you to have limited functions.
- Accept End User License agreement.
- Wait for Installation.
- After installation completes, shut down machine and go to Settings.
- Go to "Systems" Section and revert boot order.
- Click "Processor" tab and set the number of CPUs.
- Go to "Display" Section and set the video memory to maximum value.


Great! You have finished the setup. Explore as much as you want.
Resize[edit | edit source]
Here is the DOS command for six gigs (the size must be in megabytes):
"C:\Program Files\Oracle\VirtualBox\VBoxManage" modifyhd "MyVMPath.vdi" --resize 6000
NB: you may need to resize the internal VM partition after, for example to enlarge "/" in Linux :
- boot with gparted
- move the other partitions at the disk end
- then resize /
FAQ[edit | edit source]
The Windows installation page doesn't allow me to skip product key entry. How to skip this?[edit | edit source]
If this is the case, it would be quite complicated.
- First, you will need to mount the iso file by your own means: Windows does not have built-in function to unpack iOS files. But there is a software called Virtual CD-ROM Control Panel. If you are using OS X, mount it by "Disk Utility".
- Open the .iso file and search for a file called "ei.cfg".
- If this file exists, open with Notepad/TextEdit. Otherwise, create a CFG file. (Save it as "All Files" and type "ei.cfg" for name.
- Type the following (type all content as is if bracketed in [], write by instructions if bracketed in {}):
   [Edition ID]
   {Edition you desire (e.g. Home/Professional)}
   [Channel]
   {OEM/Retail}
   [VL]
   {0/1}
- For any other problems, see this Microsoft page
- Save this file and you should see the "Skip for now" option.