Blender 3D: Noob to Pro/Advanced Tutorials/Advanced Animation/Guided tour/Mesh/Amodif
|
|
Applicable Blender version: 2.4x. |
How to tell Blender: "use this armature to deform this mesh"
The Armature Modifier
[edit | edit source]Blender now has a Modifier stack (Editbutton, F9KEY). As such, we should use it over existing methods to pair mesh and armature, as the modifier stack is optimised and simple to use. Note: You don't need to parent the mesh to the Armature anymore. The only case you could need to do this would be animating the Armature object itself. Then the mesh should also follow the armature. In this case select mesh, then armature, and do CTRL-PKEY --> Object.
The clean way to do so is to go in the Editbutton window (F9KEY) and press "Add modifier" in the Modifier panel, then select "armature" in the dropdown menu. Then you'll get a new modifier "Armature" like the previous picture. Change the OB: field to the name of the armature object that should control the mesh. This step is very important! Without the armature object being defined, Blender won't know how to modify the mesh since there may be multiple armatures within your world. To limit the effect of the modifier, you can enter the name of a vertex group in the VGroup: field. This will minimize unwanted distortions in very dense meshes. There are also fields to enable/disable the modifier when rendering, enable/disable when working to only move the armature (could get handy with massive character), and when editing (that's very handy, you can edit the topology while it's deformed). There are also two toggles to tell Blender what it should use to deform: Vertex Groups and/or Envelopes. You may have noticed these options are repeated also in the Editbutton --> Armature panel, but as the tooltip says: these two are used when you use virtual modifier (the old way) to keep compatibility with old files.
Parenting the mesh to the "armature" will create an old-way link, still visible in the modifier stack, but not very useful. The first entry with the "make real" button is what appends if you do a CTRL-PKEY to "armature". You should not use that kind of connection when you see that. Press "make real" to get a working modifier.
The Old Way
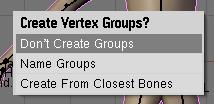
[edit | edit source]This way is not recommended but can still be useful. When doing CTRL-PKEY to "armature", you will get a menu like this:
- Don't Create Groups will just create a virtual modifier so you can deform the mesh (the "make real" button)
- Name Groups is almost useless now as blender will create a group for you when you do weight painting.
- Create From Closest Bones is a function to remember when you want to bake all your envelopes to vertex groups.
Tip: Bake envelope to vertex groups
[edit | edit source]The workflow is very simple. When you are done with the envelope's tweaking and you have gotten the best out of it, delete the Armature modifier and parent the mesh to the armature. To parent it, go to object mode, first select the mesh and then the armature, then press CTRL-PKEY. Select Create From Closest Bones.
Do ALT-PKEY and redo the Armature modifier. Now all the envelope influence are converted to Vertex Groups. This way you can further tweak influence zone using Weight paint. More info in the following pages.


