RAC Attack - Oracle Cluster Database at Home/Create DB
Jump to navigation
Jump to search

- ASM Databases Only: Login to a terminal as the oracle user. Use the oenv macro to set your environment for the SID +ASM1. Then, type asmca to launch ASMCA. collabn1:/home/oracle[RAC1]$ oenv SIDs here are: grid +ASM1 ORACLE_SID = [RAC1] ? +ASM1 The Oracle base for ORACLE_HOME=/u01/grid/oracle/product/11.2.0/grid_1 is /u01/app/oracle collabn1:/home/oracle[+ASM1]$ asmca
-
ASM Databases Only: Verify that both diskgroups are mounted. If you have jumpstarted or rebooted, then the BACKUP diskgroup may be dismounted. To mount it, right click then choose Mount on All Nodes. Click EXIT to close the ASM Configuration Assistant.

-
Type ". oraenv" to set up the environment. Leave the default SID and enter /u01/app/oracle/product/11.2.0/db_1 for the ORACLE_HOME. Then type dbca to launch the Database Configuration Assistant.

-
At the first prompt, choose Real Application Clusters Database and click NEXT.

-
Choose to CREATE A DATABASE then click NEXT to continue.

-
Select GENERAL PURPOSE OR TRANSACTION PROCESSING then click NEXT to continue.

-
Choose Admin-Managed Database, Set the global database name to RAC.vm.ardentperf.com and select all cluster nodes. Then click NEXT to continue.

-
Do not configure Enterprise Manager (there's probably not enough memory here). Uncheck it and click the Automatic Maintenance Tasks tab.

-
Disable the automatic maintenance tasks (they can really tax the CPU on your laptop...) After unchecking the box, click NEXT to continue.

-
Set all passwords to racattack and click NEXT to continue. Choose YES to continue even though Oracle doesn't like the password.

-
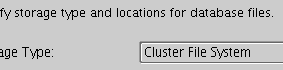
Choose a Storage Type depending on which track of the RAC Attack lab you're doing.
Oracle ASM Shared Filesystem Choose a Storage Type of Automatic Storage Management (ASM).

Choose a Storage Type of Cluster File System.
-
Configure Oracle Managed Files.
Oracle ASM Shared Filesystem Choose ORACLE MANAGED FILES and type +DATA for the database area. Then click NEXT to continue.

Choose ORACLE MANAGED FILES and type /u51/oradata for the database area. Then click NEXT to continue.

-
Configure a Flash Recovery Area.
Oracle ASM Shared Filesystem Choose to SPECIFY FLASH RECOVERY AREA and type +BACKUP as the destination. Increase the size to 3000 MBytes. Do not enable archiving and choose NEXT to continue.

Choose to SPECIFY FLASH RECOVERY AREA and type /u52/oradata as the destination. Increase the size to 3000 MBytes. Do not enable archiving and choose NEXT to continue.

 Oracle will automatically create a directory tree in the specified location and it will separate files by type and by database.
 -
Choose to install the sample schemas. After checking the box, click NEXT to continue.

-
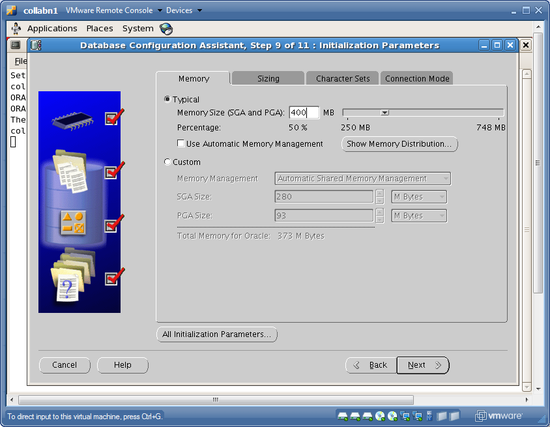
Bump the memory target up to 400MB and do not check Automatic Memory Management. Skip the other tabs and click NEXT to continue.
-
Accept the default storage settings and click NEXT to continue.

-
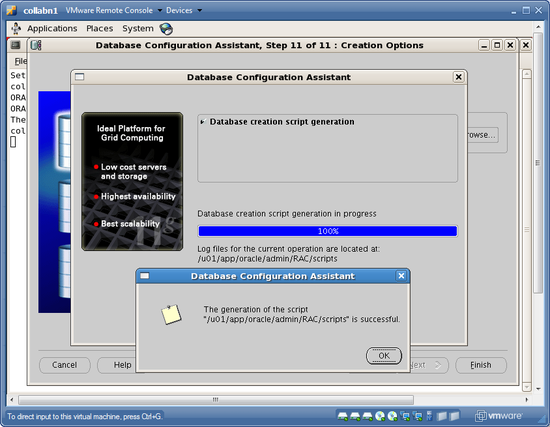
Go ahead and generate scripts (in the default location), but leave Create Database option checked. the Click FINISH to begin database creation.

-
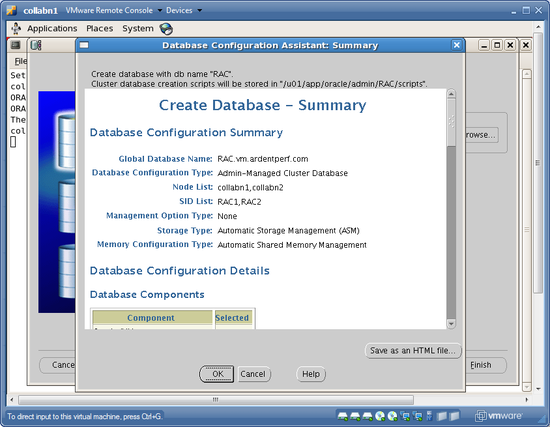
Review the summary, then click OK to continue.
-
DBCA will inform you after it generates the scripts. Click OK to continue with database creation.

-
When database creation is complete a summary window will appear. Click EXIT to close the installer.


- One last thing: edit /etc/oratab on both nodes and replace the DB name with the Instance name. Also edit the bash_profile on node 2 and set the instance name to RAC2. [oracle@collabn1 ~]$ vi /etc/oratab RAC1:/u01/app/oracle/product/11.1.0/db_1:N [oracle@collabn1 ~]$ ssh collabn2 [oracle@collabn2 ~]$ vi /etc/oratab RAC2:/u01/app/oracle/product/11.1.0/db_1:N [oracle@collabn2 ~]$ vi /home/oracle/.bash_profile export ORACLE_SID=RAC2


