Mewa Film User's Guide/Editing with Montage
What is Montage window
[edit | edit source]The finishing process will almost always include a component of editing. Where it is possible for a creative editor to supply a finished sequence directly to a finishing artist, it is rare that continued client input and the need to create subtly different versions can be satisfied without an editorial tool. Montage window is that non-linear editing tool.
Very intuitive and seamless integrated with Mewa Film, montage window offers the ability to assemble, delete, replace frames on clip and simultaneously use the same clip in the Timeline or Node Graph.
You can have open as many montage windows as you wish, they are represented as tabs.

In Montage window a clip (or footage) is shown as a sequence of frames. A frame is a single image and a clip is the container for a sequence of frames. It's important to understand the difference between a frame and a clip in the Montage window context. If you drag a frame you can see that the frame is dragged away from the clip. If you drag a clip, this is the rectangle containing the sequence of frames, the all clip including its frames are dragged with it.
Start editing with montage
[edit | edit source]To start editing a clip we need first to open a montage tab and add some footage to it. If you don't have any footage loaded see how to load some footage in section managing footage.
Opening a montage tab
[edit | edit source]To open a montage tab just click the button ![]() . This button is part of the view toolbar.
. This button is part of the view toolbar.
Copy clips from Footage
[edit | edit source]To start editing a clip you need to bring a clip from your footage window to a montage window. You can add a clip in 2 ways,
- draging the footage, from the footage window, to the montage window.
- In footage window, select the footage to copy to montage window, and click
 .
.
Edit clips from Footage
[edit | edit source]We know that footage window holds the loaded clips of the current project. When a montage tab is created the user can create a copy of a clip from footage window and edit it at the montage tab.
Well, it's also possible to edit a footage window clip without creating a copy to a montage tab, this means, the clip can be edited and any changes made to the clip are applied directly to the clip.
To edit the clip itself
- double click to footage to edit.
A montage tab will be added with the name of the clip. The clip appears colored in green, to inform that this is a reference to a clip at footage, not a copy.
Note that when editing the clip itself, called referenced clip, it's not allowed to delete all frames from the clip.
Manipulating the view
[edit | edit source]Zoom
[edit | edit source]To zoom you can:
- use the wheel of the mouse,
- or press key z while moving the mouse diagonaly.
Pan
[edit | edit source]To pan the view,
- use the middle key of the mouse,
- or press space key and hold it while dragging the view, with the mouse, in the direction you wish to pan the view.
Clip editing
[edit | edit source]Once a clip is in a Montage window you can start editing. All editing actions can be undone using undo and redo, allowing you to easily correct mistakes, as well give you freedom to experiment.
Selecting frames
[edit | edit source]Selecting frames can be done using rubberband or ctrl key. To select multiple frames,
- hold ctrl key while selecting frames,
- or use the rubberband.
The rubberband is created when clicking, with the mouse left-button, in a empty area, and holding the mouse left-button, drag the mouse to create the region of selection.
When frames are selected a number appear on top of the frame. This number represents the selection order, so that, when a copying or cut-and-paste operation is performed the selection order is preserved.

Cut and paste frames
[edit | edit source]Moving frames or 'cut and paste' frames are the same operation. Clicking on a frame you are selecting a frame, and if you drag it you can move the selected frame to another clip. A new clip is created if you drop the frame(s) in an empty area. Is also possible to select multiple frames and move them all together.
Copy frames
[edit | edit source]A copy operation of frames is achieved keeping the shift button pressed while dragging the selected frames.
Delete frames
[edit | edit source]To delete frames, first select the frames to delete and:
- press key delete,
- or right click over 1 of the selected frames and select delete option.
Break clips
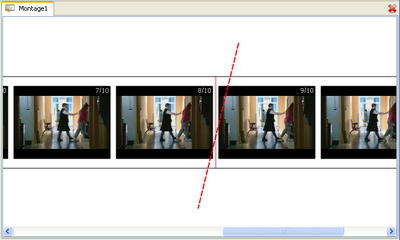
[edit | edit source]To break, or split, a clip there is a easy tool called break line. Keep pressed the key B on your keyboard and use the left mouse button to draw a line so the line cuts the clip. The picture below ilustrates the break line spliting a clip.

Expand and collapse clips
[edit | edit source]Clips can be expanded or collapse by
- double clicking the clip area ( not the frame ),
- use the context menu.
Because clips can be very long, collapsing clips can be of great help when editing many clips. A collapse clip holds all the frames while showing only the first frame of the sequence, occupying less space, makes moving the clips around easier.
Frames information
[edit | edit source]Information about any individual frame is shown as tool tips. These tool tips appear any time the mouse stops on top of a frame for a 2 or 3 seconds. This information include,
- The original loaded file name,
- Resolution in pixels,
- Depth in bits,
View a frame at full resolution
[edit | edit source]It's possible to zoom in and out in a montage window, but all images (or frames) shown inside a montage window are thumbnails which resolution is set when creating a project.
To see a frame at full resolution
- right-click over the frame, to show the context menu
- and choose View full resolution.

Explanation on output windows usage can be found at Main window/Output windows.
Montage player
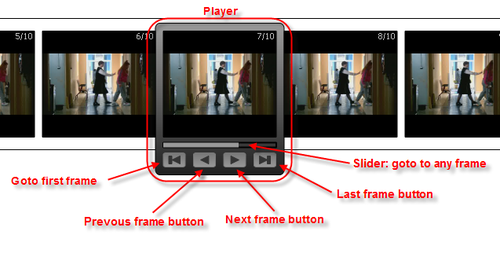
[edit | edit source]Clips can be long and to facilitate the navigation through a clip the montage player was created. It consists in a slider and 4 buttons. The slider makes montage player to jump to any frame in the clip. The image below describes the montage player and its buttons.

To use the montage player:
- double click a frame,
- or select a frame and press the key p on your keyboard.
The montage player helps moving through a clip, moving inside the clip frame by frame, to the beginning and to the end of the clip by just clicking one button. But not only, you can preview a clip pressing, and holding pressed, the next frame button the clip will be played with a constant frame rate.
The montage player does not change the position of clips, it shifts the view to the desired frame position.