JPEG - Idea and Practice/Miscellaneous
Leave out the last terms?
[edit | edit source]After quantization, the last of the s2 numbers of the sxs-matrices g(u, v) are usually very small, and we could choose one of the numbers r = 3, 4, ..., s-1 and omit those pairs (u, v) for which u or v >= r, so that we only had to deal with r2 numbers (u, v = 0, 1, ..., r-1). However, we do not win much by doing this, since r must be rather near s-1 and since the actual size of the number of zeros is not essential (30 zeros engage 8 bits and 12 zeros engage 7 bits). In the drawing procedure we could save time by restricting the inverse cosine transform to r2 numbers. We have done this in our (two) drawing programs of part two (we have set r = 6). But as such a program (for practical use) has to be written in assembly language, we do not win much by doing this either, since nowadays the picture is drawn pretty fast. But it is illustrative to see how many, or rather, how few of the cosine transformed numbers (the terms in the expansion of the colour value function) we actually need. We have therefore designed our drawing program so that we can enter a "number of terms" (the number r). In this picture (using 8x8-squares) the number of terms is 8 and 4, respectively:
-
 8 terms
 -
 4 terms


Note that the size of the file depends strongly on the fact that most of the numbers before the compression are zeros, because every second number states a number of zeros. Therefore, if there were only few zeros, the most (every second) of these numbers (being zero in coded form = 000), would unnecessarily occupy considerable space. Thus, if instead of dividing by a large number in the quantization, we divide by a small number (e.g. 0.1), we get the result that the file takes up twice as much space as in BMP format!
Why only 8x8-squares?
[edit | edit source]The choice (in the true JPEG procedure) of 8 as side length of the small squares, has nothing to do with the role of 8 in the computer, since the numbers are converted to sequences of bits of all sorts of lengths. The side length must not be too small, because then the effect of the cosine transform is lessened, and not too large either, because then the number of calculations may be too large: for an sxs-square, the total number of terms is s4, because there are s2 points and for each point the formula has s2 terms. Therefore, if the side length is doubled, the number of calculations quadruples. The choice of 8 as side length was surely the most optimal when the JPEG procedure was introduced. However, nowadays, as the speed has multiplied, we could make better compression by choosing a larger side length (12, for instance), but it is too late to alter this and the benefit is not significant.
As regards the earlier mentioned quadratic picture of 280 pixels (to demonstrate the cosine transform), the number of calculations is 1225 times larger than if the picture were divided up in 8x8-squares.
In the two pictures below we have used divisions up in 20x20- and 10x10-squares, respectively. The procedure is not as efficient for small divisions as for large ones. Both of the pictures are quantized by approximately the same numbers, the first takes up 13 Kb, the second takes up 22 Kb:
-
 20x20-squares

-
 10x10-squares

The luminant contra the chromatic part
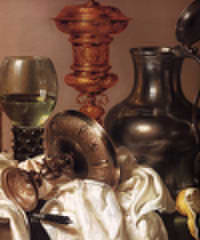
[edit | edit source]Let us see how it goes if we make large differences in the quantization of the luminant and the chromatic part of the top-most picture below. In the left-most picture the quality is low for the luminant part and high for the chromatic part. Therefore the pattern is disturbed but the colours seem correct. In the right-most picture it is the opposite: the pattern is correct but the colours are unfamiliar:
-
 Original

-
 Bad luminant part
 -
 Bad chromatic part


Difficult pictures
[edit | edit source]The JPEG procedure always introduces changes into the picture, but by choosing a high quality, these changes can be made microscopic. But they are there, and if you want to someday be able to work up a picture, you should not save it in JPEG format. Some pictures are less suited for JPEG compression than others, in the sense that the quality must be set high, if you want the changes to be completely invisible. But it is always possible to save in JPEG without visible changes, people will say. However, this is not necessarily true: it depends on the JPEG implementation. Our demonstration program can always make a file resulting in a (nearly) faultless picture, but this is because we handle the colour components in the same way as the Y component - we only quantize by different numbers, but we could refrain from quantization (setting the quality to 100). In the true JPEG procedure it is possible to reduce the size of the two colour "pictures" (the colour components) compared to the grey scale picture (the Y component). This can be done (for instance) by a previous dividing up of the two colour "pictures" in 2x2-squares and by regarding such a square as one pixel by taking the average value of the four colour values, so that the colour pictures become four times as small. This is done before the dividing up in 8x8-squares, so that four 8x8-squares of the Y component are combined with one 8x8-square of the colour components. The reason is that the colours usually do not vary rapidly across the picture, and we can compress about 25 per cent more in this way. The procedure is called subsampling (of the colour components).
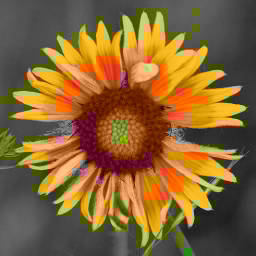
The next two pictures are made with our (home-made but) true JPEG program in part two, but with different settings. The picture is made by laying a picture for which every second pixel is green and every other pixel is transparent over another picture. Both pictures take up rather much space because of the strong changes from pixel to pixel. In the first picture the colour components are handed in the same way as the Y component, therefore the picture is correct. In the second picture subsampling of the colour components has been used, so that the colour values become average values, therefore the picture is more green:
-
 Without subsampling

-
 Subsampling

Note that not all JPEG compressing programs allow for the option between subsampling and non-subsampling the colour components.
For a picture in grey scale we have only the Y component, but as the contribution of the Cb and Cr components (after quantization) are small compared to the Y component, the grey scale version of a picture takes up almost as much space as the colour version - usually more than 90 per cent.
The compression should reach its extremum when the picture is of only one colour. This is the case for our demonstration program: the data part of such a 1000x1000-pixel picture take up only 14 bytes. But when we use the true JPEG procedure, the data part will take up 15.000 bytes - we will see why in part two.
Transparency
[edit | edit source]Some image formats can contain transparency, GIF and PNG, for instance, but not BMP and JPEG. GIF is especially suited for graphic representations and PNG is suited for pictures with objects laid over a simple background. They are both lossless, but a GIF picture can only contain 256 different colours (specified in the header), and, in spite of an effective compression, a photo converted to a PNG file often takes up 75 per cent of the BMP file. As regards JPEG, in a FAQ-article you can read the following answer to the question "Can I make a transparent JPEG?": "No. JPEG does not support transparency and is not likely to do so any time soon. It turns out that adding transparency to JPEG would not be a simple task; read on if you want the gory details". And then we are told that in a GIF picture the transparency is introduced by letting an unused colour value mark out the transparent domain, but this method cannot be used in JPEG. It could be used in BMP, where one of the 16777216 possible colours could easily be missed for marking out a transparent domain; however not in JPEG, where the colour values are imprecise. Transparency will engage one bit for each point, and this new component could be subjected to the same procedure as the three YCbCr components. However, this method is rejected on the grounds that the JPEG procedure is not suited for sharp passages: if the boundary around a hole, through which strongly deviating colours appear, is to be reproduced satisfactorily, the cosine transformed numbers (of the transparency component) could only be quantized by small numbers, and then the file would take up quite some space. This is true, but the picture would still take up much lesser space than in PNG format, and besides, transparency is usually only for temporary use. It is easy to arrange the JPEG file such that it can support transparency.
However, as not much is won by cosine transform and quantization of the transparency component, these operations should be left out, and the bits for the transparency should be entered in the file in this way: we go along the horizontal lines by turns from left to right and from right to left, so that the pixels are adjacent, and in this sequence of bits we replace each unbroken interval of 0's or 1's by the number of the 0's or 1's (the sum of these numbers is just the width times the height). The resulting sequence of natural numbers is then coded, and can be written in the file before the colour data. By this method, the transparent domain becomes exactly as in the original picture. In the picture to the left the black is made transparent and the picture is laid over a blue background resulting in the picture to the right, and in spite of the very low quality of this picture, the transparent domain is the same:
-
 Original
 -
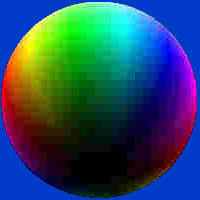 Transparency


The procedure of introducing transparency in a picture can take place via a picture in BMP format, for instance. The BMP format does not (at present) support transparency, but we can accompany the picture by a monochrome picture also in BMP format determining the transparent domain. A monochrome picture is a picture containing only two different colours, usually black and white. The RGB values of the two colours are stated in the header (or rather the header is prolonged with the bytes necessary for this information), and the data - one bit for each point - are written in the same way as the RGB values in an usual BMP file: row for row, but such that each 8-block of bits is converted to a byte (and such that the length of the rows of bytes is divisible by 4). This method is supported by the Windows bitmap drawing procedure: if we let the transparent domain in the picture with the colours be black, and let it be the white domain in the monochrome black-and-white picture, then Windows has procedures that can transfer the data of the two files directly to the screen, making a picture where the transparent domain is empty, so that we through this see the underlying - the desktop, for instance.