
Adventist Youth Honors Answer Book/Recreation/Wilderness Living
| Wilderness Living | ||
|---|---|---|
| Recreation General Conference |
Skill Level 2 | 
|
| Year of Introduction: 1956 | ||
|
The Wilderness Living Honor is a component of the Wilderness Master Award . |
1. Go on at least two weekend campouts during which you learn the skills called for in this honor.
[edit | edit source]These campouts can be done with your Pathfinder club, with your family, or with friends. You should also look at the requirements for the Pioneering honor, as you may be able to manage both honors on the two trips.
2. Tell five things to do if lost in the wilderness. Know three methods of determining directions without a compass.
[edit | edit source]What to do when Lost
The best advice about being lost, is - DON'T! And the best way to keep from getting lost is to stay on the path.
If you suddenly realize that you do not know where you are, then here are some things to do:
- Don't panic. You can't think clearly when you panic, so take a deep breath and relax.
- Pray. You may not know where you are, but God does, so talk to Him.
- Stay where you are. It is a lot easier for someone to find you if you stay put.
- Listen for the sounds of other campers, traffic, waterfalls, rivers, airplanes or anything that might help you find your way back.
- Look around - maybe you'll recognize something that can guide you back to civilization.
- If you have a whistle, blow on it. If you don't have a whistle, yell loudly. Someone in your party might hear you. Repeat this every 15 minutes or so and be sure to listen after each sounding. (three of anything is universally recognized as a call for help, so three whistle blasts, or three shouts)
- If you have a map and compass, try to locate your position by looking for hills valleys or streams.
- You can try to relocate the trail, but you do not want to get any further away from your last known location. Mark your location with something - a backpack, hat, or a large rock - but make sure it's something unmistakable. Then venture 10 meters out, and circle your marker, all the while looking about to see if you recognize the trail or a landmark, and always keeping your marker in view. If you do not see anything you recognize, widen the circle by another 10 meters and repeat. Continue circling your marker at ever wider intervals, but stop when continuing would cause you to lose sight of the marker.
- Climb a tree or hillside. A higher vantage point might reveal a landmark you missed from a lower elevation.
- If it's an hour or less until sunset, prepare to spend a comfortable evening. Make a shelter, and light a fire. Things will look better in the morning, and your fire may attract a rescuer.
Determining Direction without a Compass

- North Star
- In the northern hemisphere on a clear night you can determine which direction is north by finding Polaris (the North Star). You can find Polaris by following the two "pointer stars" in the Big Dipper. Unfortunately, this method is only effective on clear nights.
- Using a Watch
- You can use an analog watch to figure out which way is south during the day. To do this, it is easiest if you remove the watch from your wrist first. Hold the watch so that the face is pointing upwards. Then rotate it until the hour hand points to the sun. You can use a blade of grass to cast a shadow on the watch face to make this easier - just line the hour hand up with the shadow. Once the hour hand is pointing towards the sun, you can find south by bisecting the angle between the hour hand and the 12 o'clock position. In other words, if it is 4:00pm, south will lie in the 2:00 o'clock direction (because 2:00 is halfway between 4:00 and 12:00). At 7:00 am, south will lie in the 9:30 direction (because 9:30 is halfway between 7:00 and 12:00).
- Using a shadow
- Find a straight stick at least 12 inches long (30 cm) and drive it into the ground such that it points directly at the sun. You can tell the stick is pointing directly at the sun because its shadow will disappear. Then wait until the earth rotates enough so that you can see the shadow. The shadow will point directly east.
3. Demonstrate three ways to purify drinking water.
[edit | edit source]- Boiling
- Water can be purified by boiling for five to ten minutes.
- Iodine
- Iodine is added to water as a solution, crystallized, or in tablets. The iodine kills many—but not all—of the most common pathogens present in natural fresh water sources. Carrying iodine for water purification is an imperfect but light weight solution for those in need of field purification of drinking water. There are kits available in camping stores that include an iodine pill and a second pill that will remove the iodine taste from the water after it has been disinfected.
- Chlorine
- Chlorine-based bleach may be used for emergency disinfection. Add 2 drops of 5% bleach per liter or quart of clear water, then let stand covered for 30 to 60 minutes. After this it may be left open to reduce the chlorine smell and taste.
- Filtering
- Water filters are also used to make water potable. These filters are usually small, portable and light (1-2 pounds), and filter water by working a hand pump. Dirty water is pumped via a tube through the filter, then out into another flexible tube and directly into a water bottle. These types of filters work to remove bacteria, protozoa and cysts, all of which can cause disease. These water filters should not be confused with devices or tablets that are water purifiers. Water purifiers satisfy higher EPA standards, and also remove viruses, such as hepatitis A and rota virus, among others.
4. Know three ways to collect drinking water in the wilderness and demonstrate two of these methods.
[edit | edit source]Catching rain water
[edit | edit source]This is probably the simplest way to collect drinking water, as long as it rains while you are camping. To catch water, simply stretch a clean tarp between trees such that the tarp is mostly horizontal. As it rains, the water will find its way off the tarp, usually in a stream. Place a basin beneath this stream and wait until it fills. You can also "tip" the water out of the tarp.
Catching dew
[edit | edit source]You can catch the morning dew by spreading a clean tarp flat on the ground. If a dew falls during the night, you can collect the water by sopping it up with a paper towel and wringing it into a container. If you forget to set a tarp out the night before, or if you do not have a tarp, you can still collect dew. Wrap a T-shirt (or other piece of cloth) around your pant legs, and then walk through the dewy grass. When the T-shirt is sufficiently wet, wring it out into a container.
Solar still
[edit | edit source]A solar still can be used to extract pure water from just about anything that is wet. Start by digging a hole 25cm![]() deep. Place a small container in the center of the hole - this will catch the water. Place damp matter (chopped up cacti, wet leaves, etc.) in the hole around the container, and then cover the hole with a transparent plastic sheet. Weight down the edges of the plastic sheet so that it cannot slip into the hole, and place a small weight (such as a small rock) in the center of the sheet. This weight should be situated directly over the center of the container. As sunlight penetrates the sheet, it evaporates the water from the damp material in the hole. The water vapor rises until it reaches the sheet, where it condenses. As the water collects on the underside of the sheet, it runs downhill to the weight where it drips off, and hopefully, falls into the container.
deep. Place a small container in the center of the hole - this will catch the water. Place damp matter (chopped up cacti, wet leaves, etc.) in the hole around the container, and then cover the hole with a transparent plastic sheet. Weight down the edges of the plastic sheet so that it cannot slip into the hole, and place a small weight (such as a small rock) in the center of the sheet. This weight should be situated directly over the center of the container. As sunlight penetrates the sheet, it evaporates the water from the damp material in the hole. The water vapor rises until it reaches the sheet, where it condenses. As the water collects on the underside of the sheet, it runs downhill to the weight where it drips off, and hopefully, falls into the container.
From bodies of freshwater
[edit | edit source]You can also collect water from freshwater bodies such as rivers, springs, and lakes, but this water must be purified before using.
Melting snow
[edit | edit source]If you are in an area that has snow, you can collect it and melt it in a pot. It will melt faster if there is a little bit of liquid water in the pot. Do not eat snow, as this will lower your internal body temperature and increase the risk of hypothermia.
5. Demonstrate two methods of judging the height of a tree and the width of a stream.
[edit | edit source]The main reason for wishing to estimate the height of a tree and the width of a stream would be so that you could cut down a tree and use it as a bridge to cross the stream. Of course, a responsible Pathfinder would never do this without permission from the landowner, and even then, only after careful consideration. How unfortunate for you though, if you cut down a tree that was not tall enough to span the stream, and what a waste of a good tree if it were too long!
Height Estimation, Method 1
[edit | edit source]
In the first method presented here, you will need a ruler, or any object with evenly spaced markings on it. Walk up to the tree, and estimate a point on it that is a mathematically convenient height from the ground (say five feet, or two meters). Mark that spot so that you can see it clearly from a distance by tying a rope around the tree at that height.
Next, walk away from the tree so that you can see its top. Hold the ruler in front of your face, such that the line of sight from your eye to the base of the tree crosses the "0" mark on the ruler. This is line A in the diagram. Then move the ruler either towards or away from your eye until the line from your eye to the rope you tied to the tree crosses the "1" mark on the ruler. This is line B in the diagram. When the ruler is positioned correctly such that lines A and B point to the base and the known height, glance up and note the measurement where the line from your eye to the top of the tree (line C in the diagram) crosses the ruler. Do this without moving the ruler or your head. When you have this measurement, multiply it by the mathematically convenient height you selected in the beginning. This is the height of the tree.
For instance, suppose you selected 2 meters as the known height on the tree, and line C crossed the 4.5 mark on the ruler:

Height Estimation, Method 2
[edit | edit source]
In the second method for estimating height presented here, you will need a sheet of paper. Fold the paper so that the left edge meets the bottom edge, forming a 45° angle. Sight along the bottom of the paper so that line A in the diagram points to the base of the tree. Then move closer to or farther from the tree until the line through the fold points to the top of the tree (line B in the diagram).
Be careful to not poke yourself in the eye with the corner of the paper. In fact, it would be prudent to cut off the corner. The angle will still be correct even without it.
When the bottom of the paper points to the bottom of the tree, and the fold in the paper points to the treetop, the distance between you and the tree equals the height of the tree. Estimate this distance by pacing it off. Every two steps is roughly 5 feet, or if you prefer metric, every step is roughly 75 cm (which means every fourth step is about 3 meters). For more precision, measure your stride and use that figure.
Width Estimation, Method 1
[edit | edit source]
The first method we present here for estimating the width of a stream will involve choosing an easily seen marker on the opposite side, and designating is "Marker A". Place a second marker (B) directly across the stream from marker A, and the place two more markers (C & D) along the stream bank at equal intervals. That is, be sure that the distance from B to C equals the distance from C to D. Also, try to form a 90° angle from A to B to C. Walk away from the stream at 90° from line B-D until you can see that markers A and C line up. Mark the place where this happens with marker E. If your 90° angles are accurate and the distance from B-C and C-D are equal, the distance between E-D will equal the distance between A-B (which is the width of the stream).
Width Estimation, Method 2
[edit | edit source]Method 2 for estimating the width of a stream is exactly the same as method 2 for estimating the height of a tree, except that the paper is held horizontally instead of vertically. Find a marker on the opposite side of the stream to serve as the "treetop" (this could be a rock or a tree), and mark a spot on your side of the stream bank directly across from the marker on the other side. Walk along the stream bank as you sight along the bottom edge of the folded paper to the mark on your side, and sight along the folded edge to the marker on the opposite side. Move away from the marker until both line up. Then pace off the distance between you and the marker on your side. This will be equal to the distance across the stream.
6. Identify four wild animal or bird tracks.
[edit | edit source]See the Animal Tracking honor for instruction. The easiest kinds of tracks to find in North America are deer and raccoon, but you may also be able to find squirrel and opossum tracks. Coyote tracks are nearly indistinguishable from dog and wolf tracks. If you have access to a beach that is frequented by herring gulls, you should be able to find their tracks too.
7. Using a compass, follow a course for more than 100 yards (91.4 meters) with three different headings and less than 5% error.
[edit | edit source]As the instructor, you will be responsible for setting up the course. There are many ways to do this, but one thing that does work well is to use tent stakes to mark the control points. When you lay out the course, make sure you do not have anything magnetic on your person, as this will throw off the compass readings for everyone. If you could make it through an airport metal detector, you should be OK. Be extra careful when shooting your azimuths, and write them down. This would be a bad time to discover that your memory isn't as good as you thought it was. If you are marking the control points, it is OK to estimate the distances. Remember that for most people two steps equal about five feet. Therefore, you can make a reasonable estimate of the distance if you start out on your left foot (like when you do marching and drilling), and count by fives every time your right foot touches the ground. If you have an accurate bearing, this should be close enough. You can also indicate the number of paces instead of the distance in feet. Your instructions should indicate that the Pathfinder should walk a particular bearing for an approximate distance and look for the tent peg. Then shoot the second azimuth and repeat, until they reach the final control point. Be sure to collect the tent pegs on the way back.
8. Identify in the wild, prepare, and eat ten varieties of wild plants.
[edit | edit source]We present some of the more common edible plants here. For more options see the Edible Wild Plants honor in the Nature chapter of this book. Incidentally, once you have met this requirement, you will be well on your way to earning the Edible Wild Plants Honor.
|
Acorn | |
|---|---|
|
Description: Acorns are the fruit of the oak tree. They are a very important food source for wildlife. Creatures that make acorns an important part of their diet include birds such as jays, pigeons, some ducks and several species of woodpeckers. Small mammals that feed on acorns include mice, squirrels and several other rodents. Large mammals such as pigs, bears and deer also consume large amounts of acorns; they may constitute up to 25% of the diet of deer in the autumn. However, acorns are toxic to some other animals, such as horses. In some human cultures, acorns once constituted a dietary staple, though they are now generally only a very minor food.
Where found: The oak is native to the northern hemisphere, and includes deciduous and evergreen species extending from cold latitudes to tropical Asia and the Americas.
Availability: Fall
Use: The acorn contains tannin, which is very bitter and slightly toxic. Luckily, tannin is easily removed by soaking in water. Acorns from the white oak family have far less tannin than acorns from the black (or red) oak family, so if you have a choice, opt for white oaks. The first acorns to fall from the tree are likely to contain worms and moth larvae. Most of these bad acorns will float in water, while most good acorns will sink. At the beginning of acorn season (late summer or early autumn) you will find that most of the acorns will float and very few will sink. As the season progresses, you will find that most acorns will sink and few will float. Once you have sorted them, shell them. They can be opened with a pair of pliers or a nutcracker. Remove the meat from the shell, crush it into a fine powder (use a mortar & pestle or a food processor), and then soak it in water for about a week, changing the water twice a day. If you choose to, you can speed this process by boiling the shelled, crushed acorns in several changes of water. Native Americans would put the crushed acorns in a sack and then place the sack in a swift stream for several days. If after soaking, the acorn mush is still bitter, it needs to soak longer. When they are no longer bitter, spread them out on a cookie sheet and dry them in an oven at 120°C
|
 |
|
Blackberry | |
|---|---|
|
Description: The blackberry is a widespread and well known shrub; commonly called a bramble in the eastern U.S. and Europe but a caneberry in the western U.S. growing to 3 m (10 ft) and producing a soft-bodied fruit popular for use in desserts, jams, and seedless jellies.
Where found: Throughout the non-polar regions of the world.
Availability: Fall
Use: The berries are fantastic eaten straight from the cane, cooked into jelly, or baked into pies.
|
 |
|
Typha latifolia - Cattail | |
|---|---|
|
Where found: in wetlands throughout the Northern Hemisphere
Availability: Winter, Spring, Summer, Fall
Use: In early spring, the shoots and stalks can be pulled up and eaten raw or boiled for 15 minutes. In late spring, the spikes can be gathered just before they break out of their papery sheaths, boiled for a few minutes, buttered, and eaten like corn-on-the-cob. In early summer, the spikes produce large quantities of pollen which can be gathered by covering the top of the plant with a paper bag, inverting it, and shaking vigorously. The pollen can be used as flour when mixed half and half with wheat flour. In fall and winter, the roots can be gathered. Wash them and then soak them in a bucket of water. While still submerged, crush them to remove the fibrous covering. Then let the starchy portion of the root settle to the bottom. Skim off the fiber, strain out the water, and use as flour.
|
 |
|
Chicory | |
|---|---|
|
Description: Chicory is a spindly plant with purple (though sometimes pink or white) flowers. The petals are narrow, notched at the tips, and numerous. The flowers fold up in the afternoon, opening again in the morning.
Where found: Originating from Europe, it was naturalized in North America, where it has become a widespread roadside weed.
Availability: Early spring (leaves), Fall to Spring (roots)
Use: The roots are washed, roasted, ground, and brewed as a coffee substitute (use 1.5 tsp per cup of water). In the spring the white, underground portion of the leaves are an excellent addition to salads, and the green above-ground portions can be boiled and eaten as greens.
|
 |
|
Clover | |
|---|---|
|
Where found: Found worldwide in fields and yards
Availability: Spring, Summer, Fall
Use: The flowers can be eaten raw, added to salads, boiled in soups, or dried and ground to flour. They can also be used to make fritters. Red clover is shown here, but white clover is just as good (but a little smaller, so it takes more work to collect). The leaves and stems are also edible in salads or as greens.
|
 |
|
Dandelion | |
|---|---|
|
Where found: Throughout Asia, Europe, and North America
Availability: Spring, Summer, Fall
Use: Add the young, tender leaves to salad raw, or boil and eat as greens. The roots can be roasted and ground, and used as a coffee substitute.
|
 |
|
Day Lily | |
|---|---|
|
Description: The alternating lanceolate leaves are grouped into fans (a clump also containing the roots and the crown). The crown of a day lily is the small white portion of the stem, between the leaves and the roots. The name "day lily" reflects the fact that the individual flowers last for only one day. The flowers of most species open at sunrise and wither at sunset, to be replaced by another one (sometimes two or none) on the same stem the next day; some species are night-blooming.
Where found: Originally from Eurasia, native from Europe to China, Korea, and Japan, their large showy flowers have made them popular worldwide
Availability: Early Spring (shoots), Summer (buds and flowers), All Year (tubers)
Use: The early shoots make a good addition to a salad. The buds and flowers can be prepared by boiling or be made into fritters. The tubers can also be added to salads or can be prepared like corn-on-the-cob.
|
 |
|
Goldenrod | |
|---|---|
|
Description: Goldenrods are easily recognized by their golden inflorescence with hundreds of small flower heads. They have slender, usually hairless stems. They can grow to a length between 60 cm and 1.5 m. Their alternate leaves are linear to lanceolate. Their margins are usually finely to sharply serrated.
Where found: Found in the meadows and pastures, along roads, ditches and waste areas in North America and Europe.
Use: The flowers can be steeped in boiling water for 10 minutes to make an anise-flavored tea.
|
 |
|
Greenbriar | |
|---|---|
|
Description: On their own, Smilax plants will grow as a shrub, forming dense impenetrable thickets. They will also grow over trees and other plants up to 10 m high using its hooked thorns to hang on to and scramble over branches. The genus includes both deciduous and evergreen species. The leaves are heart shaped and vary from 4-30 cm long in different species.
Where found: Eastern United States
Availability: Spring, Summer
Use: The shoots and leaves are delicious eaten raw on the trail or in salads. They can also be boiled and eaten as asparagus and greens.
|
 |
|
Milkweed | |
|---|---|
|
Description: Common milkweed is a herbaceous perennial plant growing from a rhizome to 1-2 m tall. The stem is very hairy, and all parts of the plants produce a white latex when broken. The leaves are opposite, simple broad ovate-lanceolate, 7-25 cm long and 3-12 cm broad, usually with an undulate margin and a red-colored main vein. They have a very short petiole and a velvety underside. The flowers are grouped in several spherical umbels with numerous flowers in each umbel. The individual flowers are small, 1-2 cm diameter, perfumed, with five cornate hoods. The seeds are attached to long, white flossy hairs and encased in large pods.
Where found: Native to most of North America east of the Rockies, with the exception of the drier parts of the Prairies. It grows in sandy soils and appreciates lots of sunlight.
Availability: Spring, Summer
Use: The stems, shoots, leaves, flowers, and young pods are all edible after they are boiled in several changes of water. The milky sap tastes bitter and is mildly toxic, but boiling removes it completely.
|
 |
|
Pine Trees | |
|---|---|
|
Description: Pines are evergreen and resinous. The bark of most pines is thick and scaly, but some species have thin, flaking bark. The branches are produced in regular "pseudowhorls", actually a very tight spiral but appearing like a ring of branches arising from the same point. Many pines are uninodal, producing just one such whorl of branches each year, from buds at the tip of the year's new shoot, but others are multinodal, producing two or more whorls of branches per year. The new spring shoots are sometimes called "candles"; they are light-colored and point upward at first, then later darken and spread outward.
Where found: Pines are native to most of the Northern Hemisphere. In North America, they range from the Arctic south to Nicaragua and Hispaniola, with the highest diversity in Mexico and California. In Eurasia, they range from Portugal and Scotland east to the Russian Far East, Japan, and the Philippines, and south to northernmost Africa, the Himalaya and Southeast Asia, with one species (Sumatran Pine) just crossing the Equator in Sumatra. Pines are also extensively planted in many parts of the Southern Hemisphere
Availability: All year
Use: The needles can be eaten year-round. The young shoots can be eaten as candy when stripped of the needles, peeled, boiled until tender, and then simmered for 20-30 minutes in a sugary syrup.
|
 |
|
Pine Nuts | |
|---|---|
|
Description: Pine nuts are the edible seeds of pine trees. About 20 species of pine produce seeds large enough to be worth harvesting; in other pines the seeds are also edible, but are too small to be of value as a human food. The nuts are located at the base of the scales of the cones.
Where found: Temperate areas of North America, Europe, and Asia.
Availability: Fall
Use: Pine nuts can be eaten raw or baked into a casserole.
|
 |
|
Plantago Major, or Broadleaf Plantain | |
|---|---|
|
Description: The Broadleaf Plantain or Greater Plantago (Plantago major) is a member of the plantago family, Plantaginaceae. In North America, this plant is primarily a weed, though it is edible and is used in herbal medicine. The plant is native to Europe, and is believed to be one of the first plants to naturalize in the colonies.
This plant does best in compacted soils, and hence is sometimes called "roadweed". It is commonly found on field boundaries as it is tolerant to pesticides and herbicides. It is wind-pollenated, and a cause of summer allergies when in flower. Where found: Common lawn weed found throughout
Availability: Best in Early Spring, also usable in Summer and Fall, but tough and stringy.
Use: Crushed leaves can be applied directly to the skin to stop bleeding, bee stings and insect bites. Psyllium seeds are a bulk laxative. The young leaves are delicious raw in salads. In summer and fall the leaves can be eaten when boiled as greens.
|
 |
|
Sheep Sorrel | |
|---|---|
|
Where found: Throughout the Northern Hemisphere
Availability: Spring, Summer, Fall
Use: Nibble on the raw leaves - a great addition to a salad. They may also be boiled and eaten like greens, or steeped to make a tea.
WARNING: Sheep sorrel contains small amount of oxalic acid which gives it its pleasantly sour taste. If eaten in large quantities over a period of time, however, may inhibit the body's ability to absorb calcium.
|
.jpg) |
|
Wild Strawberry | |
|---|---|
|
Description: Similar to the domestic variety, but the berries are quite a bit smaller, measuring about quarter inch (6 mm) in diameter. The Woodland Strawberry was widely cultivated in Europe before being largely replaced by the Garden Strawberry (Fragaria x ananassa and other hybrids), which have much larger berries. Woodland Strawberry fruit is strongly flavored, and is still grown on a small scale commercially for the use of gourmets. Unlike most commercial and garden cultivars of strawberries, Woodland Strawberries rarely form runners, and are usually propagated by seeds or division of the plants.
Where found: Throughout the Northern Hemisphere
Availability: Summer
Use: The fruits can be eaten raw or cooked into jellies and jams. It can also be baked into pies. An herbal tea made from the leaves, stems, and flowers is believed to aid in the treatment of diarrhea.
|
 |
|
Sumac | |
|---|---|
|
Description: It grows to 3-10 m tall, and has alternate, pinnately compound leaves 25-55 cm long, each with 9-31 serrate leaflets 6-11 cm long. The leaf petioles and the stems are densely covered in rust-colored hairs. The fruit of staghorn sumac is one of the most identifiable characteristics, forming dense clusters of small red drupes at the terminal end of the branches; the clusters are conic, 10-20 cm long and 4-6 cm broad at the base. The fruit appear during autumn, at which point the foliage turns a brilliant red. Sumacs are considered some of the best fall foliage around. The fruit has been known to last through winter and into spring.
Where found: From Ontario and Quebec south to northern Georgia and Mississippi.
Availability: Spring, Summer, Fall, Winter
Use: The fruit drupes can be bruised and then soaked in water to make a refreshing lemonade-like drink.
WARNING: Avoid the Poison Sumac tree which is easily identified by its white flowers. Contact with poison sumac will cause a rash (like poison ivy).
|
 |
|
Wintergreen, or Teaberry | |
|---|---|
|
Description: Wintergreen (also called Teaberry) is a low evergreen plant that grows in wooded areas. It produces red berries in the Fall, and they remain on the plant through the winter until the plant flowers again in the spring. The crushed leaves have a medicinal smell very much like peppermint (or surprise! wintergreen!) It is also used as the flavor of Wrigley's popular Winterfresh chewing gum.
Where found: Primarily found in the Northeastern United States, but it also grows in Minnesota, south to Mississippi, east to Georgia, and north to Maine.
Availability: Spring, Summer, Fall, Winter
Use: The leaves can be picked and chewed raw like a chewing gum. The leaves can also be finely chopped and steeped in boiling water to make a tea. The berries can be eaten as well.
WARNING: Wintergreen is endangered in Illinois, so if you find it there, leave it be!
|
 |
|
Wild Carrot (Queen Anne's Lace) | |
|---|---|
|
Description: It is a biennial plant growing up to 1 m tall, bearing an umbel of bright white flowers that turn into a "bird's nest" seed case after blooming. Very similar in appearance to the deadly poison hemlock, it is distinguished by a mix of bi-pinnate and tri-pinnate leaves, fine hairs on its stems and leaves, a root that smells like carrots, and occasionally a single dark red flower in its center.
Where found: Waste ground, fields, throughout
Availability: Fall to Early Spring
Use: The roots of the wild carrot can be cleaned and used as regular carrots. They are quite a bit smaller than domestic carrots, but the flavor is unmistakable. It is best to use the roots of the plant during its first year.
WARNING: Do not confuse the wild carrot with poison hemlock. The root of the wild carrot smells like carrots. Also the bracts beneath the flower heads are three-forked. Poison hemlock has a smooth, hollow, jointed stem and often has purple spots. Queen Anne's Lace has none of these characteristics.
|
 |
|
Wild Garlic | |
|---|---|
|
Description: All parts of the plant have a strong garlic odor. The underground bulb is 1-2 cm diameter, with a fibrous outer layer. The main stem grows to 30-120 cm tall. The leaves are slender hollow tubular, 15-60 cm long and 2-4 mm thick, waxy textured, with a groove along the side of the leaf facing the stem. The flowers are 2-5 mm long, with six petals varying in color from pink to red or greenish-white. It flowers in the summer, June to August
Where found: Northern Hemisphere
Availability: All year
Use: Use the tubular leaves and bulbs in salad or in soups.
|
 |
|
Wild Onion | |
|---|---|
|
Description: Wild Onion has an edible bulb covered with a dense skin of brown fibers and tastes like an onion. The plant also has strong, onion-like odor. The narrow, grass-like leaves originate near the base of the stem, which is topped by a dome-like cluster of star-shaped, pink or white flowers. It typically flowers in the spring and early summer, from May to June.
Where found: Throughout North America
Availability: Spring - Winter
Use: Use the leaves and bulbs raw in salads, or cook them in a soup. Basically, use them as you would domestic onions.
WARNING: Though the plant is edible, it pays to be careful in identifying it as there are several look-a-likes. So be sure to do more research before eating plant.
|
 |
|
Wood Sorrel | |
|---|---|
|
Where found: Occurs throughout most of the world, except for the polar areas.
Availability: Spring, Summer, Fall
Use: Use the raw leaves, stems, and flowers as a refreshing, sour addition to a salad. Steep in boiling water for 10 minutes to make a tea.
WARNING: Wood sorrel contains small amount of oxalic acid which gives it its pleasantly sour taste. If eaten in large quantities over a period of time, however, may inhibit the body's ability to absorb calcium.
|
 |
9. Have a personal survival kit of 15 items and know how to use each item.
[edit | edit source]- Knife
- A knife has many uses in a survival situation. It can be used for making fuzz sticks or wood shavings for tinder, carving wooden utensils, cutting cloth, cleaning fish, etc. Its use is limited only by your imagination.
- Waterproof matches in a waterproof container
- If it gets cold, you will need to light a fire. A fire is also necessary for boiling water (which is one way to purify it).
- Metal cup
- A metal cup (or a tin can) can be used to hold water while you boil it. It can also be used as a pot for cooking food, and as a dish for eating.
- Flint or other firestarter
- A magnesium block with a flint is an ideal backup for the matches.
- Compass
- The needle of a compass points to magnetic north.
- Map
- If you have a map of the area you're in as well as a compass, you should be able to find out where you are and find your way out.
- Watch
- A watch can be used as a compass too.
- Waterproof ground cloth and cover
- This will help you stay dry, and staying dry is critical for staying warm.
- Flashlight
- Binoculars
- Useful for spotting game, rescue craft, rescue parties, etc.
- Whistle
- A whistle can be used for signaling a rescue party. It is far louder than your voice and can be heard even at great distances. Give three blasts on it to signal for help.
- Fatty emergency foods
- Nuts, peanut butter, chocolate, etc., are high in fat. Fatty foods are packed with calories, and if it gets cold, your body can convert calories into heat.
- Food gathering gear
- Signaling items
- Rope
- Many uses, especially in building a shelter, or climbing.
- Emergency blanket
- Emergency blankets (sometimes called space blankets) are very lightweight, foil-like sheets that reflect up to 90% of a persons body heat back towards the person. Cover yourself with it at night.
- Aluminum foil
- Can be used for cooking, or even shaped into a crude cup for boiling water.
10. Explain the necessity in wilderness living of adequate sleep, proper diet, personal hygiene, and proper exercise.
[edit | edit source]Adequate sleep, proper diet, personal hygiene, and proper exercise are all important for keeping the mind and body in tip-top shape. When you are in a wilderness situation, it is important to be in good condition, because if you need emergency medical assistance, it will not be easy to get. Keeping your mind sharp will help you make good judgment calls, and that, in turn, will help prevent you from a foolish accident. Keeping your body in shape will also help you avoid sprains, falls, and other accidents.
11. Have the First Aid honor. In addition to the First Aid honor, know the prevention, symptoms, and the first aid treatment for the following
[edit | edit source]Instructions and tips for earning the First Aid, Standard honor can be found in the Health and Science chapter.
a. Hypothermia
[edit | edit source]Hypothermia is caused by continued exposure to low or rapidly falling temperatures, cold moisture, snow, or ice. Those exposed to low temperatures for extended periods may suffer ill effects, even if they are well protected by clothing, because cold affects the body systems slowly, almost without notice. As the body cools, there are several stages of progressive discomfort and disability. The first symptom is shivering, which is an attempt to generate heat by repeated contractions of surface muscles. This is followed by a feeling of listlessness, indifference, and drowsiness. Unconsciousness can follow quickly. Shock becomes evident as the victim’s eyes assume a glassy stare, respiration becomes slow and shallow, and the pulse is weak or absent. As the body temperature drops even lower, peripheral circulation decreases and the extremities become susceptible to freezing. Finally, death results as the core temperature of the body approaches 80 °F (27 °C). The steps for treatment of hypothermia are as follows:
- Carefully observe respiratory effort and heart beat; CPR may be required while the warming process is underway.
- Rewarm the victim as soon as possible. It may be necessary to treat other injuries before the victim can be moved to a warmer place. Severe bleeding must be controlled and fractures splinted over clothing before the victim is moved.
- Replace wet or frozen clothing and remove anything that constricts the victim’s arms, legs, or fingers, interfering with circulation.
- If the victim is inside a warm place and is conscious, the most effective method of warming is immersion in a tub of warm (100° to 105 °F or 38° to 41 °C) water. The water should be warm to the elbow - never hot. Observe closely for signs of respiratory failure and cardiac arrest (rewarming shock). Rewarming shock can be minimized by warming the body trunk before the limbs to prevent vasodilation in the extremities with subsequent shock due to blood volume shifts.
- If a tub is not available, apply external heat to both sides of the victim. Natural body heat (skin to skin) from two rescuers is the best method. This is called “buddy warming.” If this is not practical, use hot water bottles or an electric rewarming blanket. Do not place the blanket or bottles next to bare skin, however, and be careful to monitor the temperature of the artificial heat source, since the victim is very susceptible to burn injury. Because the victim is unable to generate adequate body heat, placement under a blanket or in a sleeping bag is not sufficient treatment.
- If the victim is conscious, give warm liquids to drink. Never give alcoholic beverages or allow the victim to smoke.
- Dry the victim thoroughly if water is used for rewarming.
- As soon as possible, transfer the victim to a definitive care facility. Be alert for the signs of respiratory and cardiac arrest during transfer, and keep the victim warm.
b. Venomous snake bite
[edit | edit source]First aid
[edit | edit source]Call emergency services as fast as you can .But keep patient calm. Snakebite first aid recommendations vary, in part because different snakes have different types of venom. Some have little local effect, but life-threatening systemic effects, in which case containing the venom in the region of the bite by pressure immobilization is highly desirable. Other venoms instigate localized tissue damage around the bitten area, and immobilization may increase the severity of the damage in this area, but also reduce the total area affected; whether this trade-off is desirable remains a point of controversy.
Because snakes vary from one country to another, first aid methods also vary. As always, this article is not a legitimate substitute for professional medical advice. Readers are strongly advised to obtain guidelines from a reputable first aid organization in their own region, and to be wary of homegrown or anecdotal remedies.
However, most first aid guidelines agree on the following:
- Protect the patient (and others, including yourself) from further bites. While identifying the species is desirable in certain regions, do not risk further bites or delay proper medical treatment by attempting to capture or kill the snake. If the snake has not already fled, carefully remove the victim from the immediate area. If possible, take a photograph of the snake (many cell phones are equipped with cameras). If you do not know what type of snake it is, someone else might be able to identify it from the photo. A poor photo is better than no photo.
- Keep the victim calm. Acute stress reaction increases blood flow and endangers the patient. Keep people near the patient calm. Panic is infectious and compromises judgment.
- Call for help to arrange for transport to the nearest hospital emergency room, where antivenin for snakes common to the area will often be available.
- Elevate the affected limb at a 45° angle to the body to help minimize swelling.
- Do not give the patient anything to eat or drink. This is especially important with consumable alcohol, a known vasodilator which will speed up the absorption of venom. Do not administer stimulants or pain medications to the victim, unless specifically directed to do so by a physician.
- Remove any items or clothing which may constrict the bitten limb if it swells (rings, bracelets, watches, footwear, etc.)
- Keep the victim as still as possible.
- Do not incise the bitten site.
Many organizations, including the American Medical Association and American Red Cross, recommend washing the bite with soap and water. However, do not attempt to clean the area with any type of chemical. Australian recommendations for snake bite treatment strongly recommend against cleaning the wound. Traces of venom left on the skin/bandages from the strike can be used in combination with a snake bite identification kit to identify the species of snake. This speeds determination of which antivenin to administer in the emergency room.[1]
References
[edit | edit source]- ↑ Chris Thompson. "Treatment of Australian Snake Bites". Australian anaesthetists' website.
c. Heat and sunstroke
[edit | edit source]Heat stroke is a less common but far more serious condition than heat exhaustion, since it carries a 20 percent fatality rate. The main feature of heatstroke is the extremely high body temperature, 105 °F (41 °C) or higher, that accompanies it. In heatstroke, the victim has a breakdown of the sweating mechanism and is unable to eliminate excessive body heat built up while exercising. If the body temperature rises too high, the brain, kidneys, and liver may be permanently damaged.
Sometimes the victim may have preliminary symptoms, such as headache, nausea, dizziness, or weakness. Breathing will be deep and rapid at first, later shallow and almost absent. Usually the victim will be flushed, very dry, and very hot. The pupils will be constricted (pinpoint) and the pulse fast and strong.
When you provide first aid for heatstroke, remember that this is a true life-and-death emergency. The longer the victim remains overheated, the higher the chances of irreversible body damage or even death occurring. First aid treatment for heatstroke is designed to reduce body heat. Reduce body heat immediately by dousing the body with cold water, or applying wet, cold towels to the whole body. Move the victim to the coolest possible place and remove as much clothing as possible. Maintain an open airway. Place the victim on his/her back, with the head and shoulders slightly raised. If cold packs are available, place them under the arms, around the neck, at the ankles, and in the groin. Expose the victim to a fan or air-conditioner since drafts will promote cooling. Immersing the victim in a cold water bath is also effective. Give the victim (if conscious) cool water to drink. Do not give any hot drinks or stimulants. Get the victim to a medical facility as soon as possible. Cooling measures must be continued while the victim is being transported.
d. Heat exhaustion
[edit | edit source]Heat exhaustion is the most common condition caused by working or exercising in hot spaces. Heat exhaustion produces a serious disruption of blood flow to the brain, heart, and lungs. This causes the victim to experience weakness, dizziness, headache, loss of appetite, and nausea.
Signs and symptoms of heat exhaustion are similar to those of shock: the victim will appear ashen gray; the skin will be cold, moist, and clammy; and the pupils of the eyes may be dilated (enlarged). The vital (blood pressure, temperature, pulse, and respiration) signs usually are normal; however, the victim may have a weak pulse together with rapid and shallow breathing.
Body temperature may be below normal. You should treat heat exhaustion victims as if they were in shock. Loosen the clothing, apply cool wet cloths, move the victim to either a cool or an air-conditioned area, and fan the victim. Do not allow the person to become chilled. If the victim is conscious, administer a solution of 1 teaspoon of salt dissolved in a quart of cool water. If the victim vomits, do not give any more fluids. Transport the victim to a medical facility as soon as possible.
e. Poison ivy and poison oak
[edit | edit source]-
 Poison Ivy
 -
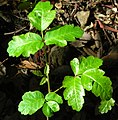 Poison Oak


Poison ivy, poison oak, and poison sumac all cause a rash when oils from the plant come into contact with the skin. The contact does not have to be direct – it can be transferred from the plant to another item, and then to the skin. Tools, pets, and clothing can all transfer the oil from the plant to the skin. The best defense against this rash is to be able to recognize these plants, stay alert, and avoid contact. If you do come into contact with any of them, the first thing you should do is immediately wash the affected area with soap and water. This will, in many cases, prevent the rash from developing. If contact went undetected and a rash does develop, apply Calamine lotion or a cortizone cream to the affected area. If the rash develops on the face or genitals, seek medical attention.
f. Open wound infection
[edit | edit source]Open wounds are a serious hazard in a survival situation, not only because of the tissue damage and blood loss, but also because of the increased possibility of infection. Little can be done to prevent wound contamination at the time of the injury. Proper wound care can minimize further contamination and promote healing and preservation of function in the injured part.
- Clothing should be cut or torn away from a wound; drawing clothes over the wound may introduce bacteria into the wound.
- Whenever possible, avoid touching the wound with fingers or any unsterile object. All water and instruments used in wound care should be sterilized by boiling. Washing your hands before you treat any wound is very important in keeping down infection.
- Clean all wounds as soon after occurrence as possible. Only antiseptics especially designed to use in open wounds should be used directly in the wound.
- NOTE
- Common antiseptics such as Merthiolate, iodine, and Mercurochrome should never be applied directly to a wound. These solutions destroy only part of the bacteria and actually damage the exposed tissues.
- When cleansing solutions for wounds are not available, and medical attention will not be available for a while, a suitable substitute may be a poultice made of fern root. To prepare a poultice, you boil finely chopped roots in water until syrupy. Allow the poultice to cool and apply directly to the wound.
- The “open treatment” method is the safest way to manage wounds in a survival situation. No attempt should be made to close a wound by stitching. The wound should be left open to permit drainage of pus from infection. As long as a wound can drain, it generally will not become life threatening. If a wound is gaping, the edges can be brought together with adhesive tape cut in the form of a butterfly or dumbbell. When a butterfly bandage is applied properly, only a small portion of the adhesive is in contact with the wound; but a large surface of the tape is in contact with the skin on either side of the wound, providing traction that pulls the edges of the wound together. The narrow center permits some free drainage from the wound, and the strips can be removed easily if the wound has to be opened should infection develop.
g. Altitude sickness
[edit | edit source]Altitude sickness can begin in susceptible people at elevations as low as 2400 meters![]() . The early symptoms are drowsiness, feeling unwell, and weakness, especially during exercise. More severe symptoms are headache, poor sleep, persistent rapid pulse, nausea and sometimes vomiting, especially in children. More severe symptoms include pulmonary edema (fluid in the lungs; persistent coughing), confusion, psychosis, hallucination and death.
. The early symptoms are drowsiness, feeling unwell, and weakness, especially during exercise. More severe symptoms are headache, poor sleep, persistent rapid pulse, nausea and sometimes vomiting, especially in children. More severe symptoms include pulmonary edema (fluid in the lungs; persistent coughing), confusion, psychosis, hallucination and death.
Victims can sometimes control mild altitude sickness by consciously taking ten to twelve rapid large breaths every five minutes. If overdone, this can blow off too much carbon dioxide and cause tingling in the extremities of the body. The quickest cure is to reduce the victim's altitude if possible. Some mountain rescue groups carry acetazolamide (a prescription drug) to treat mountain sickness, injectable steroids to reduce pulmonary edema, and inflatable pressure vessels to relieve and evacuate severe mountain-sick persons.
Altitude acclimatization has two stages. Overnight, the body can adjust its carbonic acid balance, and substantially improve its performance. Over four to six weeks, the body can grow more blood cells, strengthen the heart and make other tissue changes. Above 5,500 meters![]() , further altitude exposure weakens, rather than strengthening one's acclimation.
, further altitude exposure weakens, rather than strengthening one's acclimation.
h. Dehydration
[edit | edit source]Dehydration is the depletion of water from the body. It can be prevented by drinking plenty of water, especially during periods of physical exertion. One to five percent dehydration will make you lose your appetite, become sleepy and nauseated, and begin to vomit. As dehydration goes up to 10 percent, dizziness results. You will have headaches, difficulty in breathing, tingling of the legs and arms caused by poor circulation, indistinct speech, and, finally, an inability to walk. Still, 10 percent dehydration generally causes no permanent ill effects. When dehydration exceeds 10 percent, you will become delirious, spastic, almost deaf, and barely able to see. The skin shrivels and becomes numb. At temperatures above 90 °F, dehydration over 15 percent is generally fatal. At 85° and less, the body can stand up to 25 percent dehydration. Dehydration is quickly cured by water—in fact, only water can cure it. When you are dehydrated, you don’t have to worry about how much water you drink or how quickly you drink it, or if the water is warm or cool. Cold water, though, will upset the stomach.
12. Demonstrate two ways to signal for help.
[edit | edit source]Make a distress signal
Make a distress signal on the ground by piling rocks, branches, or other debris to form large letters spelling "S.O.S." This is the universally recognized signal for help. Try to use materials that contrast with the surrounding environment. In winter, you may be able to stomp an SOS into the snow. Make the letters read from east to west (or west to east) so that the shadows catch the letters better.
Light three fires
You may also light three fires to signal for help. Build them either in a line or in a triangle, and get them good and hot. When you see a rescue plane during daylight hours, add green plant matter to the flames. This should cause thick smoke. Be careful to not extinguish the fire by doing this.
Signaling mirror The emergency signaling mirror is approximately 3 by 5 inches and consists of an aluminized reflecting glass mirror, a back cover glass, and a sighting device. It is used to attract the attention of passing aircraft or ships by reflection, either in sunlight or in hazy weather. The reflections of this shatterproof mirror can be seen at a distance of 30 miles at an altitude of 10,000 feet. Though less effective, and with possible shorter range, mirror flashes can also be seen on cloudy days with limited visibility. To use the mirror, proceed as follows:
- Punch a cross-hole in its center.
- Hold the mirror about 3 inches in front of your face and sight through the cross at the ship or aircraft. The spot of light shining through the hole onto your face will be seen in the cross-hole.
- While keeping a sight on the ship or aircraft, adjust the mirror until the spot of light on your face disappears in the hole. The bright spot, seen through the sight, will then be aimed directly at the search ship or aircraft.
13. Demonstrate the principles of stalking and concealment.
[edit | edit source]In order to come close to an animal, trackers must remain undetected not only by the animal, but also by other animals that may alert it. Moving as quietly as possible, trackers will avoid stepping on dry leaves and twigs, and take great care when moving through dry grass.
If the trackers are in close proximity to the animal, it is important that they remain downwind of it, that is, in a position where the wind is blowing away from the animal in the direction of the tracker. They must never be in a position where their scent could be carried in the wind towards the animal and thereby alert it. It is also important that the animal does not have the opportunity to cross their tracks, since the lingering human scent will alert it. Most animals prefer to keep the wind in their faces when traveling so that they can scent danger ahead of them. Trackers will therefore usually be downwind from them as they approach the animals from behind. The wind direction may, however, have changed. If the wind direction is unfavorable, the trackers may have to leave the spoor (tracks and other indications of an animal's presence) to search for their quarry from the downwind side.
As the trackers get closer to the animal, they must make sure that they see it before it sees them. Some trackers maintain that an animal keeps looking back down its own trail, always on the alert for danger coming from behind. When the spoor is very fresh, trackers may have to leave the spoor so that the animal does not see them first. Animals usually rest facing downwind, so that they can see danger approaching from the downwind side, while they can smell danger coming from behind them. An animal may also double back on its spoor and circle downwind before settling down to rest. A predator following its trail will move past the resting animal on the upwind side before realizing that the animal had doubled back, and the resting animal will smell the predator in time to make its escape.
When stalking an animal, trackers use the cover of bushes, going down on their hands and knees where necessary. In long grass they go down on their stomachs pulling themselves forward with their elbows. The most important thing is not to attract attention by sudden movements. Trackers should take their time, moving slowly when the animal is not looking, and keeping still when the animal is looking in their direction. When stalking an animal, trackers must also be careful not to disturb other animals. A disturbed animal will give its alarm signal, thereby alerting all animals in the vicinity, including the animal being tracked down.
Text from The Art of Tracking: The Origin of Science, by Louis Liebenberg, with permission from the author. Taken from Wikipedia:Tracking (hunting)
14. Explain how to prepare and provide shelter on the following
[edit | edit source]In a survival situation, the most important thing for a stranded person to do is find or build a shelter. This is more important than water, fire, or food. The rule of threes tells us that a person can survive for three hours without shelter, three days without water, and three weeks without food. In most wilderness fatalities, the victims die from exposure to the elements. They do not die of thirst, nor do they die of starvation. Unless rescue is expected to take more than three days, the victims need not consider water or food - only shelter. They key to being found and rescued is to stay put, and keep warm.
a. Snow slopes
[edit | edit source]In deep snow, you can dig a snow cave and use that for shelter. Try to make a sleeping platform higher than the floor, as this will keep you warmer. Place something on top of the platform so that you do not sleep directly on the snow. Leaves, pine needles, or if you have one, a sleeping pad will all work well for this. Block the opening with a backpack.
If the snow is not deep enough, you can build a quinzhee, which is similar to an igloo, but less time-consuming to build. Start by piling any gear you can do without for a few hours in a heap, and then start shoveling snow on top of it. It may take a while to dig the gear out again, so be careful about what you bury. The mound of snow needs to be at least 2.5 meters![]() wide, and 2 meters
wide, and 2 meters![]() high. Once the snow is in place, let is sinter for an hour or two. Cook your supper, or go on a hike. Sintering is the process of the snow particles binding to one another. Once enough time has elapsed, gather some sticks and break them into 30 cm
high. Once the snow is in place, let is sinter for an hour or two. Cook your supper, or go on a hike. Sintering is the process of the snow particles binding to one another. Once enough time has elapsed, gather some sticks and break them into 30 cm![]() lengths. Insert the sticks fully into the snow dome. These will serve as wall thickness indicators when you begin hollowing out the inside.
lengths. Insert the sticks fully into the snow dome. These will serve as wall thickness indicators when you begin hollowing out the inside.
Begin digging a door, and tunnel in until you reach the pile of gear in the center. Then extract the gear. Having the gear inside is not strictly necessary, but it reduces the amount of digging you have to do. Shed a few layers when you dig, because this will cause you to work up a tremendous sweat. As soon as the quinzhee is finished, you should change into some dry clothing (otherwise, you may be calling an emergency rescue crew to deal with a severe case of hypothermia). Hollow out the inside, stopping as soon as you hit the sticks. Smooth the walls as you go. This is important, because if the walls are smooth, as the snow inside melts, it will run down the walls. If the snowmelt finds a point, it will form a drip. There is nothing adventurous about having a drip of ice cold water landing on your neck at 3:00 am.
Finally, cut three or four vent holes in the ceiling. This will allow stale air to escape. The vent holes need only be 5 cm![]() in diameter, but they must be made, or you will be re-breathing the C02 you exhaled previously. If you plan to light a candle inside, the vents are even more important, as they will allow carbon monoxide to escape.
in diameter, but they must be made, or you will be re-breathing the C02 you exhaled previously. If you plan to light a candle inside, the vents are even more important, as they will allow carbon monoxide to escape.
As with the snow cave, make a smooth sleeping platform. The coldest air in the quinzhee will find the lowest point inside, and that is not where you will want to sleep. Again, block the entry with a backpack.
b. Rocky areas
[edit | edit source]A shelter does not have to be tall enough to stand up inside, nor does it even need to be tall enough to sit up inside. It will, however need to be tall enough for you to lie inside. 40 cm![]() should be plenty. Start by gathering stones, and build two walls as high as you want the shelter to be. Unless you are a skilled stone layer, the walls should be at least as wide as they are tall. The two walls should be parallel to one another, a little longer than you are, and about twice as wide as your shoulders and hips. When the walls are finished, throw a tarp over them. The tarp should cover the fine walls you just built and lie on the ground on either side. Pile more rocks on the part of the tarp that is lying on the ground. If you can find a stick a little taller than the wall, use it to hold one end of the tarp (near an open end) higher than the rest of the structure. This will create a slope so that water will run off rather an collect on the tarp. (If enough collects on the tarp, your roof will most certainly collapse.)
should be plenty. Start by gathering stones, and build two walls as high as you want the shelter to be. Unless you are a skilled stone layer, the walls should be at least as wide as they are tall. The two walls should be parallel to one another, a little longer than you are, and about twice as wide as your shoulders and hips. When the walls are finished, throw a tarp over them. The tarp should cover the fine walls you just built and lie on the ground on either side. Pile more rocks on the part of the tarp that is lying on the ground. If you can find a stick a little taller than the wall, use it to hold one end of the tarp (near an open end) higher than the rest of the structure. This will create a slope so that water will run off rather an collect on the tarp. (If enough collects on the tarp, your roof will most certainly collapse.)
c. Swamps and marshes
[edit | edit source]
The main function of a shelter in a swamp or marsh is to get you off the ground. To do this, you will need to build a platform. This can be constructed by finding two trees at least 20 cm![]() in diameter and about 2.5 meters
in diameter and about 2.5 meters![]() apart. Then using square lashing, attach two long poles to either side of the trees, high enough to keep you out of the muck. Use continuous lashings to lash several shorter poles across the support poles to make the platform surface. The short poles should all be as close to the same diameter as possible, or if that's impossible, arranged from smallest to largest. Be diligent when making the lashings, checking and double checking the tightness of the ropes. The lashings must be sufficient to hold your weight.
apart. Then using square lashing, attach two long poles to either side of the trees, high enough to keep you out of the muck. Use continuous lashings to lash several shorter poles across the support poles to make the platform surface. The short poles should all be as close to the same diameter as possible, or if that's impossible, arranged from smallest to largest. Be diligent when making the lashings, checking and double checking the tightness of the ropes. The lashings must be sufficient to hold your weight.
Finally, string a rope between the two trees about 1 meter![]() higher than the platform, and throw a tarp over this to keep the rain off of you. You may wish to tie off the corners of the tarp so that the wind does not carry it off.
higher than the platform, and throw a tarp over this to keep the rain off of you. You may wish to tie off the corners of the tarp so that the wind does not carry it off.
d. Forests and tundra
[edit | edit source]It is somewhat odd that forests and tundra are grouped together in this requirement. A forest is by definition, an abundance of trees, while a tundra is an area where the tree growth is hindered by low temperatures and short growing seasons. They are geographical opposites.
In a forested area, build a lean-to. This is done by finding two trees about 2 meters![]() apart, and lashing a horizontal pole to them, about 1.3 meters
apart, and lashing a horizontal pole to them, about 1.3 meters![]() from the ground. Then find more poles, and lay one end of each on the horizontal pole, and the other end on the ground. This will take several poles, as they should be lain side-by-side all the way across. Finally, cover the poles with a layer of debris - leaf litter, twigs, moss - whatever you can find.
from the ground. Then find more poles, and lay one end of each on the horizontal pole, and the other end on the ground. This will take several poles, as they should be lain side-by-side all the way across. Finally, cover the poles with a layer of debris - leaf litter, twigs, moss - whatever you can find.
In tundra, use the techniques for building a shelter in the snow, or if there is no snow, use the techniques for building a shelter in a rocky area.
15. Prepare a balanced menu for two people for a weekend. Prepare these meals while on a campout over an open fire or a camp stove.
[edit | edit source]| Food Group | Grains | Vegetables | Fruits | Milk | Meat & Beans |
|---|---|---|---|---|---|
| 10 year-old Male | 7 oz | 3 cups | 2 cups | 3 cups | 6 ounces |
| 10 year-old Female | 6 oz | 2.5 cups | 2 cups | 3 cups | 5.5 ounces |
| 11 year-old Male | 7 oz | 3 cups | 2 cups | 3 cups | 6 ounces |
| 11 year-old Female | 6 oz | 2.5 cups | 2 cups | 3 cups | 5.5 ounces |
| 12 year-old Male | 8 oz | 3 cups | 2 cups | 3 cups | 6.5 ounces |
| 12 year-old Female | 7 oz | 3 cups | 2 cups | 3 cups | 6 ounces |
| 13 year-old Male | 9 oz | 3.5 cups | 2 cups | 3 cups | 6.5 ounces |
| 13 year-old Female | 7 oz | 3 cups | 2 cups | 3 cups | 6 ounces |
| 14 year-old Male | 10 oz | 3.5 cups | 2.5 cups | 3 cups | 7 ounces |
| 14 year-old Female | 8 oz | 3 cups | 2 cups | 3 cups | 6.5 ounces |
| 15 year-old Male | 10 oz | 5 cups | 2.5 cups | 3 cups | 7 ounces |
| 15 year-old Female | 8 oz | 3 cups | 2 cups | 3 cups | 6.5 ounces |
Of course you are free to select foods you like to eat, but here are a few ideas, including the food groups they belong to:
Suggested Breakfast Foods
[edit | edit source]- Pancakes (Grains)
- Oatmeal (Grains and Milk)
- Cold cereal (Grains and Milk)
- French Toast (Grains, Meat & Beans)
- Scrambled eggs (Meat & Beans)
- Vegetarian breakfast links (Meat & Beans)
- Bananas (Fruit)
- Hot Chocolate
Suggested Lunch and Supper Foods
[edit | edit source]- Haystacks (Grains, Meat & Beans, Dairy, Vegetables)
- Apples, Oranges, Bananas (Fruits)
- Grilled Cheese (Grains, Dairy)
- Vegetarian burgers (Grains, Meat & Beans, Vegetables)
- Vegetarian hotdogs (Grains, Meat & Beans)
- Vegetarian chili (Meat & Beans, Vegetables)
- Salad (Vegetables)
- Fruit juice (Fruit)
- Spaghetti with marinara sauce and Parmesan cheese (Grains, Vegetables, Dairy)
- Spaghetti with chili, onions, beans, and cheese (Grains, Vegetables, Dairy, and Meat & Beans)
- Peanut butter and jelly sandwiches (Grains, Meat & Beans, Fruit)
- Macaroni and Cheese (Grains, Dairy)
- Bread on a stick (Grains)
16. Know ways to observe wilderness etiquette and how you can contribute to wilderness conservation.
[edit | edit source]Be considerate of other campers. When purchasing tents, buy ones in muted colors that will blend in with the environment. Blues, greens, and browns are preferred to reds and oranges. People go camping to escape the garishness of the city—leave that behind.
Also be mindful of the noise level made in your camp. Don't be a nuisance. If camping in the wilderness, be sure to make your camp out of sight of the trail. Most National Forests have guidelines for where you can camp in relation to the trail. Find out what those guidelines are and follow them.
Do not enter anyone else's camp site without their permission, especially when traveling to or from your campsite to other places on the campground. It is very rude to cut through another camp. Use the road or trail, even if it will take longer.
Leave the area cleaner than you found it. If you are leading a group of youngsters on a campout, have a contest before you pile back in your cars to go home: see who can collect the most litter (define "most" first though - it can mean by volume, by weight, or by item count). Offer a prize to the one who collects the most (such as getting to choose which seat he or she will sit in on the trip home).
17. Demonstrate how to tie the following knots and know their uses
[edit | edit source]a. Bowline
[edit | edit source]| Bowline |
|---|
 Use: This knot doesn't jam or slip when tied properly. It can be tied around a person's waist and used to lift him, because the loop will not tighten under load. In sailing, the bowline is used to tie a halyard to a sail head.
How to tie:
|
b. Bowline on a bight
[edit | edit source]| Bowline on a bight |
|---|
 Use: This makes a secure loop in the middle of a rope which does not slip.
How to tie:
|
c. Clove hitch
[edit | edit source]| Clove hitch |
|---|
 Use: This knot is the "general utility" hitch for when you need a quick, simple method of fastening a rope around a post, spar or stake.
How to tie:
|
d. Double fisherman's
[edit | edit source]| Double fisherman's knot |
|---|
 Use: Use the double fisherman's knot to tie together two ropes of unequal sizes. This knot and the triple fisherman's knot are the variations used most often in rock climbing, but other uses include search and rescue.
|
e. Figure eight
[edit | edit source]| Figure Eight |
|---|
 Use: This knot is ideal for keeping the end of a rope from running out of tackle or pulley.
How to tie:
|
f. Prusik
[edit | edit source]| Prusik knot |
|---|
 Use: A Prusik (aka Prussik or Prussic) is a friction hitch used in climbing, canyoneering, caving, rope rescue and by arborists to grab a rope (sometimes referred to as a rope-grab). The term Prusik is used both for the knot, for the loops of cord, and for the action (to prusik).
A Prusik rope is a circular loop with a circumference of 20 to 100 cm Prusiks will work around two ropes, even two ropes of different diameters. Prusiks provide a high-strength and relatively fail-safe (i.e., they will slip before damaging the rope or breaking) attachment, and are used in some rope-rescue techniques. Prusiks are good to use in hauling systems where multiple rope-grabs may be needed, and where mechanical rope-grabs are not available. Although the Prusik Climb technique may be called old-school by some, the US Army still includes it in its annual Best Ranger competition. Rangers in the competition routinely make it up a 90 foot rope in under a minute.How to tie:
|


g. Taut-line hitch
[edit | edit source]| Taut-line hitch |
|---|
 Use: The Taut-Line Hitch is an adjustable loop knot for use on lines under tension. It is useful when the length of a line will need to be periodically adjusted in order to maintain tension. It is made by tying a Rolling hitch around the standing part after passing around an anchor object. Tension is maintained by sliding the hitch to adjust size of the loop, thus changing the effective length of the standing part without retying the knot. When under tension, however, the knot will grip the cord and will be difficult to cause to slip.
It is typically used for securing tent lines in outdoor activities involving camping, by arborists when climbing trees, for creating adjustable moorings in tidal areas, and to secure loads on vehicles. A versatile knot, the Taut-line hitch was even used by astronauts during STS-82, the second Space Shuttle mission to repair the Hubble Space Telescope. How to tie:
|
h. Two half hitches
[edit | edit source]| Two half hitches |
|---|
 Use: This reliable knot is quickly tied and is the hitch most often used in mooring.
How to tie:
|
i. Square
[edit | edit source]| Square Knot |
|---|
 Use: Also known as a Reef knot, the Square Knot is easily learned and useful for many situations. It is most commonly used to tie two lines together at the ends. This knot is used at sea in reefing and furling sails. It is used in first aid to tie off a bandage or a sling because the knot lies flat.
How to tie:
WARNING: Do not rely on this knot to hold weight in a life or death situation. It has been known to fail.
|
References
[edit | edit source]- Book:Adventist Youth Honors Answer Book/Honors
- Book:Adventist Youth Honors Answer Book
- Book:Adventist Youth Honors Answer Book/Skill Level 2
- Book:Adventist Youth Honors Answer Book/Honors Introduced in 1956
- Book:Adventist Youth Honors Answer Book/Recreation
- Book:Adventist Youth Honors Answer Book/General Conference
- Book:Adventist Youth Honors Answer Book/Wilderness Master Award
- Book:Adventist Youth Honors Answer Book/Overlapping requirements
- Book:Adventist Youth Honors Answer Book/Completed Honors