Tomato
| Tomato | |
|---|---|
 | |
| Binomial: | Solanum lycopersicum |
| Genus: | Solanum |
| Family: | Solanaceae |
| Type: | Fruit |
Tomatoes are in many regions among the most popular fruits grown in gardens, because with most varieties freshness is a major factor in the quality of harvested fruit.
Growing Conditions
[edit | edit source]Tomato plants need acidic (5.0 to 6.0 pH) soil, a balance between the three primary fertilizer nutrients, and thrive in warm weather. Inexpensive ways to naturally increase soil acidity include using pine needles as mulch, and mixing either used coffee grounds or sawdust into the soil. Pine needles (and the soil under pine trees) are very acidic, and though used coffee grounds are not very acidic, they and sawdust cause a chemical change in the soil, lowering its pH. Fresh coffee grounds or a 4:1 solution of water and coffee can be used for a quick, direct boost in acidity. Tomatoes do not need high calcium content in order to produce good fruits.
In temperate climates, tomatoes are generally started from seed indoors, then planted out after the last frost date. Tomatoes are planted deeply in the soil, often burying the plant up to just below its top set of leaves, as it roots freely off the stem. If staked, trellised, or caged (methods of supporting the weight of vining plants, allowing them to devote more energy into growing fruit), tomato plants can be grown much closer together than the three feet usually recommended.
While tomato plants do best with eight or more hours of direct sunlight, they may do better if shaded during noontime sun if the temperature is above ninety degrees. Some gardeners will actually throw fine cloth over the plants around noon on very hot days. Indeterminate plants require at least twenty gallons of soil in order to grow in a container; it's better to use determinate varieties for containers, instead.
In each tomato plant, there are about 2 to 3kg when the tomato plant has finished growing. Tomatoes tend to grow faster and produce more fruit when companion planting. Marigolds repel aphids and grow well with tomatoes, and Basil both repels insects (even mosquitoes) and improves fruit flavor. Other companion plants for tomatoes are asparagus, onion/garlic/chives, nasturtium, rose, and parsley. Tomato plants are themselves good companion plants for chili peppers, helping shade their fruit.
Varieties
[edit | edit source]- Beefsteak VFN (a common hybrid resistant to Verticillium, Fusarium, and Nematodes)
- Big Boy (a very common determinate garden cultivar in the United States)
- Black Krim (a purple-and-red variety from Crimea)
- Brandywine (a pink, indeterminate beefsteak type with a considerable number of substrains)
- Burpee VF (an early attempt at disease resistance in a commercial tomato)
- Early Girl (an early-maturing indeterminate)
- Gardener's Delight (a smaller English variety)
- Jet Star Hybrid ( low acid, big yield, large globe shape fruit)
- Juliet (a grape tomato developed as a substitute for the rare Santa F1)
- Marmande (a heavily ridged variety from southern France; similar to a small beefsteak and available commercially in the US as UglyRipe)
- Moneymaker (an English greenhouse variety)
- Mortgage Lifter (a popular heirloom beefsteak known for gigantic fruit)
- Patio (bred specifically for container gardens)
- Roma VF (a plum tomato common in supermarkets)
- Rutgers (an heirloom commercial variety)
- San Marzano (a plum tomato popular in Italy)
- Santa F1 (a closely guarded Chinese grape tomato cultivar popular in the USA and parts of southeast Asia)
- Sweet 100 (a very prolific, indeterminate cherry tomato)
- Yellow Pear (a yellow, pear-shaped heirloom variety)
Uses
[edit | edit source]Maintenance
[edit | edit source]Early Spring
[edit | edit source]Tomatoes grow best in a deep, rich soil, so preparing the bed for this is key.
Seeds are usually planted indoors 4-8 weeks before the last frost date.
Trellising or cages should be put in before the tomatoes are planted.
Summer
[edit | edit source]Consistent irrigation is key, because inconsistent irrigation can lead to cracking. Irrigation should be to the soil, rather than using sprinklers.
Fall Cleanup
[edit | edit source]Just before the first frost, it's a good idea to pick the last green tomatoes (which can be used in many recipes, and can be pickled much like cucumbers), as they can be damaged by cold. All vines should be removed from the field (roots and all) to help manage any disease organisms. Seeds will sprout in cold compost piles, so heat composting should be used if possible. be sure to make clean as possible.
Propagation
[edit | edit source]Tomatoes are almost always propagated by seed but some success has been had with stem cuttings.
Grafting[1]
[edit | edit source]Tube grafting should be carried out when the seedlings have two to four w:true leaves and the stems are 1.5 to 2 millimeters in w:diameter (Figure 3). For proper healing to take place, the vascular tissue in the rootstock and scion must align so that their tissues can easily grow together, forming a strong union for water and nutrient uptake. Again, an essential component for grafting success is to use rootstock and scion plants that have similar stem diameters. Grafting should take place when there is little water stress upon the plants. Early in the morning or just after dark are excellent times to graft as transpiration has typically slowed to reduced levels. Additionally, the grafting process should be carried out indoors or under some sort of shading device. If daytime grafting is essential due to timing and labor concerns, move the plants to a shady area in the morning before w:transpiration increases to prevent unwanted water stress during the process.
-
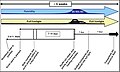 Tube Grafting Timeline (Rivard and Louws, 2006)
 -
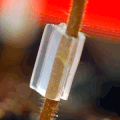
 2.0 mm grafting clips (Rivard and Louws, 2006)


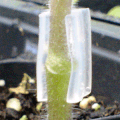
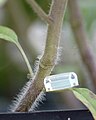
Make the grafts w:Sanitation is extremely important during grafting. Wash with anti-microbial soap, and use latex gloves and sterile tools to reduce the exposure of the plant to pathogenic bacteria, fungi, and viruses. To make a graft, sever the bottom half of a rootstock seedling from its top at a 45-degree angle, and sever the top half of a scion seedling from its bottom at a 45-degree angle. Attach the rootstock to the scion with a rubber or silicon clip (Figure 4). Although the specific degree of each angular cut does not have to be exact, all cuts should be made at a consistent angle to provide more surface area for the vascular tissue to meet and grow together. Other methods have attempted to increase this surface area even further by making V-shaped cuts, but the results are similar to those of the tube grafting technique. Locate the graft union above the cotyledon to prevent adventitious roots from forming and leading to infection of the susceptible scion tissue. Once the transplants have been grafted, put them directly into the healing chamber and cover the chamber to prevent any light from reaching the plants.
-
 Cut the stem at a 45 degree angle
 -
 Attach the silicone clip to the rootstock
 -
 Insert the scion into the clip
 -
 The clip holds the union


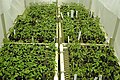
Monitor the healing process Immediately after grafting takes place, the plants must form callus tissue and reconnect vascular bundles to provide the scion with nutrients and water. The purpose of the healing chamber is to keep the scion from becoming water stressed during this process. This can be accomplished by slowing the transpiration stream—the movement of water from inside the plant tissue into the atmosphere. The best ways to do this are to increase humidity, decrease light, and decrease temperature. By decreasing the temperature, however, the development of newly forming callus tissue may be hindered. Therefore, the keys to successful chamber operation are high humidity and no direct sunlight while the graft union is developing—between two and four days after making the graft. The first major constraint to proper graft healing is water stress. Because the scions have been physically separated from their root systems, they tend to wilt, especially in the first few hours after grafting. By adjusting environmental conditions to keep the scions from wilting severely, the grafts will have a better chance of survival. Typically, a small amount of wilt during the first day of healing is acceptable. The high humidity level inside the healing chamber will help the scions regain sufficient turgor pressure and show little sign of wilting. Grafts should be left in the chamber for the first two to four days with absolutely no light and high humidity. After these first days, the successful grafts will become apparent as they will regain normal turgor levels while those that were not successful will wilt permanently. Any movement that pulls the scion stem away from the rootstock will decrease the contact surface between these tissues, ultimately diminishing graft success. Place the grafts into the chamber carefully. Inspect the grafts after placing them in the chamber to be sure that the scion has not been pulled away from the rootstock. Excess water on the leaves can also physically pull the scion away from the rootstock. For this reason, do not mist grafts once they are in the chamber. While the grafts are still weak and healing, apply water from the bottom so that the grafts are not subjected to damage from overhead irrigation.
-
 Healing Chamber
 -
 Recent grafts in the chamber
 -
 Chamber with cool-mist vaporizer
 -
 Commercial healing chamber


Acclimate the grafts to normal conditions Throughout the healing process, open the chamber at least twice a day to replenish carbon dioxide for the grafts. After two to four days in the healing chamber with absolutely no light and high humidity, the scions should return to normal turgor levels and display no evidence of moisture stress. Once the grafts reach normal turgor levels, light can be slowly introduced, and eventually humidity levels can be reduced over the following week. There is a danger that this process can be carried out too fast. When light is first introduced back into the chamber, it is best to simulate indirect light. If the chamber is indoors, mount fluorescent lights above the chamber. In the greenhouse, use a shading apparatus that will significantly reduce the amount of sunlight without eliminating it altogether. As soon as the transplants have acclimated to the reduced light level with no signs of stress, gradually decrease humidity by removing pans of water or the cool-water vaporizer and lifting up the sides of the chamber. Typically, the grafts will require two days at medium light and humidity levels before they can be moved into a low-humidity and high-light environment. Even after the plants have been moved out of the chamber and into a standard greenhouse environment, it is best to water from the bottom to prevent any physical damage to the grafts while the graft union is still weak. Careful overhead watering is possible as long as the seedlings are not exposed to high water pressure that could separate a scion from its rootstock. As the grafted transplants develop, the grafting clip will expand with the growing stem, and eventually fall off (Figure 7). Once the grafted transplants have been in the greenhouse for five to seven days, they can be managed and planted in the field or greenhouse similarly to non-grafted transplants. It is important that grafted tomatoes be planted in the soil in a way that prevents adventitious roots from allowing a bridge to susceptible scion tissue. Therefore, they should be planted so that the graft union is well above the soil line to prevent scion-borne adventitious roots from forming.
-
 Eight days after grafting.
 -
 Ten days after grafting.
 -
 Grafting clip falls (Rivard and Louws, 2006).
 -
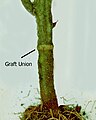 Planting depth (Rivard and Louws, 2006)


Harvesting
[edit | edit source]Tomatoes should be harvested as soon as ripe. Most varieties will continue to ripen once picked.
Many varieties have delicate fruits, and should not be stacked too high in the basket.
Pests and Diseases
[edit | edit source]Tomato cultivars vary widely in their resistance to disease. Modern hybrids focus on improving disease resistance over the heirloom plants. One common tomato disease is tobacco mosaic virus. Various forms of mildew and blight are also common tomato afflictions, which is why tomato varieties are usually marked with letters like VFN, which refers to disease resistance to verticillium wilt, fusarium fungus, and nematodes.
Some common tomato pests are cutworms, tomato hornworms, aphids, cabbage loopers, whiteflies, tomato fruitworms, flea beetles, and Colorado potato beetles and moth lava.
Transplanted tomatoes may begin to show yellow leaves at the base. According to hothouse tomato pioneer, Dan Busch, "With your leaves turning yellow, the tomato plant needs to be fertilized. The fertilizer that you need to use needs to be well balanced, meaning 20-20-20, and if you do not want to use this kind of fertilizer, use blood meal and fish emulsions. This will give you a good source of nitrogen, then you will need to add phosphorus (rock phosphate or super phosphate). Slow growing plants are a sure sign of low phosphorus. Be sure to read the instructions on the blood meal and fish emulsion because it is easy to over fertilize. The real issue here is the nutrition. The yellowing of the leaves is not uncommon with a new transplant, because any nutrition is gone by the time you take it home. If the plants are weak, this is an indication of low potassium. To get potassium in the soil you can add granite dust or wood ash. Call around to local garden centers to find these items.
Fungal Diseases
[edit | edit source]Viral diseases
[edit | edit source]Arthropod Pests
[edit | edit source]To prevent cutworms, tomato seedlings' most vicious predators, one can place an open-ended can so that it surrounds the plant, or wrap it with something like foil or paper, or simply brace its stem with popsicle sticks or toothpicks, all of which seem to deter this moth larva from wrapping around and cutting off the baby plant at its base or leaves.
Vertebrate Pests
[edit | edit source]Birds occasionally damage fruits by pecking. Chipmunks and rats may eat whole fruits.
White tail deer can be a serious problem in North America.
Troubleshooting
[edit | edit source]Yellow leaves on transplants
[edit | edit source]Transplanted tomatoes may begin to show yellow leaves at the base. According to hothouse tomato pioneer, Dan Busch, "With your leaves turning yellow, the tomato plant needs to be fertilized. The fertilizer that you need to use needs to be well balanced, meaning 20-20-20, and if you do not want to use this kind of fertilizer, use blood meal and fish emulsions. This will give you a good source of nitrogen, then you will need to add phosphorus (rock phosphate or super phosphate). Slow growing plants is a sure sign of low phosphorus. Be sure to read the instructions on the blood meal and fish emulsion because it is easy to over fertilize. The real issue here is the nutrition. The yellowing of the leaves is not uncommon with a new transplant, because any nutrition is gone by the time you take it home. If the plants are weak, this is an indication of low potassium. To get potassium in the soil you can add granite dust or wood ash. Call around to local garden centers to find these items.
Yellowing leaves can also be caused by either magnesium or sulfur deficiency, both of which can be treated by adding dissolved w:epsom salt or other forms of w:magnesium sulfate to the soil, and w:foliar feeding the plant with a mixture of two tablespoons epsom salts per gallon. Foliar treatment is reputed to work within 48 hours, but the soil does also need to be amended as a long-term fix.
References
[edit | edit source]