Blender 3D: Noob to Pro/Quickie Render
|
|
Applicable Blender version: 2.63. |

If you haven't completed the "Quickie Model" module, do so now. You will need the resulting model for this module.
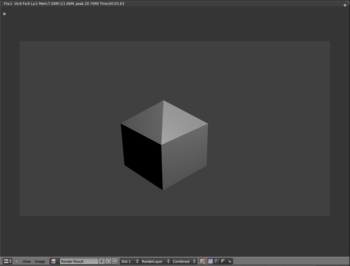
Now that you've created your first model, you'll probably want to try rendering it. Your first render, with a single light source and only nine faces, should finish quickly. However, as your 3D scenes become more complex, you'll find that rendering can take a long time.
In this module, you'll render your quickie model and save the result in various file formats. You'll also learn how to aim cameras and create lamps.
Rendering the Quickie Model[edit | edit source]
- Launch Blender and load factory settings.
- To load the house model from the previous module, select File → Open Recent, and select the file you saved. Alternatively, press F1 or select File → Open, find the file, and open it. As soon as the operation is complete, the window will load the quickie model that you created in the previous exercise.
- Press F12 or select Render → Render Image. This opens the Image Editor so you can watch the render progress.
- With the new Apple keyboard, use Fn + F12 to avoid the Mac Dashboard.
- With Macintosh OS X 10.5, use Alt + Fn + F12 .
- With Gnome, use Alt + F12 to avoid the Gnome Search Dialog.
|
You can stop a render in progress by pressing Esc any time the render window has the focus. Bear in mind this will stop the rendering of the current frame and abandon any partial results. Pressing F12 will start rendering the image from the beginning again. |
Seeing Your Render[edit | edit source]
By default, pressing F12 will switch to the UV/Image Editor window, and show your render there. You can switch back to the 3D view with F11 . Pressing F11 in the 3D view will switch you to the UV/Image Editor window without redoing the render, i.e. you will see the same image as last time.
Aiming the Camera[edit | edit source]
If you don't get a picture of the house, or if the picture is not framed well, try moving or re-aiming the camera:
- Press Esc to get back to Edit Mode, if needed.
- Press Num0 to take the camera's viewpoint.
- Press Shift + F to put the 3D View window into camera fly mode.
In camera fly mode, you can:
- Pan and tilt by moving the mouse pointer up, down, left, or right.
- Accelerate by SCROLL forwards.
- Decelerate by SCROLL backwards.
- Press any key or button to exit fly mode.
(It works differently in version 2.70 and later, more like a FPS game with possibility to slide and so on, buttons are regular FPS controls)
When you're done positioning the camera, try rendering again.
Lighting[edit | edit source]
If your cube is completely black, you may not have a lamp in the scene. Either the default lamp got deleted, or you're using a version of Blender that doesn't provide a default lamp.
To add a lamp:
- Make sure Blender is in Object Mode.
- Place the 3D cursor where you want the lamp to go; or add the lamp then immediately grab it, and move it somewhere else.
- Press Shift + A .
- In the popup menu, select Lamp → Point.
Saving the Render[edit | edit source]
This is old information and is no longer valid. Saving the scene (with F2 , for instance) does not save any renders. Saving renders is a separate step.
To save your current render :
- Make sure you are in the Image Editor. If not press F12 to render
- Press F6 . This temporarily changes the active window into a File Browser window. (in the older versions you use F3 but in the newer versions the button can be FN + S or SHIFT + S
- Navigate to the directory (folder) where you want to write the file.
- Type a filename in the text box (to the left of the "Cancel" button).
- To the left of the window, choose your preferred file type.
- Click LMB on the "Save as Image" button. As soon as the save operation is complete, the window will return to the Image Editor.
Renderer Selection[edit | edit source]

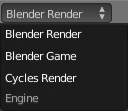
Blender offers a choice of different rendering engines for producing images. The menu for selecting from these appears in the Info window (the thin one that contains the menu bar at the top of the default layout). In most of these tutorials, you will leave this choice set at Blender Render. But it is worth knowing what other choices are available:
- Blender Render—the oldest renderer, commonly known as the Blender Internal renderer. Built into Blender right from its early days. Can still produce good results with the right tricks, but considered by the Blender developers to be antiquated and not worthy of continuing development.
- Blender Game—this is the renderer used by the Blender Game Engine. Designed to be fast enough for interactive use in a game, which means there are limitations in the quality of renders it produces. You also use this renderer to create rigid-body physics simulations.
- Cycles Render—for this and other choices, see Advanced Rendering.
Render Control[edit | edit source]

The top panel under the Render tab ![]() in the Properties window shows 3 buttons and a menu. The first button renders a single frame, equivalent to F12 . The other two buttons are more relevant to animations.
in the Properties window shows 3 buttons and a menu. The first button renders a single frame, equivalent to F12 . The other two buttons are more relevant to animations.

The “Display:” menu controls what happens when you press F12 : the default “Image Editor” causes the 3D view to be switched to the UV/Image Editor showing the rendered image. “Full Screen” causes the UV/Image Editor display to take over the entire screen, while “New Window” makes it appear in a separate OS/GUI window (similar to how older versions of Blender used to work). Finally, “Keep UI” causes no changes to your window layout at all; you have to explicitly bring up the Image Editor with F11 to see the rendered image.
Render Image Dimensions[edit | edit source]

You can control the size of the image that Blender creates when rendering. This is specified in the “Dimensions” panel under Render ![]() properties. Apart from the menu at the top, the settings in this panel are grouped into two columns:
properties. Apart from the menu at the top, the settings in this panel are grouped into two columns:
- The column on the left controls settings for a single image.
- The column on the right specifies additional settings for rendering a whole sequence of images as part of an animation. These settings will be discussed later.
At the upper left, under “Resolution:”, we have the dimensions in pixels of the image (the default settings are 1920×1080 as shown in the screenshot), plus an additional scale factor slider below (showing 50% by default). With these settings, the image will actually be rendered at (1920×50%)×(1080×50%) = 960×540. Having the scale factor is a convenience. Rendering smaller, lower-quality images is faster, which speeds up initial work on your model, but you'll want full quality for the final result. Instead of mentally having to work out numbers for render quality, you can simply set the resolution to full quality, and use the scale factor to reduce this to, say, 50% or 25% for interim work, then set it to 100% for the final output.
Image File Formats[edit | edit source]

You set the format and location for saving rendered images in the “Output” panel under the Render ![]() properties.
properties.
In current versions of Blender, the default format for saving rendered images is PNG. This is a lossless format which has the option for alpha transparency (which means the sky background is replaced by transparent pixels—enabled by clicking the “RGBA” button). This is a good format if you intend to do further work with the image (e.g. in an image editor like Gimp or Photoshop), but the files can be large.
JPEG is a lossy image format, which means it throws away information that the human eye doesn’t see. This produces much smaller files than PNG, and is adequate if you just want to upload the render directly for use in a Web page or other such document, but is not the best choice if you intend to do further processing of the image. It also doesn’t support alpha transparency.
To change the render file format:
- Switch to the Render tab in the Properties window.
- Look for the “Output” panel.
- Click LMB on the popout menu with the current file format.
- Select your preferred format.
Additional Resources[edit | edit source]
- the "Output Formats" module
- Tutorial on Using Multiple Cameras ← Pictures are missing from this tutorial
- Ira Krakow's Basic Blender Camera Positioning (Rigging)