Geometry for Elementary School/Print version
| This is the print version of Geometry for Elementary School You won't see this message or any elements not part of the book's content when you print or preview this page. |

The current, editable version of this book is available in Wikibooks, the open-content textbooks collection, at
https://en.wikibooks.org/wiki/Geometry_for_Elementary_School
Table of contents

Introduction
Why geometry?
Geometry is one of the most elegant fields in mathematics. It deals with visual shapes that we know from everyday life.
Who should use this book?
This book is intended for use by a parent (or a teacher or ward) and a child. It is recommended that the parent have some familiarity with geometry, but this is not necessary. The parent can simply read the chapter before teaching the child and then learn it together.
Book guidelines
The classic book about geometry is Euclid's Elements. This book helped teach geometry for hundreds of years, so we feel that writing this book based on the Elements is a correct step.
We will adapt parts of the book for children and modify the order of some topics in order to make the book clearer.
The learning will be based on constructions and proofs. A construction is a method of creating a geometric object (such as a triangle) using a set of tools. In the case of this book, the tools we will be using are a compass and a ruler. A proof is a logical trail where we can prove one fact by starting with some given information and make a series of conclusions based on that information. Oftentimes it is more difficult to prove a result than to simply find the result.
The constructions are useful for letting the child experience geometric ideas and get visual results.
The proofs are a good way to understand geometry and are a good basis for future study of logic.
Since the book is for children, we omit some of the proof details and use intuition instead of precise definition. On the other hand, we insist on correct and elegant proofs. Precise definitions and exact proofs can be found in regular geometry books and can be used to extend to material to some of the children.
Notation
The notation that is used in the book is defined the first time it is used. However, in order to simplify its use, it is also summarized in the notation section of the conventions chapter at the end of the book.
How to contribute to this book
This book uses British English as a primary language; however, there is a table provided at the end of this book that summarises all the American terms that readers may come across.
Before using this book
Make sure that these resources are available before using this book:
- A protractor
- A compass
- A ruler
- Graph paper
- Single-lined paper
Ruler and Compass
Introduction
How to draw a line

We will use the notation for the line segment the starts at A and ends at B. Note that we don't care about the segment direction and therefore is the same as .


How to draw a circle
- Using the compass (based on Book I, Postulate 3).
We use the notation for the circle whose centre is the point A and its radius length equals that of the segment .


Note that in other sources, such as Euclid's Elements, a circle is described by any 3 points on its circumference, ABC.
The center-radius notation was chosen because of its suitability for constructing circles with a ruler and a compass.
Points
A point is a dot that is so small that its height and width are actually zero! This may seem too small. So small that no such thing could ever really exist. But it does fit with our intuition about the world. Even though everything in the physical world around us of things larger than atoms, it is still very useful to talk about the centers of these atoms, or electrons. A point can be thought of as the limit of dots whose size is decreasing.
 |
The reason that this shape is not a point is that it is too large, it has area. This is a 'circle'. |
|
Even when taking a circle of half that size we don't get a point. |
|
And that is too large as well... |
A point is so small that even if we divide the size of these dots by 100, 1,000 or 1,000,000 it would still be much larger than a point. A point is considered to be infinitely small. In order to get to the size of a point we should keep dividing the circle size by two – forever. Don't try it at home.
A point has no length, width, or depth. In fact, a point has no size at all. A point seems to be too small to be useful. Luckily, as we will see when discussing lines we have plenty of them. It may be best to think of a point as a location, as in a location where two lines cross.
Why define a point as an infinitely small dot? For one thing it has a very precise location, not just the center of a rough dot, but the point itself. Another reason is that if the drawing is made much bigger or smaller the point stays the same size. A point which is an infinitely small dot would be too small to see, so we must use a big old visible normal dot, or where two lines cross to represent it and its approximate location on paper.
When we name a point, we always use an uppercase letter. Often we will use for "point" if we can, and if have more than one dot, we will work our way through the alphabet and use , , and so on. However, nowadays many people will start with any letter they like, although the still remains the best way.


If some points are on the same line, we call them 'colinear'. If they are on the same plane, they are 'coplanar'. Two points are always colinear. But a point can be collinear with several points.Two to three points are always coplanar. Of course this is tautological since the definition of a 'line' is 'two connected points', and the definition of a 'plane' is 'the surface specified by three points'.
Exercises
Lines
Lines
A line is as wide as a point, infinitely thin, having an infinite number of points, (in a straight row), extending forever in both the directions. Remember that this is impossible to be constructed in real life, so usually we would simply draw a line (with thickness!) with an arrow on both ends. Any two lines can intersect at only a single point. Lines that are on the same plane are 'coplanar'.


Line segments
A line segment, or segment, is a part of a line, which has two endpoints. The endpoints give the line segment a fixed, or finite length.


Line segments AB, and CD, can bewritten as , and


Rays
A ray is a line segment that has only one endpoint. A ray is infinite in one direction. That means that it goes on forever in one direction. As they are impossible to construct in real life, usually we will just draw a line with an arrowhead on one end. They can be expressed as .


Intersecting lines
Two lines intersect when they cross each other. They form vertically opposite angles, which we will learn later. The point where the lines intersect is called the point of intersection. If the angles produced are all right angles, the lines are called perpendicular lines. If two lines never intersect, they are called parallel lines. Parallel lines will be discussed in detail later. Usually if two lines are not parallel, they intersect each other. The definition of intersecting lines can be called two lines that cross each other a only one point. This point is called the point of intersection.
Axiom: there is only a single straight line between two points
Axiom: there is only a single straight line between two points.


- show by halving that there are infinite number of points in a line
- show that the number of points in a long line and a short line is equal
Angles
 |
The corresponding material in Euclid's elements can be found on page 26 of Book I in Issac Todhunter's 1872 translation, The Elements of Euclid for the Use of Schools and Colleges. |
In this section, we will talk about angles.
Angles

An angle (∠) is made up of a vertex (a point), two arms (rays), and an arc. They are arranged so that the endpoint of the arms are the same as the vertex, and the arc runs from one arm to another. The size of an angle depends on how big the arms are opened, and they are measured in degrees. You can measure them by putting your protractor on the vertex and looking at the degrees your second arm has reached.
An angle that is less than 90° is known as an acute angle. A 90° angle is known as a right angle. Those between 90° and 180° are obtuse angles. Exactly 180° angles are called straight angles. Those between 180° and 360° are reflex angles, while angles at 360° are round angles
An angle is usually named by the points it contains. The format is as follows:
"∠" + a point on one arm + vertex + a point on the other arm
However, sometimes there are no angles on that vertex, and we can omit the point on the arms. In fact, when we are lazy, we can even use a lowercase letter to represent a certain angle. Note that in this case, ∠ must be omitted. Although the lowercase letter represents the value of the angle, all of these names can be used as unknowns in equations.
Adjacent angles (adj. ∠s) are angles where:
- Their opposite arms coincide (overlap);
- Their arcs do not coincide (overlap);
- Their vertices coincide (overlap).
Sometimes, two angles may add up to 90° or 180°. They are called complementary angles and supplementary angles respectively. As many angles have such properties, these will be quite handy in the future.
Angles at a point

Sometimes, two or more angles share a common vertex, and their sizes add up to 360o. They are called angles at a point (∠s at a pt.). This can be very useful when we write proofs or find out angles.
For example, imagine that O is a point in the figure. The three points, A, B, and C are around the point O, and a ray shoots out of O to A, B and C respectively. Given that ∠AOB = 120° and ∠BOC = 150°,

Adjacent angles on a straight line

When the sizes of adjacent angles add up to 180°, they are adjacent angles on a straight line. They are used when finding out the value of one of the angles. (Or more, for that matter, when you have angles that are equal or related.) The abbreviation, adj. ∠s on st. line, can be used as a reference that the angles add up to 180°.
Look at the image on the right as an example. Here, b and a are supplementary. The sum of b and a is equal to c. b and a are adjacent angles on a straight line. If we know the value of b, we can find out the value of a easily. Note that a, b, and c are angles at a point.
Vertically opposite angles

Vertically opposite angles are very simple. If two straight lines run into each other, the opposite angles produced must be vertically opposite angles (vert. opp. ∠s). They must be equal to each other. Note that you cannot assume that something is a straight line just by observation, so be sure that it's mentioned in the question before you do anything. Vertically opposite angles is a very common reference and will come in handy in many situations, so before you are stuck on a problem, see if you can find some vertically opposite angles first.
Look at the figure on the right. As indicated in this figure, D is equal to C and A is equal to B. This is because they are vertically opposite angles. Note that here, D and A, A and C, C and B, and D and B are all pairs of adjacent angles on a straight line. Also, the four angles are angles at a point.
Plane shapes
In this section, we will talk about plane figures, which are formed with coplanar (on the same plane) points joined together. When planes run into each other, they intersect. The line produced in between is called the line of intersection.
Plane figures
Any shape that can be drawn in the plane is called a plane figure. A shape with only straight sides as edges is called a polygon (POL-ee-gone). Polygons must have at least three sides, thus the polygons with the fewest number of sides are triangles. Circles and semicircles are not polygons because they have curved sides.
When all the sides of a polygon are equal, it is equilateral (ee-quee-LAH-teh-roll). When all the angles of a polygon are equal, it is equiangular (ee-quee-ANG-ger-lah). When a polygon is both equilateral and equiangular, it is a regular shape. When doing mathematics problems, it is very important that an equilateral shape may not be equiangular (such as a rhombus), and an equiangular shape may not be equilateral (such as a rectangle). However, an equilateral triangle is always both (see below).
When dealing with plane figures, there are two measurements that are important to find: the area and the perimeter. The perimeter is the length around the shape while the area is the size of the shape. They can be calculated with different formulae.
Triangles
|
The corresponding material in Euclid's elements can be found on page 27 of Book I, Definition(s) 24-29 in Issac Todhunter's 1872 translation, The Elements of Euclid for the Use of Schools and Colleges. |
A triangle is a shape with three sides. It can be classified according to its sides or angles, with three kinds each. Here they are:
- Equilateral triangles, which are also equiangular triangles, have three sides equal and three angles equal. Their angles are always 60°.
- Isosceles triangles are triangles in which two of the sides are equal. The non-included angles of the sides are also equal.
- Scalene triangles have no equivalence in any way.
- Right triangles are triangles with a right angle. The longest side of such triangles is called a hypotenuse.
- Obtuse triangles are triangles with an obtuse angle.
- Acute triangles are triangles with no right or obtuse angle.
It is interesting to note that the interior angles of triangles must add up to 180°. This is commonly used in proofs and other problems. Imagine a triangle whose points are marked A, B and C, angle A is 60 degrees, and angle B is 70 degrees:

Usually, when drawing a triangle, we draw one side horizontally. This side is usually called the base. There is nothing special about the base. By turning your paper you can make any side into the base. There is no mathematical reason to call one side a base; we do it to make talking about the triangle easier. When you have a triangle and think of one of the sides as the base, then there is one corner of the triangle that is not on the base and this point is the furthest point on the triangle from the base. The height of the triangle is the line that is perpendicular to the base and goes through that furthest point. Sometimes instead of being called the height it is called the altitude of the triangle. (So if your teacher calls it an altitude, don't worry, it's really the same thing.) The length of the base and the height are the only two numbers you need to know when calculating the area of any triangle. Just multiply base and height and divide by two (or multiply it by a half if you like.) and you have the area of the triangle!
The perimeter of the triangle is easy: just add up all the sides and voilà, you have the perimeter. You can multiply one side of an equilateral triangle by three as well. As for isosceles triangles, simply multiply one of the equal sides by two and add the shorter one. There we go.
Quadrilaterals
A quadrilateral is a shape with four sides. You will spend a lot of time with these. They can be classified into many different categories:
- Parallelograms are shapes where opposite sides and angles are equal. The opposite sides are parallel, hence the name.
- Rectangles are parallelograms where the angles are all 90°. Its width or breadth refers to the shorter sides, while its length refers to its longer ones.
- Rhombuses are parallelograms where all the sides are equal, and opposite angles are equal.
- Squares are parallelograms that are both rectangles and rhombuses, i.e. all angles are right and all sides are equal.
- Trapeziums, called trapezoids in American English, have two opposite sides that are parallel. The parallel sides are sometimes called the upper and lower bases.
- Right-angles trapeziums are trapeziums with a right angle.
- Isosceles trapeziums are trapeziums where the laterals sides are equal but not parallel.
- Scalene trapeziums are trapeziums that fall into neither category.
- Kites are quadrilaterals where two pairs of adjacent sides are equal and one pair of opposite angles is equal.
- Irregular quadrilaterals are any quadrilaterals that do not fit into one of the groups above.

Calculating the area of these shapes can be very easy. For parallelograms, simply multiply the base with the height, the way with do with triangles, except we don't need to divide by two. The square is especially easy: just square one of the sides, which would be the length. For the others, we can cut them up into bite-sized pieces before we calculate. For example, we can dissect the right-angled trapeziums into a right-angled triangle and a rectangle.
The perimeter of these shapes are just as easy. For rectangles, we simply add up the length and the width, then multiply by two. You can simply multiply the length of a square by four. The isosceles trapeziums are just as easy: multiply one of the lateral sides by two, then add it up with the other two. The kite is easy as well: Just add up the two different sides and multiply that by two. For the rest, you can just add up everything.
Other polygons
Many other polygons have a name. The following are the ones you need to know in elementary school:
- Pentagons have five sides.
- Hexagons have six sides.
- Heptagons or septagons have seven sides.
- Octagons have eight sides.
- Nonagons have nine sides.
- Decagons have ten sides.
And here are two more extras:
- Hendecagons (also known as undecagons) have eleven sides.
- Dodecagons have twelve sides.
Calculating the perimeter and area of these shapes can be more difficult. Sometimes you have to come up with ways of doing it yourself. When you come across an equilateral polygon, you can of course multiply one of the sides by the number of sides of the shape. In other cases, you may need to find some dimensions yourself. Keep your eyes peeled for equivalences, and the problems cannot be that difficult.
When calculating the area of these shapes, there are two main ways of doing so: dissecting and filling. With dissecting, you cut up the figure into many pieces, such as parallelograms, squares and triangles. Then you can simply add up all those areas to find out the total. With filling, you add extra bits to shapes so as to make it look like the shapes you usually come across with. For example, when you don't known the altitude of a triangle, you can put three surrounding triangles around it. Then you can calculate the area of the rectangle formed and the surrounding triangles, thereby finding the area of the triangle.
Circles and other plane figures
Apart from polygons, there are other shapes that have wavy sides, round corners or other peculiarities that disqualify them as polygons. Among them, the most famous are the circle, the ellipse, and the semicircle. These shapes are different from polygons, and have their special formulae that you must learn by heart. Let's start with the most basic: the circle.
|
The corresponding material in Euclid's elements can be found on page 27 of Book I, Definition(s) 15-17 in Issac Todhunter's 1872 translation, The Elements of Euclid for the Use of Schools and Colleges. |
Circles are shapes with infinite loci around its centre. Its perimeter is called the circumference. The line running from one side of the circle, through the centre and to the other side is called the diameter. The line running from the centre to any point on the circumference is called the radius. Any other line running from one point of the circumference to another is called a chord. An arc is any part of the circumference.
For thousands of years, mathematicians have been trying to find out the relationship between the circumference and the diameter. When we divide the circumference by the diameter, we get a number that is slightly larger than 3. That number is called π (spelt pi and pronounced pie). Supercomputers have discovered millions of digits of π, but you only need to remember that π is roughly 3.14 or 22/7. That is close enough. If you know the circumference of a circle, dividing that by π will result in the diameter; multiplying the diameter by π will result in the circumference. To find out the area of a circle, calculate πr2.
You don't really get to know much about ellipses and semicircles in elementary school. Ellipses look like ovals, except they have a stricter way of constructing that is more than a crushed circle. They have two 'centres' called foci. Semicircles are circles cut along the diameter, and if you draw a line from one end to a point on the circumference, then to another end, you always get a right angle. These two shapes are seldom taught in elementary school, and aside from knowing their names you don't need to study them.
Constructing an Equilateral Triangle
Introduction

In this chapter, we will show you how to draw an equilateral triangle. What does "equilateral" mean? It simply means that all three sides of the triangle are the same length.
Any triangle whose vertices (points) are A, B and C is written like this: .

And if it's equilateral, it will look like the one in the picture.
The construction
|
The corresponding material in Euclid's elements can be found on page 31 of Book I, Proposition 1 in Issac Todhunter's 1872 translation, The Elements of Euclid for the Use of Schools and Colleges. |
- Using your ruler, Draw a line segment whatever length you want the sides of your triangle to be.
Call one end of the line segment A and the other end B.
Now you have a line segment called .
It should look something like the drawing below.
- Using your compass, Draw the circle whose center is A and radius is .

- Again using your compass Draw the circle , whose center is B and radius is .

- Can you see how the circles intersect (cross over each other) at two points?
The points are shown in red on the picture below.
- Choose one of these points and call it C.
We chose the upper point, but you can choose the lower point if you like. If you choose the lower point, your triangle will look "upside-down", but it will still be an equilateral triangle.
- Draw a line segment between A and C and get line segment .

- Draw a line segment between B and C and get line segment .

- Construction of is completed.


Claim
The triangle is an equilateral triangle.
Proof
- The points B and C are both on the circumference of the circle and point A is at the center.

- So the line segment is the same length as the line segment . Each is a radius of circle , or more simply .

- We do the same for the other circle:
The points A and C are both on the circumference of the circle and point B is at the center.
- So we can say that .

- We've already shown that and . Since and are both equal in length to , they must also be equal in length to each other. This can be shown by substitution. So we can say
- Therefore, the line segments , , and are all equal.

- We proved that all sides of are equal, so this triangle is an equilateral triangle by definition.


Problems with the proof
The construction above is simple and elegant. One can imagine how children, using their legs as compass, accidentally find it.
However, Euclid’s proof was wrong.
In mathematical logic, we assume some postulates. We construct proofs by advancing step by step. A proof should be made only of postulates and claims that can be deduced from the postulates. Some useful claims are given names and called theorems in order to enable their use in future proofs.
There are some steps in its proof that cannot be deduced from the postulates. For example, according to the postulates he used, the circles and do not have to intersect.
Although the proof was wrong, the construction is not necessarily wrong. One can make the construction valid, by extending the set of postulates. Indeed, in later years, different sets of postulates were proposed in order to make the proof valid. Using these sets, the construction that works so well using pencil and paper is also logically sound.
This error of Euclid, the gifted mathematician, should serve as an excellent example of the difficulty in mathematical proof and also the difference between proof and our intuition.
Copying a Line Segment
This construction copies a line segment to a target point T. The construction is based on Book I, prop 2.
The construction
- Let A be one of the end points of . Note that we are just giving it a name here. (We could replace A with the other end point B).

- Draw a line segment

- Construct an equilateral triangle (a triangle that has as one of its sides).

- Draw the circle , whose center is A and radius is .

- Draw a line segment starting from D going through A until it intersects and let the intersection point be E . Get segments and .

- Draw the circle , whose center is D and radius is .

- Draw a line segment starting from D going through T until it intersects and let the intersection point be F. Get segments and .


Claim
The segment is equal to and starts at T.
Proof
- Segments and are both from the center of to its circumference. Therefore they equal to the circle radius and to each other.

- Segments and are both from the center of to its circumference. Therefore they equal to the circle radius and to each other.

- equals to the sum of its parts and .

- equals to the sum of its parts and .

- The segment is equal to since they are the sides of the equilateral triangle .

- Since the sum of segments is equal and two of the summands are equal so are the two other summands and .

- Therefore equals .


Constructing a Triangle
| This module may require a complete rewrite in order to suit its intended audience. You can help rewrite it. Please see the relevant discussion. |
In this chapter, we will show how to construct a triangle from three segments. The construction is based on Book I, proposition 22
The construction
Given three line segments , and we build a triangle whose sides equal the segments.

- Copy the line to point A.

If you have forgotten how to do this, follow the instructions in the previous section. Your construction should look like the grey lines in the picture below. Call the new line
It's a good idea to erase your construction lines now, so all that's left are the four line segments shown below.
- Copy the line to point B

Your construction should look like the grey lines in the picture below. Call the new line
- Draw the circle , whose center is A and radius is .
- Draw the circle , whose center is B and radius is .
- Let J be an intersection point of and .

- Draw a line .
- Draw a line .


Claim
The sides of the triangle equal to , and .

Proof
- The segment is a side of the triangle and equal to itself.
- The segment is equal to because they are both radii of circle. And because it was copied, =. Therefore is also equal to
- The segment is equal to because they are both radii of circle. And because it was copied, =. Therefore is also equal to
- Hence the sides of the triangle are equal to , and .
Testing the procedure
- Draw a line of some length.
- Copy the line to an arbitrary point C and get .
- Draw a line such that it length is three times the length of . (We didn't specify how to construct such a segment and we give it as an exercise. Use chapter Copy the line as a guide for the solution.
- Construct a triangle from , and .
Why you couldn't construct the triangle in the test?
The reason we couldn’t build the triangle in the test is that the circles we constructed did not intersect. One cannot use any three segment to construct a triangle. The length of the segments must obey a condition called “The triangle inequality”. The triangle inequality states that any of the segments should be shorter that the sum of the length of the other two segments. If one of the segments is longer the circles do not intersect. If one segment equals to the sum of the other two, we get a line instead of a triangle.
Therefore, the construction is correct but one should condition the segments on which it can be applied. Note that the original construction was conditioned by Euclid, hence there is no error in the construction or in its proof.
Why the Constructions are not Correct
In the previous chapters, we introduced constructions and proved their validity. Therefore, these constructions should work flawlessly. In this chapter, we will check whether the construction are indeed foolproof.
Testing a construction
- Draw a line of length 10cm.
- Copy the line segment to a different point T.
- Measure the length of the segment you constructed.
Explanation
I must admit that I never could copy the segment accurately. Some times the segment I constructed was of the length 10.5cm, I did even worse. A more talented person might get better results, but probably not exact.
How come the construction didn't work, at least in my case?
Our proof of the construction is correct. However, the construction is done in an ideal world. In this world, the lines and circles drawn are also ideal. They match the mathematical definition perfectly.
The circle I draw doesn't match the mathematical definition. Actually, many say that they don't match any definition of circle. When I try to use the construction, I'm using the wrong building blocks.
However, the construction are not useless in our far from ideal world. If we use approximation of a circle in the construction, we are getting and approximation of the segment copy. After all, even my copy is not too far from the original.
Note
In the Euclidian geometry developed by the Greek the rule is used only to draw lines. One cannot measure the length of segments using the rulers as we did in this test. Therefore our test should be viewed as a criticism of the use of Euclidian geometry in the real world and not as part of that geometry.
Congruence
In this chapter, we will start the discussion of congruence and congruence theorems. We say the two figures are congruent if they have the same shape and size. Congruent figures have three things in common: corresponding sides (corr. sides), corresponding angles (corr. ∠s) and corresponding points (corr. points). We will only talk about congruent triangles.
Congruent triangles
The triangles and are congruent if and only if all the following conditions hold:

- The side equals . (Corresponding sides)

- The side equals . (Corresponding sides)

- The side equals . (Corresponding sides)

- The angle equals . (Corresponding angles)

- The angle equals . (Corresponding angles)
- The angle equals . (Corresponding angles)


Note that the order of vertices is important. It is possible that and are not congruent even though both refer to the same triangle. Remember that the place where corresponding points are must be the same on both triangles.

Congruence theorems give a set of the fewest conditions that are sufficient in order to show that two triangles are congruent. They are SSS, SAS, ASA, AAS and RHS. We will talk about them later on.
Finding the value of unknowns in triangles whose congruence is given
Let's say we have two triangles, and , and they are congruent. AB=3, ∠F=90° and ∠E=60°. We need to find DE and ∠A. Here's how:


Side-Side-Side Congruence Theorem
The first congruence theorem we will discuss is the Side-Side-Side theorem.
The Side-Side-Side congruence theorem
Given two triangles and such that their sides are equal, hence:
- The side equals .

- The side equals .

- The side equals .


Then the triangles are congruent and their angles are equal too.
Method of Proof
In order to prove the theorem we need a new postulate. The postulate is that one can move or flip any shape in the plane without changing it. In particular, one can move a triangle without changing its sides or angles. Note that this postulate is true in plane geometry but not in general. If one considers geometry over a ball, the postulate is no longer true.
Given the postulate, we will show how can we move one triangle to the other triangle location and show that they coincide.
Due to that, the triangles are equal.
The construction
- Copy The line Segment side to the point D.
- Draw the circle .
- The circle and the segment intersect at the point E hence we have a copy of such that it coincides with .
- Construct a triangle with as its base, , as the sides and the vertex at the side of the vertex F. Call this triangle triangles


The claim
The triangles and congruent.
The proof
- The points A and D coincide.
- The points B and E coincide.
- The vertex F is an intersection point of and .
- The vertex G is an intersection point of and .
- It is given that equals .
- It is given that equals .
- Therefore, equals and equals .
- However, circles of different centers have at most one intersection point in one side of the segment that joins their centers.
- Hence, the points G and F coincide.
- There is only a single straight line between two points, therefore coincides with and coincides with .
- Therefore, the coincides with and the two are congruent.
- Due to the postulate and are equal and therefore congruent.
- Hence, and are congruent.
- Hence, equals , equals and equals .


Note
The Side-Side-Side congruence theorem appears as Book I, prop 8 at the Elements. The proof here is in the spirit of the original proof. In the original proof Euclid claims that the vertices F and G must coincide but doesn’t show why. We used the assumption that “circles of different centers have at most one intersection point in one side of a segment that joins their centers”. This assumption is true in plane geometry but doesn’t follows from Euclid’s original postulates. Since Euclid himself had to use such an assumption, we preferred to give a more detailed proof, though the extra assumption.
Copying a Triangle
In this chapter, we will show how to copy a triangle to other triangle .
The construction is an excellent example of the reduction technique – solving a problem by solution to a previously solved problem.

The construction
- Construct a triangle from the sides of : , , and get .
Claim
The triangles and are congruent.
Proof
- , , are sides of the triangle and therefore obey the triangle inequality.
- Therefore one can build a triangle whose sides equal these segments.
- The sides of the triangle and are equal.
- Due to The Side-Side-Side congruence theorem the triangles and congruence.
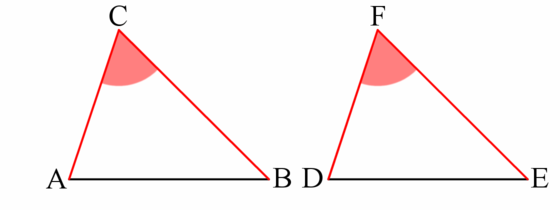
Copying an Angle
In this chapter, we will show how to copy an angle to other angle .
The construction is based on Book I, proposition 23.

The construction
- Draw a line between A and C and get .
- Copy the triangle and get
Claim
The angles and are equal.
Proof
- The triangles and congruence.
- Therefore the angles of the triangles equal.
- Hence, and are equal.
Note that any two points on the rays can be used to create a triangle.
Bisecting an Angle
Geometry for Elementary School/ Bisecting an angle
Side-Angle-Side Congruence Theorem
|
The corresponding material in Euclid's elements can be found on page 33 of Book I, Proposition 4 in Issac Todhunter's 1872 translation, The Elements of Euclid for the Use of Schools and Colleges. |
In this chapter, we will discuss another congruence theorem, this time the Side-Angle-Side theorem. The angle is called the included angle.
The Side-Angle-Side congruence theorem
Given two triangles and such that their sides are equal, hence:
- The side equals .
- The side equals .
- The angle equals (These are the angles between the sides).

Then the triangles are congruent and their other angles and sides are equal too. Success!
Proof
We will use the method of superposition – we will move one triangle to the other one and we will show that they coincide. We won’t use the construction we learnt to copy a line or a segment but we will move the triangle as whole.


Angle-Side-Angle Congruence Theorem
In this chapter, we will discuss another congruence theorem, this time the Angle-Side-Angle theorem, usually shortened as ASA. The side in this theorem is called the included side.
The Angle-Side-Angle congruence theorem

Given two triangles and such that their sides are equal, hence:
- The angle equals .
- The side equals .
- The angle equals (These are the angles between the sides, or the included angle).


Then the triangles are congruent and their other angles and sides are equal too. Note that the side must be the included side of the two angles.
Bisecting a Segment
In this chapter, we will learn how to bisect a segment. Given a segment , we will divide it to two equal segments and . The construction is based on book I, proposition 10.

The construction
- Construct the equilateral triangle on .
- Bisect an angle on using the segment .
- Let C be the intersection point of and .


Claim
- Both and are equal to half of .
The proof
- and are sides of the equilateral triangle .
- Hence, equals .
- The segment equals to itself.
- Due to the construction and are equal.
- The segments and lie on each other.
- Hence, equals to and equals to .
- Due to the Side-Angle-Side congruence theorem the triangles and congruent.
- Hence, and are equal.
- Since is the sum of and , each of them equals to its half.


Some Impossible Constructions
In the previous chapters, we discussed several construction procedures.
In this chapter, we will number some problems for which there is no construction using only ruler and compass.
The problems were introduced by the Greek and since then mathematicians tried to find constructions for them. Only in 1882, it was proven that there is no construction for the problems.
Note that the problems have no construction when we restrict ourself to constructions using ruler and compass. The problems can be solved when allowing the use of other tools or operations, for example, if we use Origami.
The mathematics involved in proving that the constructions are impossible are too advanced for this book. Therefore, we only name the problems and give reference to the proof of their impossibility at the further reading section.
Impossible constructions
Squaring the circle
The problem is to find a construction procedure that in a finite number of steps, to make a square with the same area as a given circle.
Doubling the cube
To "double the cube" means to be given a cube of some side length s and volume V, and to construct a new cube, larger than the first, with volume 2V and therefore side length ³√2s.
Trisecting the angle
The problem is to find a construction procedure that in a finite number of steps, constructs an angle that is one-third of a given arbitrary angle.
Further reading
Proving that the constructions are impossible involves mathematics that is not in the scope of this book.
The interested reader can use these links to learn why the constructions are impossible.
The Four Problems of Antiquity have no solution since any solution would involve constructing a number that is not a constructible number. The numbers that should have been constructed in the problems are defined by these cubic equations.
It is recommended to read the references in this order:
- Four Problems of Antiquity http://www.cut-the-knot.org/arithmetic/antiquity.shtml
- Constructible numbers http://www.cut-the-knot.org/arithmetic/rational.shtml
- Cubic equations http://www.cut-the-knot.org/arithmetic/cubic.shtml
Pythagorean Theorem
In this chapter, we will discuss the Pythagorean theorem. It is used to find the side lengths of a right triangles. It says:
- In any right triangle, the area of the square whose side is the hypotenuse (the side of a right triangle opposite the right angle) is equal to the sum of areas of the squares whose sides are the two legs (i.e. the two sides other than the hypotenuse).
This means that if is a right triangle, the length of the hypotenuse, c, squared eqauls the sum of a squared plus b squared. Or:

Here's an example:
In a right-angled triangle, a=5cm and b=12cm, so what is c?


If c is not larger than a or b, your answer is incorrect. There may be a number of reasons that your answer is incorrect. The first is that you have calculated the sums wrong, the second is that the triangle you are trying to find the hypotenuse of is not a right angled triangle or the third is you have mixed up the measurements. There may be more finer points to having a wrong answer but the three stated are the most common
Exercise
- Write about Pythagorean Theorum and its use to prove that is an irrational number.

Parallel Lines
Definition
|
The corresponding material in Euclid's elements can be found on page 29 of Book I, Definition(s) 35 in Issac Todhunter's 1872 translation, The Elements of Euclid for the Use of Schools and Colleges. |
Let us recall what we learnt from the lines chapter. Parallel lines are straight lines that never intersect, which means that they never cross. Notice that when we look at parallel parts of shapes there is no place where they intersect even if we extend the lines.
As we have learnt from the plane shapes chapter, parallelograms, including squares, rhombi and rectangles, have two pairs of parallel sides. Also, there is one pair in trapeziums. Can you name any other polygons that contain parallel lines?
Transversals
|
The corresponding material in Euclid's elements can be found on page 55 of Book I, Proposition 27 in Issac Todhunter's 1872 translation, The Elements of Euclid for the Use of Schools and Colleges. |
A transversal is a line segment that cut through two line segments. (They can, of course, be lines and rays as well.) When the two line segments are parallel, the eight angles produced will have some special properties.
In such a case, imagine that one of the angles on one of the segments is called x. It is the top left angle. The top left angle of the other segment would be its corresponding angle, or corr. ∠. Corresponding angles are always the same size. Then imagine the vertically opposite angle of angle x. Let's call it y. The corresponding angle of y would be the alternate angle, or alt. ∠, of x. Bear in mind that alternate angles are also the same in size as they are vertically opposite angles with the corresponding angles.

What about the adjacent angles of x? As you can see, these angles are adjacent angles on a straight line with x, so they must be supplementary. These are called interior angles on the same side of the transversal (int. ∠s). They are different from the kind of interior angle in a polygon, so do not mix them up.
When you are doing your sums, you will find out that these three kinds of angles pop up very commonly and are very useful. The reference for these angles are corr./alt./int. ∠s, AB//CD. When you want to prove that two lines are congruent, then use corr./alt. ∠s equal or int. ∠s supp..
Look at the figure. Given that m and n are parallel, angles 1 and 5, 2 and 6, 3 and 7, 4 and 8 are corresponding angles, and are therefore equal. 5 and 3, 6 and 4 are alternate angles, so they must be equal as well. 5 and 4, 3 and 6 are interior angles, so they must be supplementary. Note that there are also two sets of angles at a point and eight pairs of adjacent angles on a straight line.
Let us look at an example. Given that DE and GB are parallel, how can we find x, y and z?


Symmetry
In this section, we will talk about symmetry. Symmetry is when a figure has certain properties. There are many kinds of symmetry, but you only need to learn two in elementary school. Note that a figure with any kind of symmetry is called a symmetrical figure.
Reflectional symmetry

A figure is considered to have reflectional symmetry when a half of the figure coincides with the other half when folded in half (an easier way to say it would be saying it looks exactly the same on both sides). The line produced by folding is called the axis of symmetry, also known as the line of symmetry. The line must be dotted and must reach outside the figure. Common figures with reflectional symmetry are the English letters A, C, D, E, H, I, K, M, O, and so on. Regular polygons always have reflectional symmetry. The square, for example, has four axes of symmetry. Reflectional symmetry is also known as line symmetry, since it is symmetrical across a line.
Rotational symmetry

Rotational symmetry is when a figure returns to its original shape after rotating at a certain angle. The point around which it is rotated is called the centre of rotation, and is marked with an 'x'. The centre of rotation is also the centre of the shape, so you can find the centre of rotation easily. Many figures with reflectional symmetry have also rotational symmetry. Common figures with only rotational symmetry are the recycling sign and fan blades. If a figure coincides with the original twice in one full turn, it has two-fold rotational symmetry, or rotational symmetry order two. Regular polygons always have rotational symmetry. The square, for example, has four-fold rotational symmetry.
Examples
-
 A figure with rotational symmetry. What should we add to its centre?
 -
 We should add a cross.


A Proof of Irrationality
In mathematics, a rational number is a real number that can be written as the ratio of two integers, i.e., it is of the form
- a/b where a and b are integers and b is not zero. An irrational number is a number that cannot be written as a ratio of two integers, i.e., it is not of the form
- a/b .
History of the theory of irrational numbers
The discovery of irrational numbers is usually attributed to Pythagoras, more specifically to the Pythagorean Hippasus of Metapontum, who produced a proof of the irrationality of the . The story goes that Hippasus discovered irrational numbers when trying to represent the square root of 2 as a fraction (proof below). However, Pythagoras believed in the absoluteness of numbers, and could not accept the existence of irrational numbers. He could not disprove their existence through logic, but his beliefs would not accept the existence of irrational numbers and so he sentenced Hippasus to death by drowning. As you see, mathematics might be dangerous.

Irrationality of the square root of 2
In this section we attempt to explain why is irrational. Irrational is a fancy word for a number that cannot be written as a fraction where the top and bottom of the fraction are whole numbers. At one point in time it was once believed that every number could be written as a fraction.
Before we start the proof we first should recall a few familiar facts. First, is that when we write fractions we can always reduce them so they have no common factors. Just to remind ourselves how this goes, let's think about the fraction . Since 3 divides into 15 evenly, and 3 divides into 21 evenly, then we can make this fraction have a smaller numerator and denominator. In this example see this by the following calculation:

- .

The exact same calculation will let us get rid of any number that divides both the numerator and denominator. Imagine we have a fraction and there is a number r so that r divides evenly into p, and r divides evenly into q. We can then write (just like we wrote ). We can also write . Then the calculation looks like:


- .

So whenever we have a fraction where the numerator and denominator are numbers we don't know yet (so we need to use letters like p and q), we can assume we have already gotten rid of all the numbers that divide both p and q.
The other thing that we need to remember is our facts about even and odd numbers. First every even number is really 2 times some smaller number. This is easy to see if you list out the even numbers:
even number 2 4 6 8 10 12 14 16 18 20 … the same even number
as 2·"something"2·1 2·2 2·3 2·4 2·5 2·6 2·7 2·8 2·9 2·10 …
Finally we need to remember that the product of two even numbers is again an even number, and the product of two odd numbers is again an odd number. In fact this is just the familiar rules:
- "even times even is even"
- "odd times odd is odd"
- "even times odd is even"
Now we can start thinking about the proof. The proof is a "proof by contradiction". For us this means we will start by assuming can be written as a fraction. We will try to investigate and see what this means for the fraction, being careful that every step follows from the last step by something we know to be true. At the last step we will contradict ourselves. This will mean that we had to make a mistake somewhere. Since we were careful about all of the steps, the only possible place for a mistake will be that we assumed can be written as a fraction.
- Assume that can be written as a fraction. This means . We will assume that this fraction is reduced, so no number could divide both a and b. Specifically 2 cannot divide both a and b.
- We now square both sides of your equation, that is we write , which is the same as .
- By multiplying both sides by , it follows that .
- Therefore is even, because it is equal to which is even.
- If were odd, then would be odd, because "an odd times an odd is odd". So, it follows that must be even.
- Because is even, and every even number is 2 times something, we can write , for some whole number .
- If we substitute in for in the equation in line 3, we get . Now . So, .
- Because is even then is also even. Just like we saw with in line 5, this means that b is even.
- In line 5 we saw that was even and so 2 divides . In line 8 we saw that was even, so 2 divides . But in line 1 we said that 2 cannot divide both and . This is a contradiction.


Since we have found a contradiction, the assumption in line 1 must be false. That is, it must be false that where and are whole numbers. So we cannot write has a fraction. The fancy way of saying this is to say that is irrational.
Fractals
All the previous constructions we considered had one thing in common. The constructions were ended after a final number of steps. When one recalls that mathematicians actually used a ruler and compass in order to execute the constructions, this requirement seems to be in place. However, when we remove this requirement we can construct new interesting geometric shapes. In this chapter we will introduce two of them. Note that these shapes are not part of Euclidian geometry and were considered only years after its development.
Cantor Set
For a full overview of Cantor set see the article at wikipedia on which this section is based. The Cantor set was introduced by German mathematician Georg Cantor.
The Cantor set is defined by repeatedly removing the middle thirds of line segments. One starts by removing the middle third from the unit interval [0, 1], leaving [0, 1/3] ∪ [2/3, 1]. Next, the "middle thirds" of all of the remaining intervals are removed. This process is continued for ever. The Cantor set consists of all points in the interval [0, 1] that are not removed at any step in this infinite process.
What's in the Cantor set?
Since the Cantor set is defined as the set of points not excluded, the proportion of the unit interval remaining can be found by total length removed. This total is the geometric series

So that the proportion left is 1 – 1 = 0. Alternatively, it can be observed that each step leaves 2/3 of the length in the previous stage, so that the amount remaining is 2/3 × 2/3 × 2/3 × ..., an infinite product which equals 0 in the limit.
From the calculation, it may seem surprising that there would be anything left — after all, the sum of the lengths of the removed intervals is equal to the length of the original interval. However a closer look at the process reveals that there must be something left, since removing the "middle third" of each interval involved removing open sets (sets that do not include their endpoints). So removing the line segment (1/3, 2/3) from the original interval [0, 1] leaves behind the points 1/3 and 2/3. Subsequent steps do not remove these (or other) endpoints, since the intervals removed are always internal to the intervals remaining. So we know for certain that the Cantor set is not empty.
The Cantor set is a fractal
The Cantor set is the prototype of a fractal. It is self-similar, because it is equal to two copies of itself, if each copy is shrunk by a factor of 1/3 and translated.
Koch curve
For a full overview of Koch curve see the article at wikipedia on which this section is based.
The Koch curve is a one of the earliest fractal curves to have been described. It was published during 1904 by the Swedish mathematician Helge von Koch. The better known Koch snowflake (or Koch star) is the same as the curve, except it starts with an equilateral triangle instead of a line segment. 
One can imagine that it was created by starting with a line segment, then recursively altering each line segment as follows:
- divide the line segment into three segments of equal length.
- draw an equilateral triangle that has the middle segment from step one as its base.
- remove the line segment that is the base of the triangle from step 2.
After doing this once the result should be a shape similar to the Star of David.
The Koch curve is in the limit approached as the above steps are followed over and over again.


The Koch curve has infinite length because each time the steps above are performed on each line segment of the figure its length increases by one third. The length at step n will therefore be (4/3)n.
The area of the Koch snowflake is 8/5 that of the initial triangle, so an infinite perimeter encloses a finite area.
What's Next?
Congratulations! You have read through your elementary school geometry areas. That does not mean that your studies of geometry are over! When you get to higher forms, you will come across more complex mathematics, such as deductive geometry. When you get to those areas, don't be afraid! Remember your basics, and anything is possible.
Now that you have finished the entire course, you may want to try out the advanced geometry course, Geometry. Although some topics may be less easy to understand, some are already covered in this book, so you will be revising some of your basics before starting on more difficult topics.
Notation
This appendix summarises the conventions used in this book. There is also a British-American English differences table provided.
Language
All the language in this book uses simple British English. Alternative names in American English are listed below.
| British English | American English | Other names |
|---|---|---|
| Vertically opposite angles | Vertical angles | / |
| The right angle-hypotenuse-side congruence theorem (RHS) | The hypotenuse-leg congruence theorem (HL) | The hypotenuse-leg-right angle theorem (HLR) |
| Centre | Center | / |
| Compass | Compass | A pair of compasses (British) |
| Trapezium | Trapezoid | / |
| Centimetre / Millimetre / Metre / Kilometre | Centimeter / Millimeter / Meter / Kilometre | / |
| Millilitre / Litre | Milliliter / Liter | / |
Notation
This appendix summarises the notation used in the book. An effort was made to use common conventions in the notation. However, since many conventions exist the reader might see a different notation used in other books.
- Point
A point will be named by an uppercase letter in italics, as in the point A. In some equations though, it will look like this: .

- Line segment
We will use the notation for the line segment that starts at A and ends at B. Note that we don't care about the segment direction and therefore is similar to .
- Angles
We will use the notation for the angle going from the point B, the intersection point of the segments and . Sometimes the angle may also be represented by a lowercase letter or even a number, but this is only used in the main text for ease and not in the exercises.

- Triangles
A triangle whose vertices are A, B and C will be noted as . Note that for the purpose of triangles' congruence, the order of vertices is important and and are not necessarily congruent.

- Circles
We use the notation for the circle whose center is the point A and its radius length equals that of the segment .

Note that in other sources, a circle is described by any 3 points on its circumference, ABC. The center, radius notation was chosen since it seems to be more suitable for constructions.
- External links
If you are interested seeing an example of past notation, you might be interested in Byrne's edition of Euclid's Elements. See for example the equilateral triangle construction.