Game Creation with XNA/Audio Sound/Synthesizer
Synthesizer[edit | edit source]
Introduction[edit | edit source]
If you want to create a game and you think of what your game should sound like you most probably have a pretty clear idea of the atmosphere and the sounds you want to achieve.
There are three ways i can think of to get your desired sounds:
- search the web for free sounds that suit your needs.
- take any kind of recorder (e.g. your mobile phone, mp3-player with recording function, a microphone, ... ), go out and record whatever you think sounds cool and then pimp it up with a recording software.
- design your own sounds using a synthesizer.
The third and last approach is the one i thought to be the most exciting and here i am now searching the web for a simple synthesizer i can start my little experiment with.
My goal (and therefore the goal of this article) is to get an understanding of how i have to manipulate which parts of the synthesizer to get what kind of sound-effects.
Preparation[edit | edit source]
I found a nice book about synthesizer programming/sound design[1] which uses native instruments reaktor5 so i decided to go along with that and use their basic synthesizer called soundschool_synth which is available for download here. Unfortunately this is a demo version which runs only for half an houre and you can not save your snapshots but it is designed to demonstrate the basic concepts of sound synthesis and therefore is exactly what i need.
Lets start the demo version of Reaktor5, go to file and open ensemble and choose the SoundSchoolAnalog.ens. What you see should look somewhat like this:

How does the sound get through the synthesizer?[edit | edit source]
Every synthesizer consists of three to four basic elements to shape a sound: First of all a sound has to be generated. Responsible for that is the Oscillator. You can choose between some basic wave-shapes like the sine-wave, sawtooth, or rectangle. Try them out and hear the differences. Since in our synthesizer we have two oscillators, the generated sound-waves have to be mixed. For that purpose every synthesizer with more than only one oscillator needs a Mixer. The resulting signal is a waveform-combination which can already include a beat and /or an interval. At this point the generation of sound is completed and we come to the elements that do its modulation.
After passing through the mixer the next station of our sound-wave is the Filter. Here parts of the frequencies get cut off (filtered) which adds a different timbre to the sound. Try out the different filter-characteristics and play with the cutoff-knob and you'll hear how the timbre of the sound changes.
The third thing we want to be able to change is the way sounds fade in and/or out. This happens in the Amplifier. In this synthesizer, just like in most other ones, the amp is not directly visible but it is controlled by the Amp envelope in which you find 4 knobs: A = attack, D = decay, S = sustain, R = release. Changing their values you can directly hear (and see in the graphic below) what happens to the progression of the sound.
All the other components basically have the purpose of changing, regulating and modifying those four elements.

So lets follow the way of the sound and try to get a deeper understanding of what really happens and which design opportunities we have in each of the different modules of the synthesizer.
Oscillator[edit | edit source]
In general there are 6 different waveforms: sine, triangle, sawtooth, rectangle/square, pulse and noise.
In our first oscillator we have four different wave-shapes and three controllers to modify them.
The first controller is the symm-knob which changes the symmetry of the wave. Try it out!! Did you realize that if you choose the pulse-wave and leave symm on 0 (off) you get a simple rectangle-wave, but by increasing symm you can modify the waves width and therefore turn it into a pulse-wave?! And if you choose the triangle- or sine-wave increasing the symmetry bends it clockwise and turns it into a sawtooth!
The next knob is the interval-knob which simply transposes the sound in steps of semitones.
The third knob regulates the frequency-modulation: if you turn it up osc1 does not only generate a sound but its amplitude also controls the frequency of osc2. This means that the frequency of osc2 gets higher, where the wave of osc1 is positive and gets lower, where the wave is negative. This feature adds a really important character to a sound: vibrato!
Lets try it out with a little experiment:
- For osc1 choose the pulse-wave and in the mixer turn osc1 on 0 (off). We don't want to hear the wave, we only want to use it as a modulator and since the pulse-wave switches rapidly from positive to negative it the best wave-form to demonstrate FM.
- For osc2 choose the sine-wave and in the mixer turn it on 1 (on). Now turn the FM-knob slowly up. Already now you should hear a vibration in the sound but it will get even more striking!
- Now turn the interval of osc1 on -60 and the interval of osc2 on 60. What you should see in the scope should be a wave that switches from
this: to this: 


if you still didn't understand what is happening there turn osc1 on 1 just to hear the sound we are using for the manipulation: it is a periodic, very short sound that seems just like a beating. Now it should be all clear: When the wave of the beating sound is positive the frequency of our sine and therefore its sound is high and when it is negative the frequency is low and therefore we hear a deep sound.
The second oscillator offers the same amount of different parameters which differ just slightly from the first one. Instead of bending a wave like the symm-controller of osc1 does, the puls-sym-controller just adjusts the pulse-width; and instead of the FM controller we have a knob for detuning. Detuning makes only sense if we use both oscillators as sound-generators so that we can detune them against each other.
Lets do another small experiment to see which effect we can reach with detuning.
- 1. We choose the square/pulse sound-wave for both of the oscillators and in the mixer turn osc1 on 1 (on) and osc2 on 0 (off)
- 2. While playing a note on the keyboard, slowly turn osc2 on as well. If you stop at about 0.25 you should be able to nicely see the effect in the scope.
It should look somewhat like this: 
The two waves add up and until now the character of the sound did not really change jet.

- 3. Try out what happens if you turn the detune on. It looks like one wave is faster than the other and as you can hear the tone already seems to gain some color.
- 4. Then turn the detune off again and try out the interval. Basically the interval- and the detune-knob do the same: they change the frequency of the wave but whereas the detuning results in just a very slight
- change, turning the interval on 12 (or 24) already makes the tone one octave (respectively two) higher.
The scope should now look similar to this: 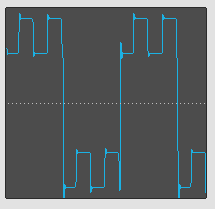
Did you realize that while the tones have a difference of one, two, three,.. octaves you hear them as one tone?!

Play around with both, the interval and the detuning and even try out what happens if you combine other waveforms!!
What you just experienced is actually the phenomena of beat: it emerges when two oscillators with slightly different frequencies interfere with each other. The sound gets fetter and seems more animated.
Sync[edit | edit source]
Sync stands for synchronization and is a tool which, similar to the FM, gives the first oscillator a modulating role: every time its signal reaches its starting point it forces the second oscillator to start over as well. Choose a pulse-wave for osc1 and a sawtooth-wave for osc2. Now increase the interval of osc2 (set it on a value between 1 and 12) and check the sync-box. In the mixer turn osc1 on 0 and osc2 on 1 and you will see how the sawtooth-wave gets interrupted and reset every time the pulse-wave crosses the x-axis.
 |
 |

|
LFO[edit | edit source]
LFO stands for Low-Frequency-Oscillator. The way it works is basically very similar to the FM. The LFOscillator generates a wave, usually with a frequency below 20Hz, which then is used to modify certain components of the synthesizer, such as the inputs of any other, audible oscillator (pitch and symmetry), the filter or the amplifier. Obviously the difference to FM is that you can use this wave to modify any components that are modifiable in a synthesizer. Its rate defines the velocity (in our synthesizer between 0.1 and 10 Hz) and its amount (guess what!? ..) the amount of the modulation. In our synthesizer-model the first three units of the LFO (rate, waveform and symm) describe the characteristics of the genertated wave and the units on the right describe how much and what the wave modulates.
Mixer[edit | edit source]
The first two knobs of the mixer are self-explaining: they regulate the amount of signal taken from both of the oscillators. The third controller is responsible for the Ring-modulation. ..This sounds complicated but it is actually really easy: it is basically the multiplication of the two waves (signal of osc1 multiplied by the signal of osc2). Put the mixer for the two oscillators on 0, turn the
RingMod on and then try out the different combinations of waves!
Filter[edit | edit source]
The filter of our synthesizer consists of a drop-down-menu, from where we can choose the type of filter we want to use, and four controllers.
The most important controller is the Cutoff-knob!! It sets the frequency form which the filter starts to operate. This means that if you choose a LowPass-filter only the parts of the signal with a higher frequency than the cutoff-value get filtered and the lower ones pass through unchanged; if you choose a HighPass-filter the signals which are higher than the cutoff-value pass through and the lower ones get filtered and the BandPass-filter filters both, the higher and the lower signals and just lets a band around the cutoff-frequency pass unchanged.
At this point one thing we should throw a little glance at is the slope of a filter. In our synthesizer the filters not only differ in their range but also in their slope. The slope is measured in decibel per octave and tells us how fast the filter starts to pull in. A filter with a slope of 6 dB/oct is also called a 1-pole-filter, with a slope of 12 dB/oct a 2-pole-filter and so on... That's what the number behind the names of our filters mean!! So if you just switch between Lowpass1 and Lowpass4 you will realize that the higher the number of the pole and therefore the slope is the clearer we can hear the filter- effect!
The Resonance-controller is also a very important one: it boosts the frequency around the cutoff-value!! If you turn it on completely the filter starts self-oscillating. This is because the frequencies around the cutoff-value get lifted up that much that they result in a sine-wave and all the overtones get cut off! The best way to hear and see this phenomena is by choosing the noise wave, set the filter on LowPass4 and the Resonance on 1. Because we chose the LowPass-filter all frequencies lower than the cutoff-value get filtered and therefore with a high cutoff-value nothing happens. But try turning the cutoff down!! You will see that slowly the random noise signal turns into a sine wave!
The Env-value simply describes how much the filter is controlled by the filterEnvelope, whose purpose is to control the chronological sequence of the filter-effect. Again choose the noise wave, put resonance on 1 and the cutoff-frequency on 80. If you now change the ADSR-values of the envelope and put the env-controller on a negative value you will realize that the result is as if you would turn the cutoff from a low frequency up to 80, if you put the env-controller on a positive number the result is as if you would turn the cutoff from a high frequency down to 80. You see that using envelopes has the same effect as playing with controllers and the filterEnvelope is the one that controlles the progression of the timbre.
K-track stands for Keyboard-tracking and is responsible for how much the cutoff-frequency follows the note-pitch. Choose the pulse-wave with a lowPass4-filter, set cutoff on 80 and resonance on 0.5. now play a very low note and afterwards a very high note while the k-track is set on 0 (turned off). We can see in the scope that the high note got filtered that much that it almost doesn't have any overtones anymore and turned into a sine-wave while the low note has its own characteristic sound and shape. Most of the times we don't want this to happen but instead we want that the filter filters relative to the frequencies we play. If now we turn the k-track on 1 that is exactly what happens!!
 |
 |

|
| low tone | high tone (no k-track) | high tone (with k-track) |
Amplifier[edit | edit source]
Like mentioned before the Amplifier is not really visible in the synthesizer but representative for it is the AmpEnvelope. This unit functions just like the envelope of the filter, where you can modify the ADSR-values, only that instead if controlling the progression of the filtration it actually regulates the progression of the finally audible sound. This is one of the most essential tools for sound-design because it defines if a sound is for example short and crisp or long and stretched. As you can figure the AmpEnvelope for the sounds of a car-racing game should look a lot different than the AmpEnvelope for the sounds of a horse-racing game and the sound of the wind has a different progression then the sound of a gunshot!!
Don't we love patterns??[edit | edit source]
So now that we know about all the different components and what they do, instead of the 'trial-and- error'-approach of just playing around with the knobs, hoping to accidentally get a nice sound out of that machine we should get ourselves a pattern (to use for orientation, obviously not to stolidly stick to it) to achieve our first reasonable results.
Here are the steps we should follow:
| What to do? | Where to do it? | |
|---|---|---|
| 1) | Variate the raw timbre | Osc1, Mixer |
| 2) | Add beat and oscillator-modulation | Osc2, Mixer, LFO, FilterEnv->Osc |
| 3) | Modify the filter-characteristics | Filter |
| 4) | Modify the filter-progression | Filter Env |
| 5) | Modify the volume-progression | AmpEnv |
[edit | edit source]
Now we need to find a freeware synthesizer (similar to this one so we can use our pattern!!) and start actually DOING something!!
[edit | edit source]
References[edit | edit source]
Author[edit | edit source]
jonnyBlu