Down'n'dirty Blacksmithing/Tools, Materials, and Supplies
Tools[edit | edit source]
In this section we will describe the tools that will be needed both to create forge and anvil and for the initial projects. More tools and more specific tools may be required for later projects. This section will concern itself with the basics to get up and running.
This list is not exhaustive or exclusive. If you have additional tools or the means to acquire them by all means use them.
If you would like more information on the tools listed check out Metalworking for links to descriptions of metal working tools.
Digging Tools[edit | edit source]
This is minimal and can be satisfied with a trowel, shovel, garden pick—basically enough of a tool to dig a hole roughly 8" in diameter and 8" deep.
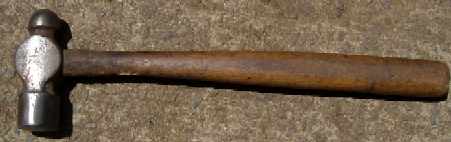
Hammers[edit | edit source]
This is the one tool that you will likely want to buy, new if you can't find used. We recommend a two- to three-pound (roughly 1 kg) cross peen or ball peen "blacksmith's" hammer. If you have a choice between going lighter or heavier go lighter, but keep it over 1.5 pounds. Some works claim that the "standard" blacksmith's hammer was 4 lbs.In the 9th century. Maybe so, but you will find, especially if you are new to this kind of work, that a 2 or 3 pound hammer will feel quite heavy enough after about 20 minutes of work.
There are four hammer styles typically found in the U.S. -- cross-peen, ball-peen, "engineers" and "claw"—the first three will be most useful for our purposes. To get started you only need one.
- cross-peen hammer (C) -- this style is most commonly associated with the blacksmith's trade. It has a fairly large diameter face, opposite the face is the peen which will look like a narrow face running perpendicular to the axis of the hammer handle. The face and peen are, typically, hardened. The straight-peen (B) and diagonal-peen variants are less common, but equally suitable for our purposes.
- ball-peen hammer (A)-- typically the faces of these have a slightly smaller diameter and they are quickly recognized by the relatively ball shaped peen opposite the face. Generally these are easier to come by and come in lighter weights than cross peen hammers. Some refer to these as "engineer's hammers". We aren't here to argue jargon. If it's got the right shape it doesn't matter what it's called.
- engineer's hammer—these will look a bit like a cross peen hammer but with two faces (or the cross peen looks like an engineer's hammer with one face and a peen, depending on how you choose to look at it) and generally they come a bit heavier than cross-peens or ball-peens if acquired commercially. Again, some call a ball-peen hammer an "engineer's hammer", and again we won't argue the jargon. Others may call them "hand sledges". Engineer's hammers tend to have softer faces, because these hand sledges are designed for striking cold metal. What this means for us is that you can do forge work with an engineer's hammer but the face will deform more easily. If you have a choice between an engineer's hammer and a ball or cross peen we recommend that you start with the ball or cross peen if it's in good condition ... by the time you know enough to argue with us you'll probably understand why we suggest this. Eventually you will want one specifically either for the greater weight, to spare the face of the "good" blacksmith's hammer when striking tools like cold chisels or simply because you like the heft of it for some work.
- claw hammer—this is the typical "carpenter's" or "framing" hammer. We don't recommend using one of these unless it is all that is available. A claw hammer will work, but the face tends to be smaller and the weight lighter and both combine to make more work out of the task. Again, if it's what you have, go for it with a claw hammer.

Sources for hammers:
- If you have the cash it might be worth the time savings to go to a blacksmith supply store like Pieh Tool Company or Blacksmith Supply to buy your first hammer. Hardware or automotive supply stores do carry lesser grade hammers, depending on how much forging you'll be doing. Look for a hammer in the 2-3 lb range. It is more important that the hammer have a smooth, slightly domed face than whether it is ball or cross peen. Ball-peens tend to have flatter faces.
- flea markets and rummage sales—we prefer the latter simply because it's usually a better bargain. If you've got some facility with tools already this can be a great source. Often there seems to be the odd box of metal junk in the corner that can be had for a few dollars. In the junk are usually a hammer head or two and often with a decent handle intact.
Locking Pliers[edit | edit source]

"Vice grips" is the brand name. There are other brands available. While these might not be absolutely necessary, they come in very handy, especially until you have developed the skills to make your own tongs.
Get at least one pair of heavy locking pliers. They'll serve a number of uses around your forge in the various projects we'll be taking on.
Also, some blacksmith's tongs are available if you don't want to make your own. Scout garage sales and the like for tools that can be used as tongs; nippers, pliers, shears, etc. can often be adapted, even when rusty or worn down past the point of utility in their original role. You'll learn to bend these to your will, adapting them for the particular job at hand.
Anvil[edit | edit source]

Our "standard" anvil for this book is a 6" x 6" x 36" section of mild steel found as scrap or purchased from a steel yard.
This can be used either lying on the ground or set upright in a bucket of concrete to give it a base.
This will likely be your most expensive purchase if you have to buy it. Scrap steel prices vary, but the last time one of the authors bought such a piece of stock, scrap steel was selling at $1.50/pound. The "anvil" cost about $80.
There are alternatives. In an industrialized country pieces of metal like that or similar can be "scrounged".
Additionally other pieces, smaller, of different shapes can be found and cost less. Do some checking and looking before you call up the local steel yard and ask them to cut three feet off the end of a steel beam.
It is worth it too to look around and price real anvils. If you have no luck scrounging and can afford it a small, decent anvil is well worth the investment, esp. if you find you have a new hobby. A 25 to 50 lb. anvil is more than adequate for a great deal of work and can be found for under $200.
There are available inexpensive imported "anvil shaped objects", which can be useful, provided one doesn't mistake them for an actual anvil. They are prone to numerous defects, including being too soft, too brittle, peculiar shapes, and painted or rough surfaces. If you can afford a decent anvil, don't even think about these. They do have potential as accessories or alternatives to homemade anvils.
Steel plate also works. One author has used a 2" by 12" x 12" steel plate. It isn't as lively as his anvil, but it works adequately.
A section of railroad rail makes a good, if smallish, anvil. If you can find someone to make cuts, you can put a horn on one end and undercut the other to make a table. Avoid grinding off the top surface; it's probably already smooth and work-hardened for you.
Others may prefer to use a flat sided dumbbell weight. The advantage is that its flat sides are good for flattening and tapering, while the round portion in the middle is a suitable horn.
Machine parts can be found as well that will serve the purpose.

Not only is it larger, but it has a hardy hole and a pritchel hole; it's even mounted at a good height to use without bending over.
Vacuum Cleaner[edit | edit source]

The vacuum cleaner will serve as the bellows for our Down'n'dirty forge.
Get one that has a "blower" hole that the hose can be connected too. Ideally one with a metal end on the hose.
Truthfully, this will provide much more air flow than you really need. It's almost overkill and this is one of the first things you will probably want to find an alternative for if you elect to pursue blacksmithing beyond the basics we outline here.
Despite the problems with vacuum cleaners one of the authors has done a lot of good work with an old Hoover vacuum cleaner that was acquired at a rummage sale for $2. He tends to "blip" the vacuum cleaner. Which is to say that he has the vacuum cleaner positioned so that the switch is in easy reach while he is at the forge and will run it for just a second or two and shut it off, repeating as necessary to bring the fire and the metal in it to heat. Periodically he'll run it for longer without metal in the fire to get the fire to a point where it is burning well and then will let the metal soak in the now hot fire without any air flow.
Another possibility for controlling the airflow with a vacuum is to put a galvanized valve between your forge and vacuum thus giving you the ability to decrease or increase air flow as needed.
Alternatives to a vacuum cleaner:
The "gun" style hair dryers also work for this purpose. If the one you find doesn't have switch settings that allow the dryer to run without heat, get creative and disable the heating element yourself: the heat is unnecessary.
Small fans might work as well with some kind of funnel fastened to the "blow" side to direct the air flow into the pipe.
Finally, if you have access to the "real thing" there are mechanical blowers that are available new and used from different sources. Additionally if you're a woodworker and up to the project it is possible to build a bellows: http://www.celticknot.com/the-elektric-anvil/blacksmithing-101/61-building-a-bellows-fed-portable-forge.html
How to deal with plastic hoses:
More and more both hair dryers and vacuum cleaners are coming with all plastic components. If these get too close to the fire they will, of course melt.
Keep in mind that the tuyer—the metal pipe that will feed the air into the bottom of the fire pit—is part of the fire, effectively. Metal is a good conductor of heat and heat rises. The tuyer pipe will be at about a 45 degree angle passing into the bottom of the fire hole. So the longer the forge is worked the more the pipe will heat and that heat will pass up the pipe to where the vacuum cleaner hose or hair dryer is connected.
Removing the hose periodically from the tuyer is one solution. Also letting the fire "rest" in combination with removing the hose will combine to keep things "cool enough". A longer piece of pipe may also help.
If you are using a plastic hose or hair dryer we suggest that you periodically wet the part of the tuyer pipe that projects from the ground to cool it. Additionally use a 36" piece of pipe the greater length will mean it takes more time for the heat to pass up the full length.
Your situation will vary and you'll have to experiment, watch and learn.
Safety Glasses[edit | edit source]
Another item there is no substitute for buying. And we recommend that you buy the best that you can afford. Safety glasses that don't fit or are uncomfortable or difficult to see through are almost worse than none at all. Get them. Get the best you can. Use them. Looking at a hot fire can irritate the eye, find safety glasses that filter infrared light if you can.
Gloves[edit | edit source]
For a lot of the work of a blacksmith we actually suggest that you not use gloves. Not only can gloves make handling a hammer more difficult and more work, but if you have a pair of close fitting gloves on by the time you feel the heat through the leather it's almost too late to avoid a burn. And the time it will take you to strip off a sweaty, tight fitting leather glove will be more time for the burn to get worse.
Gloves do have their uses for things like hot rasping where you might bump red hot metal with your hand. In a situation like that they are worth having on.
We suggest loose fitting welding or linesman's gloves or mittens. A good fit is loose enough that if you "flick" your arm you can throw the glove off your hand. This might sound crazy but you only have to imagine holding red hot metal in vice grips in one hand and feeling the glove on your left hand get hot for some reason. You can't drop what's in your right hand and you need to get the left glove off right now. A shake of the left arm and the too hot glove is on the ground. OK ... you'll look ridiculous shaking gloves off your hand in the hardware store: you'll be more ridiculous with your hand wrapped in gauze Monday morning at the day job because you had a glove on you couldn't get off in time to save your hand.
Leather or suede are the best glove materials, since they're durable; cotton will do, but you're going to wear them out quickly. Avoid synthetic, plastic, or rubber gloves, as they're apt to melt, stick to skin, then ignite. The sole exception is for oven mitts and similar items designed for handling hot materials; they may not stand up well to gripping rough steel, but should cope with the heat.
Bucket[edit | edit source]
Several buckets are handy things to have. You'll need one metal bucket of at least 5 gallons (20 liters) capacity for a slack tub or "quench bucket". This you'll keep close to the fire as a source of water for controlling the forge fire and to quench metal either to control the heat or for heat treating.
It's handy to have one or two other buckets around. The plastic 5 gallon paint bucket is pretty common and if you can't scrounge them they can usually be found for a few dollars. They find a number of uses around the forge (but keep the plastic ones away from the fire!). I keep some extra water in one, they're an inexpensive tool tote, they also hold scrap so it isn't scattered all over the ground.
Metal buckets are preferred but are getting harder to come by. If you can find more hang onto a couple. Beyond the uses mentioned filling one with Perlite makes a fireproof container for annealing and normalizing metal.
Tin cans, especially the large #10 size, are available cheap or free. Befriend someone who works in a restaurant or volunteer at the local soup kitchen.
Hose[edit | edit source]
If you have access to an outdoor spigot, having a length of garden hose and a nozzle that can reach your work area is handy. It's a bit of fire prevention insurance and it saves having to carry five gallon buckets of water around.
Fire Extinguisher[edit | edit source]
Another item for which there is no substitute for buying. And really you need to consider getting the largest and best that you can manage. We recommend one that will work on a range of fires. Don't just rely on the garden hose. While water is enough to control a small coal or charcoal fire, if your interest in blacksmithing develops you will likely have quantities of oil and other flammable materials about your forge that water can make worse. (Oil floats on water, so if you spray an oil fire with water your fire might keep on burning and float away.)
Rags[edit | edit source]
We recommend cotton shop rags. They have a number of uses. They're inexpensive. They're absorbent. They don't melt when they get hot.
Drinking Water Jug[edit | edit source]
A jug of drinking water is good to have. Blacksmithing is hot work and heat stroke is no fun. Keep a jug handy and "drink before you're thirsty".
One author keeps an insulated 1 gallon "Coleman" jug around with ice and water in it both for drinking and should you burn your hand you have ice handy to treat the burn.
An ongoing process[edit | edit source]
You'll gradually add further to your collection, as you encounter "targets of opportunity", build tools suited to the kind of work you undertake, and develop skill with techniques that call for specific tools.

Materials[edit | edit source]
1. steel
- kinds of steel
There are many alloys of steel; for smithing, you'll want the basic, cheap grades with only carbon as the main alloying element, around 0.5% carbon is suitable for basic projects. Higher carbon content, up to about 1.5% is needed to make tools that need a sharp edge. Above 1.5% is cast iron, which is too brittle to forge without extraordinary measures.
- sources for steel
- hardware store
Most chain hardware stores will have a limited selection and high prices. Don't expect that the staff will be able to tell you much about alloys or anything. The main advantage will be that if you decide that they have what you need, there's a good chance they'll have the exact same stuff available 6 months from now, if you need a bit more.
- steel yard
These folks are apt to be able to supply steel in whatever shape and alloy you want, but are generally set up for large quantity orders. This might be a bit of motivation to find a smithing club in your area.
- scrap
Scrap can be economical, but you generally won't know what alloy you're getting, so it'll be a bit of guesswork to figure out whether the piece you're making is too soft to keep its shape or so hard that it shatters in use. Try to get a large enough lot of the same stuff that you can get some experience with it and decide what kinds of projects it's good for and what heat treatment it needs.
Avoid painted, plated, or galvanized items, since they give off toxic fumes when heated and removing the coating is usually more trouble than it's worth.
Don't be shy about rusty bits. Most rust will flake off easily when it's heated to forge heat. Just be careful with the first couple of strikes that the chips don't hit anything you'd rather they didn't. I've heard rumors of small steam explosions from water trapped in or under the rust, but I've never encountered it. It's probably best to heat stock with heavy rust gently at first, just in case.
- automotive parts
Springs are popular, since they must be of high-quality, hardenable alloys to work. You'll want to anneal them before trying to cut them into convenient pieces.
- odds and ends
Rebar can be an inexpensive source, just remember that it's usually made from the lowest grade of recycled material, so it will be fairly soft, but not reliably so. A stock of rebar to fit your pritchel hole can make some Quick'N'Dirty holddown tools.
- bedframes
- nails
Nails are made from a low-carbon alloy, to prevent chipping the hammer face. You won't be able to harden them to any useful extent, unless you want to learn case-hardening. They're handy for items where softness is desirable, such as rivets.
Supplies[edit | edit source]

1. Fuel
- Coal
- Types of coal
There are basically two types of coal that can be found: bituminous and anthracite.
For blacksmithing bituminous is what is needed. Any decent supplier should be able to help you identify a grade that will suit your purposes.
If you have to hunt for a supplier some rural feed and farm supply stores will carry it as "blacksmith's coal" or "farrier's coal".
- Sources
- Charcoal
Charcoal is wood with the impurities burned out of it: charcoal is to wood what coke is to coal. The most common commercially available charcoal is briquettes which are 'not' suitable for blacksmithing.
- Natural lump
"Natural" or "Natural Lump" charcoal is the ideal charcoal for blacksmithing. It is made from any number of woods but unlike the processed, uniform bricks it is made the "old way" by charing the wood. It can be found commercially, usually as specialty charcoal for cooking and barbecue.
- "Found" charcoal
"Found" charcoal also works for smithing. This is "natural lump" and it's nothing more than the charred remains of a wood fire. Some smith's will make a special rake or sieve to separate the charcoal from ash. Check the charcoal and remove any uncharred wood before using in the forge.
- Making charcoal
There are several websites and books on how to make charcoal. The simplest is to build a fire and after it has burned enough to char all the wood in it, douse it or wait for it to go out and collect the charcoal that remains. This is not the most efficient method, but it does work.
More elaborate methods with higher yields can be researched on the web or in books.
2. Newspapers
Or some other kind of flammable paper. Newsprint has a number of uses from tinder to light the forge fire, to cheap, disposable rags.
3. Wax
- This is the simplest form of lubrication and rust prevention around. Traditionally beeswax, although that can be expensive unless you're committed to being traditional. Candle stubs are fine. Canning wax will work too and its pretty cheap to buy in bulk.
4. Machine oil
- a little can of 3 in 1 or some other brand of light weight machine oil will come in handy for a lot of little things.
Next Chapter: Safety